How to Make a Cassata, the Most Beautiful Holiday Dessert
The Chocolate-and-Citrus Cassata on the December cover of Food & Wine is a stunner. Is it a super-simple recipe that you can throw together on a weeknight in under 20 minutes with pantry staples? Nope, not quite. This gorgeous holiday centerpiece dessert from pastry chef Maggie Scales, of Rebecca Wilcomb's New Orleans restaurant Gianna, takes a little planning. But considering that everyone who has a slice will be talking about it until next December, it's totally worth it. Here's how to make your own:
Get a Head Start
1. Weight and Drain the Ricotta
At least one day before you plan to make the cassata, spoon ricotta into a cheesecloth-lined colander set inside a bowl. Wrap cheesecloth over ricotta; place 2 or 3 canned goods in a small bowl, and set bowl on top of ricotta. (Weighting the ricotta extracts the most moisture.) Place in refrigerator; drain at least 24 hours or up to 3 days.
2. Bake the Cake Layers
The cake layers may be baked up to one day before serving the cassata. Let the baked cake layers cool in pans on wire rack 10 minutes. Remove cakes from pans, and let cool to room temperature, about 1 hour. Immediately wrap each cake layer in plastic wrap and refrigerate until ready to assemble the cassata.
3. Make the Pistachio Praline
The pistachio praline may be made up to one week before serving the cassata, but it must be kept completely dry and stored in an airtight container. (This type of hard candy will start to get sticky and melt if it’s refrigerated or stored in a humid kitchen.) Find a cool, dry spot to store the airtight container until ready to assemble the cassata.
Assemble the Cake
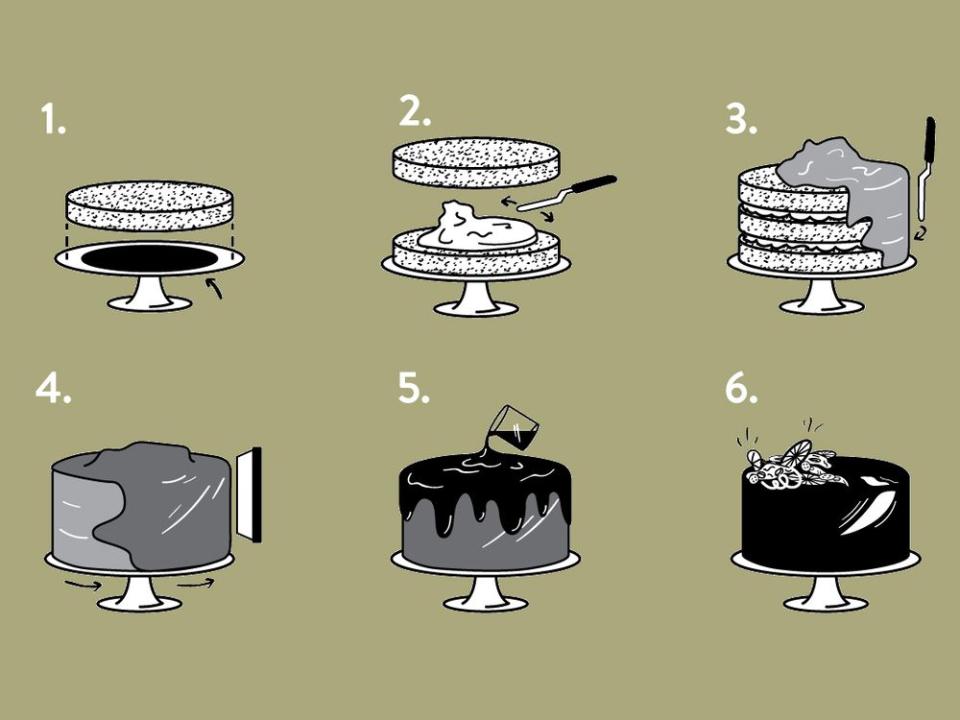
1. Get Set Up
Place a 71/2-inch cake board (or cardboard round) on a cake turntable or overturned large dinner plate. (The cake board will be slightly smaller than the cake layers so the cake can be glazed evenly.) Place one cake layer on cake board.
2. Fill the Cake
Add half of the ricotta filling to the center of the cake layer. Using an offset spatula, spread the ricotta, pushing from the center to the edge of the cake and leaving a ½-inch border. Repeat with remaining cake layers and ricotta filling.
3. Apply the Crumb Coat
Spread about 2½ cups of the buttermilk-chocolate frosting in a thin layer over the top and sides of cake to secure crumbs, making sure to work frosting into gaps between layers to encase ricotta filling. Chill cake until frosting is firm to the touch.
4. Frost Cake
Spread remaining buttermilk-chocolate frosting over the top and sides of the cake in an even layer. Using the edge of a bench scraper, smooth the frosting while rotating cake turntable. A smooth layer of frosting will ensure that the dark chocolate ganache glaze looks smooth and covers the cake evenly. Chill the assembled cake at least 2 hours and up to overnight.
5. Glaze Cake
Using two large spatulas, transfer chilled frosted cake to a wire rack set inside a rimmed baking sheet. In a continuous motion starting from the middle of the cake, pour the glaze over the cake, ensuring it coats the top and sides. Pour in a speedy, controlled manner; the cold cake will harden the glaze quickly and may result in a rippled finish—rather than smooth—if poured too slowly.
6. Garnish the Cake
Just before serving the cake, slice a mix of fresh citrus, such as clementines, blood oranges, and kumquats, into wedges or wheels, and blot dry. Use a channel knife to remove long strands of orange peel for twists. Remove glazed cake from refrigerator, and garnish with pistachio praline pieces, fresh citrus, orange peel twists, and candied citrus. Serve cake immediately.
Get the full Chocolate-and-Citrus Cassata recipe here.

