The Charming Update Your Brick House Needs
"Hearst Magazines and Yahoo may earn commission or revenue on some items through these links."
[table-of-contents] stripped
People whose houses have siding get to change the paint color at whim, but a brick exterior can make you feel a bit stuck. It's limiting at best and dated at worst, especially if you don't like the color. Painting brick has long been seen as a bit of a faux pas—many experts say paint ruins brick by compromising its natural texture and porosity—which is where limewash comes in. An alternative to latex exterior paints, limewash is better suited to brick, and it can give you full, paint-like coverage or a washed-out, historic appearance. But giving your house the limewash treatment isn't as easy as rolling on a fresh coat of paint. Luckily, we have Leslie Aiken, director of marketing for Romabio Paints, to guide us.
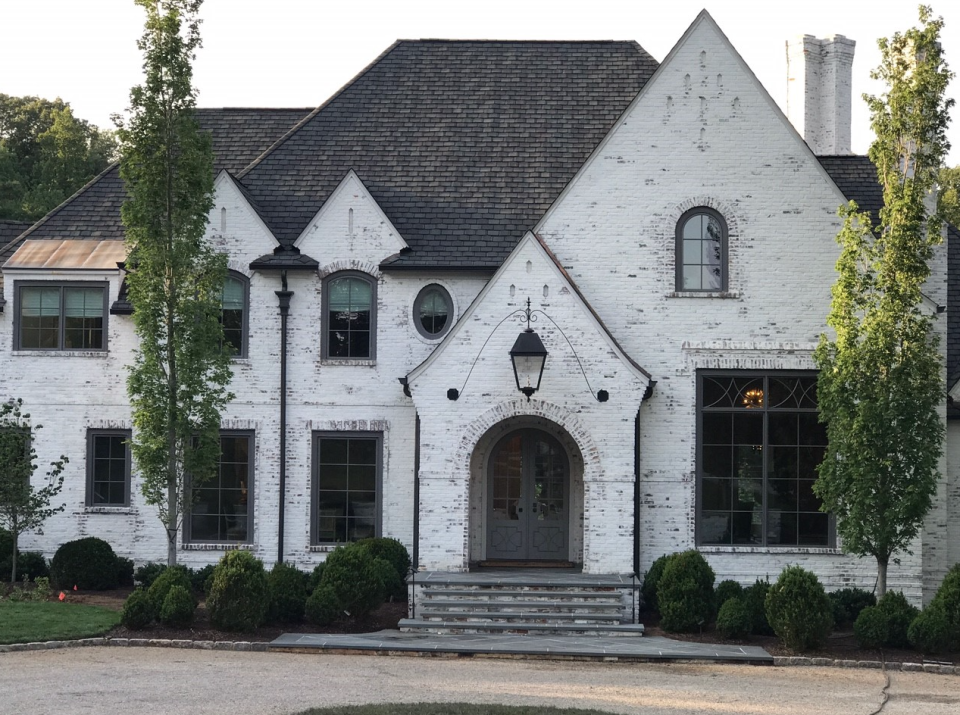
"Travel to any historic downtown in both the U.S. and Europe, and you’ll find limewashed brick that has been distressed over the decades—or centuries—by weather and time," Aiken says. "People have always looked on those historic buildings as beautiful and iconic architectural art for inspiration, and limewashing offers homeowners the ability to recreate that artistic look in hours instead of decades, all while getting the benefits of using an environmentally friendly product with no odor or VOCs that won't harm your pets or plants." Plus, it's bacteria and mold resistant, so it can even help protect your house.
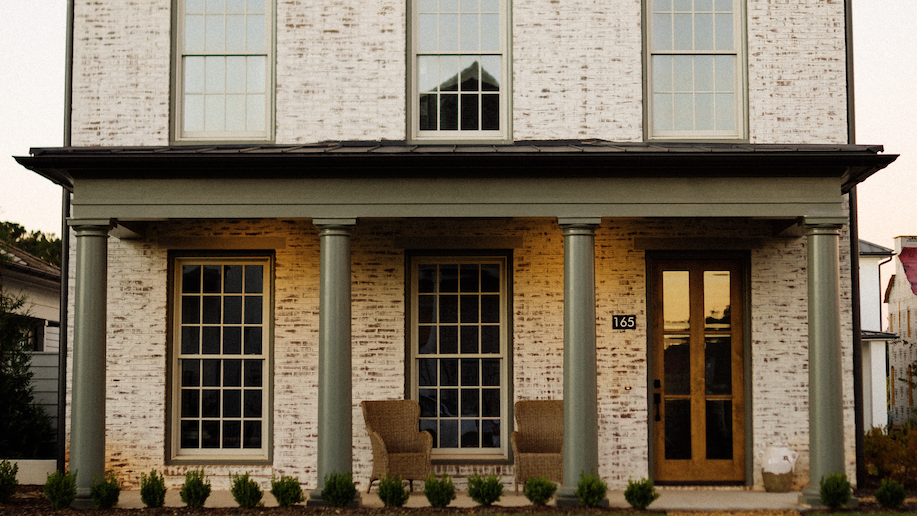
Limewash is a great way to update a tired or dated exterior. It's gaining popularity in the U.S. as a way to disguise uneven or less-desirable brick colors. You can use it to give your house a more cohesive look if it's part brick and part siding or to accentuate architectural details like arches or window framing. And if your brick has seen better days, limewash can help revive it. Read on for a complete guide on how to limewash brick, indoors and out.
The Difference Between Limewash and Paint
The primary difference between paint and limewash is what they're made of. Paint is a water-based latex polymer with color pigment mixed in. Limewash is made of crushed limestone that's mixed with water (thus the name). Whitewashing, commonly confused with limewash, is another type of paint—not a mineral finish at all. Whitewash is usually made by mixing chalk or lime with paint rather than with water for full coverage.
Patina
Because limewash is made of a mineral, like brick, it has a much more natural appearance and develops a patina over time. People who want to retain the look and feel of their brick prefer limewash over paint.
Coverage Options
Depending on number of coats you use, limewash can have a semi-transparent consistency as opposed to paint's full-coverage effect.
Breathability
Exterior paint forms a cohesive skin that protects the surface of your house, but that skin can also trap moisture inside. This can make materials like vinyl more durable, but on natural naturals like brick the trapped moisture can speed peeling and deterioration. Limewash is considered to be breathable because it allows the pores of the brick to remain open to the air.
Reversibility
Limewash, unlike paint, can easily be removed if you're unhappy with the finish or grow tired of it. Yes, limewash will eventually wear down over time, but you can remove it immediately with a high-powered pressure washer. If you paint your brick, you're stuck with it.
Limewash Pros and Cons
Pros
Reversible
Healthier for brick
More natural, historic effect
Easy to DIY
Cons
Requires multiple coats
More transparent coverage than paint
Wears down over time
Hard to clean
How to Prep Brick for Limewashing
Other than ensuring your brick surface is clean, stable, and free of any major cracks and crevices, there isn't any prep work required for limewashing. You want the brick to be slightly damp (not soaking wet) when you apply the limewash to allow the mixture to sink in better. "Limewash is made to be applied to unpainted, unsealed, absorbent brick or stone," says Aiken. "You don't need to prime the surface first as it is a one-coat process. Understanding you have the right surface is the key before you start."
Limewash Application Methods
Masonry Brush
The most traditional method calls for using a large or small masonry brush (depending on how much surface area you plan to cover) to apply the limewash in smooth strokes. This allows for thinner coats that you can build up to your desired thickness and appearance.
Sprayer
A paint sprayer is best used for large areas where you want a more uniform look. A paint sprayer saves time, but it's not as good as a masonry brush for getting the limewash deep into the pores of the brick or creating a distressed effect. If you choose this method, be sure to wear a mask.
Roller
If you want a thick coat and uniform look on a smaller area, reach for a roller. The ideal nap thickness is 1 1/4 to 1 1/2-inch for rough surface roller covers for painting brick and masonry. It's better than a sprayer at getting the limewash deep into the brick, but it's still not as good as a brush for achieving a distressed look.
How to Apply Limewash
If you want to limewash a brick surface yourself—be it a fireplace indoors or the entire exterior of your house—here are a few steps to follow.
Step One: Protect Surrounding Areas
If you're working indoors, lay down a drop cloth to protect the floors. Outdoors, spread plastic sheeting over plants to avoid drips or overspray.
Step Two: Mix Up the Limewash
Limewash almost always needs to be diluted with more water before you apply it. Pour the limewash into a large bucket, slowly add water per your specific product's instructions, and mix thoroughly. If you see any standing water on the surface, keep mixing until it's incorporated.
Step Three: Wet the Brick
Limewash needs to be applied to a damp surface. Use a hose (if outside) or a spray bottle (indoors) to spray down a small area. Working in smaller sections ensures the brick won't dry out before you finish applying the limewash.
Step Four: Apply the Limewash
Using your preferred application method (outlined above), apply the limewash to the damp brick in thin, even coats. Limewash is designed to be layered until it looks exactly the way you want, so continue to apply coats until you're happy with the coverage.
Step Five: Let It Dry
If you plan to distress your limewash finish (more on that in a minute), let the coat dry for no more than an hour; you want it to be tacky. If you're leaving the finish as is, let it set for at least 24 hours, until it's completely dry to the touch, before sealing it.
How to Distress a New Limewash Finish
If you like the look where some of the red brick peeks through, you'll want to distress the limewash finish. It gives you that more natural or historic appearance instantly.
Aiken reassures any nervous homeowner that "the distressing of limewash is very forgiving." You can always go back to layer and cover up any areas you overdistress—it's all part of the artistic process. "It's often 'ugly' in the middle and comes out beautiful in the end if you take that time to add layers where needed and paint over the mortar lines where you've removed or 'distressed' the limewash," she says. "This is how most pro applicators get that clean, professional look."
Step One: Wash the Surface
If you're working indoors, lay down a tarp or old towels to protect your flooring. Using your water hose or spray bottle (you want as continuous a stream of water you can get), wet the limewash until you see areas rinsing off or dripping. The limewash will simply wash off onto the ground.
Be random with your sprays for a more natural look. And remember what Aiken says: Because wet limewash is removable, there's no stress. Play with it to get the look you want. You can touch it up at any time because it's a flat finish—you won't see any lines or patches like you would with regular paint.
Step Two: Seal It
While a sealant or topcoat isn't necessary, it will help your limewash last longer and look newer for longer. Use a limewash-specific sealant, and apply it according to the manufacturer instructions.
FAQs
Is Limewash Harmful to My Plants or Garden?
No. Limewash is made of powderized stone and water, which are both natural materials. Unlike chipping paint, you don't have to worry about fading limewash damaging or harming your plants, trees, and gardens. Any uncovered areas might get some overspray or drips, but you can rinse this away safely with a garden hose.
How Much Does Limewash Cost?
Fifty pounds of hydrated lime, which you can mix with water to make limewash yourself, costs $20 to $30. Two bags should cover your entire house. Premixed limewash paint costs about the same as latex exterior house paint or about $50 to $60 per gallon. Four gallons of limewash is enough to apply one even coat to 1,200 to 1,500 square feet, says Aiken.
How Long Does Limewash Last?
Aiken says that although limewash seems like a permanent finish, it eventually will wear off the brick entirely. "Limewash is made to patina over time, adding to the antique limewash aesthetic organically and naturally," she says. "For this reason, it is impossible to pinpoint its life span since weather conditions and environmental factors vary across the country."
How Should I Clean Limewash?
A pressure washer is the best tool for cleaning most home exteriors, but with brick and limewash-treated brick, you'll want to lower the PSI drastically to avoid removing that hard-earned patina. Use the pressure washer on the lowest setting to ensure your finish won't get damaged. If you have a small surface, like a brick fireplace, with a limewash finish, you can clean it with a solution of water and a small amount of pH-neutral soap (like a mild dish soap).
Follow House Beautiful on Instagram and TikTok.
You Might Also Like

