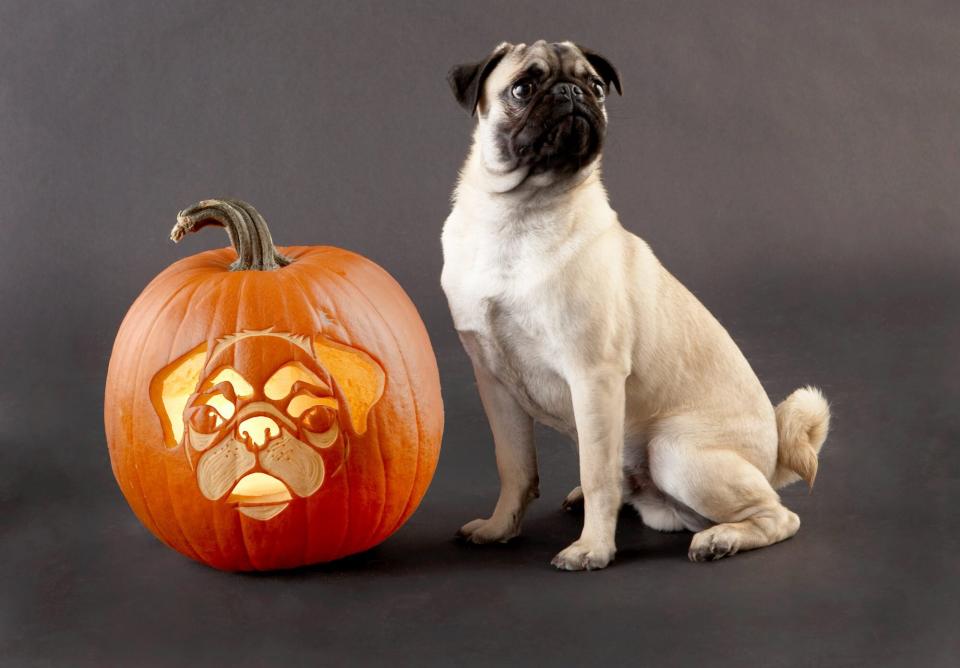
Carve a Pug Pumpkin with Our Free Stencil
Pumpkin carving is a classic Halloween tradition the whole family will enjoy—and this year, even the family dog can be involved! Gather the kids and use our free printable pumpkin stencil to carve a pumpkin that looks just like a sweet pug. The kids can help clean goopy seeds from the pumpkin's interior, and older kids can handle simple carving tasks under adult supervision. With a pumpkin stencil this cute, small-handed volunteers shouldn't be hard to find!
For even more adorable pumpkin carving ideas, get more of our free dog-inspired pumpkin stencils. If you're a cat household, we have those too! Gather the fam, head to the pumpkin patch, and get carving.
JAY WILDE
How to Carve a Pug Pumpkin
Supplies Needed
Pumpkin, fresh or artificial
Free pug pumpkin stencil
Large knife
Scraper tool
Pin tool
Etching tool
Serrated knife
Battery-operated tea light candle
Step-by-Step Directions
Follow these easy how-to instructions to carve your own pug-inspired pumpkin. You should be able to finish the project in about an hour.
Step 1: Prep Pumpkin
Carve a circle in the underside of your pumpkin and use a knife from a pumpkin carving kit ($11, Target) to pry it out. Level the cutout with a knife to form a flat surface; you'll use it as a candle platform later. Scoop out all the messy pumpkin guts, and scrape the inside pumpkin flesh thinnest on the side you're planning to carve.
Step 2: Transfer Stencil Design
Tape your printed stencil pattern to the outside of the pumpkin, smoothing the sheet of paper as you tape. Use a pin tool to poke holes along the stencil lines, keeping pinpricks closely spaced. Remove the paper stencil, but keep it nearby for easy reference.
Step 3: Etch Pumpkin
Use an etching tool to scrape the areas on the paper stencil that are surrounded by dotted lines. To etch, use a gouge or etching tool to remove just the surface skin of the pumpkin, revealing the light-color rind below.
Step 4: Carve Pumpkin
Carve areas on the paper stencil that are surrounded by solid lines. Use a serrated knife from a pumpkin carving kit ($4, Walmart) to cut completely through the pumpkin wall. After completely carving the design, press gently from inside the pumpkin to pop cutouts outward. Rub cut pumpkin surfaces with petroleum jelly ($2, Target) to preserve them.
Related: How to Keep Carved Pumpkins Fresh Longer
Step 5: Display Pug Pumpkin
Once you're done carving the stencil design, your pumpkin is ready to display! Light a candle or switch on a battery-operated tea light ($5 for six, Walmart) and place it on the leveled cutout from the bottom of the pumpkin. Set your carved pug pumpkin over the top.

