How to Build a Sand-Based Patio

When not secured with mortar, patio pavers must be set in a sand base over a gravel subbase. Sand provides a solid base for the pavers, and the gravel ensures good drainage. Sand-set (sometimes called dry-laid) installations are much easier to build than mortared surfaces. They don't require specialized skills, and because there's no concrete required, they are less expensive. A properly bedded sand-set patio will last for years and require little or no maintenance.
Take your site measurements with you when you're ready to order the paving. Your dealer will help you convert those measurements to gravel, sand, and paving quantities. Remember to buy extra pavers to cover breakage and mistakes, and to store in case a paver or two needs replacing in the future.
Soil conditions will influence the construction of your project. Sandy soils drain very quickly but are soft. Clay is hard and doesn't drain well. Contact your extension office or building department for tips pertinent to your location.
The method described in this article is for a square patio, but the process can be used to make any rectilinear shape. Because the bricks are not mortared in place, a sand-based patio is very forgiving to the inexperienced builder. You'll need about three days to lay out and excavate a 12x14-foot site. Before you begin, plan the site, choose materials, and draw plans.
What You Need
String and stakes
Mattock and shovel
Landscape fabric
2x6s
8d galvanized nails
Expansion-joint material
Gravel
Screed
Sand
Pavers
Broom
Step 1: Prepare the Bed
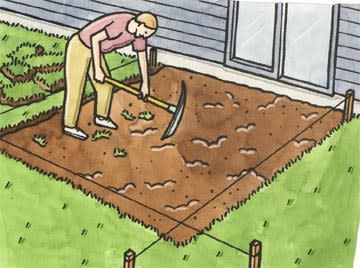
Rough out the shape and size of the patio. If you plan to include right angles, check them carefully for accuracy.
As you determine the exact size, you will need to plan for the paver you intend to use, making sure that there will be room for all the pavers in the pattern you want, allowing for a tiny space in between pavers caused by the lack of uniformity from one paver to the next.
Once the patio has been laid out, use a mattock and shovel to dig out an area equal to the size of the patio and about 5-1/2 inches deep. If you are removing turf to make room for a patio, use excavated healthy turf to patch other areas of the lawn or to create a new area of lawn.
Step 2: Cut Landscape Fabric
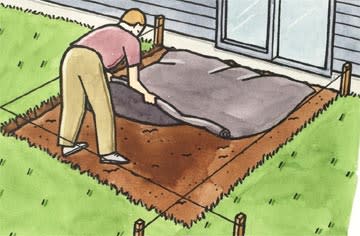
Measure and cut out a piece of landscape fabric large enough to cover the patio. This prevents weeds from working their way up through the gravel. This may require several pieces of fabric, depending on the size of your patio and the size of the roll of fabric.
Step 3: Establish First Corner

Lay out a 2x6 perpendicular to the house and cut the lumber so it ends where you want the edge of the patio to be.
Align the board with the string guides and drive a stake on the outside of it to hold it in place. Nail the stake to the board.
Step 4: Build Rest of Frame
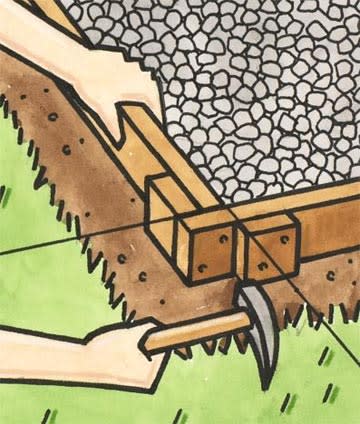
Continue to make the frame with the 2x6s, overlapping the corners as shown. Before you nail each board, use the triangulation method to make sure that everything is square. Otherwise, the pavers will not fit evenly. Once the frame is built, set stakes against the outside of the 2x6s every few feet to hold it firmly in place.
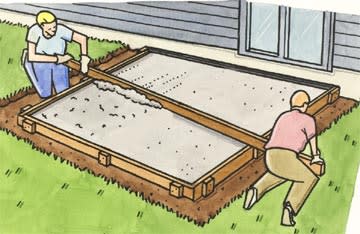
Step 5: Add Gravel and Level It
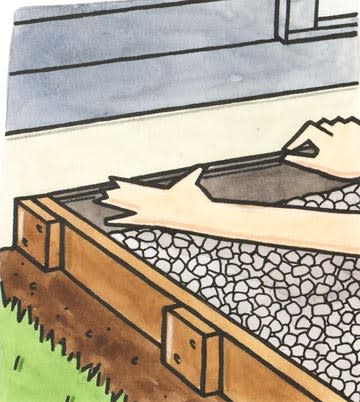
First, place a piece of expansion-joint material between the house and patio area. Then pour in enough gravel to provide a depth of about 1 inch throughout. Make a screed with a short section of 1x4 or other scrap lumber. Starting at the house, scrape the gravel until it is level from side to side and gradually slopes toward the opposite end of the patio.
Step 6: Prepare a Sand Bed
Add a layer of builders sand on top of the gravel. To calculate the sand depth, subtract the thickness of your pavers from 4-1/2 inches. Make a second screed by notching a long 2x6 to the depth of the pavers, then level the sand. If the top of the frame was set at the appropriate slope, the sand will be at the right slope too.
Step 7: Add Pavers
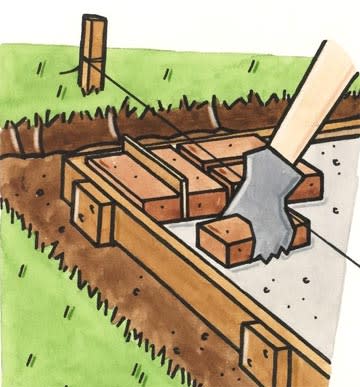
Arrange them in the desired pattern, fitting them snugly together to ensure good stability. (This is not the time to change patterns, because if you do, the pavers may not fit.) Run string from one end of the patio to the other to form a guide line. This will help keep the pavers in a straight line. As you move around in the area, keep your knees on the sand, rather than on the newly laid pavers, because the pavers won't be stable until the area is completely filled. It's much easier to re-screed small areas of disturbed sand.
Step 8: Stabilize with More Sand
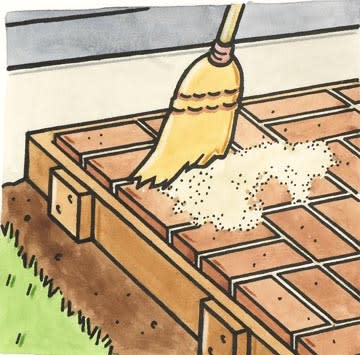
After all of the pavers are in place, toss handfuls of sand over the entire area. Then, working from one end, use a kitchen broom to gently sweep the sand down into the cracks between the pavers. Spray the entire patio with a mist to help settle the sand. Allow the sand to dry. Then add a second layer of sand, sweep it into place, and wet it down. Repeat this process a week later, as well as any time you feel a paver wobble.
Bonus Tips and Tricks
Slope the Lines

Patios and paths must slope 1/4 inch for every lineal foot to provide proper drainage. Measure the length of the mason's line between the stakes in feet, then multiply by 1/4. On the low stake, move the level line down by that much.
Screed the Sand
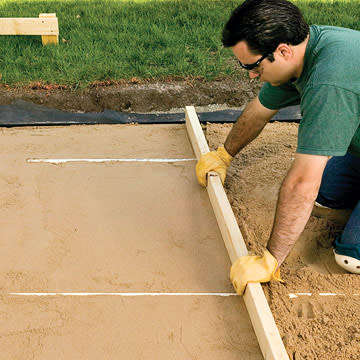
Screed the sand to a consistent level by setting a long 2x4 on the edge forms and the PVC or wood inserts. Pull the screed across the surface in a seesaw motion--you'll need a helper for large areas. Then fill in depressions, dampen the sand, and tamp it. When the site is level, remove the pipes or boards, fill the recesses with sand, and tamp again.
Size the Site

If patio or path dimensions equal multiples of tile or modular materials, you'll have less cutting to do at the edges. Save yourself time and effort by making the site dimensions the same as an even number of pavers. Lay out the paving in both directions on a flat surface, and measure the lengths. Then lay out your site to these dimensions.
Work with Curves
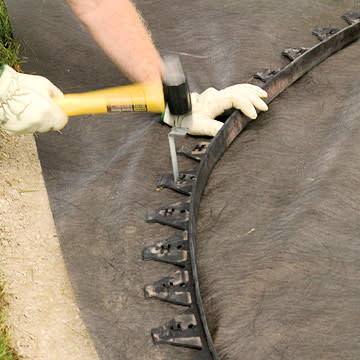
For curved patio��edges, use plastic edging with notches in the outside flange. This material conforms to almost any arc. Drive spikes through the holes in the flanges, making sure they penetrate the soil below the gravel.
Pick a Different Style
You can use the same basic method described in this article for other patio styles.
Stone. Substitute stone for the pavers. There are several beautiful varieties available in many different shapes and thicknesses. You can work with the pieces exactly as they come from nature or have the stones cut to your specifications. You also can experiment with different edging materials.
Concrete. Fill the entire bed with concrete. Use stamps or stains to add texture or color. Divide the bed into quadrants, and use one material in the upper left and lower right sections, and a different material in the other two quadrants.

