Bucket List Trips: The Euro Hut Traverse Gear Guide
Powder aims to feature only the best products and services. If you buy something via one of our links, we may earn a commission.
NOTE: We all have a bucket list of ski trips, but prepping for your next big adventure can seem pretty overwhelming when it comes to choosing what to bring. I’ve been fortunate enough to travel the world for the last decade with skis in tow, and have learned a thing or two worth sharing about what kind of gear to bring to maximize the fun and minimize the stress. It’s worth noting that my recommendations are independent, come from learning from my own mistakes, and highlight things I’m truly excited about. This series is aimed at the generalist skier who’s interested in it all - powder, freeriding, some hiking and touring, the occasional shit-your-pants steep skiing moment, and most of all, adventure!
Check out the rest of our Bucket List Trips Guides here.
The Europeans really have it made. While us North American backcountry skiers are busy trying to bash our way through the wilderness to get to the goods, our European counterparts are enjoying cappuccinos, Aperol Spritzes and delicious meals on mountain tops in the middle of their ski tours. Spread throughout the Alps is a vast network of mountain refuges (rifugios in Italian, Berghütten in German) run by both national Alpine clubs and private parties. While most cater to the summer hiking and climbing crowd, a select few are open during the winter and spring months and focus on providing skiers with delicious meals and a warm bed while traversing through Italy, France, and Switzerland’s biggest peaks.
There’s quite a few classic routes to follow like the Chamonix to Zermatt Haute Route, Italy’s Ortler Traverse, or some less-frequented ones like the Urner Haute Route in central Switzerland. The sheer beauty of skiing through these mountains is only eclipsed by the fact that you can do these trips with nothing more than a large daypack and a credit card. These routes are designed to be traveled fast and light so instead of worrying about setting camp every night, you can focus on the skiing and enjoying the regional culinary specialties (READ: cheese, charcuterie, and pastries)
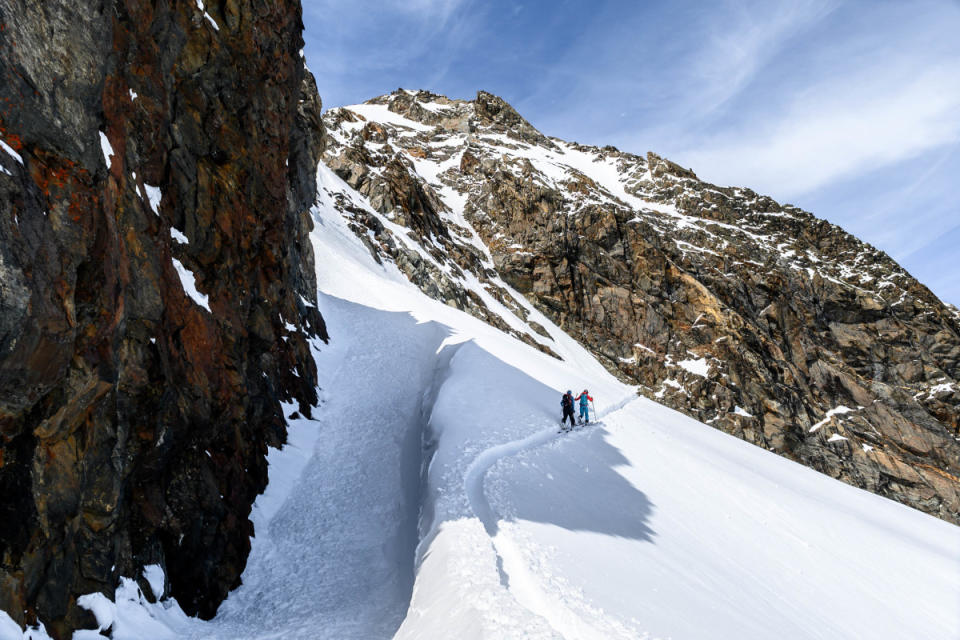
Photo: Max Ritter
Any of these classic routes is worth it on its own, but if you’re keen to avoid crowds and potentially seek out different and more exciting descents, there are many variations to each of these. Keep in mind that during the spring high season, it can be difficult to score reservations at the huts, so plan ahead if you are tied to specific travel dates. Remember, you can usually find a place to stay in a hotel or bed and breakfast on the valley floors if the huts are full. From experience, I can say that on trips longer than three days, it’s nice to build a hotel day into the middle for showering and self-care.
Skis: 85-95mm Underfoot Ski Mountaineering Ski
I’m not usually one to say this, but skinny ski mountaineering skis are going to be your friend here. There’s really no point in lugging anything over 100 underfoot around - you’re chasing the corn cycle here, not deep pow. I’d say you’d be hard-pressed to find any Euros out there with skis any fatter, and for good reason. You’ll be walking a whole lot more than you’ll be skiing, so save the weight (and your knees) and go skinnier than you think you should. You’d be surprised, there are plenty of skis that ski excellently in this category.
I’d shy away from the really light stuff (they’re too chattery in bad snow), so find something in the 1200-1300g range with a relatively stiff flex and an 18-20m turning radius. Some of my favorites are the Black Crows Camox Freebird, Atomic Backland 95, Dynafit Blacklight 95, Volkl Rise Above 88, Elan Ripstick Tour 94, or the Faction La Machine Micro. If you’re looking for a much more aggressive ski, the Blizzard Zero G 95 and its stiff flex is for you.
Pair these skis with some light mohair skins - the extra glide will help you stay efficient while touring across flat glaciers!
Bindings: Brakeless 200g Tech Bindings
Go light, and go simple! Again, this is a trip that’s heavy on the walking and light on the sending, so an ultralight tech binding is appropriate. As always, ditch the binding brakes, and in this case, I’d even say ditch the binding adjustment plate to save the grams. I’d recommend something like the Dynafit TLT Expedition, Black Diamond/ATK Helio 200 LT, or the Plum Oazo 8. These all-metal bindings weigh in around 200g a foot, and will both keep you touring efficiently and have proven to be plenty confidence-inspiring on hairy descents.
Grab an appropriate pair of ski crampons to match the bindings and ski width. Most are interchangeable, and all function the same.

Photo: Max Ritter
Boots:
Proper boots can make or break a trip like this. You don’t want to spend a week touring more vert than you ever have in heavy boots, but you don’t want to miss out on the descents with a boot that’s softer than the cheese you’re carrying for lunch. Luckily, that’s exactly the department that bootmakers have been focusing on these last few years and have come up with some excellent new designs that balance skiability with low weight.
No, these aren’t going to be the boots you charge bump runs or huck big cliffs in, so don’t get your hopes up - but you’ll enjoy every last turn on those high peaks in perfect corn. A two-buckle, 1000-1100g boot with a massive range of motion in the walk mode is the ticket here. If you want to add some extra stiffness, consider upgrading the stock liners with an Intuition Tour Wrap liner - this goes a long way in light boots like this without adding any weight. Also, a Booster strap is worth its few extra grams in my opinion as well.
As always, check with your local bootfitter about what will be most comfortable for you, but start the conversation with some suggestions like the Dynafit Blacklight, Salomon S/Lab MTN Summit, Tecnica Zero G Peak, Scarpa F1 LT, or Dalbello Quantum Evo.
Pack: 45-55L Lightweight Pack
The good news is, you won’t have to carry much in terms of food, water, or overnight supplies - the hutkeeper has that part taken care of. Instead of lugging freeze-dried food plus a stove and fuel around, bring a chunk of local cheese to enjoy on a summit! You will, however, need some space for a change of clothes, water, and your avalanche safety and mountaineering gear.
I’ve been a big fan of lightweight packs that skew a little more towards the mountaineering side of things than pure backcountry ski packs. You are, after all, going mountaineering with skis on your feet, so I think that makes sense as to why.
45-55L seems to be the ideal size for this kind of trip. I can stash my shoes, extra clothes, and all my dingle-dangles inside, and even have room to pop a helmet on top when I’m not wearing it. Packs like the Hyperlight Headwall 55, Mountain Hardwear Alpine Light 50, The North Face Phantom 50, or something a bit burlier like the Ortovox Peak 55 are what I’d think of taking.
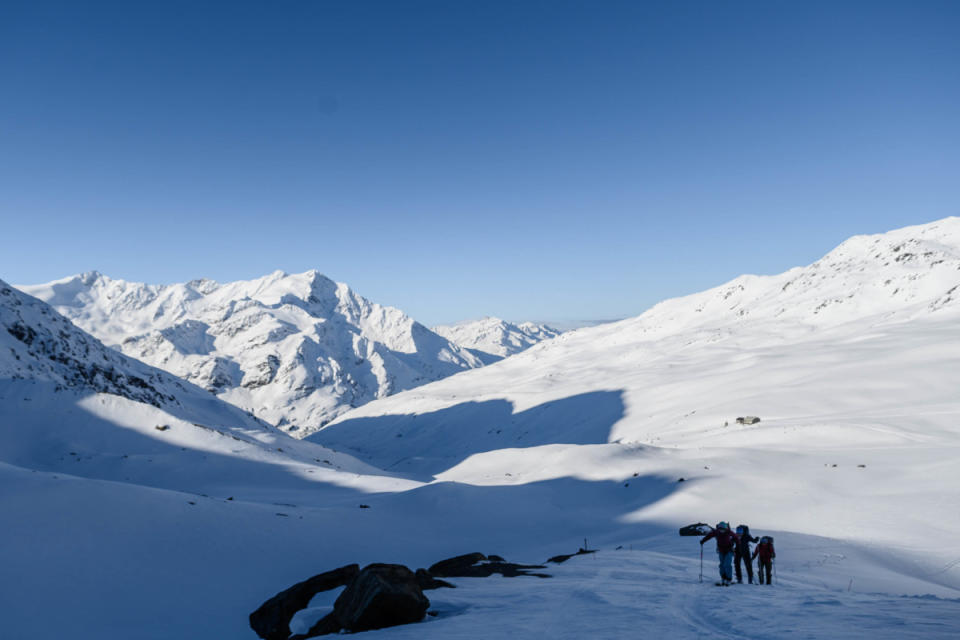
Photo: Max Ritter
Apparel:
Softshell tops and bottoms are king here, but consider packing a lightweight hardshell jacket for when the weather turns snowy or the wind picks up. If you really want to embrace the local culture, go crazy and wear the brightest colors you can find - you’ll fit right in. On warm spring days, I’ll often forego wearing baselayer bottoms, so I look for softshell ski touring or alpine climbing pants that feel comfortable directly on my skin. I’ve found the Euro brands like Millet, Mammut or Dynafit do these the best, but Black Diamond’s Dawn Patrol Hybrid pants are my favorite North American option. One thing to note with alpine climbing and mountaineering pants is to make sure the cuff actually fits over a ski boot.
On my torso, I’ll wear my favorite sun hoodie (REI Sahara hoodie) and a thin non-insulated softshell wind layer like the Strafe Cham pullover, the Arcteryx Squamish Hoody (or the discontinued Arcteryx Sigma SL), or the Mountain Hardwear Kor Airshell Hoodie. As an emergency shell, I’ll carry a super-packable jacket - this really only comes out if it’s storming or as an emergency layer. These kind of jackets are hard to come by, and are mostly marketed at alpine climbers, not skiers. A few favorites are the Arc’teryx Beta LT, The North Face Chamlang Futurelight Jacket, or Patagonia’s new SuperFree Alpine Jacket.
Technical Gear: Glacier Gear
These kinds of trips involve a lot of walking, and potentially some pretty involved technical mountaineering. Just a few years ago my partner and I skied a variation of the Chamonix to Zermatt Haute Route - and one glacier had receded so far we were unexpectedly forced to climb a few technical rock pitches to get to our next descent. This just goes to say, while you can be traveling light, you’ll want to be adequately prepared for the mountains.
On any of the major traverses, carrying a full glacier kit is essential. That means wearing and skiing in a harness all day and having full crevasse rescue and rappel gear for each person and at least two 30m ropes per party. Secondly, carrying a few extra pieces of passive rock protection can be incredibly helpful for unexpected technicalities. The French and Italian Alps are literally falling apart faster than you can say “buongiorno,” so don’t expect last year’s route beta to still be accurate.
Lightweight aluminum boot crampons and a single ice axe are also mandatory. This is a great opportunity to shave some grams, so I’d grab something ultralight and collapsible like the Petzl Leopard, Dynafit DNA, or Blue Ice Harfang Tour. A simple and light aluminum ice axe like the Petzl Ride, Camp Corsa Alpine or Blue Ice Falk is perfect.
Non-Technical Gear:
Most huts require you to sleep in a sleeping bag liner (often just called a hut sleeping bag in Europe), and while it might be tempting to save the weight, please don’t. It’s gross. Do everyone a favor and bring your own, or shell out the 15 EUR or so to borrow one from the hut. I prefer silk liners - they’re lighter, more packable, and much more comfortable to sleep in.
The number one creature comfort I recommend bringing is several sets of earplugs. No matter how deep you think you’ll sleep at a rifugio, there will be some middle-aged German man who sleeps WAY harder than you and snores so loud you can hear it from the valley floor. Plug up those ears, you’ll thank me later.
When it comes to extra clothes, I like to carry an extra set of baselayers and ski socks as well as a cotton t-shirt and some lightweight shorts. That way I can change into the t-shirt and my fresh (or less gross) baselayer bottoms when I get to the hut and wear the shorts over them. It’s usually quite toasty in the huts so I’m never too worried about being cold.
A small battery pack like the Biolite Charge 40PD is also a great way to get some extra juice for your phone as it can often be hard to find a plug to charge devices at a busy hut.
Finally, I like to pack a pair of lightweight approach shoes - you never know when the snow will run out. Trust me, it sucks to have to trudge through cobblestone streets in alpine villages in ski boots.

