How to Make Bookcases Look Built-In Using Trim with Our DIY Project
Update inexpensive shelving units with trim to add architectural character. Follow these steps to learn how to create DIY built-ins with basic bookcases.
Ready-to-assemble bookcases are available at home retailers but often look diminutive and flimsy. For more impact, try assembling several side-by-side. These inexpensive bookcases can mimic the look of custom built-in shelves when united with trim. We chose to coat ours in a rich, dark finish before assembling, but you can also paint them to match your walls or make them stand out with a bold accent color.
Create a cozy reading nook with an arrangement that wraps around a corner or flank a fireplace with DIY architectural character. Follow the steps below to learn how to make bookcases look built-in.
How to Make Bookcases Look Built-In

For a seamless look, purchase tall bookcases that reach nearly to your ceiling so you can easily fill in the gap with trim.
What You Need
Desired number of full-sized bookcases
One narrow shelving unit for the corner (optional)
1 gallon of paint or stain
Paintbrush
Screws and a screwdriver (or drill)
Anchoring hardware
Tape measure
Trim pieces (enough to line the top edge of full unit)
Saw
Sandpaper
Hammer and nails (or nail gun)
Level
Wood filler
Step 1: Screw the bookcases together.
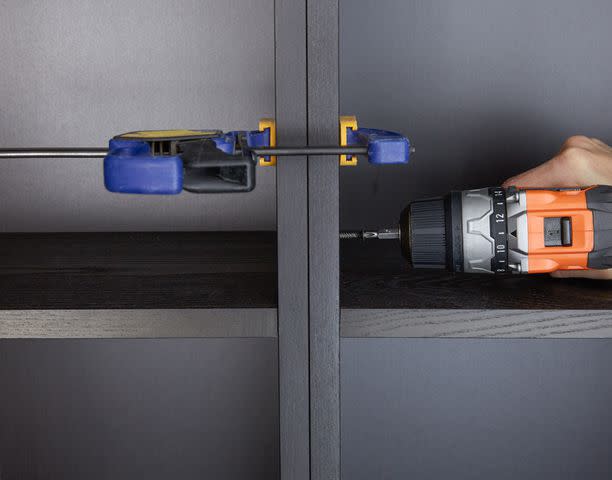
Assemble bookcases if needed. Paint all units the same color—we recommend a darker finish for a sleek, modern look. Once dry, arrange the bookcases as desired against the wall (our arrangement spans two walls with a narrow shelving unit in the corner to connect the bookcases). Once the bookcases are set in place, screw them together, eliminating gaps between the pieces. Anchor the bookcases to the wall.
Step 2: Cut trim for bookcases.
Adding trim to the top of the unit is the most important step in creating custom, built-in appeal. We layered a 3/4 x 2-5/8-inch piece of painted poplar trim over a 1/2-inch x 1-1/2-inch piece of trim (length will vary based on the width of your bookcases). Cut the trim to size and miter the corners (cut meeting ends at a 45-degree angle) for a precision fit. Sand the trim before painting the same color as the shelving units.
Step 3: Attach the smaller trim.
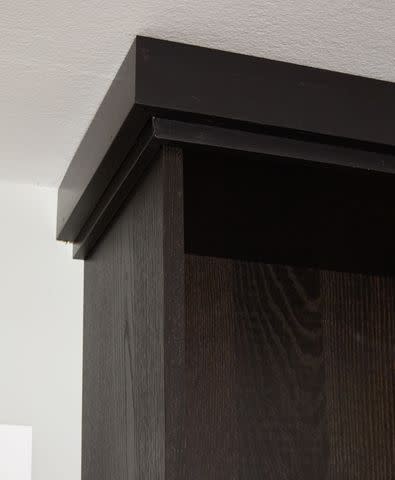
Nail the smaller trim across the front of the entire unit using trim nails. Use nails shorter than the thickness of the molding and bookcase panel together to avoid poking through the inside of the bookcase. Make sure the trim pieces are level to the top of the bookcase.
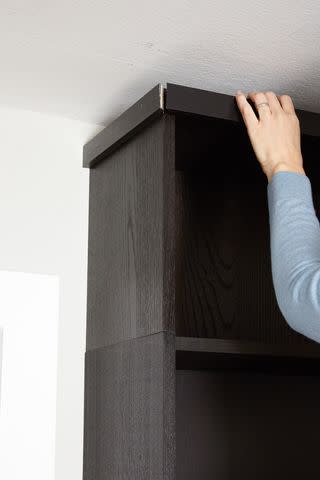
Step 4: Nail the larger trim.
Repeat with the other larger board, setting it higher than the first, so it reaches the ceiling. Hold it tightly to the ceiling when nailing it in place to avoid gaps between the unit and the ceiling. This will also help keep the trim level.
Step 5: Touch up and decorate built-ins.
Fill holes with wood filler, and touch up with paint. Try to find a wood filler as close in color to the bookcases as possible to avoid touch-ups looking obvious. When finished, decorate the built-in shelves with your favorite books and accessories. You could also experiment with paint or contact paper inside the shelves for a fun custom look.
