For the Best Thanksgiving Turkey, Roast It Upside Down
Nothing fancy like brining or basting. Just simply smart.
Simply Recipes / Photo Illustrations by Wanda Abraham / Elise Bauer
Do a quick search for roast turkey recipes, and you’ll come across countless tips and tricks for keeping your bird moist. Injecting, brining, dry brining, spatchcocking, basting—my head spins just thinking about it.
Every year I carefully consider all of these tricks, contemplating if I want to cut the backbone out of the turkey and hear the sickening crack of bones (I do not), or if I even have room for a giant turkey and its brine in my already cramped fridge. When I can’t muster the energy to prep way ahead or go the extra mile, there’s one trick that works every time no matter what. And it couldn’t be simpler.
Turn That Turkey Upside Down
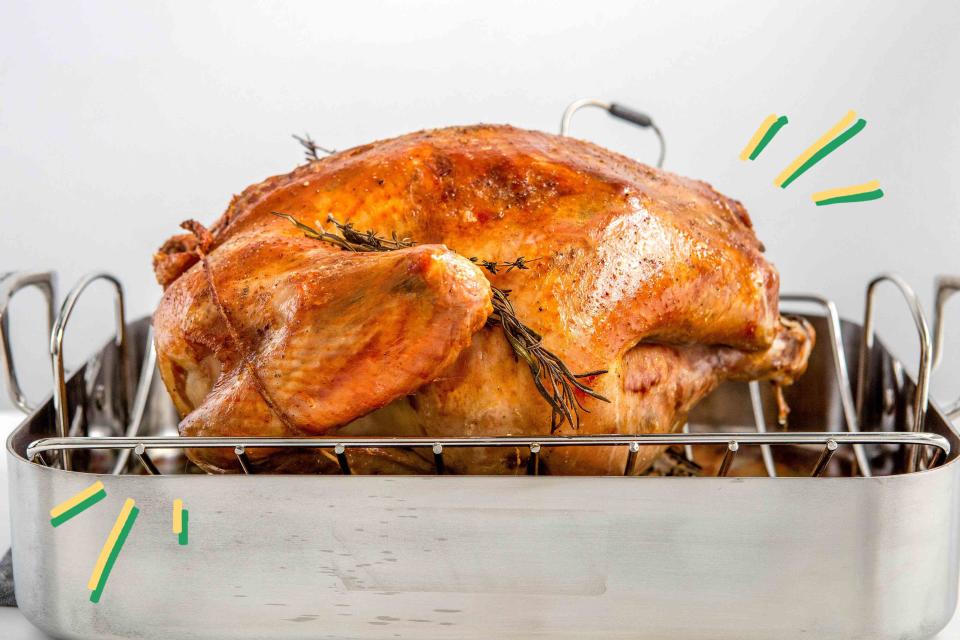
You heard me! Instead of roasting the turkey breast side up, flip it over and roast it breast side down. I learned this trick from our founder Elise Bauer who uses it in her mom’s roast turkey recipe.
Prep the turkey as you normally would, thawing it completely before beginning. Bring it to room temperature and pat dry with paper towels before smothering with softened butter or olive oil. Either brine the turkey beforehand or salt the inside and outside of the bird generously, then stuff the cavity with aromatics, like lemon halves, wedges of onion, and herbs.
Tie the legs together with kitchen twine and secure the neck closed with twine or a skewer. Arrange the turkey on the roasting rack, breast side down. Roast at 400°F for 20 minutes to brown the skin, then turn the temperature down to 325°F and roast until done.
Read More: What Temperature to Cook a Turkey
Why It Works
White meat tends to cook quicker than dark meat, but it also turns tough and dry at the drop of a hat. Dark meat, on the other hand, becomes more tender the longer it cooks. Placing the breasts on the bottom means the white meat cooks slower than the dark meat on the top, bringing the cook times more into equilibrium.
Because the breasts are on the bottom, they are also perfectly positioned to be basted by the fat dripping off of the dark meat, helping to keep them moist.
Simply Recipes / Laurel Randolph
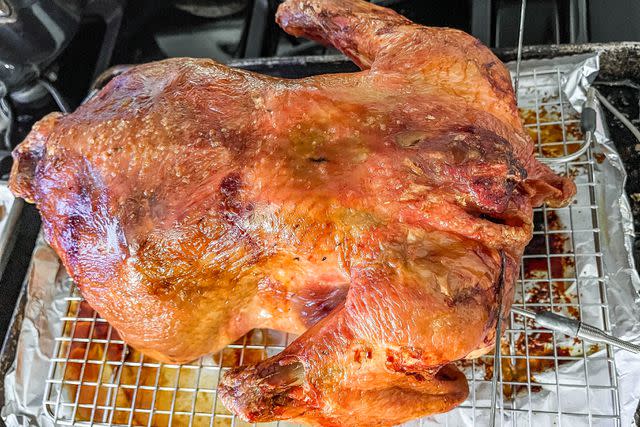
What About Crispy Skin?
The only problem with this method is you end up with a bird that doesn’t look exactly like the picture postcard—it’s beautifully browned and plump, but the breasts are on the bottom. You’ll end up with just as much crispy skin, if not more, but the skin on the breasts will not be crisp. For the record, this doesn’t bother me one bit.
If you’d like to crisp the skin on the breasts (and have crispy skin on the entire bird), don’t try to flip the hot bird. It’s dangerous and scary. Instead, let the bird rest for at least half an hour so that it is cooler, then get a buddy to help you.
With you both wearing oven mitts, stick a meat fork into one end of the turkey and another into the other end. Have one person use a big wooden spoon or large tongs to help guide it around, slowly shifting it until it is breast-side-up. Be mindful of the neck and the cavity, which can harbor hot liquid.
Adjust the oven racks so that the broiler is a few inches from the tallest part of the breasts. Broil for 3 to 5 minutes, just until the skin is browned.
Read More: Here's Where to Put a Thermometer in a Turkey
Tips for Success
I roast my turkey until the breast meat reaches 150°F. Then I loosely tent it with foil and leave the thermometer in so I can ensure that it reaches 160°F and stays there for at least a minute. The official recommendation from the USDA is 165°F, but this is the completely foolproof number that also yields overcooked turkey. Pasteurizing turkey is actually more of a time factor than a temperature factor—read more about it here.
I highly recommend investing in an electronic probe thermometer that you can leave in the turkey and check periodically (or even better, set the alarm so that it goes off when you’re approaching the target temperature). I own two, so I insert one deep into each breast without touching the bone. One was 10 degrees higher than the other, which just goes to show you that a good thermometer and a good position are key!
Quadruple-check the temperature in several spots once you take it out of the oven to ensure you’ve cooked the turkey fully.
Rest the turkey for at least 30 minutes (closer to an hour is better) before carving.
Read More: Mom's Roast Turkey
Read the original article on Simply Recipes.

