How to Bake On Your Grill
With the proper setup and a little know-how, baking on your grill is a fun way to incorporate complex and unexpected flavor into baked goods.
Through the summer and into the early fall, I look for any excuse to not turn on my oven. My old colonial-revival style home lacks central air, and the idea of turning on my oven on a steamy, 90 degree summer day is unappealing. I’d much rather be outside, seeking shade, poking around my garden, and catching a summer breeze before the oh-so long, bleak, gray, and very snowy New England winter settles in. In these cherished summer and fall months, my outdoor grill becomes an extension of my indoor kitchen. You can find me outside in the early evenings on most work days, throwing a simple dinner on the grill while my kids are fighting over the hose, and on weekends, leisurely grilling elaborate meals for entertaining, where everything is coming off of the grill, even dessert.
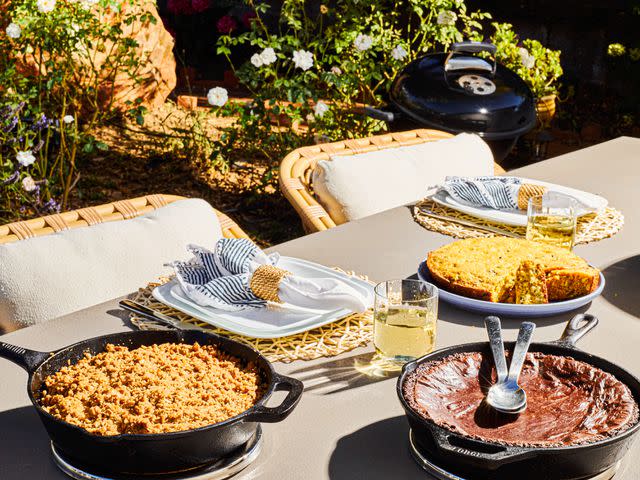
Serious Eats / Lorena Masso
It is in these moments that I have grown to love baking on my grill. Grill-baking is the term I use to refer to this style of cooking. I define grill-baking as a cooking method that uses the grill to maintain a steady temperature range while cooking over indirect heat to bake breads and batter-based and crumble-topped desserts. In effect, replicating the cooking environment of an indoor oven.
I started baking on my grill mostly to avoid my indoor kitchen in the summer, but as I gained experience with the technique, I realized that the grill is not just a way to avoid heating up an already-hot summer kitchen but a great way to incorporate complex and unexpected flavor—namely smoke—into baked goods that isn't as easy to achieve in an oven.
Successful grill-baking depends on having the proper setup and tools, as well as an understanding of both how to control a grill's more unstable temperatures as well as which desserts are the most forgiving to those shifting temps. With just a little know-how, though, you can easily turn your charcoal or gas grill into an effective outdoor oven.
Baking With a Charcoal Grill versus a Gas Grill
As Kenji López-Alt points out in his article highlighting the differences between gas and charcoal grills, there are pros and cons to grilling with each. The same is true when using a grill to bake. The advantage of a charcoal grill is the smoky flavor it gives to foods baked in it, but it comes at the cost of being more difficult to manage as an "oven." A gas grill is easier to use and will be more temperature-stable, but the trade-off is a loss of some of that fantastic smoke flavor.
The smoky flavor of charcoal is most noticeable when baking for at least 30 minutes. This is because the propane in a gas grill burns relatively cleaner than charcoal. As charcoal burns it omits smoke and a range of gaseous emissions that create that signature fresh-off-the-grill char flavor, which adds depth of flavor to savory breads and complexity to sweet desserts. This is the main reason I prefer to use a charcoal grill over a gas grill when grill-baking.
While the flavor achieved from baking with a charcoal grill is superior to that with a gas grill, the main benefit of a gas grill is that it's easier to maintain a constant heat level. With a charcoal grill, as the coals burn down, the heat level will dwindle over time, making maintaining a steady heat level—which is crucial for properly risen and evenly cooked baked goods—harder to do. With a gas grill, your initial burst of heat is lower than with a charcoal grill, but you have the ability to adjust the burners as needed to maintain a more constant heat level. The steady flow of propane is easy to maintain with the simple twist of a knob on a gas grill, and requires less monitoring than a charcoal grill. That’s not to say it’s unachievable with a charcoal grill (as I will describe later), but it does require more attention and monitoring to bake properly on a charcoal grill.
What To Bake On The Grill
One of the most important things to know about baking on a grill is that not every type of baked good is well-suited to the task. Perfectly crusty baguettes should be left in a steam-injected indoor oven. Delicate puff pastry and croissants are best baked indoors. Layer cakes are best left to more temperature-stable cooking zones.
The key is to look towards more rustic baked goods—the kinds of desserts and quickbreads that are at home in a cast iron skillet, and either more forgiving of variable temperatures, or thin enough not to require sustained even heat. My smoked ancho chile skillet brownie or a skillet cookie can achieve well charred edges with a gooey center on an outdoor grill, while the flavor of a grill-baked skillet cornbread with charred fresh corn and poblanos takes on a fire-tinged dimension when baked on the grill. Fruit desserts like my rustic apple crisp are also easy to throw together for the grill; the apple slices will soften fully and brown in spots even as a covered grill swings from higher to lower cooking temperatures.
The Essential Techniques for Successfully Baking on Your Grill
There's no question that baking on a grill is a larger technical challenge than baking in a standard oven. Ovens are insulated, helping them to hold a steady temperature and retain more heat than an outdoor grill. A grill, on the other hand, is mostly intended for faster cooking over a direct heat source, whether charcoal or gas. While a grill lid helps to regulate airflow and can trap heat during grilling, it offers little insulation and heat retention in comparison to an indoor oven.
Even if a grill isn't optimized for this type of cooking, it very much can be done. The key to success is to properly build and maintain heat on the grill. After years of fine-tuning how to grill-bake varied breads and desserts, these are the general steps and best practices I have landed on for foolproof grill-baking.
Technique 1: Preheat the Grill and Set Up an Indirect Cooking Zone
When baking in a well-insulated indoor oven, the standard is to preheat the oven to the temperature at which we intend to bake. For batter-based foods, this is usually between 325 to 375°F, while doughs usually require a higher temperature range of 400 to 500°F. Preheating to the desired final temperature is logical for an insulated oven, since it's designed to maintain the selected temperature.
When baking with a gas or charcoal grill, though, the grill needs to preheat to a higher temperature than whatever the actual baking temperature should be—we're talking 500 to 600°F—to accommodate the anticipated heat loss during the baking process due to a lack of insulation. As soon as you uncover a preheated grill and place a cold, heavy cast iron skillet full of raw ingredients inside it, its temperature will drop rapidly; by preheating the grill to a higher temperature than the intended baking temperature, we can accommodate this heat loss.
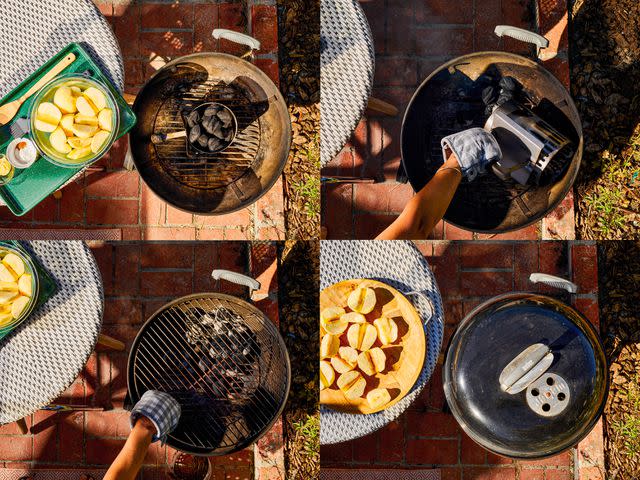
Serious Eats / Lorena Masso
For a charcoal grill, this means starting with a full chimney’s worth of charcoal briquettes, about six quarts of charcoal. Once the coals are properly lit and the top coals have a thin layer of gray ash around their edges, you'll want to pour the lit coals into a steeply banked pile along one side of the grill, edging up a couple inches of the grill wall, and leaving about two-thirds of the coal grate free of coals. By leaving a large area free of coals, you'll create an indirect cooking zone for baking, where the food can cook in the grill's high heat without scorching due to intense embers and fire right below. Important to remember: It takes 30 to 40 minutes to properly ignite a full chimney of charcoal briquettes, so plan accordingly.
For a gas grill, you'll instead want to preheat the covered grill with all burners on high until the grill reaches about 500°F (260°C). This will take about 15 minutes. Once the grill is properly preheated, you'll want to create a similar indirect cooking zone as one does in a charcoal grill by turning off all the burners except the primary one. (The primary burner on a gas grill is the burner that is connected closest to the gas source; it is the burner that is lit first on the grill and that regulates the gas flow to the other burners. Without the primary burner on, the other burners will burn out, as the connection to the gas source is cut off if the primary burner is turned off.)
If I’m already outside grilling dinner, baking a dessert or a bread on the grill is a great way to make best use of the fire. In this scenario where the heat of the coals is dwindling from having just grilled other items, you’ll need to build more heat on the charcoal grill. If the charcoal grill looses heat and drops below 300 degrees, carefully remove the cooking grate and top off the already lit embers on the grill with 2 to 4 quarts of unlit charcoal briquettes. Use tongs to shape into a steeply banked pile, then return cooking grate, cover grill and preheat for 10 to 30 minutes to let the coals ignite and the heat to rebuild back to 500 to 600°F. . Reheating a gas grill is easier. You just turn all burners to high, close the lid, let it heat up, then turn off the non-primary burners.
Technique 2: Bake on a Covered Grill and Opt for Cast Iron
Setting up the fire as described above for both charcoal and gas grills creates a large indirect heat zone, which is paramount for baking on the grill. This cooler side of the grill is where the baking happens. Too much direct fire underneath the baked item while cooking will cause the bottom to scorch, and the top to remain underbaked. Only by setting the food in the indirect zone away from the sources of heat can you ensure that whatever you are baking will cook at an even rate from edge to edge and top to bottom.
A cast iron skillet is my go-to vessel for baking on the grill. Not only does cast iron further ensure top-to-bottom even baking, but it also retains heat to encourage proper baking even as the grill temperature fluctuates. A highly durable cast iron skillet will also stand up to the more intense conditions of a grill without shattering, warping, or weakening over time.
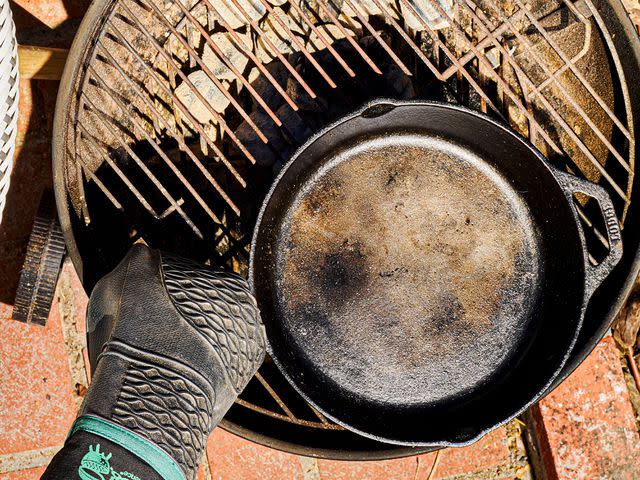
Serious Eats / Lorena Masso
And at the risk of stating the obvious, you need to use the grill's lid to promote proper heat and temperature regulation. But beyond the evident heat-containing role of a lid, there are a couple other reasons for using the lid that differ between gas and charcoal grills. With a gas grill, the stainless steel construction of the lid with its internal heat deflectors prevents heat from escaping, retaining the heat which helps mitigate the temperature drop once the skillet is added to the grill. While with a charcoal grill, closing the lid will limit oxygen flow, stifling the flame and lowering that very high initial burst of heat and slowing down the rate of burning, which will create a more regulated cooking temperature for a longer period of time. So using a lid with a gas grill will raise and help maintain the temperature to ensure proper baking, while using a lid with a charcoal grill will help lower the temperature and slow down the rate of burning so the heat will last longer.
Technique 3: Monitor and Adjust the Temperature
Using the grill lid will help regulate heat flow on the grill, but it's still important to closely monitor the temperature while baking. Built-in grill thermometers are notoriously unreliable. They can warp and damage over years of use from extreme temperature fluctuations and weather conditions, and can also be located in areas (like the underside of a lid) that might not represent the actual temperature where your food is cooking closer to the grate.
I always use an ambient temperature probe thermometer when grilling (note that an ambient temperature probe is different from the long pointy ones inserted into roasts). Before I heat the grill, I clip the probe onto the cooking grate at the same height of the food that I am cooking. This way I can properly track the grill temperature, and adjust the temperature if needed to maintain an oven-like baking environment.
Adjusting the temperature of a gas grill is relatively easy. As described above, the primary burner should be left on and the propane flow adjusted by turning the corresponding knob.
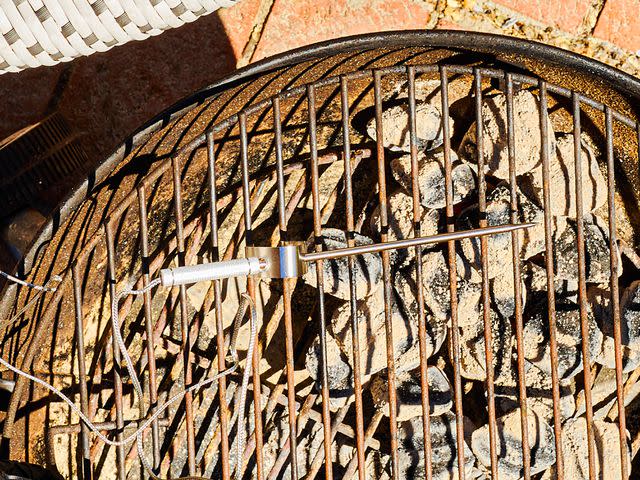
Serious Eats / Lorena Masso
Maintaining and adjusting the heat level of a charcoal grill requires a bit more finesse. A charcoal grill starts with a hotter initial burst of heat (500 to 600°F), and heat is lost throughout the course of baking as the charcoal burns down. A full (6-quart) chimney of charcoal briquettes will burn through in about an hour, with the heat dropping roughly 50°F every 20 minutes.That heat loss over the extended time of baking can be combated by adjusting the vents on the charcoal grill to maintain a constant temperature. Like any fire, charcoal needs oxygen to survive. Controlling the amount of oxygen that gets to the fire effectively controls the temperature. Most charcoal grills will have at least two air vents: one on the bottom half of the grill, and one in the lid at the top. Adjusting these air vents restricts or allows the air flow in and out of the grill, thus giving a handle on the heat being produced.
With my 22-inch Weber grill, keeping both vents open will maintain a temperature range of 425 to 475°F, while closing the top and leaving the bottom vent open will lower the temperature range by roughly 50°. Closing all of the vents will cut off the air flow and extinguish the fire over time.
I encourage you to play around with your charcoal grill's air vents while tracking the temperature using an ambient temperature probe so that you will become comfortable adjusting the heat level of your grill with intention, instead of guessing at whether you're in a good temp zone or not. Just remember to wear heat-resistant gloves!
Technique 4: Incorporate a Grill's Smoky Flavor When Possible
While I’ve described why you need indirect heat for grill-baking, I highly recommend putting the hot side of the grill to good use. First, you can use the hot side of the grill to add complex flavor to grill-baked goods by charring appropriate ingredients before they are cut and folded into a batter, bread, or filling. Grilling fruits before using them in the filling for a crisp or charring corn for cornbread intensifies the sweetness and complexity of each—it's a flavor that can only be achieved on a grill.
Beyond charing individual ingredients, you can also use smoke itself to flavor the baked good. In fact, I like to think of smoke as an unlisted ingredient in anything I choose to bake on my grill. The degree of smoke is something you can play with. Merely cooking with charcoal alone will infuse a lighter amount of smoke flavor into the food, while adding a large chunk of wood to the lit coals (or a foil packet of wood chips on a gas grill) can generate more significant amounts of smoke and thus smoky flavor.
While I’ll admit that standing over a lit grill in the summer heat might not be significantly less hot than baking indoors, for me, it's a lot more pleasant. Plus, in my opinion, the added flavor of char and smoke to grill-baked goods simply can’t be replicated indoors. The next time you’re grilling dinner outside, consider getting the most out of your grill's heat, keep that fire going, and treat yourself to a baked treat off the grill.

