How To Apply Lip Liner For The Most Lifted Look
Even a beginner can master this easy trick.
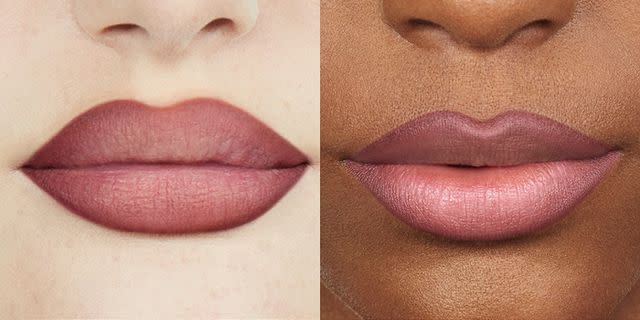
Once you learn how to use lip liner to your advantage, it finally makes sense why your grandmother always had one hiding away in her purse all those years. No matter if you're applying lipstick or just a tinted balm, lip liner can make a big difference in both the finished look and stayability. Not only does it prime your lips for a more long-lasting finish that doesn't smudge or feather into fine lines, but it also feigns a fuller pout overall, making it the easiest way to instantly flatter and boost your natural lips.
However, how you apply it is just as important. Beyond the common lip liner mistakes to avoid, there's a trick to applying lip liner that will change your routine forever once you try it. Plus, it's easy to do even if you have no experience. Coined by makeup artist and founder of Makeup by Mario, Mario Dedivanovic, this lip liner technique instantly gives your pout a lifted look, instead of dragging your lips down.
While it's always been typical to over-line your entire lip line, top and bottom, to achieve a full look, lip liner is actually better when you are particular about placement. In fact, Dedivanovic recommends using a lighter hand and only over-lining one key area: the Cupid's bow. Here's how to master his technique at home.
Step 1: The Top Lip
Using your lip liner of choice (Dedivanovic recommends his Ultra Suede Sculpting Lip Pencil that comes with a built-in blending brush), you'll want to start by slightly over-lining the upper lip line only on the Cupid's bow area. From there, extend the lip liner towards the outer corners on the edge of your natural lip line. These outer sections shouldn't be over-lined. Over-lining only the Cupid's bow makes lips appear fuller and more enhanced.
Step 2: The Bottom Lip
Next, slightly over-line the center of the bottom lip line, and then extend the liner upwards towards the outer corners of the mouth, moving the liner back inside the lip line. You're mirroring the same technique as used on the top lip. On the bottom, this creates the illusion of a lifted lip.
Step 3: Blend
For a more natural look, softly diffuse and blend the lip liner from the corners inward with the custom brush on the aforementioned lip pencil or by using a clean eye shadow brush.
Step 4: Complete the Look
Finally, finish with the lipstick of your choice.
As a result, you get fuller-looking lips without pulling them down with too much over-lining throughout. It's less work, less room for error, more subtle, and incredibly youthful and flattering. Just remember to always only go on the outer edge of the lip line around the Cupid's bow and to stay right on the lip line everywhere else, and you'll be set up for success.
Now, how about a fresh lipstick shade to pair with it?
For more Southern Living news, make sure to sign up for our newsletter!
Read the original article on Southern Living.

