8 Standing Poses to Master for a Solid Yoga Practice
Learn the benefits, common mistakes, and simple modifications for each asana to enhance your zen.
Getty Images
If you’ve ever taken a yoga class, you know that standing poses are the foundation of your practice—even though it can be tempting to use these poses as an opportunity to take a little break from holding your body in a new and uncomfortable position. But in reality, to get the most from your yoga workout, you need to conduct your standing yoga poses with just as much intention and muscle force as when you’re twisted in a triangle pose.
So, whether you’re new to yoga or just want to brush up on your skills, below you will find information on how to retrain your body in your standing yoga poses. This material will guide you on how to make sure you’re not only doing these poses with intention but also performing them correctly so you don’t develop any injuries that delay your progress.
Related: The Benefits of Yoga Go Way Beyond Improving Your Flexibility
Tadasana (Mountain Pose)
To stand in Mountain Pose, move to the front of the mat and stand with your feet together with the big toes touching and the heels close together. Bring the top of your sternum toward the ceiling to elongate your body toward the sky. Arms should be relaxed by your side with your palms facing forward and your shoulders down and back.
Benefits: According to Charlie Covey, yoga teacher, and instructor at Barry’s Denver, tadasana is a grounding pose that can improve your posture, strengthen your thighs and glutes, and even relieve sciatica (pain, weakness, numbness, or tingling in the legs). It’s also a great yoga pose for beginners to practice and improve upon.
Modifications: If you have balance issues, Covey suggests standing with your feet wider apart.
Common mistakes: Make sure to conduct this pose with intention, says Covey. “Press into the feet, engage the quads to lift the kneecaps up the thighs, pull the belly button up and in toward the heart, and actively open the palms to the front of the space. We don’t want jazz hands, but make sure there is energy in the fingers.”
Related: The 8 Best Yoga Mats of 2023, Tested and Reviewed
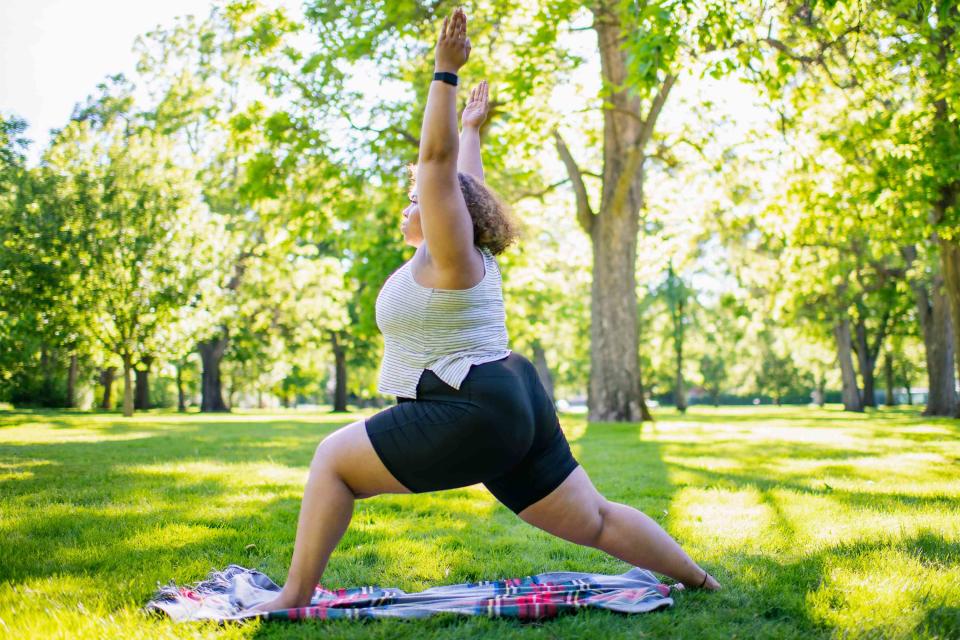
Virabhadrasana I (Warrior I Pose)
Transition into this pose from Downward Dog. Once in the Downward Dog pose, take a step forward with your right foot. Your left foot should be behind you, turned out slightly away from your inner knees. Bend your right knee over your right ankle, open up your chest, and reach your arms up toward the sky, elongating your body. You are not in a low squat for Warrior I, so stand up a little taller so you’re not in as deep of a bend.
Benefits: Warrior I can help improve balance and strengthen your shoulders, thighs, and calves, says Covey. "It also stretches the hip flexors, groin, and core.”
Modifications: Even though this is a beginner pose, getting the position right can be a bit challenging because it requires your hips to be fairly open, explains Covey. “If your hips are tight, keep the back foot pointing forward and do a high crescent lunge instead. If balance is an issue, take a shorter and wider stance on the mat. If shoulder pain occurs, hands can rest on the hips or at the heart center.”
Common mistakes: Some people turn their back foot parallel to the back of their mat, which is too far, says Covey. “The back foot should be at about 45 degrees. Making the distance between the front and back foot too great will lead to poor balance and difficulty moving to another posture. Keep the front knee stacked over the front ankle, not in front or behind it.”
Virabhadrasana II (Warrior II Pose)
To come into Warrior II, begin in Mountain Pose. Once in Mountain, take a large step back with your left leg. Flatten your foot so that it’s completely touching the ground, and turn out the foot so each ankle is in line with the other. Reach your arms out parallel to the mat with palms facing down. Then emphasize the proper drishti (gazing point) by looking toward the front, over your right toe.
Benefits: Warrior II stretches the groin, thighs, and chest and can strengthen the inner thighs and shoulders, says Covey. "It can also relieve low back pain, especially through the second trimester of pregnancy.”
Modifications: If you start to feel pain in your shoulders or fatigued when they are outstretched in this pose, Covey suggests resting your hands on your hips. “This can also help keep the pelvis level. A chair also can be placed under the front glute and thigh to provide stability and support. Alternatively, the back knee can be taken to the ground to increase stability."
Common mistakes: Make sure to keep your shoulders relaxed, since they will have a tendency to rise toward the ears when outstretching your arms, Covey says. "The front foot should be pointing directly forward and not on an angle. The feet should be aligned front heel to back heel or back arch, but not wider than that. The back shoulder should be in line with the front shoulder, not pulling forward. If you backed up against a wall, both shoulders and both glutes should be able to press into the wall evenly.”
Related: What You Need to Know About Prenatal Yoga
Utthita Trikonasana (Extended Triangle Pose)
Extended Triangle Pose is such a good stretch, says Sydni Arnett, senior instructor at Barry’s Philadelphia. “It really opens up the hips and shoulders, and increases spine strength because you’re holding yourself up floating your hand against your shin (or knee or thigh depending on your mobility.)”
To do this pose, spread your legs apart so you create a triangle with the floor as the base of your triangle. Turn out your right foot so that it’s pointing away from you. Turn your left foot straight forward so that your toes are facing the same direction your chest is. Then, lean over, resting your hand at the bottom of your right ankle while your left hand reaches up toward the ceiling with palms facing forward.
Benefits: This pose stretches and strengthens the hips, groin, hamstrings, chest, shoulders, and back. It also can help relieve stress, improve digestion, stimulate the abdominal organs, and relieve back pain, says Covey.
Modifications: If you have trouble reaching down to your ankle, try adding a yoga block for extra stability. You also can shorten your stance to help with balance, Covey says. "If you have neck issues, look directly ahead instead of up at the top hand or ceiling. The top hand can also rest on the hip to help ground and stabilize, especially before transitioning to another pose.”
Common mistakes: Don’t curve your spine and create a rainbow shape. Instead, keep the spine long and roughly parallel to the ground. Avoid the urge to touch the floor with the bottom hand, leading to the spine turning into a rainbow shape, says Covey. “People also lock out their knees in triangles, as well as any shape where a weight-bearing leg is straight. Keeping a micro bend in the knees will make the muscles around the knees engage to create stability instead of relying on joint space in a locked out knee to support the weight of the trunk.”
Parsvottanasana (Pyramid Pose)
Pyramid Pose is a great pose to release some of the heat you’ve been building up in your body throughout your yoga practice. To get into this pose start in Mountain, then step forward with your right leg, making sure both right and left toes are pointed in the same direction (straight ahead). Then put your hands behind your back and lean forward into a 90-degree angle. Or bring your hands down to your front foot.
Benefits: According to Covey, this pose calms your brain and relieves stress while also stimulating digestion. "It can strengthen the legs and stretch the hamstrings, hips, and spine.”
Modifications: Arnett suggests using yoga blocks if you can’t reach the floor in this pose.
Common mistakes: Pyramid is a smaller stance, so you want to be able to drop your forehead in your front shin, says Arnett. “Your front foot is barely a step in front of the back foot, on those train tracks, with your front knee bent. It’s common to see someone trying to keep the front knee straight and their back foot too far back.”
Ardha Chandrasana (Half Moon Pose)
This pose is a great goal to work up to in your yoga practice. In this pose, your left hand and left leg are the base (touching the floor), while your right leg floats up at a diagonal and your right arm points straight up toward the sky.
Benefits: This pose is great for balance, coordination, and core strength.
Modifications: This is another pose where using a block can help you find stability as you work on your flexibility and balance.
Common mistakes: The most common mistake seen in Half Moon is dropping that top foot below the hip, says Arnett. “Think about keeping that whole leg up at hip height, flexing your toes toward your knee, and driving that heel into the imaginary wall behind you to fix this.”
Vrksasana (Tree Pose)
This pose is all about focus and concentration. You’ve probably already tried this pose if you’ve taken any beginner yoga classes. To get into Tree Pose, stand in Mountain Pose and then lift up one foot to step into your inner thigh. You can bring your hands into a prayer position and focus on a focal point or close your eyes as you balance.
Benefits: This pose is great for practicing your balance, and it also strengthens the legs and core while stretching the hips and groin area. Covey notes that it can even help to reduce flat feet.
Modifications: If you are having trouble with balance, Covey suggests placing the floating heel on the grounded ankle and creating a kickstand with the big toe to help. “You can also use a wall or sturdy chair for help balancing. Hands can be on hips for extra balance or reach up to the sky for an extra challenge.”
Common mistakes: The biggest mistake yoga teachers see when students attempt this pose is that they place the foot on the inside of the knee, says Covey. Instead, your foot should be above the knee or below the knee. You don’t want your grounded leg to be locked in this pose. You should have a slight knee bend to engage the thigh and your glutes should be engaged.
Utthita Parsvakonasana (Extended Side Angle Pose)
This is kind of like a lunge, except your upper body is twisted and extended toward the sky. In a lunge position with your right leg bent forward at a 90-degree angle, place your right hand down toward your foot (or grab onto your foot for more stability). Twist open toward the left and reach your left hand up toward the sky.
Benefits: Extended Side Angle can strengthen your core, thighs, glutes, and shoulders, says Covey. "It stretches the outer thigh, obliques, lats, and chest. It can also increase stamina and stimulate digestion."
Modifications: A block will be handy in this pose as well. Or, the bottom forearm can be placed on the front thigh to create more support for the torso, says Covey. “The gaze can be directly forward if the neck is stiff and for shoulder issues, the top hand can be directly vertical or rest on the top hip instead of reaching toward the front of the space.”
Common mistakes: Don’t force the front hand to touch the ground; this will just create compression in the spine. Instead, Covey suggests using a block or the hand-on-thigh modification. Just do not rely too heavily on the block or thigh for support. “Use the top obliques to maintain length in the spine.”
Related: Yoga for Beginners: A Guide to the Different Types of Yoga
Learning these poses can be a great way to strengthen your practice and get better over time. Standing poses are the foundation of yoga, so mastering these will help you in all other poses and flows as well.
But, like any workout routine, yoga practice requires you to go at your own pace, so make sure to pay attention to your body and listen to its cues. Take rests when you need them and use yoga blocks to comfortably find poses. You may even want to discuss practicing yoga with a healthcare provider first before beginning to make sure your body will adjust to the practice properly.
For more Shape news, make sure to sign up for our newsletter!
Read the original article on Shape.

