8 Ideal Yoga Stretches for Your Lower Back
Tight, tense, and stiff? Try these simple poses for lower back relief.
Grace Canaan
People are drawn to yoga for numerous reasons and healthy benefits, including to find relief for their back issues. According to the Centers for Disease Control and Prevention, almost 60 percent of adults have experienced pain in the past three months—and back pain, specifically, is the most common type. But even if your low back isn’t exactly in pain, it can also get uncomfortably stiff and tight from everyday activities—or lack of activity, like if you’re sitting (or staying in any single position) for long periods of time.
How many times have you felt the need to stretch after having sat for a long time, whether behind a desk, in a car, on a plane, or on the couch? No doubt that eagerness to stretch is due in some part to discomfort or pain in your lower back area. And this is where a movement practice like yoga can come into play.
Related: 4 Stretches You Probably Didn’t Know Could Ease Back Pain
Benefits of Yoga for the Lower Back
Stretching and relief for surrounding muscles that contribute to low back pain.
“Yoga poses can help soften and relax tight muscles in the lower back, as well as the glutes and hamstrings, which are common contributors to low back pain,” says Kelly Smith, E-RYT 500, founder of Yoga For You, host of the Mindful in Minutes Podcast and author Mindful in Minutes: Meditation for the Modern Family.
Strength, stability, and mobility for future lower back pain prevention and management.
Plus, yoga can help mobilize surrounding joints and strengthen both your back and core muscles, which can help create stability for your back. As a result, you’ll be less susceptible to back injury or pain in the long run, Smith explains.
Proper diaphragmatic breathing strengthens the core and reduces stress naturally.
What’s more, one of the main components of yoga is the emphasis on breathwork as you move or hold poses. The breathing element of any yoga practice is beneficial for low back pain management, both directly and indirectly. “When you learn how to breathe properly by engaging the diaphragm, you’ll also strengthen the deep core, which is a key player in posture and back health and strength,” Smith says. What’s more, yoga’s integral deep breathing and mind-body connectivity is proven to be extremely helpful for relieving tension and reducing stress in the body, which is often closely related to muscle stiffness, aches, and pain.
Yoga Poses and Stretches for Lower Back
Smith shares eight yoga stretches and poses she recommends as the most helpful for releasing tension, decompressing the spine, and strengthening your low back to prevent future issues.
Do the entire series of stretches from top to bottom, or cherry pick a stretch or two to repeat as their own workout or to add to the middle or end of a larger workout. For instance, for a lower back strength workout, do a modified side plank and locust pose. For a gentle round of lower back stretches at the end of a long day or a workout, try the knees-to-chest stretch, windshield wiper twists, and a downward dog to relieve tension.
360-Degree Breathing Tip
When you reach the child's pose stretch, practice using the 360-degree breathing technique. This involves breathing not just into your chest or belly, but fully into your diaphragm: As you inhale, feel your rib cage and mid-torso expand all the way around—back, front, and sides—like there’s a balloon inside you filling completely with air; as you exhale, let the balloon deflate with control, feeling your ribs close back in and your navel draw in toward your spine.
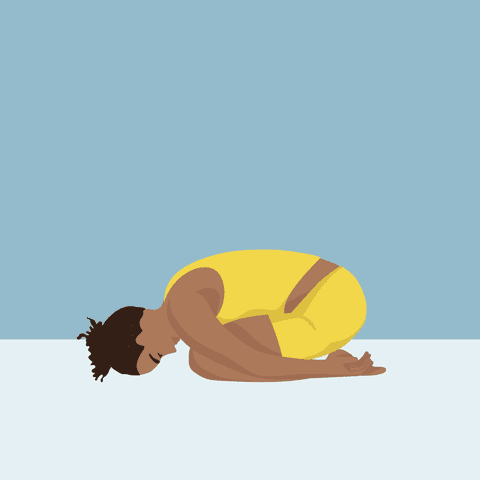
Child's Pose
Grace Canaan
Starting on your hands and knees, shift your hips back over your heels and down, and lower your forehead to the floor. (If your knees are uncomfortable, slide a blanket underneath or double up your yoga mat.)
Keep your knees slightly apart, angling them in a slight V.
Place your arms down to the side of your body with palms facing up.
Staying in this pose, breathe deeply into your belly and lower back to soften and relax the muscles.
Hold 30 to 60 seconds, longer if possible and comfortable.
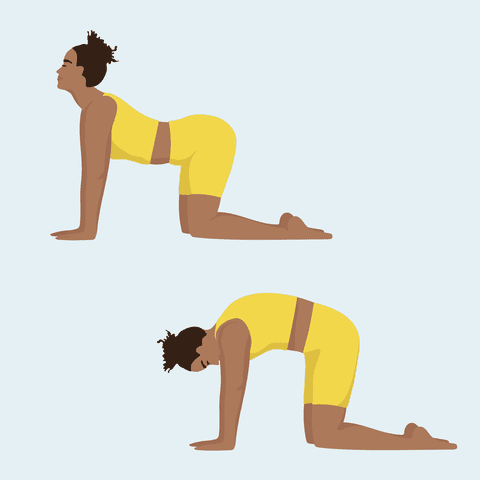
Cat Cow Pose
Grace Canaan
Start on your hands and knees with your wrists directly under your shoulders and knees under hips.
Inhale, lift your chin and chest and gaze up to the ceiling as you drop your belly toward the mat.
Exhale, round your mid back up to the ceiling, tuck your tailbone under, draw your belly in toward your spine, and drop your head toward the floor.
Repeat the entire sequence four to six times, following the rhythm of each inhale and exhale.
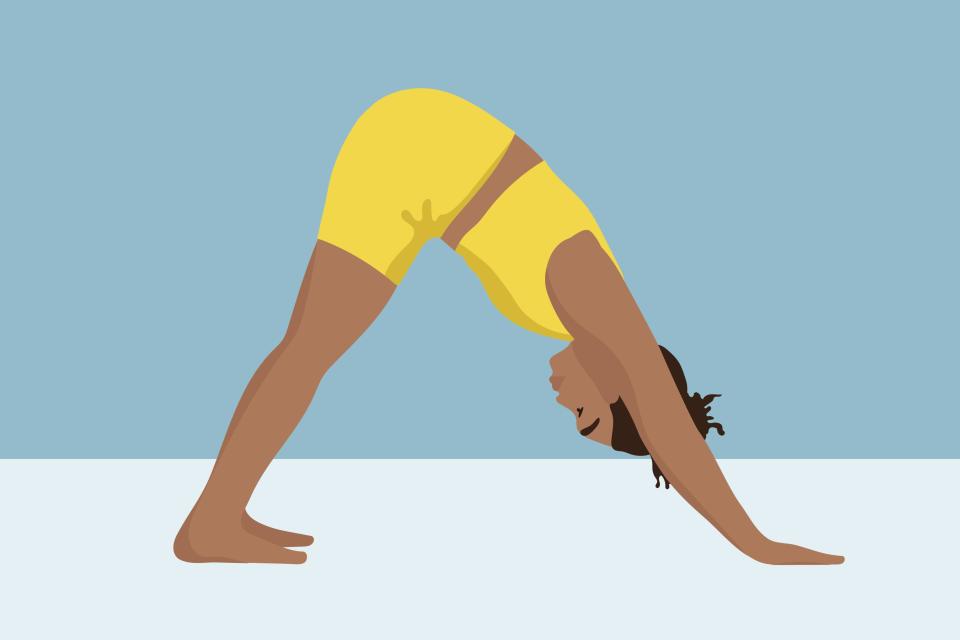
Downward Dog
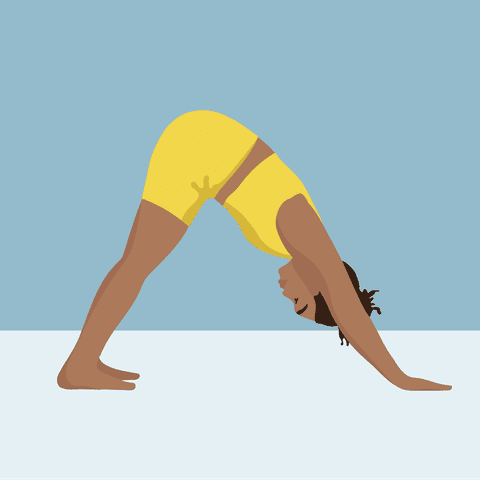
Grace Canaan
Start on your hands and knees: Keep your knees about hip-width apart, your toes tucked under, and your hands about shoulder-width apart.
Walk your hands forward a few inches and spread your fingers wide.
Pressing your hands into the mat, lift your knees off the floor and start to straighten your legs as you send your tailbone to the sky (don’t completely lock your knees; keep a slight, soft bend in your knees).
Hold for four to six breath cycles.
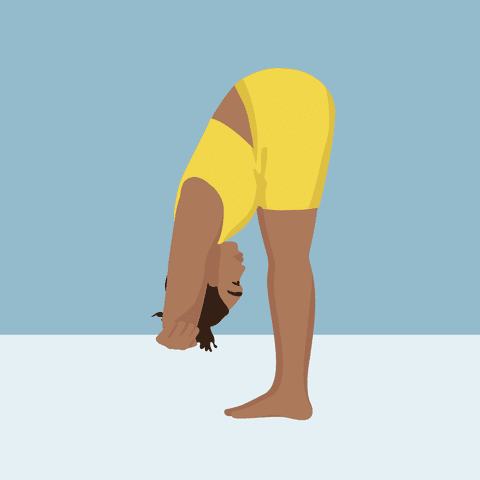
Ragdoll
Grace Canaan
Stand with your feet hip-width apart, arms at your sides.
Keeping a slight bend in your knees (knees unlocked), hinge forward from your hips and let your upper body, head, and neck, hang relaxed toward the floor.
Grab the opposite elbow with each hand, keep the back of your neck long, and let your head hang heavy.
Deepen the bend in your knees if your hamstrings are very tight.
Stay in this stretch for five to eight breath cycles.
If, however, you’re getting light headed from being upside down, gently come out of the pose.
Related: 6 Simple Yoga Stretches That Melt Away Muscle Tension
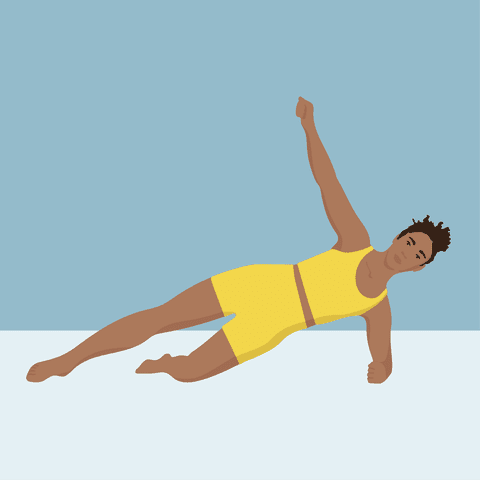
Modified Side Plank
Grace Canaan
Start by lying on your left side with your body in one long line.
Keeping your knees aligned, bend your left leg behind you, forming a 90-degree angle with the original line of your body.
Place your left elbow under your left shoulder, engage your core, and lift your upper body.
Lift your left hip off the floor a few inches into a side plank, so your body is supported by your left elbow, left knee, and right foot.
Hold for five to eight breath cycles. Switch sides and repeat.
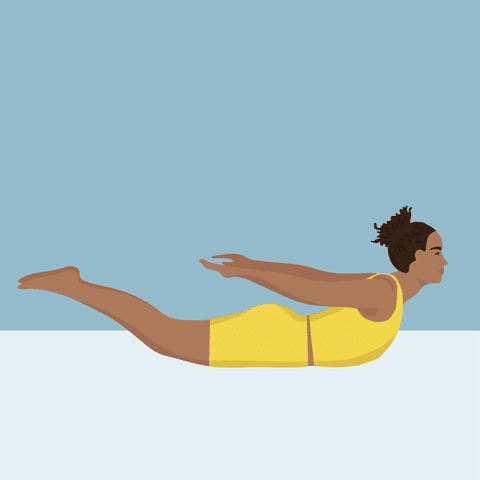
Locust
Grace Canaan
Lie face down with your forehead on the mat, arms at your sides with palms down, and the tops of your feet resting on the mat.
Take a deep inhale, then exhale and engage your core: Then focusing on using only the muscles in your back, lift your head, chest, arms, and legs off the floor.
Hold here for three to five breath cycles.
Release and repeat two to three times.
Related: 8 Bodyweight Exercises You Can Do Anywhere
Windshield Wiper Twist
Grace Canaan
Lie face up on the floor with your knees bent and feet on the floor as wide as your mat.
Extend your arms to the sides.
Slowly and gently rock your legs from side to side like slow windshield wipers—letting them fall all the way to one side, back up to center, and all the way to the other side—feeling a gentle twist and stretch in your lower back (and even your hips and glutes, if they’re tight).
Repeat this gentle windshield wiper motion for one to two minutes.
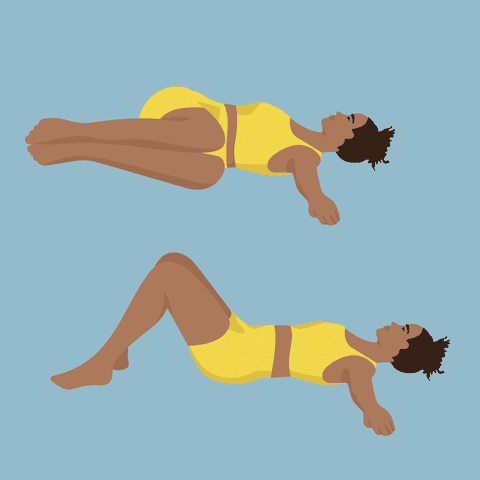
Knees to Chest (Knee Hug)
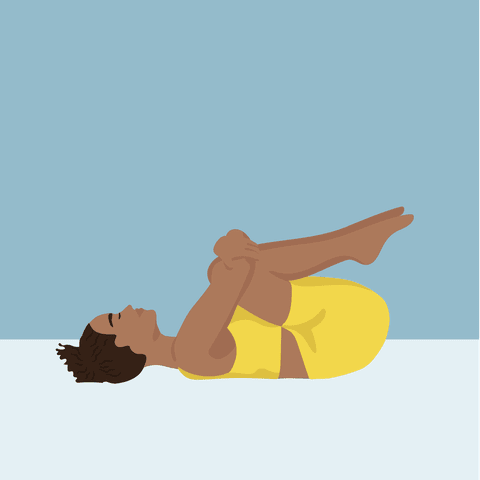
Grace Canaan
Lie face up on the floor and hug your knees up to your chest, wrapping your arms around your shins.
Keep your head on the floor as you gently rock in small movements from side to side.
Stay with this as long as it feels comfortable, breathing deeply into your belly and lower back, ideally until you feel your low back begin to release.
Related: 7 Great Stretches for Your Mid-Back
For more Real Simple news, make sure to sign up for our newsletter!
Read the original article on Real Simple.

