7 Yoga Poses to Work Those Easily Overlooked Lower Abs
In yoga, we often talk about strengthening our core, but what does that mean, exactly? Oftentimes, when people are searching for poses to work their abs, they're looking to achieve that coveted six-pack or V-cut. But all that is just aesthetics. Having a strong core has benefits that extend far beyond the way you look in a swimsuit--from improving your balance and posture to relieving lower back pain--that's why developing these muscles is so important.
If you're consistently trying to build core strength through your yoga practice, you might notice that one area of your midsection is harder to target than the others--your lower abs. Why is that? For one, "lower abs" are not actually a muscle group. What you're looking at here is actually the bottom of the rectus abdominis, or your "six-pack" muscles, which stretch from your ribs to your pubic bone. This muscle works in connection with the other abdominal muscles--the internal and external obliques, which run diagonally up and down the sides of your torso, attaching from the bottom of the ribcage to the top of the pelvis; and the transversus abdominis, which wraps around your stomach area and stretches from the sternum to the pubic bone--that make up your core. So, if you're looking to strengthen your lower abs, working all four of these muscles will get you there.
Fortunately, you don't have to do 1,000 leg lifts and endless crunches to activate the lower abdominal area. While many of us are familiar with the "burn" in our abs during an intense exercise, that might not get you the desired result. In fact, tension is the secret ingredient to strengthening and toning your muscles. Many single-leg yoga poses and twists activate all of the lower abdominal muscles, because their primary functions are to keep your torso straight, or not wobbling too far to one side in a balancing posture. While you may feel a burn while doing the poses below, noticing engagement is the most important sensation.
7 yoga poses to exercise your lower abs
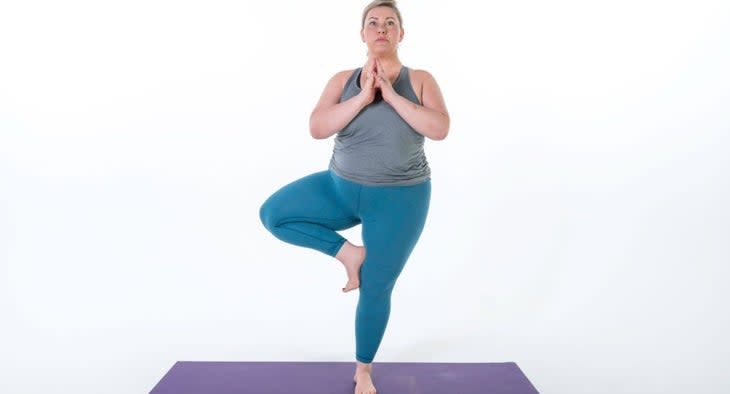
Vrksasana (Tree Pose)
In this one-leg standing posture, your obliques will be engaged to keep your torso squarely over the top of your hips, fighting the tendency to lean toward the lifted leg. The transversus abdominis also clicks on to reduce as much of the sway as possible.
To practice:
From Tadasana, bend the right knee and place the right foot high on the left inner thigh, taking the hands to the hips and keeping the standing foot pointed forward. Press the right foot and left inner thigh against each other. Allow the right knee to be as far forward in space as is needed to keep the frontal hip bones square, so there is no rotation in the pelvis. Notice if your right hip is hiked up higher than the left. If so, descend the right sitting bone toward the left heal. Keeping the pelvis squared straight ahead, carefully draw the right knee back to deepen the external rotation in the hip. Raise your arms overhead, without flaring the front ribs. If able to keep the arms straight, reach up, touch palms and take the gaze to the thumbs. Hold for 5-10 breaths.

Ardha Chandrasana (Half Moon Pose)
Half Moon is another single-leg balancing posture that requires full core engagement to keep your body steady. The obliques will be working on the side of the lifted leg to keep the ilium--or wide crest of the hip bone--in line with your shoulder instead of buckling toward the floor, and the transversus abdominis is activated to round out your pelvis. Place your lowered hand on a block for added support--keeping steady will be just as difficult, but it protects your hamstrings and obliques from over-stretching.
Try it:
Move yourself into Utthita Trikonasana (Extended Triangle Pose) on the right side, with your left hand resting on the left hip. Inhale, bend your right knee, and slide your left foot about 6 to 12 inches forward along the floor. At the same time, reach your right hand forward, beyond the little-toe side of the right foot, at least 12 inches. Exhale and press your right hand and right heel firmly into the floor, and straighten your right leg, simultaneously lifting the left leg parallel (or a little above parallel) to the floor. Extend actively through the left heel to keep the raised leg strong. Be careful not to hyperextend the standing knee: make sure the kneecap is aligned straight forward and isn't turned inward. Rotate your upper torso to the left, but keep the left hip moving slightly forward. Most beginners should keep the left hand on the left hip and the head in a neutral position, gazing forward. The body's weight should primarily be on the standing leg. Press the lower hand lightly to the floor, using it to balance. Stay in this position for 30 seconds to 1 minute. Then lower the raised leg to the floor with an exhalation, and return to Trikonasana. Switch sides.
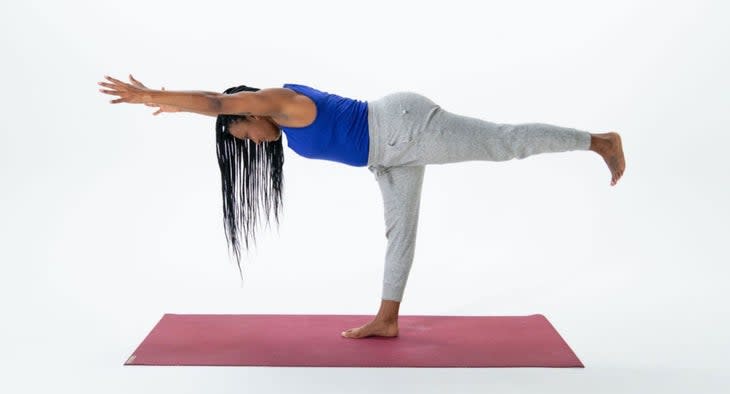
Virabhadrasana III (Warrior III Pose)
For the final (although certainly not exhaustive) single-leg balancing pose, Warrior III is a powerful option. The transversus abdominis stabilizes the torso and spine while the obliques are utilized to keep the hips over the standing leg.
To practice:
From Tadasana, exhale and step your left foot back into a high lunge position. Your right knee should be more or less at a right angle. Lay the midline of your torso (from the pubis to the sternum) down on the midline of the right thigh (from the knee to the hip crease) and bring your hands to your right knee, right hand to the outer knee, left hand to the inner. Squeeze the knee with your hands, lift your torso slightly, and with an exhalation, turn it slightly to the right. Stretch your arms forward, parallel to the floor and parallel to each other, palms facing each other. Exhale and press the head of the right thighbone back and press the heel actively into the floor to lift the back leg. The arms, torso, and raised leg should be positioned relatively parallel to the floor. Energize the back leg and extend it strongly toward the wall behind you; reach just as actively in the opposite direction with the arms. Bring the head up slightly and look forward, but be sure not to compress the back of your neck. Stay in this position for 30 seconds to a minute. Release back to the lunge on an exhalation. Repeat on the opposite side.

Vasisthasana (Side Plank Pose)
You knew it was coming! Side Plank gets your entire core fired up. All of the abdominal muscles are involved to maintain a flat back, straight legs, and a stable base.
To feel the burn:
From Adho Mukha Svanasana (Downward-Facing Dog), shift onto the outside edge of your left foot, and stack your right foot on top of the left. Swing your right hand onto your right hip, turn your torso to the right as you do, and support the weight of your body on the outer left foot and left hand. The supporting hand should be slightly in front of its shoulder. Align your entire body into one long diagonal line from the heels to the crown by firming the scapulas and sacrum against the back torso and strengthening the thighs by pressing through the heels toward the floor. If you'd like you can stretch the top arm toward the ceiling, parallel to the line of the shoulders. Keep the head in a neutral position, or turn it to gaze up at the top hand. Stay in this position for 15-30 seconds. Release and repeat to the right side for the same length of time.
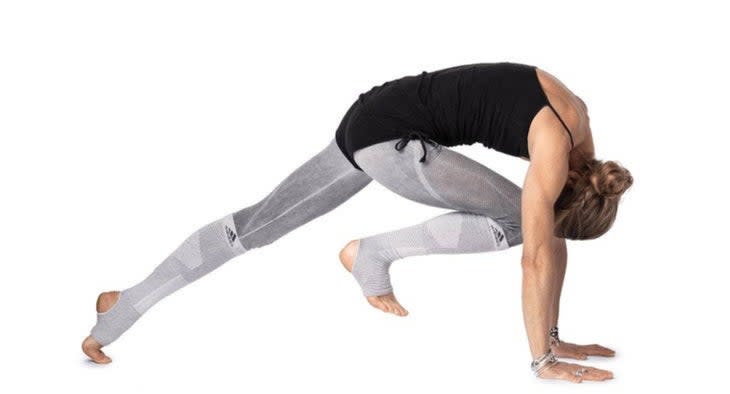
Knee-to-Nose
You may be familiar with doing Knee-to-Nose while flowing into Three-Legged Downward-Facing Dog Pose, but holding the posture is an excellent workout for your core. Your transversus abdominis is engaged to keep your back straight while tucking your pelvis forward, and the obliques fire to bring the knee up toward your face. For an added burn, you can accentuate the crunch by pulsing the knee forward instead of statically holding it.
Try it:
From Downward-Facing Dog, lift your right leg up high behind you. On an exhalation, round your spine as you bend your knee and glide it underneath your chest, bringing it as close to your nose as feels comfortable. Focus more on crunching your knee forward than rounding your neck and face down. Hold for 30 seconds to one minute. On an inhalation, extend your right leg back and straight, then come back to Down Dog. Repeat on the other side.

Eka Pada Setu Bandha Sarvangasana (One-Legged Bridge Pose)
Work your glutes and lower abs to strengthen and stabilize these key postural muscles. Your glutes and transversus abdominis work to pull your pelvis up and stay flat, while the obliques are activated to lift and hold your leg while keeping it steady in the air. Pulsing the lifted leg toward your face or up toward the ceiling are two variations that target more activation in the transversus abdominis.
To practice:
Lie on the floor, and if necessary, place a thickly folded blanket under your shoulders to protect your neck. Bend your knees and set your feet on the floor, heels as close to the sitting bones as possible. Exhale and press your inner feet and arms actively into the floor to push your tailbone up toward the pubis, firming (but not hardening) the buttocks, and lift the buttocks off the floor. Clasp your hands below your pelvis and extend through the arms to help you stay on the tops of your shoulders. Keep your knees directly over the heels, but push them forward, away from the hips, and lengthen the tailbone toward the backs of the knees. On an exhalation, lift the right knee into your torso, then inhale and extend the leg perpendicular to the floor. Hold for 30 seconds, then release the foot to the floor with an exhalation. Repeat with the left leg for the same length of time.
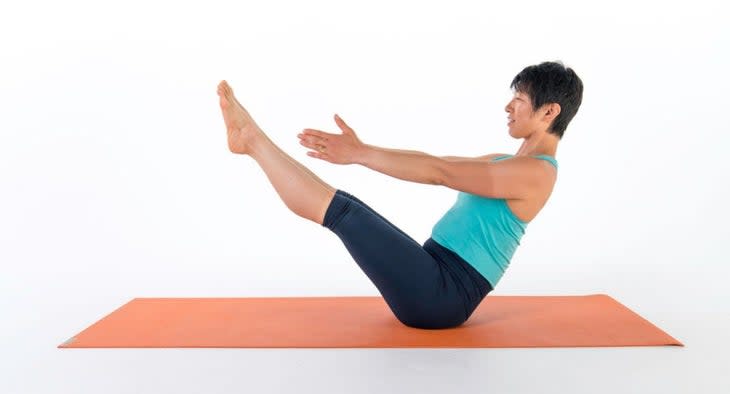
Parivrtta Paripurna Navasana (Full Boat Pose)
This is the ultimate pose for melding strength with stability. Boat Pose already gets your entire core firing to keep you from falling over, so the addition of a twist requires significant concentration to keep you steady. You can't muscle your way through this one, tuning into your breath is essential for holding the posture.
Get started:
Sit on the floor with your legs straight in front of you. Press your hands on the floor a little behind your hips, fingers pointing toward the feet, and strengthen the arms. Lift through the top of the sternum and lean back slightly. As you do this make sure your back doesn't round; continue to lengthen the front of your torso. Sit on the "tripod" of your two sitting bones and tailbone. Exhale and bend your knees, then lift your feet off the floor, so that the thighs are angled about 45-50 degrees relative to the floor. Lengthen your tailbone into the floor and lift your pubis toward your navel. If possible, slowly straighten your knees, raising the tips of your toes slightly above the level of your eyes. If this isn't possible remain with your knees bent, perhaps lifting the shins parallel to the floor.
Stretch your arms alongside the legs, parallel to each other and the floor. Spread the shoulder blades across your back and reach strongly out through the fingers. If this isn't possible, keep the hands on the floor beside your hips or hold on to the backs of your thighs. Press the heads of the thigh bones toward the floor to help anchor the pose and lift the top sternum. Breathe easily. Tip the chin slightly toward the sternum so the base of the skull lifts lightly away from the back of the neck.
On an exhalation, gently thread your left arm and shoulder back and behind you while lengthening your right arm and shoulder forward. Allow your head to follow the back arm so you're looking over your left shoulder, which will aid in twisting your torso. Hold for 30 seconds to one minute, then repeat on the other side.

