7 Ways to Stretch in Uttanasana (That You’ve Probably Never Seen Before)
This article originally appeared on Yoga Journal
There's something profoundly inviting about a pose that asks you to do nothing more than drape yourself over your lower body and be one with gravity in stillness. As blissful as Uttanasana (Standing Forward Bend) can be in that regard, I prefer to bring movement to the pose and explore the release of even more tension.
How to come into Standing Forward Bend
Before we get started, let's go over the basics of our forward fold:
Come to stand at the top of your mat, feet parallel to each other, hip-width apart. Slowly hinge at your hips to fold forward and bring your head toward the floor. If you feel any tension here, feel free to soften your knees in order to bend a little deeper into your fold. Push your body weight forward into your toes slightly and aim to compress the upper body to the lower body by bringing your navel toward your thighs. Relax your head and neck.
7 ways to feel fabulous in Uttanasana
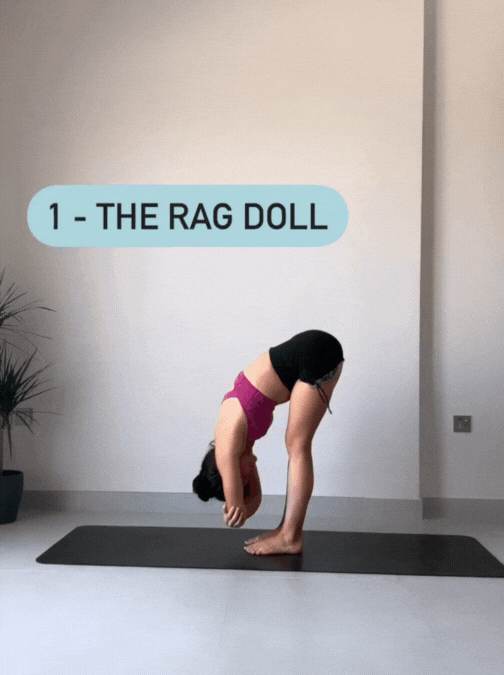
1. The Rag Doll
I usually use The Rag Doll at the beginning of class as the first standing forward bend. Holding onto opposite arms provides a slightly more intense stretch along the length of the posterior chain, which includes your hamstrings, lats, and erector spinae.
How to: Start in your Standing Forward Bend and grasp your right elbow with your left hand and your left elbow with your right hand, bringing your forearms over your head and parallel to the floor. Relax your neck and begin to sway your elbows and upper body gently from side to side. To ensure maximum benefit, bend your knees slightly to release any tension in the hamstrings.

2. The Pulse
This variant on The Rag Doll may look a little weird, but the pulsing action helps release the upper back and can also bring relief to the cervical spine.
How to: Begin in a forward fold with each hand on the opposite elbow. As you sway side to side, start slightly pulsing up and down. To do this, keep your knees soft and shift your weight to your heels. On an inhalation, lift slightly from your abs and lower back until your elbows lift about 2 inches (5cm). As you exhale, let your lower back release and your elbows once again fall to the deepest part of the fold. To feel the full benefit of this dynamic movement, be sure that your upper body, including your head and neck, is completely relaxed.
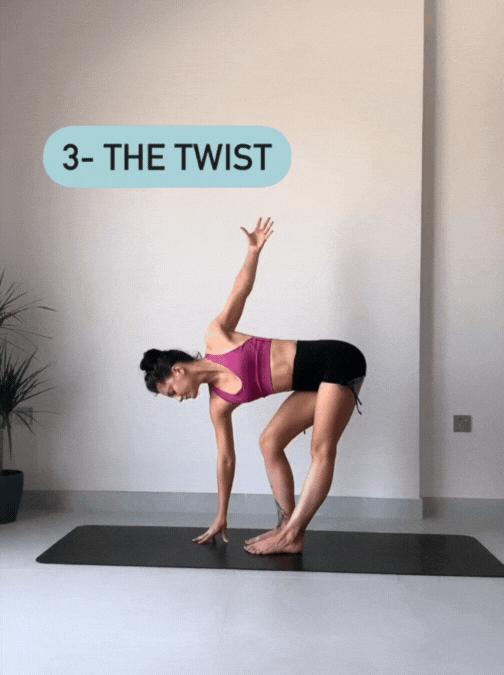
3. The Twist
This is a forward bend variation that I use as a precursor to more intense stretches in my twisty vinyasa flows. Not only does it stimulate the thoracic spine, it also sends movement love to the outer hips and lower back. It can be done with a block on the floor beneath your fingertips.
How to: Come into Uttanasana and begin to bend your right knee as you bring your right fingertips or hand to the floor or a block placed beneath your right shoulder. Lift your left arm toward the ceiling as you straighten your left leg and draw your left hip toward the back of the mat. To accentuate your twist, try to stack your left shoulder on top of your right and draw your shoulder blades toward your hips. Try not to compress the right side of the body. Instead, lift and lengthen through the obliques and send the crown of your head forward in space. Repeat on the other side.
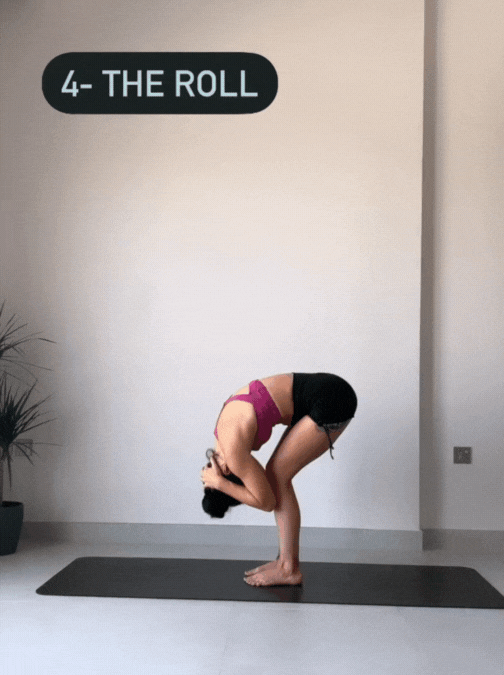
4. The Roll
A spinal roll mobilizes the spine and stretches the muscles of the entire back body, including the hamstrings and spinal extensors. This posture involves rounding your back and arching your back, so you get both extension and flexion of your spine.
How to: Start in your forward fold and interlace your fingers behind your head. Draw your elbows together so that your arms wrap around your head. Bend your knees considerably. Shift your weight into your heels and ground down through them as you roll up the length of the spine. Take your time, keeping your back rounded and slowly stacking your vertebrae on top of one another as you come up. When you come to standing, with your spine stacked and straight, open your elbows to the side and lift your chest toward the ceiling (extension). Slowly reverse the action to carry you back down to your forward fold.
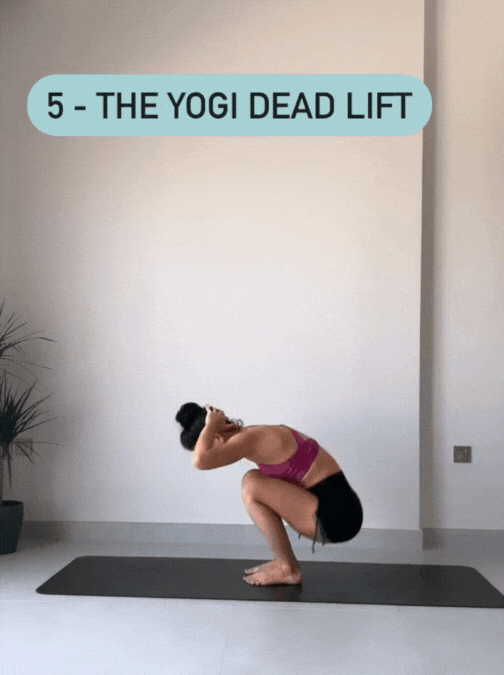
5. The Yogi Dead Lift
I love this variation on a forward fold. It helps combat the chronic overuse injury known as "yoga butt" by adding activation and strengthening to the hamstring tendons.
How to: Begin standing, feet hip-width apart and parallel to each other. Interlace your hands behind your head. Bend your knees and lower your hips into a full squat, keeping your weight in your heels. Then, in one fluid movement, lean forward and let your upper body fold toward the floor as you lift through the sitting bones to straighten your legs. Push your heels into the ground, engage your abs, and lift your torso, letting your chest lead as you come to standing with a straight spine.
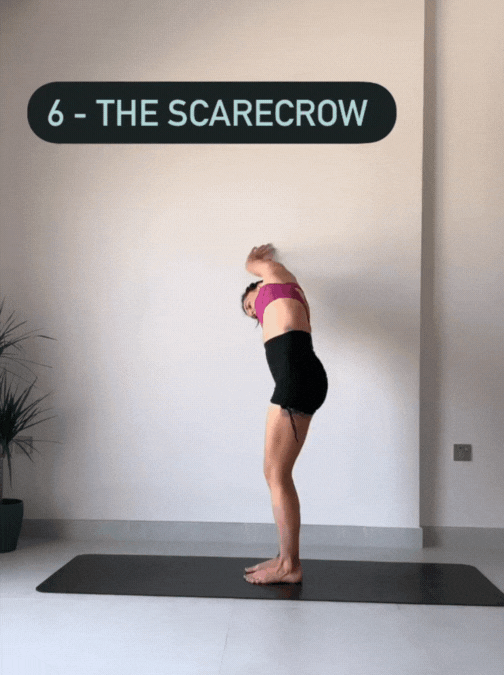
6. The Scarecrow
This is not your conventional yoga pose, I know. Despite its silly name, The Scarecrow is serious in the work it does for the body. It guides you into an exploration of the sides of your body as well as the connection between the upper and lower halves of the body. Remember to keep your knees slightly bent as tension in the back body may stop you from accessing the lower back quadratus lumborum (QL) muscles.
How to: Begin standing, feet hip-width apart and parallel to each other. Lift your left arm toward the ceiling and begin to bend laterally to your right side, resting your right hand alongside your right thigh. Bend your knees slightly and float your left arm down toward the right side of the mat. In a sweeping action, let your left fingertips graze across the front of your mat, passing through center in your forward fold. Continue to sweep to the left and lift into a side bend on your left side until your left hand reaches the side of your left thigh to create an arc. Lift your right arm alongside your ear with your hand draping over to the left side, finding lateral flexion on the opposite side. You can repeat this action as many times as feels necessary.
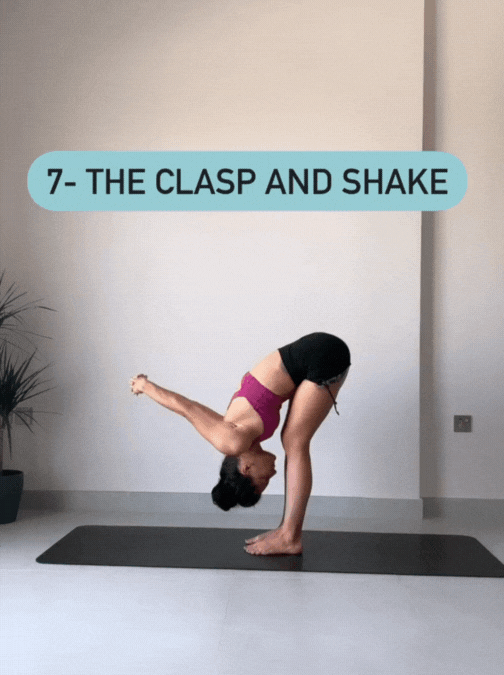
7. The Clasp and Shake
This variation of Uttanasana brings extra opening to the chest and releases the lats.
How to: Come into standing at the top of the mat, feet hip-width apart and parallel to each other. Interlace your fingers behind your back. Bend your knees and begin to hinge at your hips as you come into your fold forward with your belly close to or resting on your thighs. Squeeze your shoulder blades together as you reach your fists toward the floor. From here, bend your right knee and bring your right shoulder toward it while straightening your left leg and lifting your left shoulder toward the ceiling. Alternate between sides.
About our contributor
Sarah White is a continuing-education provider based in Dubai. Her creative sequencing style is born from her own curiosity and exploration of the human body and many other movement disciplines. To learn more about Sarah, her courses, or upcoming Sequencing Teacher Trainings, check out withsarahwhite.com or follow her on instagram @Sar_white.
For exclusive access to all of our fitness, gear, adventure, and travel stories, plus discounts on trips, events, and gear, sign up for Outside+ today.
