6 Ways to Practice Chaturanga
This article originally appeared on Yoga Journal
When I tell people that I practice yoga, I often get the response, "I've tried yoga but I'm not good at it!" The concept of being "good" or "bad" at yoga has always bewildered me, and when I try to reassure people that it's not possible to be bad at yoga, I'm often met with resistance. There seems to be a common misconception that our "success" at practicing yoga is based on how capable we are at getting into physically demanding postures.
This couldn't be further from the truth. When I roll my mat out to practice yoga, I'm there to be good to myself rather than be good at the physical practice itself. Yoga benefits each of us, regardless of how strong or flexible we think we are. There truly is something for everyone with yoga--including variations for each pose to meet the needs of your body.
Chaturanga Dandasana, often referred to as simply Chaturanga, is an example of a pose that many students mistakenly believe they are "bad" at doing. A recurring posture in vinyasa flow classes, Chaturanga has its basis in the traditional practice of Surya Namaskar (Sun Salutation A). But it's commonly regarded by students as merely a transition from Plank Pose to Urdhva Mukha Svanasana (Upward-Facing Dog Pose) rather than an asana in its own right.
Practicing the classic version of Chaturanga requires you to slowly lower your torso from Plank Pose toward but not all the way to the mat by bending your elbows while maintaining a neutral spine. The traditional version of Chaturanga can be particularly challenging for anyone who is still developing core and arm strength, working with a shoulder or wrist injury, or experiencing muscle tightness across the chest.
Following are some variations of the pose that allow you to experience a similar shape while accommodating your unique body.
6 Chaturanga Dandasana variations
Preparation
As you're working up toward Chaturanga, practice Plank Pose. It can help you build the required core strength. Bhujangasana (Cobra Pose) will help you create openness across the front of your chest. Dolphin Pose and Forearm Plank will help you build strength in your shoulders.
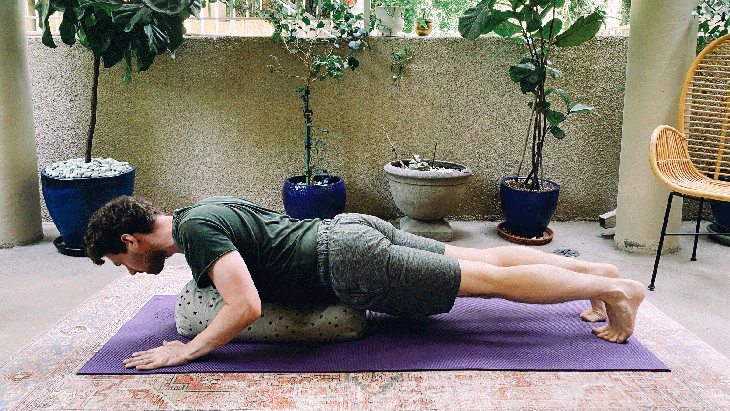
1. Chaturanga with a bolster
A common tendency in Chaturanga is to lower yourself too close to the mat, which can overtax your shoulders. Providing a tangible reminder of where to stop can be helpful. Place a bolster lengthwise along your mat so that when you are in Plank Pose, the bolster is directly below your chest. From Plank, slowly bend at your elbows so that your torso lowers toward the bolster. Keep a straight line from your heels to the top of your head. As you lower, imagine you are dragging your hands back toward your feet to encourage your body to move forward as well as down. At the same time, push through your heels to engage your legs.
Tip
When you come into Plank Pose, experiment with placing your hands slightly wider than shoulder-distance apart to see if that helps you feel more stable and comfortable.
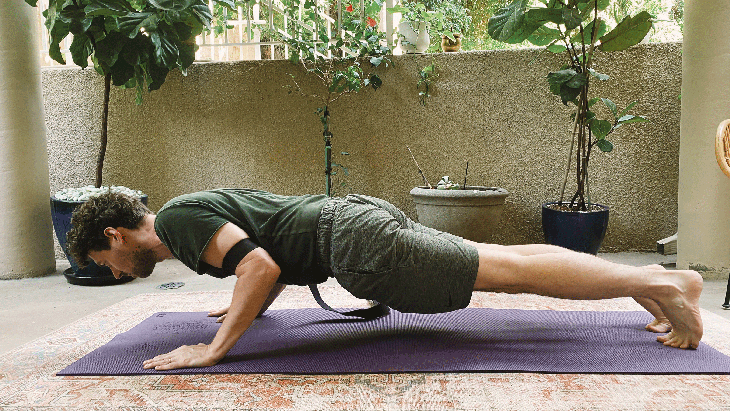
2. Chaturanga with a strap
Often our elbows want to move away from the sides of the body as you bend them and lower yourself. To prevent this, place a looped strap around your upper arms, just above your elbows. When you pull the strap taut, your upper arms should be roughly shoulder-distance (or slightly wider) apart. From Plank Pose, slowly bend at your elbows until your torso presses against the strap.
Tip
Your elbows falling outward isn't necessarily the end of the world. Instead of focusing on your elbows staying in, try to focus on drawing your elbows back toward your heels. This action works synergistically with the top of your head reaching forward.
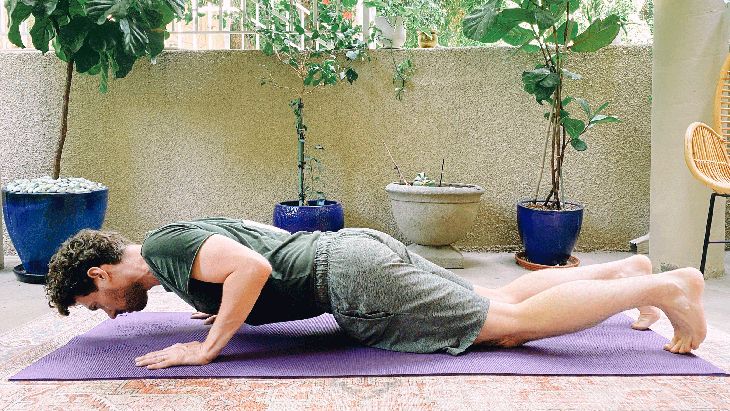
3. Half Chaturanga with knees down
Lowering your knees to the mat lessens the pressure on your wrists and shoulders. In Plank Pose, lower your knees to the mat but keep your arms straight. Slowly bend at your elbows to lower your torso toward the mat, pausing at the place where your waist reaches the height of your elbows.
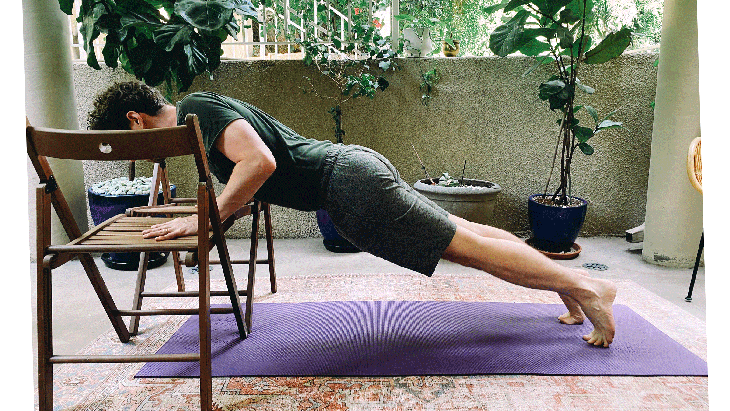
4. Incline Chaturanga on a chair
Practicing Chaturanga at an incline results in less pressure on your wrists and shoulders. Place your hands on the back of a chair. (A kitchen countertop works, too.) Slowly bend at your elbows so that your torso moves toward the chair (or countertop), keeping a straight line from your heels to the crown of your head.
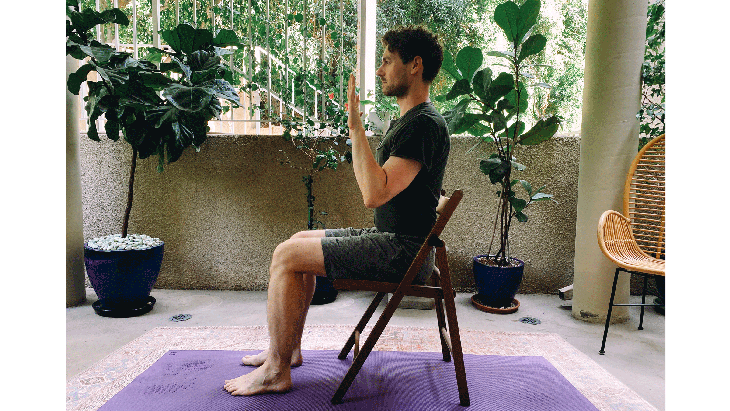
5. Chaturanga in a chair
In this variation, you experience the action of Chaturanga in your upper body without bearing weight in your wrists and shoulders. Sit in a chair with your arms extended straight in front of you and horizontal to your thighs. Draw the tops of your hands toward your forearms as if you were pressing your palms into an imaginary wall. Keep your hands in this position as you slowly bend your elbows and draw your arms back along the sides of your waist.
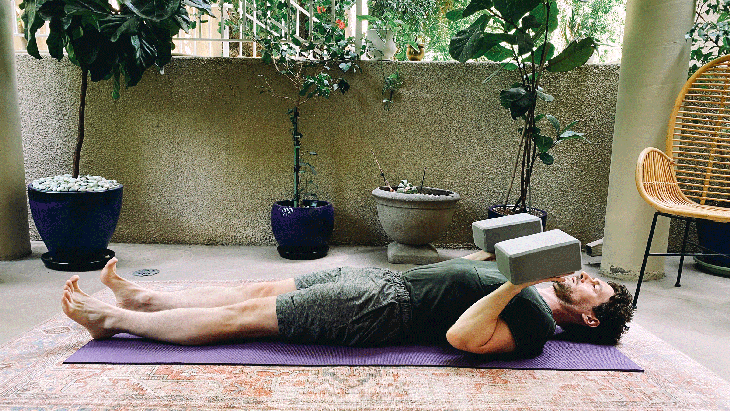
6. Chaturanga on your back
This is another opportunity to practice the shape of Chaturanga without the pressure on your wrists and shoulders or the demand on your arms and shoulders. Lie on your back and reach your arms straight toward the ceiling so that your hands are approximately shoulder-distance apart. Ask someone to place a foam block on each palm to encourage you to keep the backs of your hands drawing back, toward your forearms. Slowly bend your elbows and bring your upper arms alongside your chest. You can progress this variation by replacing the foam blocks with heavier cork blocks and then wooden blocks or heavy books.
About our contributor
Andrew McGonigle has studied anatomy for more than 20 years. After initially studying to become a doctor, he moved away from Western medicine to become a yoga and anatomy teacher. He shares his knowledge of the body and the ways it moves in yoga teacher training courses throughout the world and leads his own Yoga Anatomy Online Course. His second book, The Physiology of Yoga, was published in June 2022. To learn more about Andrew, check out doctor-yogi.com or follow him on Instagram @doctoryogi.
For exclusive access to all of our fitness, gear, adventure, and travel stories, plus discounts on trips, events, and gear, sign up for Outside+ today.

