5 Mistakes to Avoid When Painting Your Appliances (Because Everyone Is Doing It)
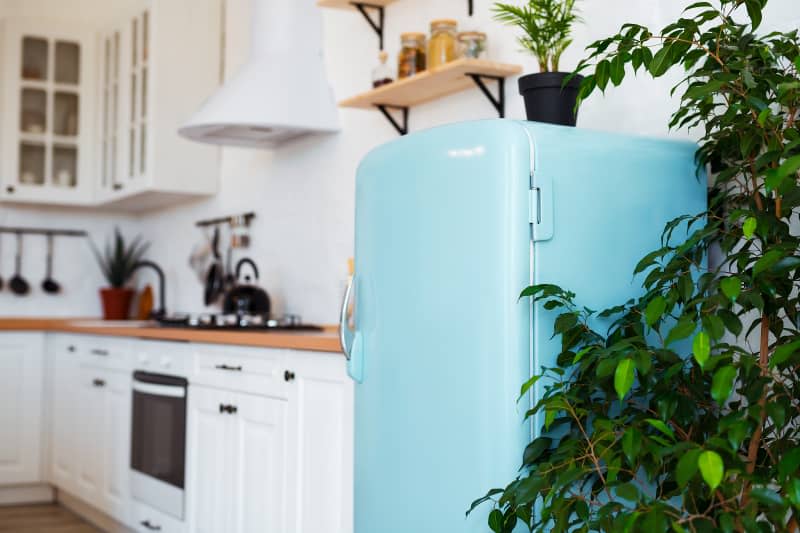
We all want a kitchen that matches our own personal taste and style, and one simple way to do that is by opting for colorful appliances — one of 2024’s hottest kitchen design trends. But kitchen appliances are a major expense, so it makes sense that you might hesitate to replace a perfectly functional refrigerator or stove just because you’d prefer another color. One option? Paint your appliances!
That’s right — you can paint most major appliances if you’d like to change the look without replacing them! Whether you choose a dark color to give your appliance a chic, modern look, or opt for a trendy turquoise or light pink for a more vintage vibe, there are a few things you need to know. I spoke to experts to walk you through exactly how to do this, why you may want to (or not want to), common mistakes people make, and more. While it isn’t the easiest DIY project in the world, with a bit of preparation, a dash of bravery, and this handy guide, you can give that old refrigerator, stove, or even a dishwasher a facelift in the span of a single day.
The Pros and Cons of Painting Kitchen Appliances
This DIY project isn’t for everyone. “Painting appliances can be a game-changer for your kitchen or laundry room, but it’s not a decision to take lightly,” says Riley Annen, real estate specialist and property investor at Companies That Buy Houses.
If you’re willing to invest a bit of time and elbow grease, painting your current appliances can upgrade your kitchen without the cost of replacing an appliance that works just fine. But before you get started, there are some considerations to think about. “Consider the pros and cons, do your prep work, and you’ll be well on your way to a fresh new look,” Annen says.
Pros
Savings: You can save hundreds, maybe even thousands, of dollars by painting your kitchen appliances instead of replacing them. Consider the fact that even a basic refrigerator retails for about $700, while the materials needed to paint an appliance clock in around or under $100.
Customization: “Painting lets you customize your appliances to fit your vibe precisely, making your space feel uniquely yours,” Annen says.
Environmental impact: “By painting your appliances instead of tossing them out [and replacing them], you’re doing your part to reduce waste and be more environmentally friendly,” says Annen.
Cons
Durability: If you invest the time to do it right, your painted appliances will look amazing — but you can’t expect the finish to be as durable as stainless steel. After painting appliances, “you might see chips, scratches, or fading over time, especially in high-traffic areas like the kitchen,” Annen warns.
Longevity: “Depending on factors like the quality of paint and how much wear and tear your appliances see, you might find yourself touching up or repainting more often than you’d like to keep things looking fresh,” Annen says.
Prep time: To achieve the best outcome, you’ll need to invest the time and follow the step-by-step process exactly. It isn’t a quick fix, Annen advises.
Common Mistakes People Make Painting Kitchen Appliances
Before you roll up your sleeves to get started, it’s good to be aware of a few common mistakes or pitfalls that can seriously affect your finished product. After all, the last thing you want is to end up ruining your kitchen appliances!
1. Failing to properly prepare the surface.
Thoroughly cleaning and sanding your appliance according to the instructions for that particular appliance can go a long way toward ensuring that the new paint sticks like glue and looks professional, Annen says.
2. Not using primer.
After you finish preparing the surface of your appliance, you’ll need to apply a primer. “This step is crucial,” Annen says. “A good primer designed for metal surfaces sets the stage for a smooth, long-lasting finish.”
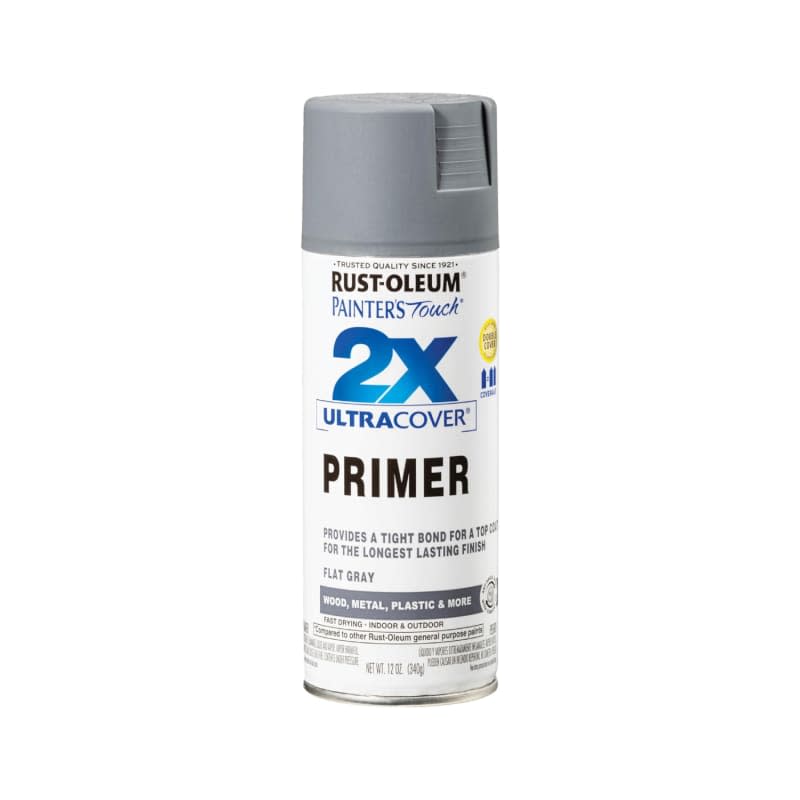
Rust-Oleum 334017 Painter's Touch 2X Ultra Cover Spray Primer
3. Painting the wrong appliances.
Most appliances found in the kitchen or laundry room can be painted (even small ones, like a KitchenAid mixer). But there are some appliances that simply don’t hold up as well, and others that can be downright dangerous to attempt to paint by yourself. In these cases, it’s best to simply spring for a new one. Don’t try to paint a microwave or any type of plastic appliance (like a plastic toaster), as the high heat can damage the paint.
4. Using the wrong type of paint.
Because latex or oil-based paints can create dangerous volatile compounds when exposed to high heat, these paints aren’t suitable for any appliance that heats up, like a stove or oven. Rather, most large home stores sell appliance paint or appliance spray paint that are safe for use on most appliances. Make sure to always read the instructions before using.
5. Expecting the finish to last a long time.
As mentioned above, a painted appliance surface simply won’t last as long as the factory finish. But it can be a great way to give your kitchen an inexpensive facelift if you’re willing to touch it up every once in a while.
How to Paint Kitchen Appliances
For the best outcome, take your time and follow the steps below when painting kitchen appliances. It’ll ensure your DIY project turns out looking showroom-chic instead of, well, shabby.
1. Preparation
Thoroughly clean the surface of the appliance to remove dust, dirt, and grime. This will be especially critical with appliances that are regularly exposed to food and grease, like an oven or a stove.
2. Sanding
Depending on what type of surface your appliance has, you may need to use a very fine grit sandpaper to prepare the surface. This will help your appliance “take” the paint better, for a longer-lasting finish. Don’t forget to wipe the surface down with a soft cloth after sanding to remove any grit.
3. Priming
Perhaps the most important step in painting kitchen appliances is priming the surface. This step is crucial for achieving a smooth, long-lasting finish, Annen says. Talk to your local hardware store employees about which primer is the right choice for your appliance.
4. Painting
For the best results, Annen advises using a durable enamel or epoxy paint, and layering it on using several thin coats for a flawless finish.

