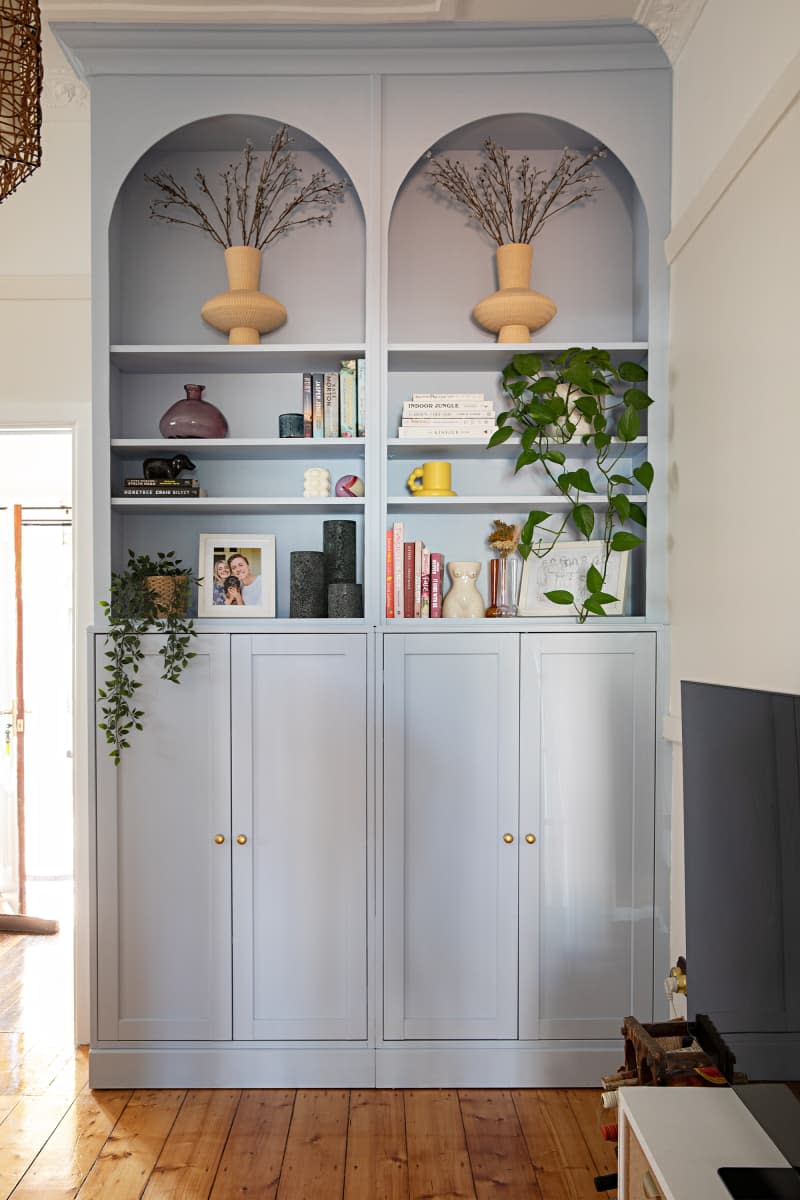
5 Golden Rules for a Flawless IKEA BILLY Bookcase Hack

Furniture hacks are one of the best entry points into DIY projects, as they require only modifying something that’s already built (rather than creating something completely from scratch). And among furniture hacks, IKEA hacks are famous. Not only are there tons of completely hackable IKEA products on offer, but there also seems to be an endless supply of inspiring IKEA hack projects from intrepid DIYers online that can serve as your guide. And one of the most popular pieces to hack among those DIYers? The iconic IKEA BILLY bookcase.
The BILLY bookcase has been among IKEA’s top sellers in the past decade, and no wonder: It’s reasonably priced and wildly adaptable. “I’ve done more BILLY bookcase DIYs than I can count,” says designer Jessica D’Itri Marés of Renovate 108. “I love how versatile they are. They’re so basic in shape and detail that they can fit into virtually any style of home.”
The BILLY bookcase is a perfect hack project for experienced DIYers and newbies alike — you can easily design the project to fit a range of skill levels. And, more importantly, this is a hack that’s supremely practical: The BILLY bookcase is a hero if you’re ever looking for more storage (which, if you are anything like me, is always). But there are a few steps that you can take to help your BILLY hack look like it was done by a pro. Here, find the five golden rules for the perfect IKEA BILLY bookcase hack, according to two DIY pros.

Rule One: Don’t Cut Assembly Corners
While a standard BILLY bookcase will cost less than $100 to take out of IKEA’s doors, don’t think that these pieces aren’t durable. “My parents still have theirs, which they bought in 1990,” D’Itri Marés says. “My aunt still has one with all of our childhood heights marked on the side in her office.”
Knowing that these bookcases can be treated like heirlooms in some ways, D’Itri Marés offers up the first golden rule: If you treat a BILLY bookcase with respect, it’ll last.
“It’s simple: Follow the directions and use all of the nails — even add a few more if you want,” she says. “If you don’t, you will compromise the vital structure that supports the sides and keeps it from collapsing like a box. Similarly, if you’re putting two or more bookcases side-by-side, then screw them together for a more finished and secure look. And lastly, I always think it’s a good idea to secure the bookcase to the ceiling, too.”
If you’re a beginner, then stick to IKEA’s recommendation of only using a hammer and the provided nails to put the bookcase together. But if you’re an experienced DIYer who’s comfortable with power tools, like D’Itri Marés is, then you can assemble the bookcase with those as well. “I always use one when assembling IKEA furniture,” she says. “You need the hammer to nail in the backing and the screwdriver to assemble the box. Bonus points for a measuring square to keep your corners at 90 degrees before you nail in the back.
Rule Two: Know the BILLY’s Limits
Although the premise of DIY means that you can create to your heart’s content, the reality is that some environments are better for some materials than others. Before you get your mind set on using a BILLY bookcase in a specific place, you should come to grips with its limits.
“Keep in mind that the BILLY is made from particleboard,” says DIYer Trisha Sprouse. “It’s not going to have the same quality or durability as a real wood bookcase. For example, if you put too much weight on the shelves, they can sag. It’s also not an ideal shelf to use in a space that has high humidity, such as a bathroom, because particleboard can warp with excess moisture.”
If you’d like your project to stand the test of time, these bookcases will do best in temperature- and moisture-controlled environments with consistent temperatures, like living areas and bedrooms. Position them elsewhere with caution!
Rule Three: Don’t Get Tripped Up by the Existing Finish
The BILLY bookcase comes in a range of colors, and if you like the standard shade of your choice, then there’s no need to worry. But if you’re more interested in the structure than the color, you can cover this bookcase with whichever paint strikes your fancy. But beware: You need to prep the surface first.
“You should always prime before painting — even if you’re using paint with a built-in primer,” Sprouse says. “IKEA furniture, particularly their laminate and veneer pieces like the BILLY, have a very slick surface, which makes it hard for paint to adhere properly.”
If you cover the bookcase in a fresh coat of paint without prep work, which Sprouse admits is tempting, it’s likely that the paint will peel off almost immediately after it’s dried. “I’d recommend a shellac-based primer like Zinsser BIN, which I’ve personally had great results with,” she says.
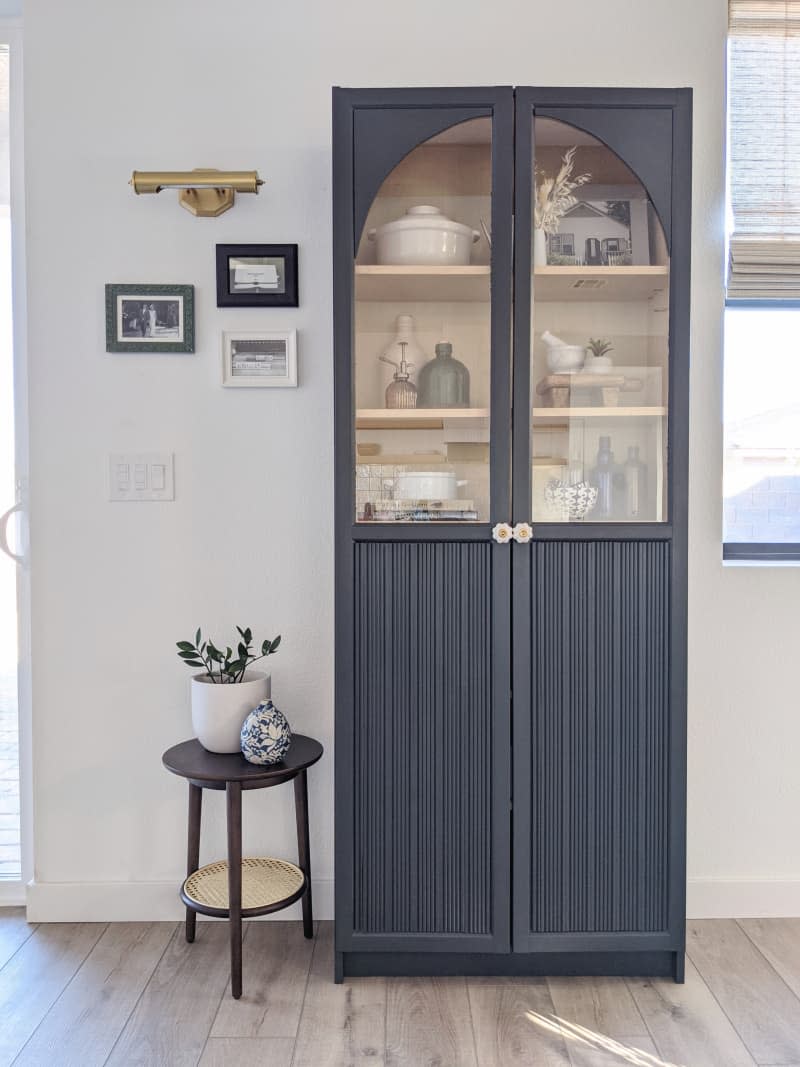
Rule Four: Pay Attention to Lighting
D’Itri Marés has used a BILLY bookcase as a food pantry, noting that “they’re the perfect depth for cereal boxes.” She’s used them as a room divider, ensuring that the backings are on real tight. She’s even made use of them as a shoe organizer, among many other projects. But the reason why she says that they can sometimes look more promising in the store comes down to one important detail.
“Don’t sleep on the lighting,” she says. “If you’re wondering why BILLY looks so nice and cozy in the showroom but lackluster at home, it often comes down to lighting.”
To keep your space from losing out on lighting or other electric needs, cut holes in the back of a bookcase that might otherwise conceal one. “Double-check your measurements before cutting in — I’ve even used a steak knife in a pinch,” D’Itri Marés says. Then you will have an easy way to plug in your lighting and hide any wires, including those of other electronics.”
Rule Five: Bring in Painter’s Tape as a Protector
Since you’ll want to keep mistakes to a minimum, it’s a good idea to commit any safety or preventative tips to memory. And when it comes to drilling, here’s one rule Sprouse never forgets to follow.
“Put a piece of painter’s tape on the surface where you plan to drill first,” she says. “This will keep your drill bit from skidding across the slick surface, and it’ll help protect the surface from splintering or cracking.”
Practice makes perfect when it comes to undertaking any type of do-it-yourself project, but an IKEA BILLY bookcase is a great place to start. After all, so many creatives have come before you, and soon you may be able to lend your own tips, too.

