Try These Easy Foam Roller Exercises to Relieve Any Kind of Muscle Pain
If you wake up every morning with an aching lower back or find yourself rubbing sore shoulders several afternoons a week, you’re far from alone. An estimated 50 million Americans suffer from some kind of chronic pain, according to the Centers for Disease Control and Prevention (CDC). So you’re in good company—though that doesn’t make it any less of a pain in the, well, neck.
Good news: The solution might be just an inexpensive tool and a few minutes away. Physical therapists have long turned to foam rollers (the long, cylindrical black or blue pieces of foam you’ve likely seen at the gym) to release tension and, in the process, wipe out aches.
What are the benefits of foam rolling?
Foam rolling, also known as “self-myofascial release,” helps release muscle tension by making the top layers of your tissues more flexible. “There’s a layer of tissue called fascia that lies on top of the muscles and connects your muscle groups,” explains Brian Gurney, D.P.T., C.S.C.S., a trainer, board-certified sports clinical specialist, and physical therapist at BeFit Therapy in New York City. “Typically what happens is that tight, sensitive trigger points develop in the fascia. Using the foam roller helps release those points and soft tissue adhesions.”
Pairing foam roller exercises with stretches will open the unrestricted tissues, and you might just find yourself moving more freely and your pain relieved.
Foam rolling also helps increase your range of motion because the muscles around your joints aren’t so tight. Most trainers recommend you foam roll before you exercise to wake up the muscles as well as post-workout to prevent soreness.
Kym Nolden, C.P.T., a NASM-certified exercise specialist, also loves foam rolling to help even out any muscle imbalances that are causing you pain. For example, if your quads are tight, chances are they are doing more work than they need to, and your hamstrings—which can help with the load—are a bit asleep. This combo can lead to cranky knees.
“So, I would start foam rolling to release the quad, then flip over to do some bridges which will activate the hamstring,” says Nolden.
Combining foam rolling with stretching and strengthening exercises can open a whole new world of pain-free mobility for you. One word of caution, though: If your pain is sharp or tingling, lasts more than a week, or started after some kind of traumatic incident, see your doctor. A doctor can advise about more serious muscular or skeletal injuries while a physical therapist can analyze your movement to pinpoint the problem.
Otherwise if your pain is:
achy
comes and goes away
or feels better with exercise...
...know that “those are signs it’s an issue with tightness in soft tissue that’s restricting your mobility and that foam rolling can help,” says David Reavy, P.T., O.C.S., a physical therapist and founder of React Physical Therapy in Chicago.
Which foam roller exercises relieve pain?
First, you need a foam roller, which range from cushy-soft to denser models. It all depends on how sensitive your muscles are to touch and how deep you’d like your massages. So if you’re considering buying one, talk to your physical therapist for a recommendation.
Gurney likes the MELT Method Soft Roller for something gentler and the TriggerPoint Carbon Foam Roller if you prefer a thicker option to get deep into the tissues. Prevention editors also back TriggerPoint, and we even named the brand’s Grid Foam Roller a 2021 Fitness Awards winner for its lightness and durability.
For each foam roller exercise below, roll for 30 to 60 seconds, pausing and letting the muscle relax around the roller when you hit a tight or tender spot. Remember: Foam rolling should not cause intense pain. If it does, that’s your cue to let up or stop. For extra relief, you may also want to perform a stretch that targets the muscle you’re loosening up. (For more on that, check out our favorite flexibility exercises.)
1. Lateral quad massage
Great for: quad tightness, knee pain
How to do it: Place the foam roller on the ground perpendicular to your body, then lay the right side of your thigh on top of it. Keep the right leg straight with your left foot close-to-flat on the floor. Your left hand or forearm will be on the ground to give you extra support and leverage. Next: Rotate your body slightly towards the floor to target the outside muscle of the quad then slowly roll back and forth to massage. Switch to the other leg.
2. Adductor massage
Great for: groin tightness, knee pain
How to do it: Lie with your stomach on the ground with the foam roller parallel besides you. Lift your torso up through your hands. Keep your right leg straight behind you and bend your right leg to about 90 degrees. Lift your right leg and place it on top of the foam roller. Shift your weight back and forth as the foam roller massages the length of your groin. Repeat on the opposite side.
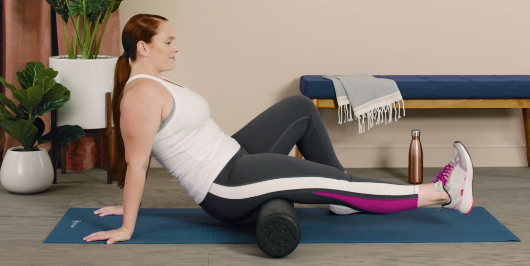
3. Hamstring roll out
Great for: hamstring tightness, knee and back pain
How to do it: Sit on the floor with your legs straight in front of you. Grab your foam roller and place it underneath your thighs. Place your hands behind you for support. Bend your left knee so that your left foot is flat on the floor. Begin shifting your body forward and back as you move the foam roller from the lower part of your butt to just above the knee. (Never foam roll behind the knee as to avoid irritating the joint.) For a deeper massage you can cross the left leg over the right. Make sure to give the left leg some love after your done loosening up the right.
4. Lat smash
Great for: shoulder pain
How to do it: Lie down on your right side with the foam roller perpendicular to your torso and right beneath your armpit. Extend your right arm so that it’s closer to your ear and let the foam roller sink into the muscle. You can roll backwards and forwards or plant your left foot into the floor and use your left leg to help you move the roller up and down. When you’ve finished, flip over to the other side.
5. Oblique massage
Great for: ab and back pain
How to do it: Lie down on your right side with the foam roller perpendicular to and beneath your abdomen. Place your right forearm on the floor and your right leg straight with your left heel flat on the ground. Slowly rock forward and back as you massage out the obliques. You can even move up and down to get other areas of the side body. When you’re ready switch to your left side.
6. Tricep smash
Great for: shoulder and elbow pain
How to do it: Kneel (or lie down facing the ground) and put the foam roller horizontally down in front of you. Place the back of your right upper arm on top of the roller and it sink into the muscle. Stay here then flex and extend your elbow as you work into the tricep. Once you feel like the muscle is relaxed, move the foam roller to another area of the tricep. Once you’re done, switch to the opposite arm.
7. Rhomboid massage and chest opener
Great for: upper back pain, pec/chest tightness, shoulder pain
How to do it: Place the foam roller vertically on the floor and lie your head, back, and butt upon it so that you are fully supported. Bend your knees and plant both feet into the ground. Cactus those arms so that your hands are by your ears, elbows bent at 90 degrees. Bring the arms as close to the floor as you can. Hold for 2 seconds then bring your arms together. Repeat until you’ve reached your desired massage time.
8. Upper back extension massage
Great for: upper back pain, shoulder pain
How to do it: Lie down on your back, knees bent with your feet on the floor. Grab your foam roller, sit up, and place it below and parallel to your upper back. Hug yourself then extend your back over the foam roller. Come back up. (Do not let the foam roller roll!) Repeat until you feel your back relax. Pick up the foam roller and place it higher or lower on your upper back. Repeat the process until you’ve covered the whole region.
9. Regular calf roll out
Great for: Achilles, heel, foot, and knee pain
How to do it: Sit on the ground with your legs straight out in front of you. Put the foam roller beneath your right calf and cross the left leg over the right to add pressure. Place your hands behind you for leverage then begin shifting your weight back and forth to massage the calf. If you need less pressure, place your left foot on the floor. When you’re satisfied switch to the other leg.
10. Kneeling calf massage
Great for: Achilles, heel, foot, and knee pain
How to do it: Begin in a kneeling position with your butt on your heels. Sit up a bit, grab your foam roller and place it in between your thighs and your calves. Sit down and let the roller sink into your calves. You can shift your hips left to right to hit different angles or you can sit until you feel your muscles release. This can be intense so if it’s too much pressure, opt for the regular calf roll out option.
11. Lateral shin mobilization
Great for: shin splints
How to do it: Place the foam roller in front of you horizontally. Then get into a plank position above the roller. Bring your right knee up to place the outside of your shin on top of the roller. Shift your body up and down so that the roller massages the length of your shin. Make sure to repeat on the left side.
12. Foot roll
Great for: foot pain
How to do it: From a kneeling or standing position step your right foot onto a foam roller that is horizontal to you on the floor. Let your foot curve over the roller as you slowly move it back and forth. When those 30-60 seconds are up, switch to the left foot.
Go here to join Prevention Premium (our best value, all-access plan), subscribe to the magazine, or get digital-only access.
You Might Also Like
