34 Creative Easter Egg Ideas That Are Easy and Fun
Go ahead and ditch the boring dye kit.
When it comes to Easter egg coloring, sometimes the easiest ideas are the best—especially if you're decorating with kids. Sure, elaborate Easter egg designs are stunning, but often require a long list of supplies, a steady hand, and a crafty eye. Fortunately, these Easter egg ideas turn out just as pretty.
Whether you want to try homemade egg dye or take the no-dye route, these clever ideas have you covered for all your Easter egg needs. It may even surprise you by how easy and mess-free some are.
After boiling Easter eggs, picking the right colors and designs for your spring-time creations can be a fun, playful activity. When you focus on the process, it doesn't matter what the final outcome is, because you had a good time. With these decorations, you'll enjoy a fun Easter tradition and have an beautiful collection of eggs to show off.
Related: 12 Easy Steps to Pulling Off an Epic Easter Egg Hunt
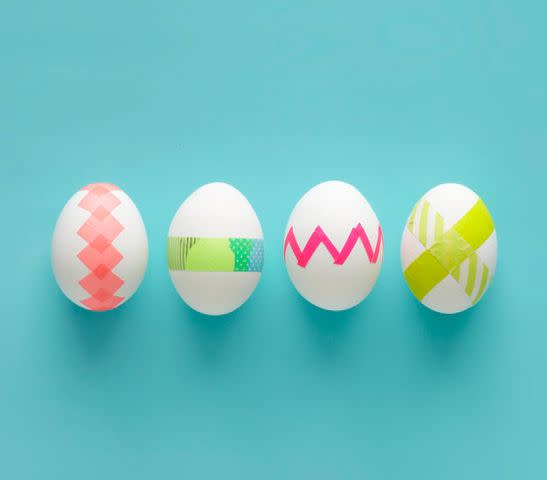
Confetti Easter Eggs

This decorating idea works with dyed and undyed eggs (in case you want to skip the dyeing process altogether).
What you'll need:
Hard-boiled eggs
Washi tape
Scissors
How-to:
Cut small shapes out of the washi tape, like triangles or lines.
Arrange the washi tape stickers on each egg to create a fun and colorful confetti-esque pattern.
Marbled Indigo Eggs
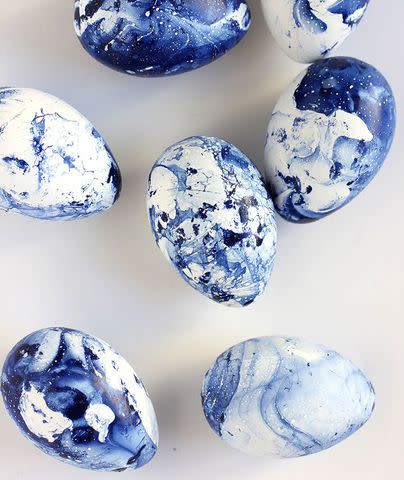
Photo: Alice & Lois
Marble is definitely having a moment in home decor, so why not apply it to your Easter eggs? The deep indigo makes each egg pattern reminiscent of shibori (a Japanese tie-dye technique), so it's even more on-trend. When you're dyeing the eggs, each design comes out differently, which makes it perfect if you mess up the first couple of times. All you need is water and blue nail polish to create the swirly look.
Photo and idea from Alice & Lois. See the how-to here.
Cactus Easter Egg
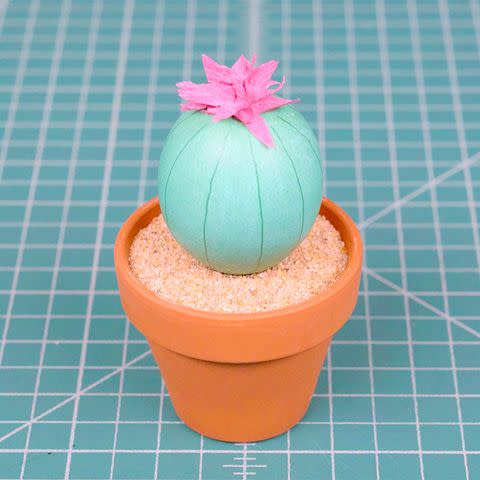
Few Easter egg ideas are as cute as this houseplant-inspired one and, fortunately, it's an easy craft, too.
What you'll need:
Vinegar
Warm water
Green food coloring
Hard-boiled egg
Mini terracotta pot
Masking tape
Sand
Green marker
Pink crepe paper or tissue (optional)
Glue dot (optional)
How-to:
Create the dye bath: Pour 1 cup hot water and 1 tablespoon white vinegar in a wide cup or small bowl, and then stir in 20 drops green food coloring.
Soak the egg to your desired hue, remove, and then pat-dry with a paper towel.
Use a fine-tipped dark green permanent marker to draw spikes or lines.
Cover the hole at the bottom of the terracotta pot with masking tape, fill the pot with sand, and then nestle the egg in it.
Optional: Cut a flower from crepe paper and attach it to the top with a glue dot.
Craft developed by Blake Ramsey.
Marbled Easter Eggs

These pretty marbled Easter eggs take less work than you think, and they're super bright so they'll be easy to spot during your Easter egg hunt. Their secret ingredient: shaving cream.
What you'll need:
Baking pan or plate
Shaving cream
Liquid food coloring
Toothpick or chopstick
Hard-boiled eggs
Drying rack
Paper towels or cloth
How-to:
Cover a baking pan or plate in a layer of shaving cream.
Add stripes and dots of assorted food coloring to the pan, and then use a toothpick or chopstick to swirl colors throughout the shaving cream.
Roll each egg around in the colored shaving cream, leaving a thick layer of shaving cream on the eggs.
Set eggs on a drying rack or plate, and let dry overnight (or at least several hours).
Wipe off eggs.
Craft developed by Morgan Levine.
Natural Easter Eggs
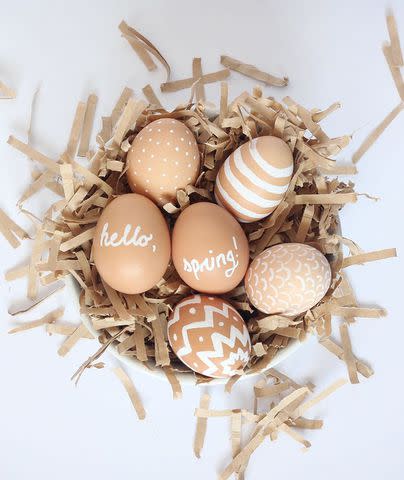
Photo: Heather Murphy
This idea works best on brown eggs, so the whiteness of the chalk really stands out. And since the marker might take a while to dry, if you're creating a design for the whole egg, start with the top first, let dry, and then doodle the rest.
Photo and idea from We Can Make Anything. See the how-to here.
Cracked Easter Eggs
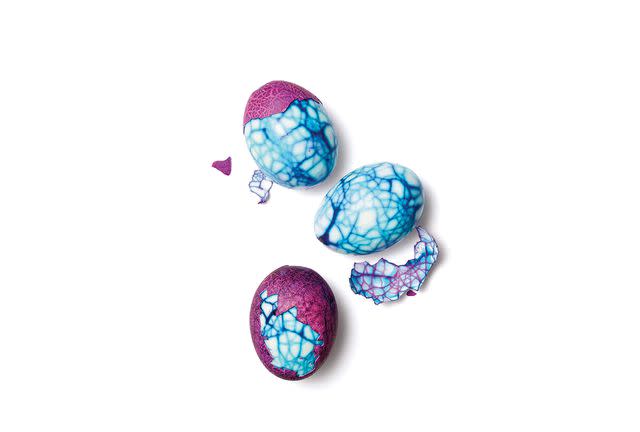
It's what's inside that counts with these simply smashing Easter eggs. They turn the stress of cracking into an artful plus.
What you'll need:
Hard-boiled eggs
Spoon
Food dye
Vinegar
Water
How-to:
Let hard-boiled eggs cool, and then tap the shells gently with the back of a spoon to create a fragmented surface all over.
Fill a quart-size container with a tablespoon of a richly toned food dye, 1 tablespoon vinegar, and 3 cups water.
Dip an egg (or several at once) in the bowl and keep submerged for about 30 minutes. For supersaturated color (as shown here), soak eggs in the dye overnight in the refrigerator.
Washi Tape Eggs

If you don't want to deal with the dye or paint of Easter egg coloring,washi tape still provides an artful design without the mess. Play around with different washi tape patterns and how you apply them to the eggs—like stripes, a confetti look, or polka dots.
Photo and idea from Lovely Indeed. See the how-to here.
Mustached Easter Eggs
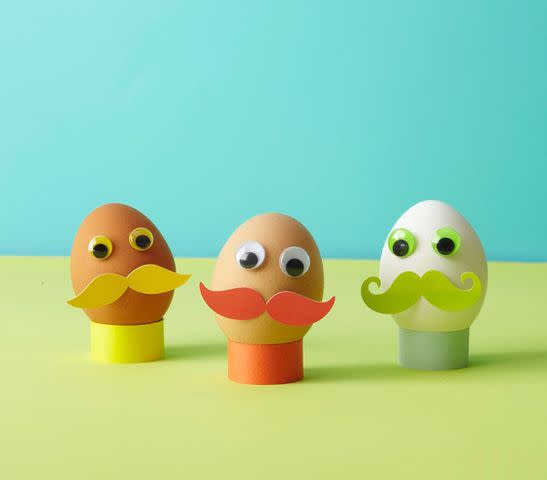
Bring some humor to the decorating table. These little men will have the kids in stitches and can even double as Easter Sunday table decor.
What you'll need:
Hard-boiled eggs
Adhesive googly eyes
Colorful mustache stickers
Construction paper
Tape
Scissors
Glue dots
How-to:
Stick eyes and 'staches on the eggs.
Create a round paper stand to keep your little version of Humpty Dumpty from, well, having a great fall.
Confetti-Dipped Easter Eggs

Photo: Studio DIY
Go glam this Easter with confetti eggs. After you paint the eggs in the colors of your choice and let dry, apply Mod Podge to part of the egg, sprinkle confetti on it, and let dry again. These eggs would look great in the middle of the dining table as a centerpiece or displayed in a basket on a buffet table.
Photo and idea from Studio DIY. See the how-to here.
Printed Easter Eggs
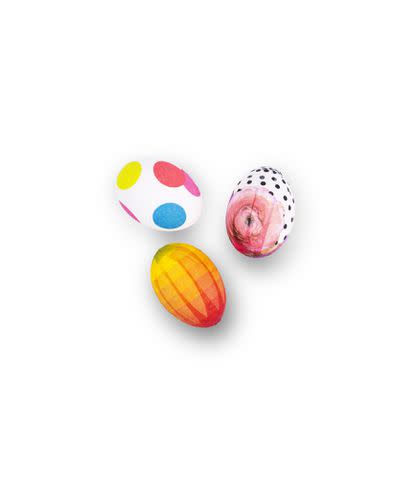
Dig out old paper napkins (good luck remembering where you stashed them) for this colorful no-dye Easter egg idea.
What you'll need:
Paper napkins
Scissors
Hard-boiled eggs
Craft glue
Paint brush
How-to:
Separate the colorful layer from the paper napkin and cut it in half-inch strips.
Brush craft glue onto the egg and apply the strips, lining up the design on each strip and trimming ends as you go.
Paint a layer of glue over the entire egg to smooth wrinkles and create a satin finish.
Craft developed by Morgan Levine.
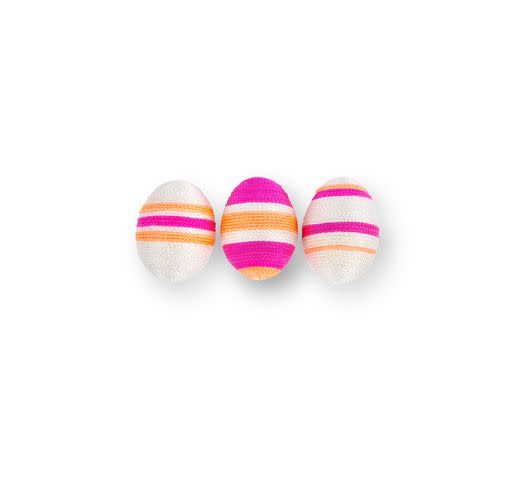
Easy Striped Easter Eggs
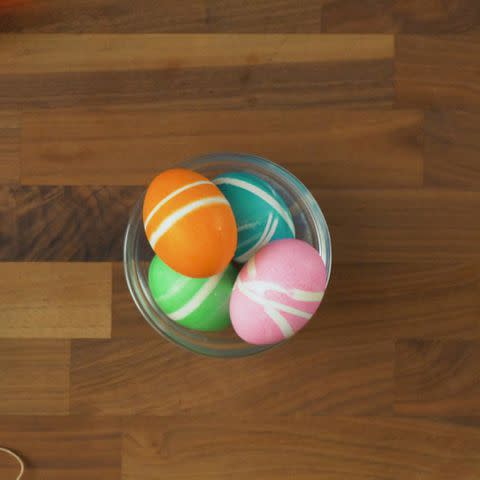
Get creative with rubber bands from your junk drawer for these colorful, color-blocked eggs.
What you'll need:
Hard-boiled eggs
Rubber bands
Heat-proof bowls
Boiling water
White vinegar
Liquid food coloring
Paper towels or clean cloth towel
Large spoons or tongs
How-to:
Wrap each egg with several small rubber bands. Play with the number of rubber bands, the thickness of the bands, and their spacing.
Combine ½ cup boiling water, 1 teaspoon vinegar, and liquid coloring (about 20 drops per color). Repeat in separate bowls for each color.
With rubber bands securely in place, submerge each egg into the dye bath and let sit for about 5 minutes.
Remove the egg, dry it off with a paper towel or cloth, and then remove the rubber bands to reveal your striped design.
Typography Eggs
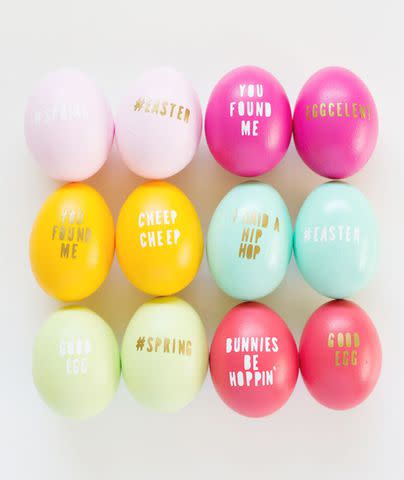
Photo: Lovely Indeed
Here's a way to really send a message (literally) with your Easter eggs. If you have a Cricut machine, you can use it to print and cut out letters from adhesive or contact paper. If you don't have one, you can use letter stickers for a similar effect. Use tweezers to place the letters on the already-dyed eggs.
Photo and idea from Lovely Indeed. See the how-to here.
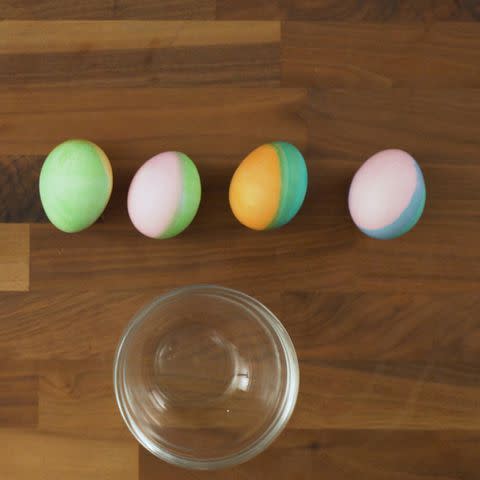
Two-Tone Easter Eggs
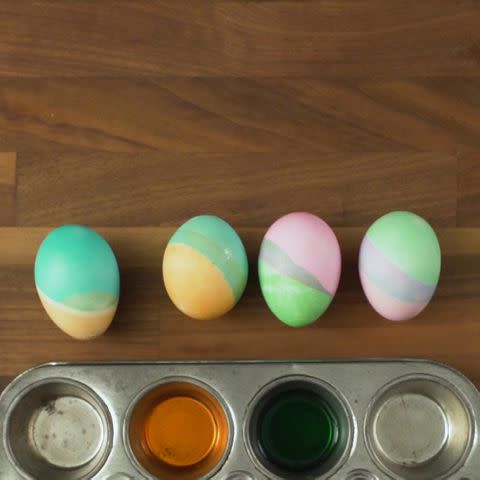
This almost-tie-dye look is a playful option that doesn't take much effort.
What you'll need:
Heat-proof bowls
Boiling water
White vinegar
Liquid food coloring
Hard-boiled eggs
Mini-muffin tin
Paper towels or clean cloth towel
How-to:
Combine ½ cup boiling water, 1 teaspoon vinegar, and liquid coloring in a bowl (about 20 drops per color). Repeat in separate bowls for each color.
Pour dyes into a mini-muffin tin.
Gently place an egg into each slot of the tin so only half is submerged in dye. Adjust the dye level higher or lower, depending on your desired effect.
Let each egg sit in the dye for about 5 minutes, remove, and then dry it off with a paper towel or cloth.
For a two-tone look, turn the egg over and dye the other half in a contrasting color.
Ombre Eggs
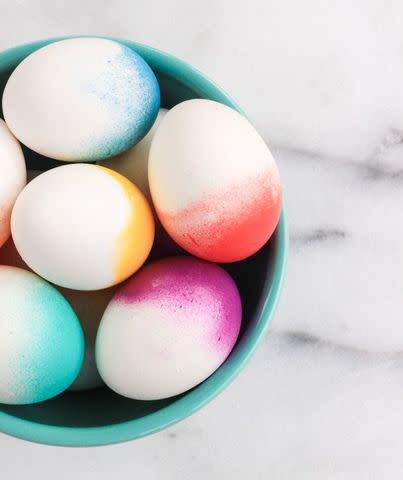
Photo: The Crafted Life
It's easy to give your Easter eggs the ombre effect in just minutes. Hard-boil or hollow out your eggs and place them upside down in the original carton, so the larger end is facing up. Lightly cover the eggs with spray paint, but be careful because if you spray too much, any excess paint will drip down the egg, ruining the effect. Let dry and voilà!
Photo and idea from The Crafted Life. See the how-to here.
Chick and Bunny Easter Eggs
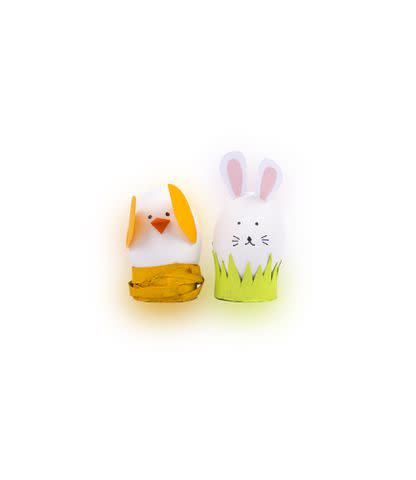
Celebrate Easter icons from the animal world with this too-cute, no-dye craft.
What you'll need:
Hard-boiled eggs
Fine-tipped Sharpie
Paper (white, pink, and orange or yellow)
Scissors
Craft glue
Toilet paper tube
Yellow and green paint
Paint brush
Paper towel tube
For the chick:
Draw eyes on the egg using a Sharpie.
Cut out paper wings and a beak, and attach them with craft glue.
For the nest, cut a portion of a toilet paper tube into a spiral strip.
Paint the tube yellow and, when dry, manipulate the spiral into a tangled nest shape.
Place the decorated egg in its nest.
For the bunny:
Draw eyes, nose, and whiskers on the egg using a fine Sharpie.
Cut out paper bunny ears and attach each with craft glue.
Cut a segment of a paper towel tube roll, and then cut one edge in a jagged shape to mimic grass.
Paint the tube green and place the decorated egg in it. If it's too wide for the egg, cut a slit and then tape the tube shut at a smaller diameter.
Craft developed by Morgan Levine.
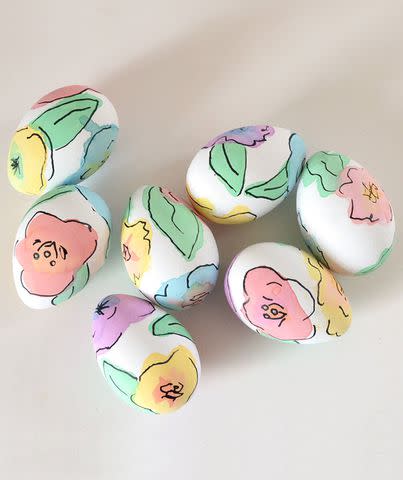
Botanical Easter Eggs
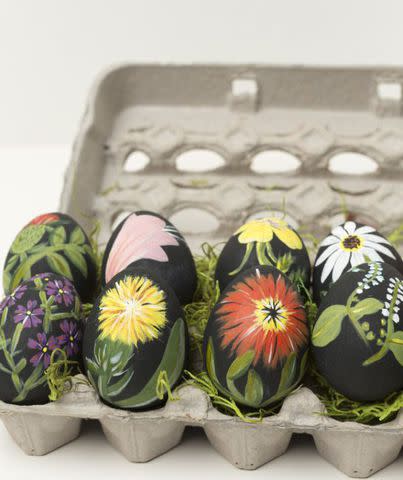
Instead of using real eggs, Brittany of The House That Lars Built suggests using papier-mâché eggs for these designs so you don't have to worry about cracks—plus you can use them the next year, too (and you'll skip the hassle of boiling Easter eggs). Paint the eggs first with black acrylic paint, trace flower designs with a pencil, and then paint over with your favorite colors. And don't worry if you don't consider yourself an artist: You can go as intricate or as simple as you want with these.
Photo and idea from The House That Lars Built. See the how-to here.
Personalized Eggs With Letters
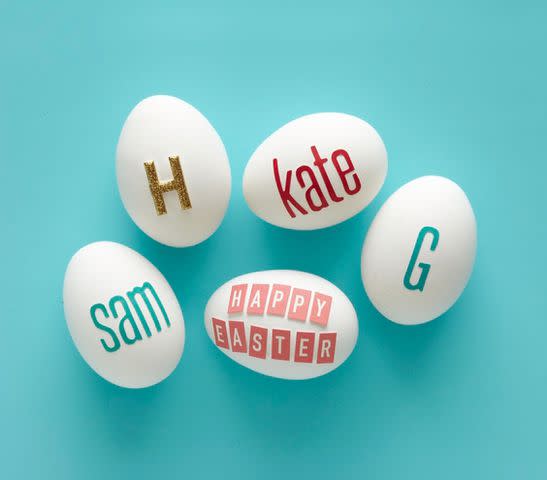
If you frequent the craft or office supply store, your decorating is halfway done. Let little fingers spell their names, pop on initials, or create favorite phrases.
What you'll need:
Hard-boiled eggs
Letter stickers
How-to:
Apply stickers, decals, and other decorations to eggs.
Galaxy Eggs
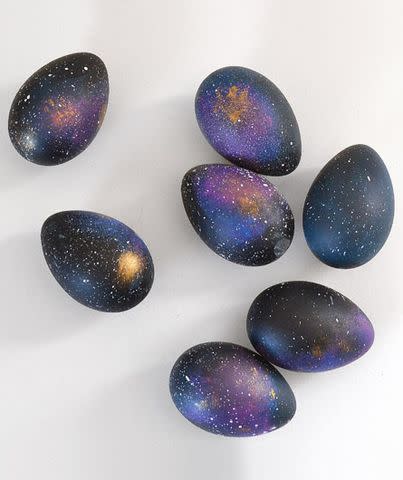
Surprise your Easter guests by displaying these otherworldly eggs on your dining table. It looks complicated, but this idea is all about layers and patience. You'll want to use fake eggs and paint them black—or use chalkboard ones that are already in that hue. Use a sponge brush to dab and layer different colors—think blues, purples, and even a hint of gold—on the egg, starting from the darkest to the lightest shade. Then speckle white paint onto the egg for the "stars."
Photo and idea from Dream a Little Bigger. See the how-to here.
Dip-Dyed Easter Eggs
Give your eggs a pretty watercolor look with some careful dipping.
What you'll need:
Hard-boiled eggs
Whisk
Heat-proof bowls
Boiling water
White vinegar
Liquid food coloring
Large spoons or tongs
Paper towels or clean cloth towel
How-to:
Combine ½ cup boiling water, 1 teaspoon vinegar, and liquid coloring (about 20 drops per color). Repeat in separate bowls for each color.
Place an egg inside the whisk and then lower it into the dye bath, stopping when the egg is halfway dipped.
Leave the egg submerged for a couple minutes, remove it, and then dry off with a paper towel or cloth. Leave the design as-is or create a two-tone egg by dipping the other side in a different colored dye.
Silk Tie Eggs
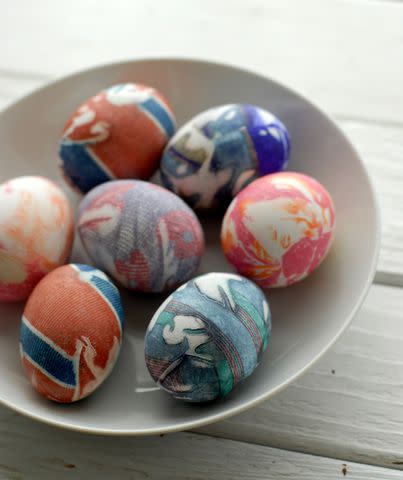
Believe it or not, old silk ties are the main ingredients for these intricate-looking eggs. You'll want to use neckties made of 100 percent silk because they are able to transfer pigment easier. The rest of the materials needed are muslin, cotton string, and hot water and vinegar to boil the eggs in.
Photo and idea from Boulder Locavore. See the how-to here.
Dotted Easter Eggs
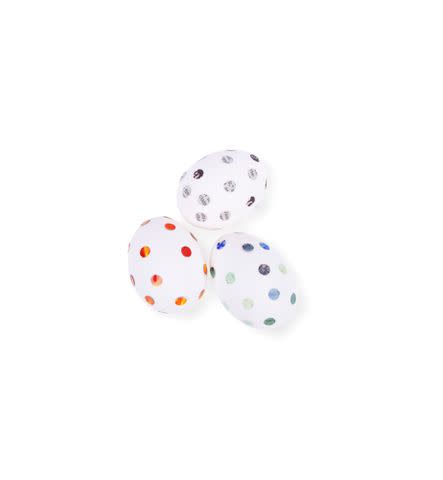
Think of this idea as collaging, but with Easter eggs!
What you'll need:
Magazines and newspapers
Hole punch
Hard-boiled eggs
Paint brush
Craft glue
How-to:
Use a hole punch to create dots from the pages of the magazines and newspapers.
Use a paint brush and craft glue to apply dots to the eggs.
Craft developed by Morgan Levine.
Fruit and Veggie Eggs
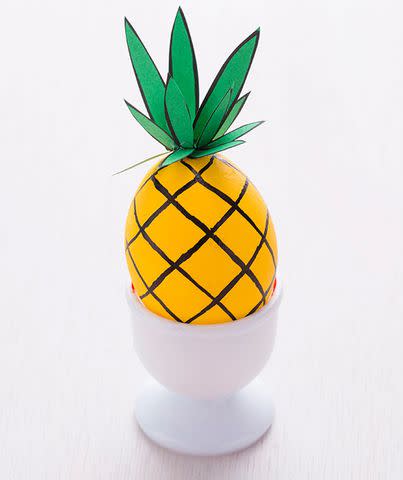
For a whimsical take on Easter eggs, why not transform them into "fruit?" You'll need acrylic paint in various colors, green cardstock, and a black permanent marker. Paint the eggs to match the color of the fruits and veggies of your choice and use the cardstock to create stems or leaves to glue to the eggs. Add any accents (like seeds) with permanent marker.
Photo and idea from Brit + Co. See the how-to here.
Natural-Dyed Easter Eggs
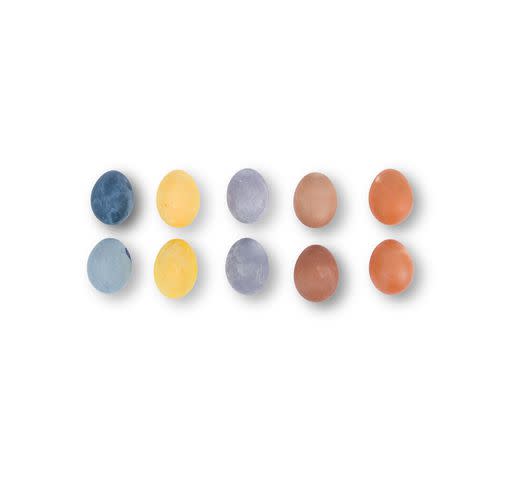
For a more pastel approach to your Easter eggs this year, try making a homemade dye.
What you'll need:
Hard-boiled eggs
White vinegar
2 cups chopped red cabbage (for purple), skins of 4 yellow onions (for yellow), or 3 tablespoons turmeric (for orange)
Water
Strainer
Tongs
Cloth or paper towels
How-to:
Wipe down eggs with white vinegar.
Boil red cabbage or onion skins with 2 cups water for 10 minutes, covered, and then strain out the vegetable.
Take the water off of the stove and place eggs in it while still hot. (The longer they sit in the dye, the more intense the color.) Remove with tongs and let dry.
If using turmeric, mix into 2 cups of boiled water and let eggs soak for 5 minutes.
Craft developed by Morgan Levine.
Painterly Eggs
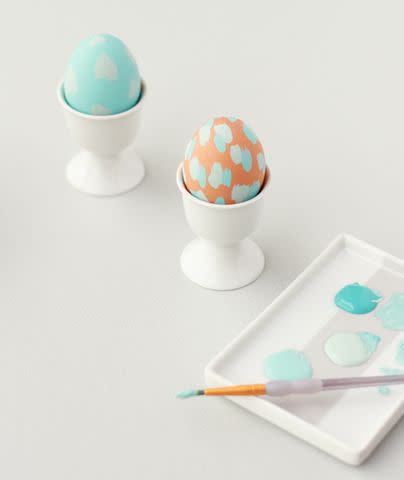
These artsy eggs will remind you of a Post-Impressionist painting with their brushstroke designs. You can have your pick of any color palette, but pretty and bright pastel acrylic paints (like the ones used in the photo) are perfect for spring and will cheer up your Easter brunch or dinner table.
Photo and idea from Paper & Stitch. See the how-to here.
Nature-Themed Easter Eggs
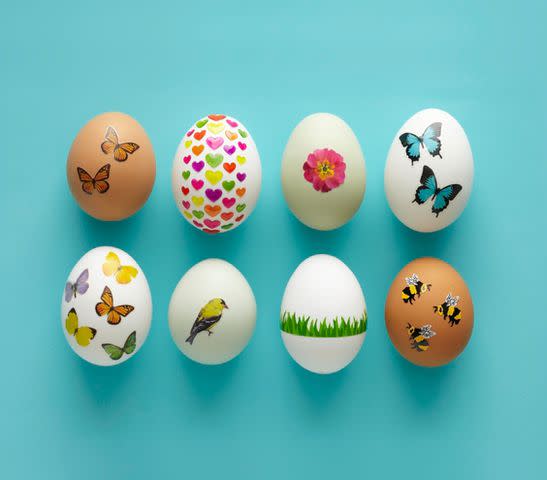
If your kids love nature, let them go bonkers sticking favorite creatures (butterflies, bees, and birds) or symbols (who doesn't love hearts?) on their eggs.
What you'll need:
Hard-boiled eggs
Nature stickers
How-to:
Apply stickers to eggs.
Tissue Paper Confetti EggsTake the traditional decoupage technique and use it on your Easter eggs—it's a fun project for kids and adults. Cut small squares from different colored tissue papers and mix a little bit of Mod Podge and water together. Layer the confetti one piece at a time with the Mod Podge mixture and cover the entire egg. Let dry and display in a basket or in porcelain egg cups. Photo and idea from Brit+Co. See the how-to here.
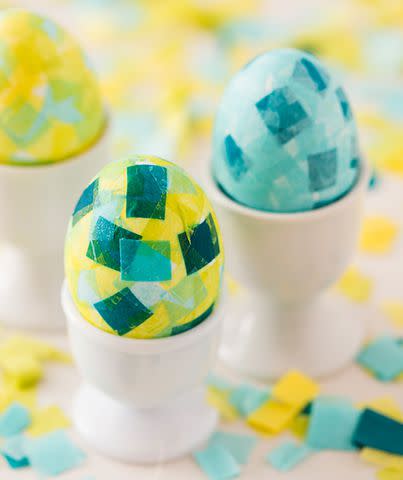
Take the traditional decoupage technique and use it on your Easter eggs—it's a fun project for kids and adults. Cut small squares from different colored tissue papers and mix a little bit of Mod Podge and water together. Layer the confetti one piece at a time with the Mod Podge mixture and cover the entire egg. Let dry and display in a basket or in porcelain egg cups.
Photo and idea from Brit+Co. See the how-to here.
Doodled Easter Eggs
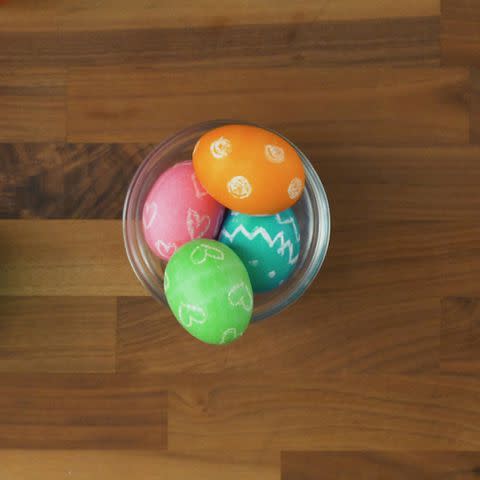
Use a clear or white wax crayon to doodle whatever you want to make unique, freestyle Easter eggs.
What you'll need:
Hard-boiled eggs
White or clear wax crayon
Heat-proof bowls
Boiling water
White vinegar
Liquid food coloring
Large spoons or tongs
How-to:
Using a white or clear wax crayon, draw any designs you like onto each egg. (Try polka dots, geometric shapes, and names to start.)
Combine ½ cup boiling water, 1 teaspoon vinegar, and liquid coloring (about 20 drops per color). Repeat in separate bowls for each color.
Dip each egg into a dye bath and let sit for about 5 minutes, turning occasionally to make sure the egg colors evenly. Remove the egg with tongs to reveal the designs.
Striped Easter Eggs
Make use of all those extra friendship bracelet strings with this colorful, geometric egg idea.
What you'll need:
Hard-boiled eggs
Friendship bracelet string in different colors
Scissors
Craft glue
Paintbrush
How-to:
Cut a few contrasting colors of string into different lengths. (Cut pieces of string are easier to wrap around the egg.)
While wrapping the string tightly around each egg, use craft glue and a paintbrush to adhere string to the shell. Trim excess string as necessary.
Craft developed by Morgan Levine.
Watercolor Floral Eggs
Dreamy and unique, these abstract watercolor eggs are a work of art. Use food dye and a little bit of water to lightly paint flowers on the fake eggs—layer as you go to create some texture on the bloom designs. Once the dye is dried, outline the flowers and leaves with a thin black permanent marker.
Photo and idea from Dream a Little Bigger. See the how-to here.
Pastel Memphis Easter Eggs

Photo: Kailochic
Combine Easter with your obsession for all things 80's with these time warp eggs inspired by the colorful and geometric vibes of the Memphis design movement. All you'll need is acrylic craft paint, a few brushes, and a steady-ish hand to paint on the basic shapes and dot them with black accents.
Photo and idea from Kailochic.
See the how-to here.
Sharpie Easter Eggs
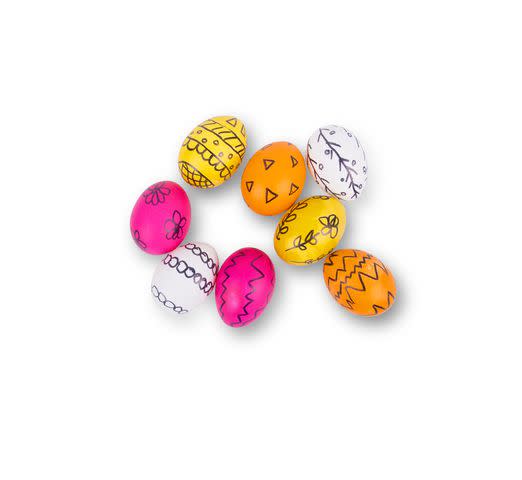
The beauty of this idea is you can decorate however you want and, if you're decorating with kids, each can create their own artwork.
What you'll need:
Hard-boiled eggs
Sharpie
Egg dye (if desired)
How-to:
You can use plain eggs, but we chose to dye our eggs beforehand.
Once the dyed eggs are dry, use a Sharpie to draw designs on them. Use ours for inspiration, or create your own!
Craft developed by Morgan Levine.
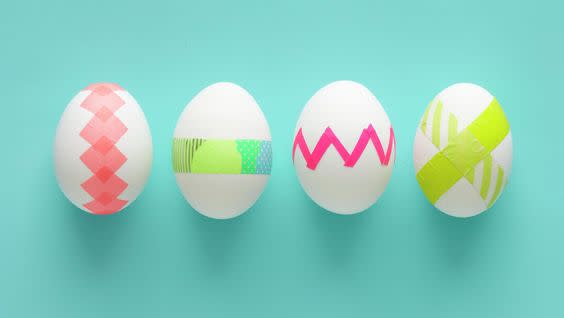
Washi Tape Easter Eggs
Washi tape is stepping onto the springtime scene just in time for decorating eggs. We're wild about neon for an extra bit of punch.
What you'll need:
Hard-boiled eggs
Washi tape in various colors
Scissors
How-to:
Apply tape to eggs, cutting into pieces as necessary.
Related: 20 Funny and Meaningful Easter Quotes, Captions, and Messages
Balloon Easter Eggs
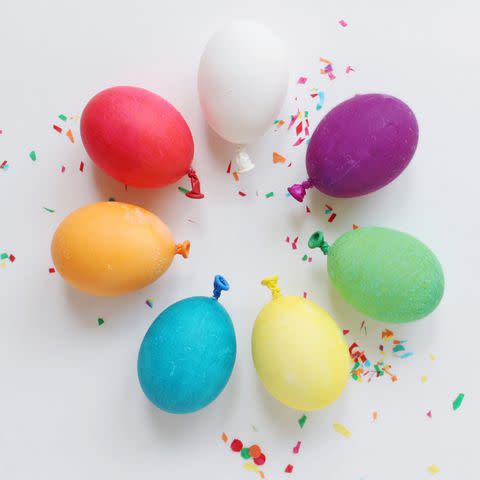
Photo: A Joyful Riot
Sisters Malissa and Machelle were inspired to make these balloon-themed Easter eggs to celebrate those who have birthdays that fall on Easter. It's the perfect two-in-one craft to get into the holiday and birthday spirit! They dyed their eggs, then blew up and tied some balloons. They then cut the little tail off of them and hot glued them to the bottom of the eggs. Egg-dorable!
Photo and idea from A Joyful Riot. See the how-to here.
Glitter Easter Eggs
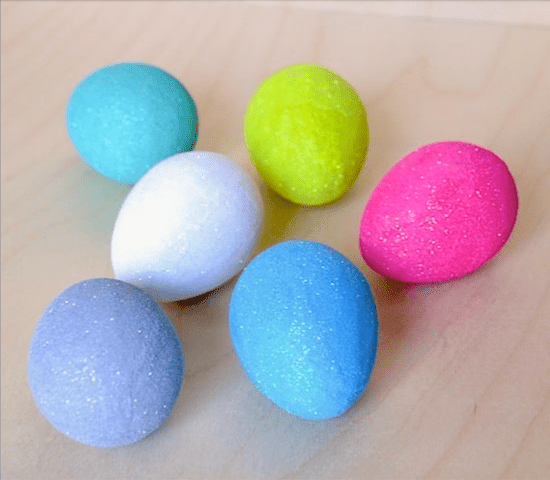
Photo: Modpodge Rocks Blog
To quote Taylor Swift, these eggs can make the whole place shimmer. All you need to do is paint or dye your eggs like you normally would, then coat them with a layer of matte Mod Podge. Roll them in glitter that matches your dye color, and voila! Sparkly Eggs! Word to the wise: put down a tarp or newspaper for this craft so that glitter doesn't get all over.
Photo and idea from Modpodge Rocks Blog. See the how-to here.
Related: The Meaning Behind the Traditional Easter Colors
For more Real Simple news, make sure to sign up for our newsletter!
Read the original article on Real Simple.

