3 Ways To Make a Paper Airplane—Step-by-Step Instructions for All Ages and Skill Levels
Learn how to make paper airplanes with these easy-to-follow directions.
Origami is the Japanese art of folding paper. Finished designs can be 2-dimensional or intricate 3-dimensional creations. And believe it or not, making a paper airplane is a form of origami! But how to make a paper airplane—that's where most of us get stuck.
Kids and adults alike can enjoy making paper airplanes. Not only can the practice be relaxing but a well-made airplane can bring endless fun when flying it.
For this article, I again roped in my teenagers to help me, and I am pretty sure it was more difficult for them to agree on which paper airplanes to build than to actually make them.
There are easily over 50 designs that we came across and narrowing them down to just three—one for each difficulty level—became, well, difficult to say the least. Ultimately, the instructions for the ones they picked were way too hard for this mom, so I had to do some digging on my own.
The number of steps to make each plane increases as its difficulty does. So, if you are new to making paper airplanes, start on "easy" and work your way up!
Taking a piece of paper and folding it into something that flies can be done in a matter of minutes, depending on your ability and experience level. Don’t let the instructions or difficult-looking folds fool you.
All of these airplanes will do well with lightweight paper like that you use for printers. Construction paper could be used too, but the weight will impact how the plane flies, and you likely won't be able to get the folds as tight. The better and more accurate the folds lead to the overall better flight capabilities of most paper airplanes.
How To Make a Paper Airplane (3 Different Ways)
The Bulldog, The Dart and the Infinity Arrow instructions are laid out below for your enjoyment. Let's get started and begin folding these together!
Wendee Wendt
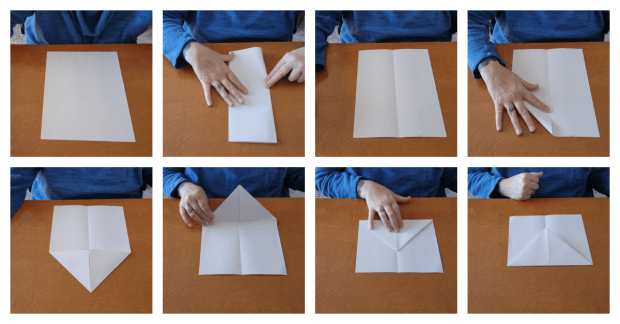
The Bulldog (Easy) Paper Airplane
Wendee Wendt
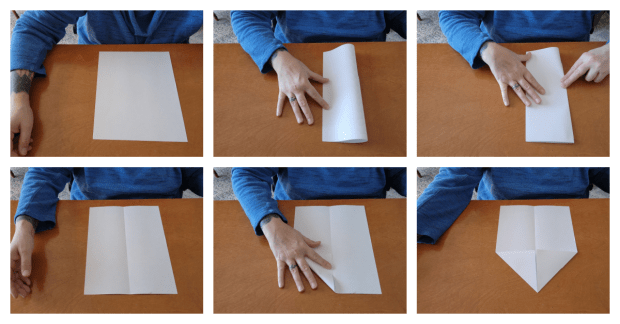
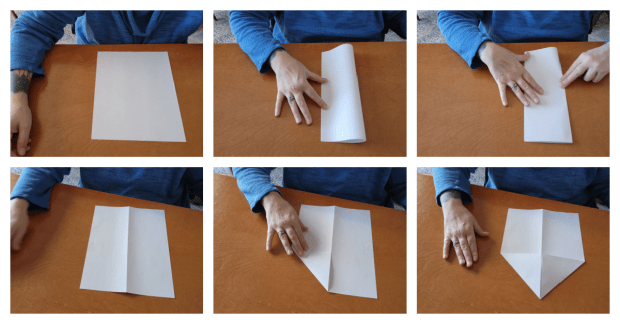
Step 1: Fold the paper in half, longways. You can do this any way that is comfortable for you. The important thing is to line up the folds as evenly as possible.
Gently run your thumb along the crease to make it nice and tight.
Step 2: Open the folded paper and lay it back flat on the table.
Step 3: Fold the top left corner in towards the middle crease you just made. When lined up where you would like it, press down on the fold to make the crease.
Step 4: Repeat for the right side.
Fold the top right corner in towards the center crease. When all lined up, make the fold tight by running your finger along it.
When those two steps are done, your paper should look like an “arrow.”
Wendee Wendt
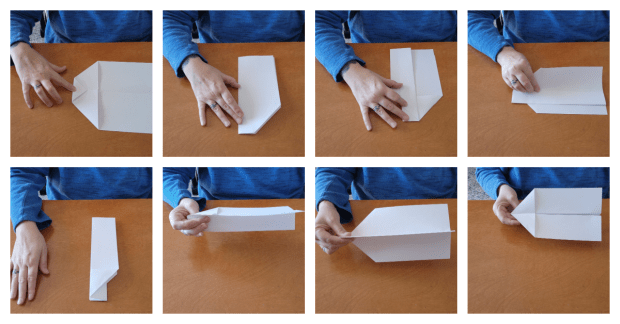
Step 5: Now fold down the very top of the arrow, about an inch, towards the bottom of the paper, and crease. This should make a small triangle shape.
This doesn't have to be an exact measurement—you can fold the point down and use your thumb knuckle to measure, and it works out perfectly.
Step 6: Fold the plane back along the very first fold, lengthways.
Next, we make the wings.
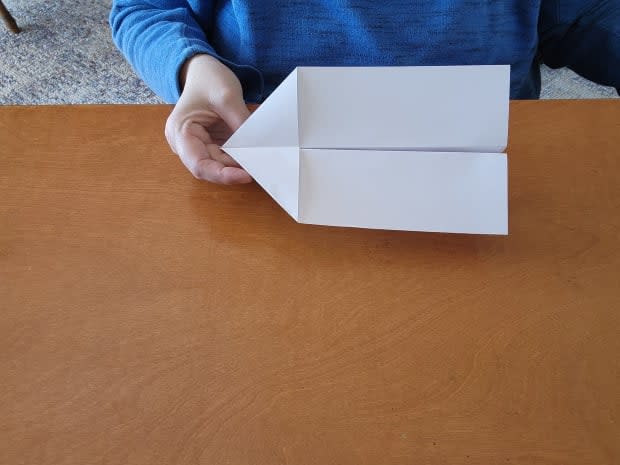
Step 7: Keeping the plane folded in half, take one side of the paper and fold in towards the center crease, until the center fold lines up halfway down the flap.
Step 8: Do the same thing to the other side of the paper airplane and fold the remaining flap towards the middle fold, making it the same length at your fold as the other side.
Keep in mind you can play around with how wide to make these folds on both sides. The key is to make them the same on each side. Changing how wide the wings are will change how well your plane flies.
This simpler plane will do well with gentle, smooth pushes. Try them inside (with caution) or outside and see how it flies. Now it’s time to take flight!
Wendee Wendt
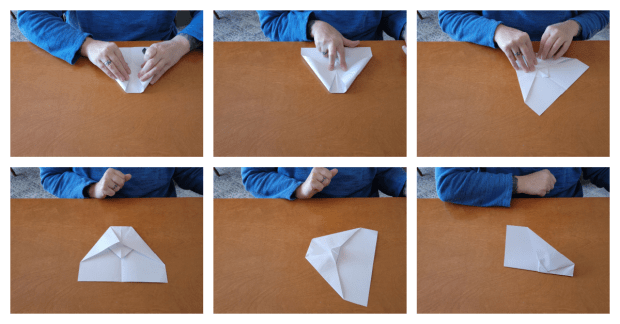
The Dart (Intermediate) Paper Airplane
Wendee Wendt
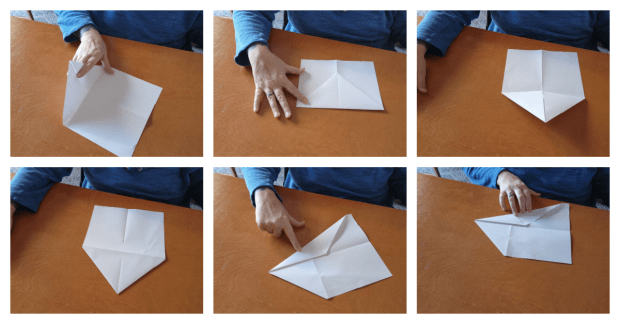
Starting out the same way as above:
Step 1: With the paper facing you with the short edge to the bottom, fold the paper in half longways (long like a hot dog or long rectangle, depending on perspective). Gently run your thumb along the crease to make it nice and tight.
Step 2: Open the folded paper and lay it back flat on the table.
Step 3: Fold the left corner down to meet the crease in the middle you had just made and run your finger along it to tighten it up.
Step 4: Repeat for right corner, making sure each corner’s fold lines up with the other.
Your paper should now be forming an arrow.
Step 5: Take the entire arrow, folding it towards the bottom of your paper, right below the arrow's bottom. Press your fold down with your fingers.
Your paper will look similar to an envelope and be rectangular shaped.
Wendee Wendt
Step 6: Take both the upper right and left corners, bending them towards the middle fold, until the points touch. This is where each side will need to be creased.
Step 7: Press down, one side at a time, while holding the two points together.
Step 8: Take the triangle that is peaking below where your last points meet and fold it towards the top of the plane.
This will lock in the previous folds.
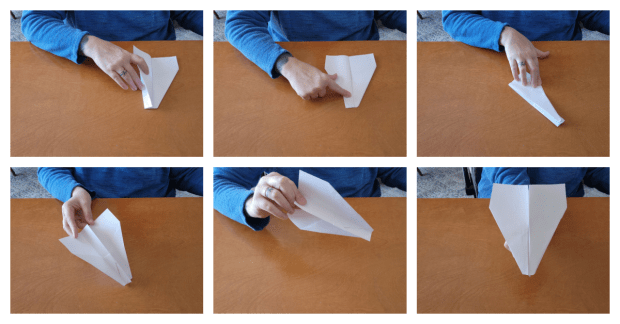
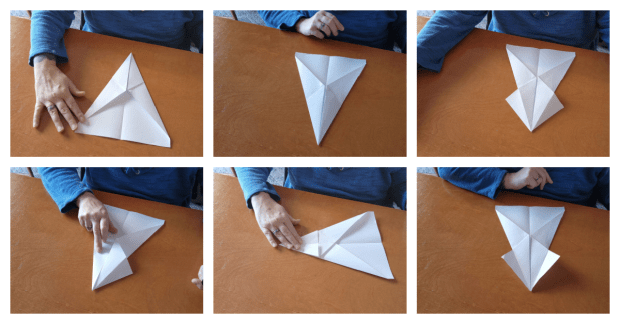
Step 9: Flip the plane over and fold it in half. This will be in the opposite direction of the initial fold. Then, press along the line.
You have done it correctly if all of the previous folds that have been made are on the outside.
Wendee Wendt
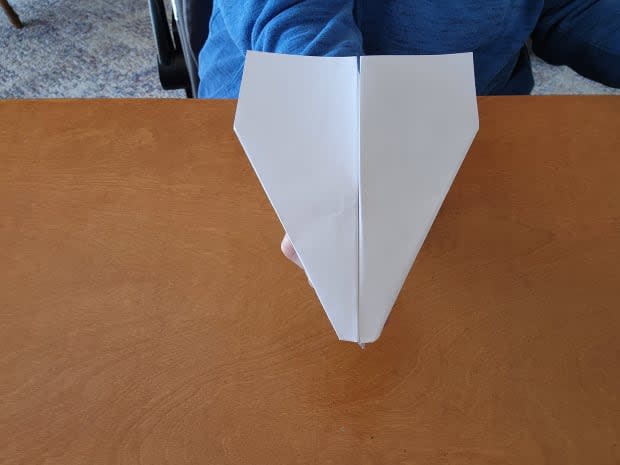
Step 10: Take the angled edge of one side of the plane and make the wing by folding it towards the center crease.
The wing flap should go past the center fold but is up to you how wide to make your wing; just make those creases tight.
Step 12: Flip the plane over and repeat the fold on the other side to make the other wing.
Make sure the second wing lines up accordingly with the first wing.
Step 13: Unfold the wings so the top of your plane is flat, helping it fly smoothly.
Keeping the folds the same on each side (creating wings that are identical) and making folds that are tightly creased will help the plane fly straighter.
This plane will be a tighter, better-flying version of the Bulldog (easy) plane above. Now, it's time for you to test this baby out!
Wendee Wendt
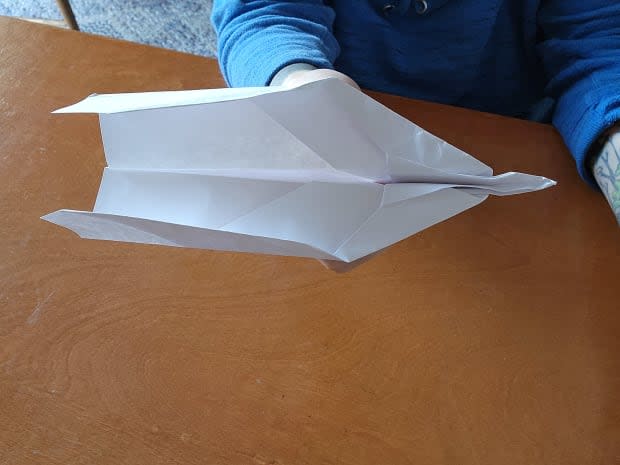
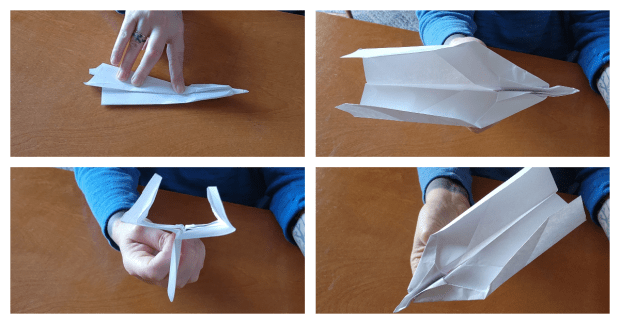
Infinity Arrow (Expert) Paper Airplane
Wendee Wendt
Ok, now for something tough. Don't be intimidated by all of the folds—just keep practicing. As long as you follow along and keep those folds tight, the Infinity Arrow will be a fantastic flyer!
This plane will do best with 8 x 11 lightweight printer paper and will start off the same as the previous two planes.
Step 1: Fold the paper in half, longways.
Step 2: Unfold the paper and it flip over.
Step 3: Fold both the right and left top corners down to the center fold line (crease one at a time), creating an arrow at the top.
Wendee Wendt
Step 4: Take the entire arrow, folding it towards the bottom of your paper (right below the arrow's bottom). Press your fold down with your fingers.
You should have something that looks like an envelope.
Step 5: Unfold, making it an "arrow" again.
Step 6: Turn the paper over.
Step 7: Fold down the left corner until it comes to the center line and press down the crease.
Wendee Wendt
Step 8: Fold down the right corner until it also meets the center line and tighten up the crease.
The "arrow" should be very pointy now.
Step 9: As the plane faces you, there are two flaps on the backside. Unfold both flaps so they are sticking out of the sides of the plane.
Step 10: Take both flaps, one at a time, and fold them towards the centerline. Re-crease it.
Step 11: Unfold flaps (again).
Wendee Wendt
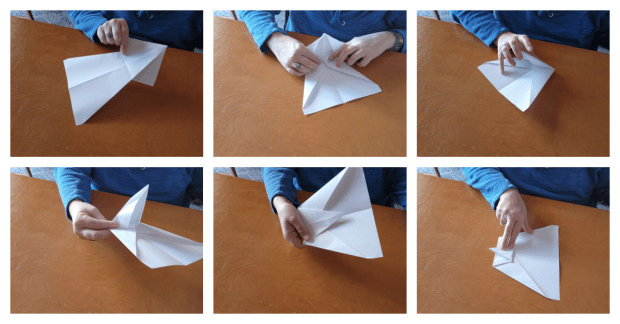
Look on the backside of the plane for a horizontal crease towards the top.
Step 12: Take the entire top of the triangle and fold it towards you along the backside crease.
Step 13: Open the last fold slightly and look for a pocket underneath. Fold the flap on the same side into the pocket.
Step 14: Tuck the right flap into the right pocket.

Step 15: Take the point of the triangle and fold it up, allowing about an inch of the tippy top above the horizontal fold.
Step 16: Being careful not to overfold, take the left corner, and fold it along the left side of the small triangle.
Step 17: Unfold.
Step 18: Gently lift the triangle and open up the pocket. Then tuck the corner from the last fold into the pocket.
Step 19: Do the same on the right side. You will do this by taking the right corner and wrapping it around the triangle.

Step 20: Now, fold the plane in half, using the vertical fold from the beginning.
Step 21: Find where the plane's point is and use it as a guide for folding each wing.
Step 22: Fold the wing down starting at that point and allow the fold to follow that line.
Step 23: Keep the wing folded and turn the plane over.
Step 24: Now, fold the other wing up to meet along the same line as the other wing.
Wendee Wendt
Step 25: Make a fin by folding over the bottom edge of the wing just far enough to be parallel to the edge of the body.
Step 26: Turn the plane over.
Step 27: Make a fin on the other wing by folding over the bottom edge of the wing just far enough to be parallel to the edge of the body.
Step 28: Open the wings (but not the fins) and straighten them out.
When holding your plane in the flying position, it should look similar to a "Y."
Congrats—you have just made a pretty tricky plane and are ready to fly high!
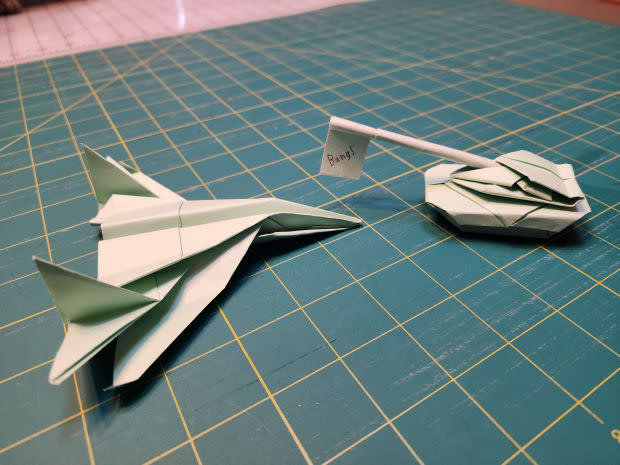
Evan Wendt
After finishing these paper airplanes, you can keep refining your skills, maybe even upgrading your folding game to something more difficult—like this tank and airplane my teenager learned to do (and made) while I was making the other paper airplanes! (Insert GRRR...with love, of course!)
Next, Here’s Exactly How To Make Bath Bombs (Bring on the Fizz and Fun!)
