These 27 Budget-Friendly DIY Projects Will Make Every Room Feel Custom

Creating a beautiful home often demands your time and energy, but it shouldn't require a ton of money. These budget-friendly DIY ideas show you how to personalize your space with minimal spending. With these projects, learn how to update items you own or create new decor using inexpensive materials.
Stenciled Pillows

Stencils make it easy to update plain pillows with fresh patterns. To re-create the look of this white pillow, use a stencil and blue upholstery spray paint to apply a pattern of multi-sized stars. Tape off any exposed fabric to prevent overspray.
Dyed Curtains

Give basic curtain panels a tie-dye twist with this budget-friendly DIY idea.
Mix an indigo dye kit ($5, Michaels) in a large bucket, according to package directions.
To create a shibori-style pattern, fold the curtain fabric using rubber bands and wooden blocks.
Place the fabric in the dye mixture; remove from the bucket when the desired color is reached.
Let dry and wash before hanging.
DIY Tile Vase

Use up leftover tile to make this pretty vase.
Choose a glass container with a cylindrical shape.
Cut a sheet of mosaic tile to the vase height. Wrap the tile around the vase, trimming any excess.
Attach the edges of the tile using clear adhesive, securing with painters tape until dry.
:20 Flower Arrangements for DIY Bouquets That Look Store-Bought
Budget-Friendly Wallpaper Art

Frame a favorite pattern of peel-and-stick wallpaper to create beautiful wall art on a budget.
Adhere the wallpaper directly to the frame's backing, or attach it to a cardboard or foam core cut to size.
Starting along the top edge, apply the wallpaper by peeling off the backing and smoothing it as you work downward.
Frame and hang your wallpaper art using screws and wall anchors.
Twisted Taper Candles

Twist basic taper candles into sculptural tabletop decor. For this budget-friendly DIY idea, fill a large Mason jar with enough 100°F water to cover the length of a taper candle. Place the candle inside and let soak until soft (about 10 minutes). Next, twist, bend, or curve the softened candles into unique shapes.
Clipboard Wall Art

Clipboards provide an inexpensive alternative to traditional frames. Hang several in a gallery wall arrangement to create a versatile display of prints or handpainted art. Swap out the artwork as the seasons, or your tastes, change.
:34 Creative Wall Art Ideas to Fill Blank Spots with Personality
DIY Marble Tray

Create the look of a high-end marble tray at a fraction of the cost. This DIY project uses a wood cutting board and marble-patterned self-adhesive paper ($7, Target). Cut the marble paper to fit the area you want to cover, peel off the backing, and carefully smooth it over the surface. To add handles, cut leather straps to size and screw them into drilled holes at each corner.
Easy Custom Planter

This easy DIY project lets you customize any planter with a cozier look. To begin, purchase cotton piping cord ($7, Joann) in your desired color and width. Wrap the cord around an inexpensive pot and hot-glue the ends to secure.
DIY Table Runner

Sew an easy-to-clean table runner using oilcloth or wax-covered fabric. This budget-friendly DIY project requires basic sewing skills, but it's easy to accomplish in about 30 minutes. Decorative trim adds an extra flourish to the finished runner.
:The Ultimate Guide to Table Place Settings for Every Occasion
Painted Pillows
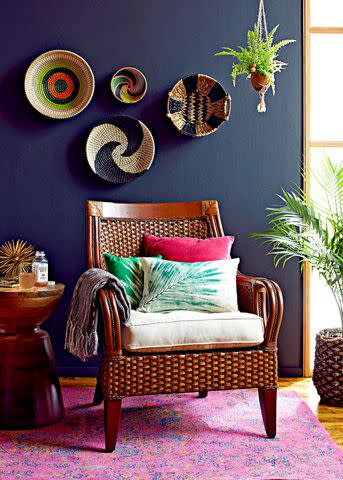
Easily add a nature-inspired pattern to a pillow using a tropical leaf as a stamp. We created this botanical throw pillow by applying paint to a palm frond, then transferring it to the pillowcase paint side down. Ironing and washing in cold water helps set the design.
DIY Rope Trivet
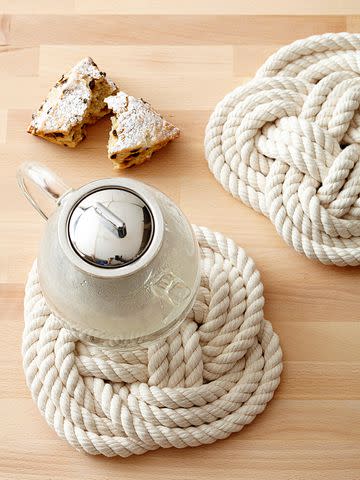
Weave inexpensive rope into a flat, circular design to form a stylish trivet. Be sure to use rope made from natural fibers, which won't melt with heat. Hot-glue the ends in the back to secure your desired shape.
Painted Staircase

Dress up a ho-hum staircase with alternating blocks of color. These painted stair risers are great for using up leftover paint or sample pots. Be sure to tape off the tread and nosing of each step and the surrounding wall before you begin painting.
Artful Chairs

Update a simple chair with pops of bright colors. Create a color-blocked look by painting only certain sections, such as the seat and front sides of the legs. A coat of clear wax ($15, Lowe's) over top will help create a durable finish.
:How to Paint Wicker Furniture for a Colorful Refresh
DIY Hanging Shelf

Create instant storage and display space with this DIY shelf project.
Use a wood cutting board ($20, Target) to skip the sanding and staining mess (and expense).
Drill holes at each corner, then slide a length of rope through D-ring hanging hardware before looping it through the two holes on one side of the board.
Knot to secure and repeat on the other side, ensuring the shelf is level before hanging.
Tea Towel Curtains

Dress your windows quickly and smartly with tea towels turned into cafe curtains. Simply clip drapery rings to the top edges of the towels, and thread the rings onto a curtain rod. If necessary, trim the towels to length and hem them using a sewing machine or iron-on fusible webbing for a no-sew option. You'll want the curtains to hang down to the windowsill, so mount the rod accordingly.
If you have a double-hung window, position the rod, so the top edge of the curtain lines up with the sash.
Paint-Swirled Vase

Update an ordinary vase with paint. Pour a small amount of enamel ceramic/glass paint into the bottom of a glass vase. Hold the vase in your hands and tip it in different directions so the paint rolls around inside, creating a wave of color. Leave some of the vase clear for added interest.
:How to Make an Inexpensive Papier-Mâché Vase with Balloons
DIY Cork Coasters

Prevent water rings and add style with DIY cork coasters. Cut 4x4-inch squares from thin cork. Cut a simple herringbone pattern from stencil acetate. Apply acrylic paint and press the stencil onto a cork square.
Mercury Glass Candle Holders

Illuminate your home with gold mercury glass-look candle holders.
Spray a light mist of water into a glass holder.
Working inside the glass only, spray a light layer of metallic gold paint ($6, Walmart) over the water beads, leaving the glass slightly translucent.
Let dry, then add a layer of gold glitter spray.
When the candle burns, the glitter twinkles inside, and the outside looks like matte gold mercury glass.
DIY Organizing Labels

Make labels from hardware store wood shims to institute order.
Cut a few shims to the desired size by either scoring with a crafts knife and snapping, or trimming with a rotary cutter.
Sand each corner to round, and drill a hole in the middle of the thick end, about 1/2 inch from the edge.
Use a small foam brush to paint the front and back of each tag with chalkboard paint.
Let dry and write or stencil on labels with a white charcoal pencil or chalk.
Tie onto a bin or basket with a length of baker's twine.
Gilded Jars

Rescue glass jars bound for the recycling bin for this upcycled project. Clean out the jars, poke a hole in the top of the lid, and screw a cabinet knob through the hole. We paired gold knobs with gold lids, but you can also paint the lids to match your hardware.
DIY Welcome Mat

Make a colorful statement at your front door with a DIY doormat.
Cut 1x2 medium-density fiberboard (MDF) into fifteen 24-inch-long pieces.
Spray-paint the pieces with exterior spray paint, let dry.
Cut coordinating fabric strips to size, and affix to the slats with spray adhesive. Once dry, apply three coats of clear exterior varnish.
To assemble:
Drill holes through each plank 1 inch from each end and at the center.
Thread a small nut onto one end of each of the three threaded rods; insert the rods through the holes in one MDF plank. Slide a larger nut onto each rod.
Continue alternating planks and nuts.
Secure the slats with a nut threaded onto the end of each rod.
Custom Window Shades

Give a plain roller shade ($9, The Home Depot) color and punch with a painted pattern using a ruler and T-square. Mask off straight stripes with blue painter's tape. Apply latex paints in your desired colors using a foam roller. Let paint set, peel off the tape, and let the paint dry completely.
DIY Tip: Keep paint from bleeding into your stripes by sealing the tape tightly to the roller shade: Run over it with a straight edge, and roll the paint roller away from the tape, not toward it.
DIY Wooden Bead Chandelier

Give a mod twist to a wrought-iron chandelier with a string of wooden balls.
Select several different-size balls from the woodworking aisle at the crafts store.
Screw small metal eye hooks into opposite ends of each ball, using a pair of needle-nose pliers to grasp and twist the tiny eye hooks.
Link the eye hooks to chain the balls together, then drape from the chandelier
Trimmed Accent Table

Embellish an accent table with decorative trim made from old-fashioned wooden clothespins. Arrange them around the table edge, using a dab of wood glue and a ppneumatic pin nailer to attach them. For a level line of clothespins, slide a scrap of 1/2-inch-thick board around the tabletop, lining up the clothespins with the top of the board as you work. When dry, spray the table with primer and paint.
Frosty Glasses

Boost the sophistication of clear glass vases by adding subtle stripes. To get the etched look without messing with caustic etching cream, mask off stripes of different widths using painter's tape, then spray with paint that mimics the look of frosted glass. The more coats of frosted-glass paint ($7, The Home Depot) you apply, the more opaque and noticeable the stripes. We applied two coats to our vases.
String Pendant Light

Create a midcentury-inspired pendant fixture using just string and a balloon.
Purchase a 35-inch balloon from a party goods store, and blow it up to about 30 inches.
Brush it with a thick coat of fabric stiffener, which you can find at fabrics and crafts stores.
Wrap the balloon with white crochet string, brushing on more stiffener as you work to ensure a thick coating. Let dry for 24 hours, then pop the balloon.
Illuminate the shade using an inexpensive light kit for hanging lanterns.
Tie a knot in the cord about 7 inches from the bulb.
Thread the plug end through a slit in the center of a plastic butter tub lid.
Using kitchen shears, cut a hole in the top of the globe slightly smaller in diameter than the butter-tub lid. Insert the bulb and lid into the globe.
Hang the cord from a hook in the ceiling. Use a low-watt lightbulb.
DIY Wood Coasters

Raid the scrap bins at the local lumberyard or home center to salvage free material for these DIY coasters.
Cut one 4x4 wood board into different sizes using a handsaw and a miter block to ensure straight cuts.
Sand the edges and corners until they're smooth, and apply a coat of natural wood stain and sealer to show off the grain.
Stick felt pads or cabinet bumpers in each corner on the bottom.

