13 Hacks to Elevate Your “Boring” Wire Closet
Recently I moved from an apartment with a custom closet full of wooden shelves to one that had cookie-cutter wire shelves. I adored everything else about my new home, so I had no choice but to deal with this one small flaw. Thankfully, I’ve got some tricks up my sleeves from my years of professional organizing that I knew I could tap into. If you’re currently renting like me, living in a temporary space, or not in the position to drop thousands on a custom closet, you can still make the most of what you’ve got.
Try out some of these wire closet hacks to get yours so organized that people will ask if you hired a pro.
1. Snap-on shelf dividers.
When I first saw these hit the shelves (ha!), I was ecstatic. Until then, I struggled with effectively organizing my client’s wire closet shelves, as I couldn’t use regular dividers like the ones that clip onto a flat surface. Now, you can find dividers in a variety of widths, depths, and heights that attach by clipping onto the individual wires. Use them to keep folded stacks of sweaters or jeans from toppling over.
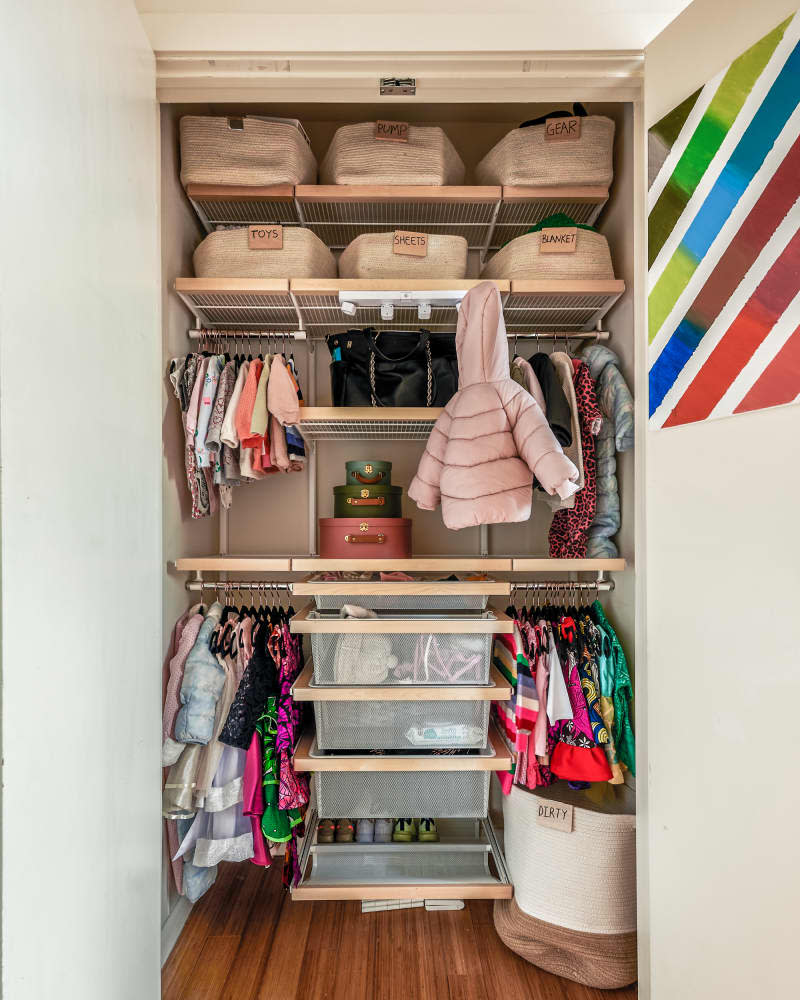
2. Embrace bins.
This is my preference instead of dividers simply because I don’t like seeing visual clutter (even in the form of neat piles). Like matching hangers, your closet will look immediately more organized if you choose matching bins. You can repurpose the ones you already own or get inexpensive ones. Ones with handles make it easier to pull down from a high shelf.
3. Stack some containers.
Because the shelves are not adjustable, you might have a lot of height between the top shelf and the ceiling. If you’re short on storage space, don’t let it go to waste. Look for stackable bins that are open front, clear front, drop front, or with pull-out drawers. Again, this method is ideal for things that you don’t need year-round or regularly, as they won’t be the most convenient to reach. But rest assured that you’re putting unused space to work.
4. Get shoes off the floor.
Along the same line, if you own a lot of shoes, consider using the top wire shelf to its maximum capacity. Either try individual (but stackable!) drop-front shoe boxes, a shoe tower, or stackable shoe shelves. Just be aware of how much weight you’re adding to the shelves so that they can withstand what you’re storing on them. Also, organizers should be sturdy (especially in the case of stacking shelves) to prevent an accidental avalanche of shoes.
5. Lay down a liner.
You can do this regardless of what you plan to put on the shelves, but it’s particularly helpful if your goal is to line shoes with heels on them. Instead of stilettos slipping through the gaps, they’ll sit flat on the liner. You can find rolls of clear shelf liner in different depths that can be cut to the length you need and often come with locking tabs to keep them in place. Standard closet wire shelves are 12 inches deep, but always measure yours to confirm before purchasing a liner.
6. Try shelf covers
The DIY version of this has been floating around Pinterest and TikTok for years. However, there’s a reason that it’s often demonstrated on linen closets and pantries as opposed to clothing closets. That’s because, depending on your wire shelves, it may make it harder to pull hangers on and off the rod. Consider trying this (either by doing it yourself or buying pre-made shelf covers) to temporarily cover your shelves and create a flat, fancier-looking surface.
7. Install more shelves.
If you’re balling on a budget, adding another shelf or two can cost significantly less than stocking up on bins. Ideally, look for the name of the brand listed on your current system or ask your landlord what they used (as well as ask for permission to do this!) and try to find the exact shelves. If you’re handy, save some more money by tackling this project yourself, or ask if maintenance can do it for you.
8. Add a better rod.
This is a good idea (whether or not you add shelf covers) if your wire closet doesn’t come equipped with a substantial rod that hangs below the shelf. Instead of hangers laying on a thin horizontal wire, see if your specific system sells accessories like rod support brackets and rods that can either be cut to size or adjusted. This will allow your hangers to slide more easily and to sit a little lower so that a shelf cover won’t be an issue. Just be mindful if clothes drag on whatever is below them once they’re slightly lower.
9. Affix your own rod.
If you can’t locate brackets that will fit your closet system, you can use this method as a close alternative. Grab a rod from any brand, cut it to size, and attach it slightly below the shelf via sockets. If done correctly, the wire shelf should have been installed into the studs of the wall so you should be fine to stay in line with it. Use a stud finder to be safe and avoid a chaotic closet collapse.
10. Double your hanging space.
So long as your wire system can support the weight, add a double rod to maximize hanging space. Most are adjustable by height and width and, from personal experience, a cinch to put together. Rather than stare at the dead space under your short items that line the single rod, you can now use it to hang a row of more short items underneath.
11. Increase your folding space.
Need more drawer space but are maxed out in your dresser? Add a hanging cubby or two and marvel at their versatility. In the past, I’ve used one to stow away shorts, jeans, sweaters, and even accessories like baseball caps, small bags, and scarves. Many brands include drawers or have them available for a minor additional charge. These are good for those who hate visual clutter as much as I do or want to contain small things like socks, underwear, and bathing suits.
12. Bring in furniture.
If that’s still not enough folding space, experiment with fitting storage furniture somewhere in the closet. Say, you recently bought a new bedroom set but your old dresser has sentimental value. If possible, slide it under a section of the wire shelf that you don’t need for hanging, and voila! You have custom drawers. I tucked a storage ottoman that holds my flats and flip-flops into a corner of my new closet underneath where I store excess hangers so it’s accessible.
13. Discover accessories.
What I love about the home organization industry is that new products are continually coming on the market, helping to solve problems — the lack of flexibility and storage in a wire closet being one of them. After I discovered wire shelf dividers, I’ve since come across shelves, baskets, tie and belt racks, and even divided organizers like this one designed specifically for clutches. They all work by looping over the wire and hanging below the shelf. One word of caution when adding an organizer is to check if it’ll work with the rod that’s attached or the one you installed. Otherwise, I encourage you to get creative and explore all the wire accessories that are out there so you can enjoy your closet for however long as you have it.

