Christmas Cookies: Everything You Need to Know About Thumbprints
Who was the first person to put his or her thumb into a cookie and fill it with jam? I want to know—because it’s not a natural progression.
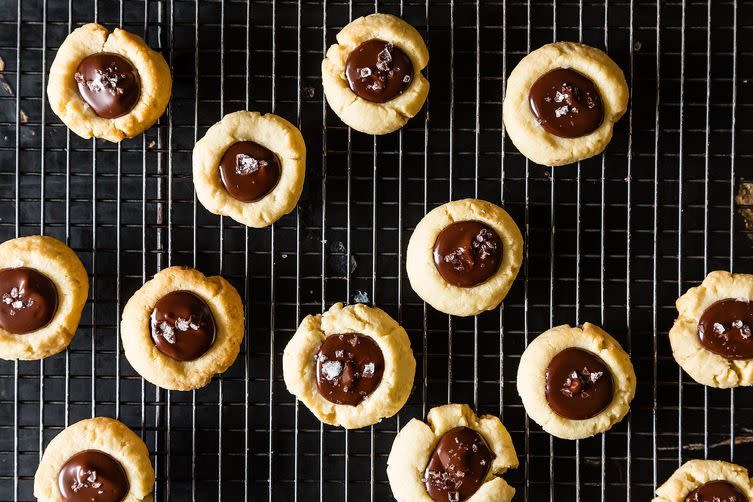
Almond thumbprint cookies with dark chocolate and sea salt. (Photo: James Ransom/Food52)
Related: Our Essential Chocolate Chip Cookie Guide
Shortbread cookies are crumbly and meant to be easily dunked. In a pre-thumbprint era, I don’t think I would’ve thought to make my shortbread cookies rounder and put a spreadable mixture in the middle. Then again, shortbread is versatile in that it’s amenable to going sweet or savory. And, like mashed potatoes with a ladleful of gravy, sometimes really good things can in fact get even better.
Related: 12 Cookies Worthy of Cookie Monster
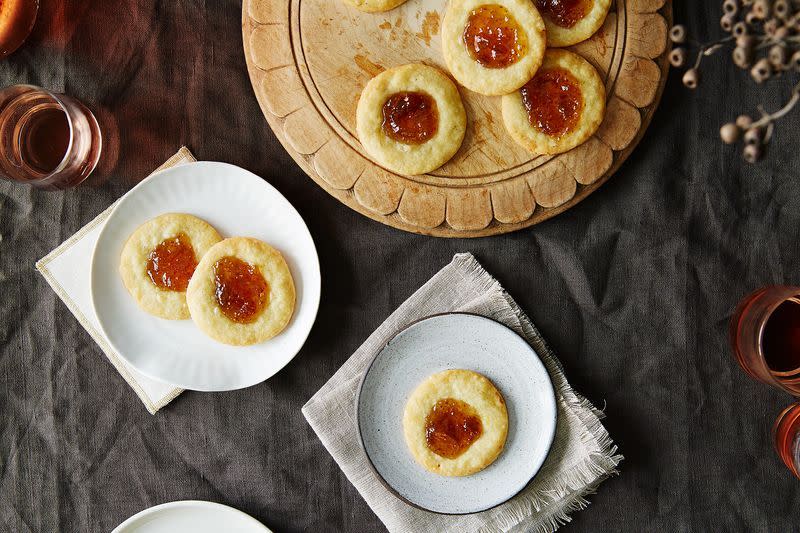
Thumbprint cookies with apricot jam. (Photo: Alpha Smoot/Food52)
Here’s how to make any kind of thumbprint cookie:
Cream the butter with sugar (and/or cheese).
Start by creaming together equal parts room temperature butter and sugar with a hand or stand mixer. A cup of each will yield you about three dozen small cookies. I usually use all granulated sugar because it’s what I have the most of on-hand and it provides a straightforward sugar cookie flavor, but you could easily use part brown sugar for more caramel notes. You can also swap out half of the butter for peanut butter (or any nut butter)—chunky or smooth.
Related: 5 No-Brainer Ways to Make Better Cookies
If you’re going the savory route, trade most or all of the sugar for a dry, flavorful cheese like grated Parmesan. Blue cheese, cheddar, or goat’s cheese also work wonders (we used blue cheese here), but be prepared to play with butter-to-cheese ratios to get things just right. Imagine the texture of a slice-and-bake dough and strive to get your raw dough to that texture. Add in butter if too crumbly and more flour if too wet.
Related: 12 Recipes that Celebrate the Chocolate Chip Cookie
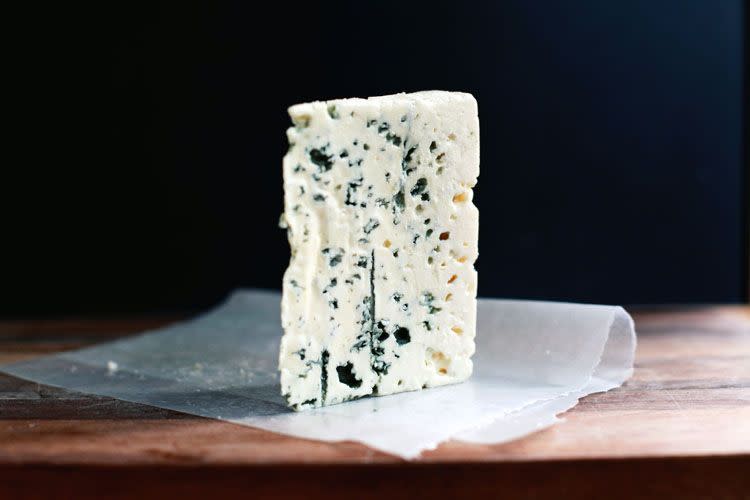
Blue cheese can be used for more than just dressing. (Photo: Tara O’Brady/Food52)
Add eggs and flavorings.
Once the butter mixture is light and fluffy after about five minutes of beating, add in 1 egg and a pinch of salt. Eggs are somewhat optional and flexible. I use one egg for my 1 cup sugar/1 cup butter dough, but I’d probably still use 1 egg even if I cut those amounts in half. Eggs add texture and stability to the cookie, so if I’m using peanut butter or adding in something else substantive (coconut flakes) that will give the cookies a sturdy shape, I might skip the egg altogether, though skipping eggs equals a very crumbly cookie.
Related: 10 Cookies to Move to the Top of Your List
Beat to combine. If you want to flavor your cookie dough somehow, now’s the time. Add in a splash of extract (vanilla, almond, peppermint); a handful of chopped, fresh herbs (rosemary shortbread!); a scoop of cocoa powder (about 1/3 cup to start if you’re using 1 cup of butter, adjusting for desired chocolateness); or toasted, chopped nuts.
Related: White Chocolate Peppermint Cookies with Vanilla Salt
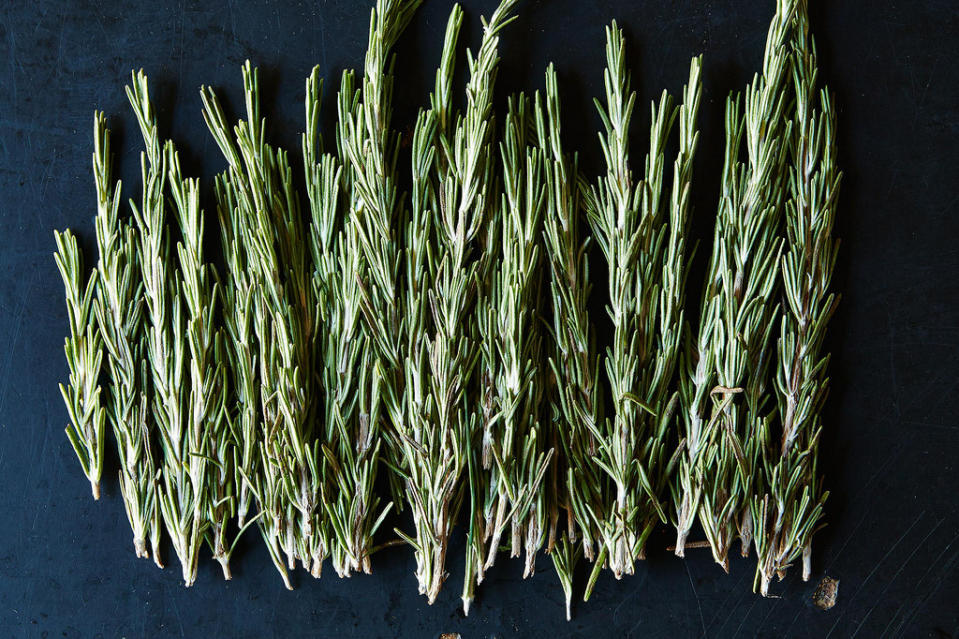
Fresh herbs are always a good addition. (Photo: Mark Weinberg/Food52)
Now comes flour.
Then comes the flour. Use about two and a half parts flour to your one part butter. So, if you used 1 cup of butter, use 2 ½ cups of flour. This will make a standard, crumbly shortbread. When making peanut butter cookies, you may wish to reduce the amount of flour by half to get a fudgier texture. Thumbprints are also great if you’re trying to bake without traditional wheat flour. Replace all-purpose with any variety of nut flours or nut meal to get a flavorful, gluten-free cookie.
Add half of your flour into the cookie dough and mix to combine. Add in the second half and continue to mix until you see a dough forming that’s a bit crumbly but comes together when pressed between your fingers.
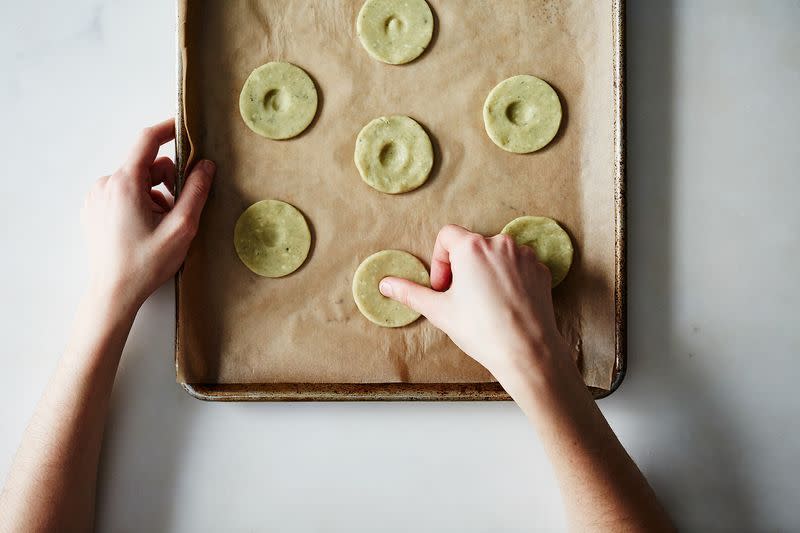
Give ‘em the thumb. (Photo: Alpha Smoot/Food52)
Roll ‘em and give 'em the thumb.
Next, line a baking sheet or two with parchment paper. Using a small ice cream scoop or a teaspoon, scoop out portions of the dough, roll each one in your hands to form a ball, and place on your prepared baking sheets, spacing each cookie apart by a few inches. You could also roll out the dough and cut out cookies using a biscuit or cookie cutter—this will result in flatter cookies. Once all dough balls are formed, use your thumb to press into each one, flattening the dough out slightly and creating the signature thumbprint—to be filled later!
Place baking sheets in the fridge and let dough chill for at least an hour or up to 3 days (cover baking sheets with plastic wrap if chilling for longer than a few hours to prevent fridge smells from getting into your cookies).
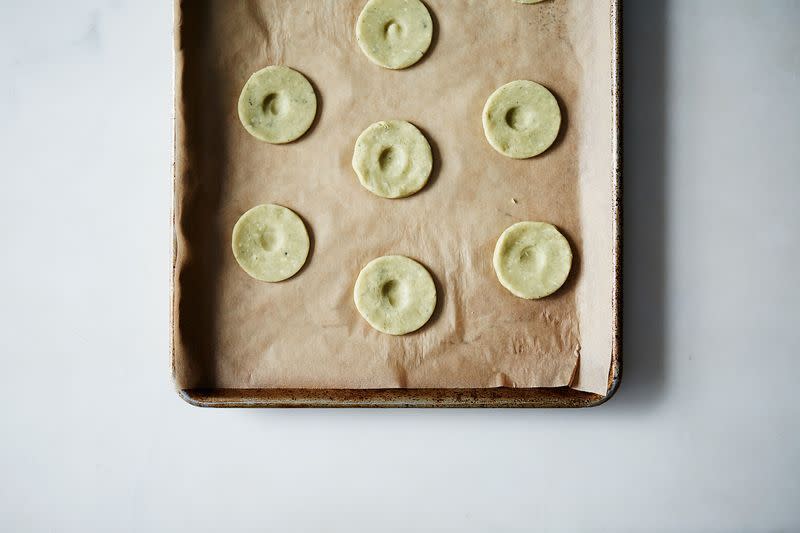
Thumbprints complete! (Photo: Alpha Smoot/Food52)
Roll them in extras, if you want, then bake.
Right before baking, you might also want to take the step of rolling the edges of your cookies in chopped nuts or crushed cereal pieces. If so, before baking, brush cookies in an egg wash and roll in your desired coating. Personally, I like the look of some sanding sugar on my cookies at holiday time. In this case, if your decoration could melt or burn in the oven (sprinkles or sugar don’t benefit from toasting like coconut or walnut pieces), wait until your cookies are done baking and then give them a roll through while still warm—no egg wash needed here, provided your cookies are warm and buttery enough!
When ready to bake, heat oven to 350° F. Depending on the size of your cookies, you’ll need to bake them anywhere between 12 to 20 minutes. I usually just wait for my kitchen to smell like cookies, and then check on things. Once they hit that fragrant stage, it’s usually 4 or 5 more minutes until the edges just begin to brown.
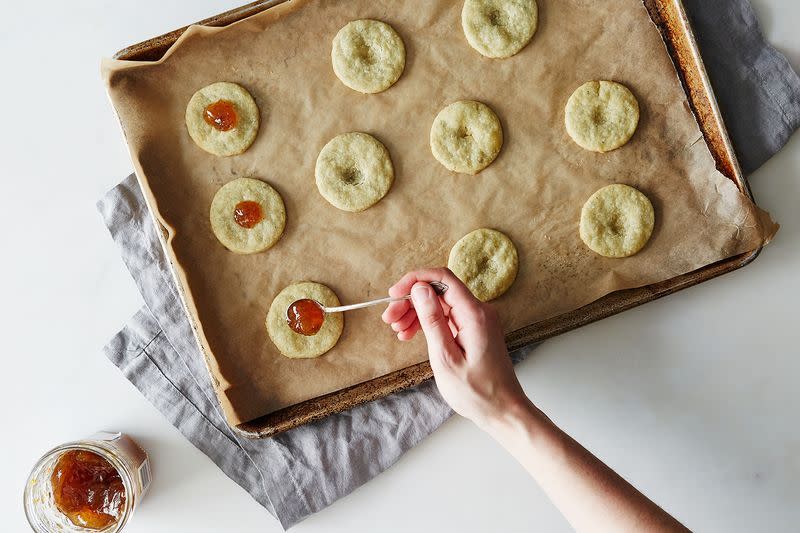
A teaspoon of apricot jam is just right. (Photo: Alpha Smoot/Food52)
Fill 'em up.
Let cookies cool and then fill them while still on the cooling rack (keep your serving dish clean!) with about a teaspoon of any number of options: Raspberry jam is traditional, but apricot is a personal favorite. If you want your filling to melt and settle into your thumbprints, add while the cookies are still warm. Should you use a buttercream or other filling that looks pretty when towered high, wait til cookies are fully cool.
Fillings can vary in whatever way your heart desires. If your cookie’s cheesy, fig jam in the center hearkens an after-dinner cheese plate. For peanut butter cookies, strawberry preserves in the center elicits a nostalgic PB&J experience. A quick chocolate icing or ganache is also fun—just mix some confectioners’ sugar, cocoa powder, and a splash of milk to get a quick chocolate filling. Eliminate the cocoa and add in a few drops of food coloring for something colorful. Sprinkles are encouraged.

Ready for holiday feasting. (Photo: Alpha Smoot/Food52)
Here are some flavor combos I’ve been keen to try:
-Carrot cake cookie with grated carrot and ginger, filled with a sweetened, softened cream cheese.
-My grandmother, an Englishwoman, always loved her shortbread filled with rosemary served alongside some lemon curd for spreading; I’d put the lemon curd right on top.
-For a sweet-meets-savory combo, I’ve thought about adding some sticky chopped dates to my cookies and filling with bacon jam.
Almond Thumbprint Cookies with Dark Chocolate and Sea Salt
Makes about 2 dozen
1 cup all-purpose flour
¾ cup almond meal
1 stick (4 ounces) unsalted butter, at room temperature + 2 tablespoons (for chocolate filling)
¼ cup granulated sugar
Finely grated zest from 1 small lemon
1 teaspoon pure vanilla extract
4 oz bittersweet chocolate, broken into small pieces
2 teaspoons golden syrup or light corn syrup
Sea salt, to taste
Preheat oven to 350 degrees F. Line two small baking sheets (or one large one) with parchment paper.
In a small bowl, whisk together all-purpose flour and almond meal.
In another small bowl, combine lemon zest with sugar. With the tips of your fingers, rub the zest and sugar together until they’re well integrated.
Combine the butter and sugar-zest mixture in the bowl of a stand or hand mixer. Beat them together on medium speed until light and fluffy, about 3 minutes, stopping once or twice to scrape down the sides of your bowl with a rubber spatula. Add the vanilla extract and beat for a few more seconds.
Reduce the mixer speed to low, then add the almond meal-flour mixture a little at a time. Beat just until just incorporated into the dough – don’t overmix.
Scoop teaspoon-sized balls of dough (a melon scoop works well) and roll them to form small balls. Place the balls about 2” apart on the parchment-lined baking sheets. Using your thumb, make an indentation in the center of each cookie. Make sure you don’t press through the dough, but make sure the centers are plenty deep and wide to hold the chocolate filling.
Bake about 15 minutes, or until the cookies are only slightly colored around the edges; be careful to not overbake. (About 10 minutes in, I often check the thumbprint indentations – if they seem too shallow, remove the cookie sheet and depress the centers while the dough is still soft. The curved back of a melon scoop or teaspoon works well.) When done, remove the baking sheets from oven and transfer the cookies to cooling racks. I like to do this by keeping the cookies on the parchment, and sliding the parchment onto the cooling rack.
To make chocolate filling: Using a double boiler or a small heat-proof bowl set over a pot of simmering water, combine chocolate, 2 tablespoons butter, and golden syrup. Stir until melted and smooth. Cool slightly. When cookies are cool, fill the thumbprints with the chocolate, and then sprinkle with sea salt. Allow about an hour for the chocolate centers to set.
By Hillary Reeves.

