Here's How Much It Actually Costs to Install a Penny Floor in Your Home

"Hearst Magazines and Yahoo may earn commission or revenue on some items through these links."
[table-of-contents] stripped
One of the most important and more permanent aspects of your home is the flooring you choose to put in. Hardwood, tile, laminate, vinyl, carpet—there are so many options, and each one helps to bring a different aesthetic to your space or enhance the one you already have. Given the flooring trends for 2024, we think it's safe to say patterns and more maximalist designs are going to continue popping up throughout the year, so it's the perfect time to look to unique penny flooring ideas for your inspiration.
There's debate around whether our single-cent coins should be eliminated as a unit of American currency. (A penny costs more to produce than it's worth, after all.) No matter what your personal thoughts on the erstwhile copper coin may be, in the interior design space the penny serves a wonderfully niche purpose that people either love or hate. Penny floors can be found in a myriad of places—from restaurants to offices—and they're actually fairly easy to DIY as long as you're committed to the bit. As Sara and Justin Ilse, the couple behind Ilse Interior Finishings, know, installing a penny floor is not a task for the impatient.
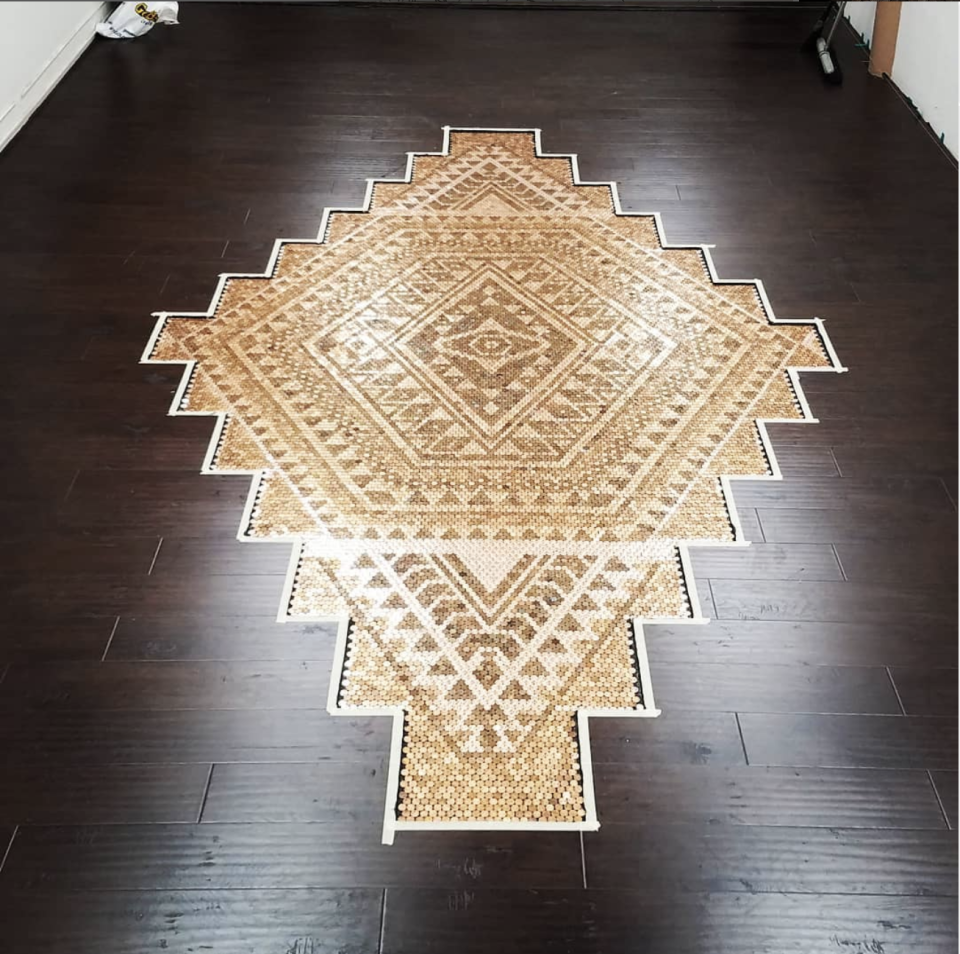
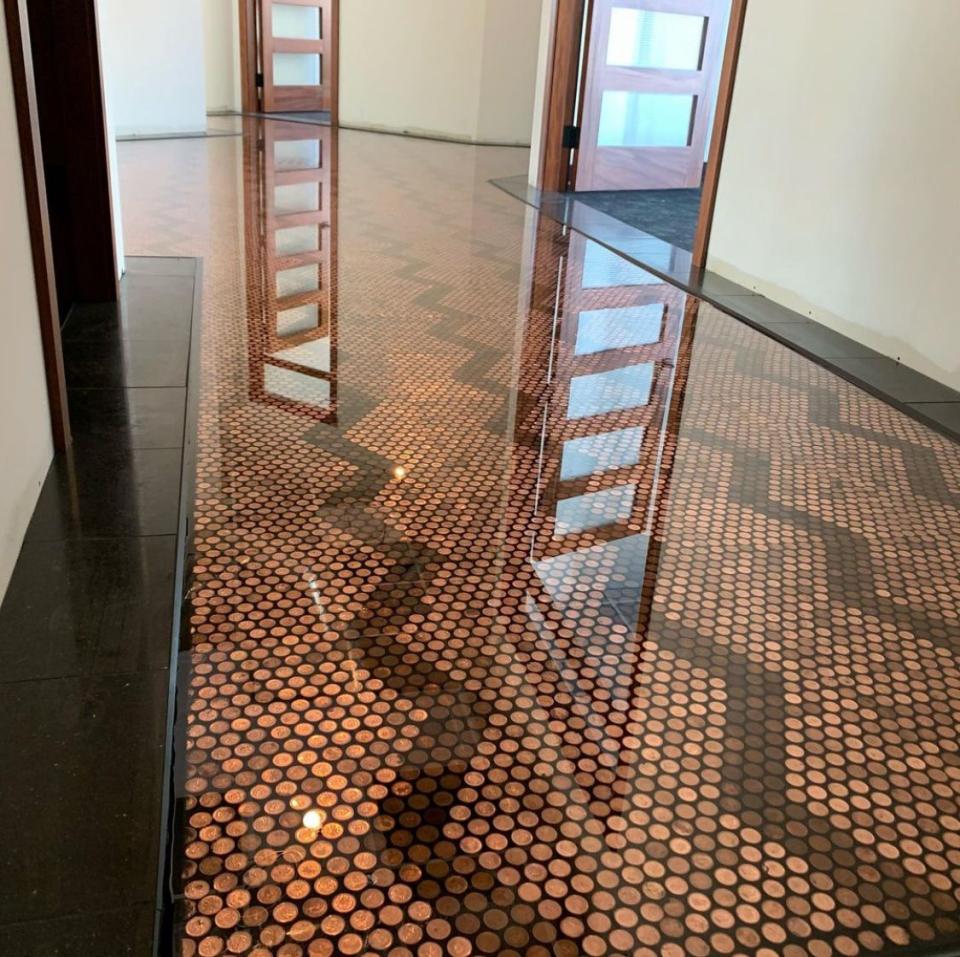
"We started laying out the pennies on January 12, so about six weeks of just laying them out on nights and weekends, whenever we have spare time. But before that, I had about a year of collecting pennies and then cleaning and sorting them," Sara tells House Beautiful. As of February 27, 2024, the Ilses had just finished laying down every coin for their penny floor in their entryway and had poured one layer of epoxy over the top. The couple, who've been documenting the process on their TikTok page, explained that while a lot of people who install penny floors opt for no design, they wanted theirs to have a beautiful diamond pattern. And while it's been definitely worth it to do, it's taken them a longer time to complete than if they had just laid pennies out with no solid pattern in mind.
Now that their own floor is almost complete, the Ilses shared all the tips and tricks they learned on how to install a penny floor that should last a lifetime. While the process is generally personal and dependent on your existing flooring, you can use their expert tips as carpentry professionals to help plan your own project. Read on to find out what all goes into DIYing your own real penny floor.
What Materials You'll Need to Install a Penny Floor
Pennies
Glue or grout
Epoxy
Hacksaw
Bench vise
Tape measure
Knee pads
Paint (optional)
UV resin (optional)
How to Install a Penny Floor
Step One: Figure Out How Many Pennies You Need
First things first, before you even think about driving to the bank, you're going to have to do a little math. Grab your measuring tape and figure out the square footage of the room you want to install the floor in. If you're unsure of how to find the square footage of your room, you can use this guide from The Home Depot.
After figuring out the square footage of the room, it's time to determine how many pennies fit within a square foot. The diameter of a penny is 1.9 centimeters, or 0.75 inches. It takes 16 pennies laid out in a row to measure one foot, or 12 inches. So in doing the most basic math, 16 multiplied by 16 gets you to 256 pennies in one square foot. If you don't want a design on your floor, you could multiple 256 by whatever your square footage is to get an estimate of how many pennies you'll need.
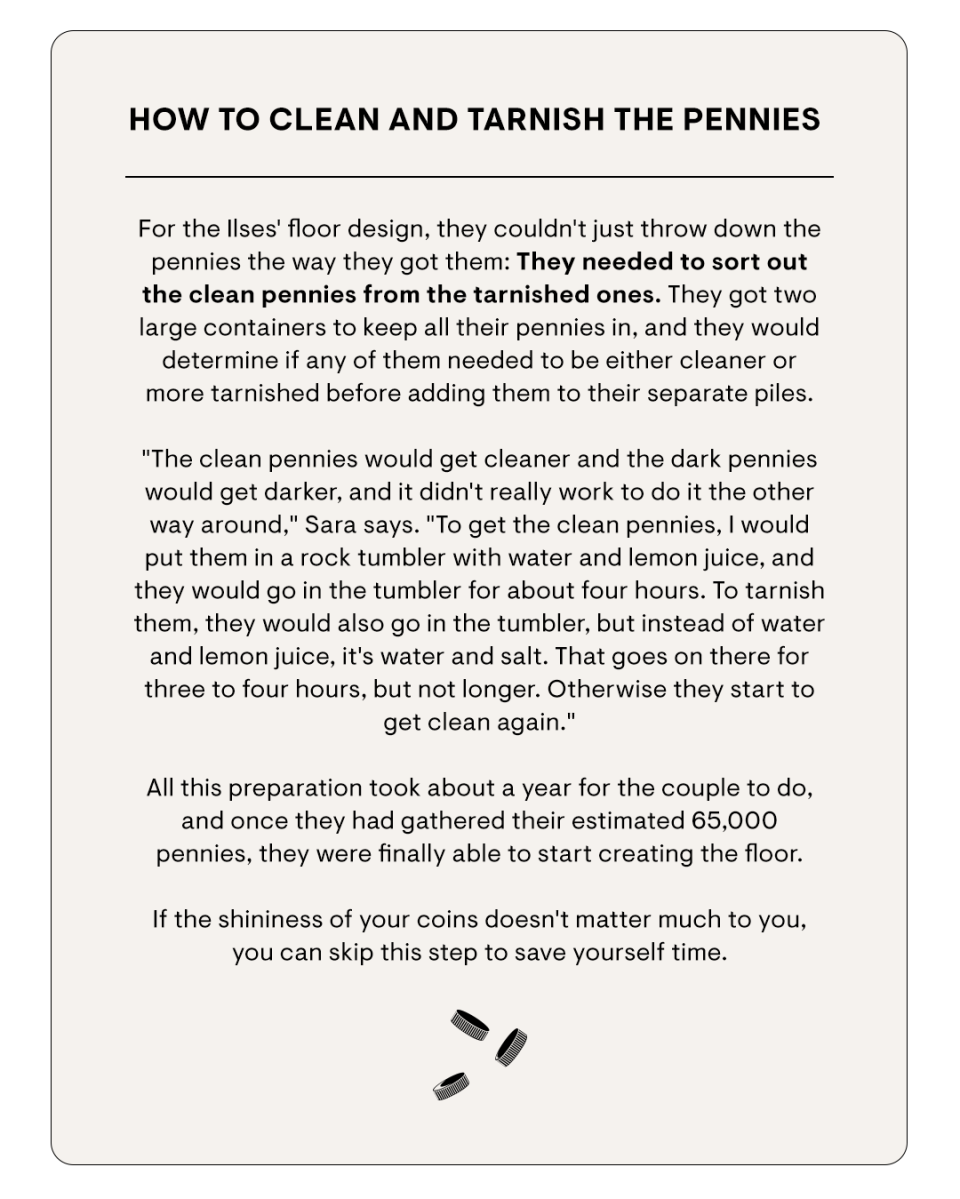
However, if you do want to create a design, the number of coins per square foot may change. "We did the pennies on an offset pattern, so the pennies are nested closely together," Sara explains. "So when you measure a square foot, there's going to be some pennies along the edges that are half on and half off the measurement, so it just depends on how you're counting those. It's basically between 256 and 288 pennies per square foot." The Ilses entryway is 230 square feet, and they estimated that they would need about 65,000 pennies to complete their project. In the end, their total was 65,507.

Step Two: Collect All the Pennies
While it's kind of obvious where you can source your pennies, there are other ways to go about finding them besides the bank. The Ilses—specifically Sara—knew they wanted to install a penny floor for a while, so they had time to gather pennies themselves and source them from family.
"My dad and my brother-in-law actually are kind of—I wouldn't say coin collectors, but they both just have big stashes of change on hand," she explains. "They let me raid their stash, and so they had probably 20,000 to 30,000 pennies on their own. After that, I went to the bank and just started buying them in about $200 quantities at a time." Just to make things as easy for you as possible: $200 worth of pennies is 20,000 pennies.
Sara also suggests getting all the pennies you need before starting your project. "I wanted to make sure that I had almost all of the pennies before I started because that process took so long and gluing them out is such a disruption of our daily life that I didn't want it to take any longer than it needed to," she says.
Step Three: Prepare Your Floor
Exactly what this part of the process will entail depends on your home's existing flooring. If you're installing a penny floor in a new build or a new addition to your home, like the Ilses, then they would recommend using a "high-quality 6 millimeter underlayment, just to make sure that the floor is super smooth beforehand."
An underlayment, Justin explains, is essentially a really nice slab of plywood. "The more plies make it generally more stable and less prone to movement during your seasonal changes," he says. "We wanted to make sure it was super stable, and we chose to just get the underlayment so it would reduce movement."
They did consider pouring self-leveling concrete instead, but it wouldn't have worked as easily for their space because of all the rooms and doors that open off their entryway. However, a self-leveling concrete might work well for you if you're considering installing a penny tile floor in a pretty contained space without many doors leading off it, like a mudroom or powder room.
If you aren't starting with a new floor, you'll want to remove the existing flooring first, then install an underlayment or self-leveling concrete. "The point is that you're starting with a completely smooth surface, something that's going to be stable and have no gaps—you wouldn't want to just start putting pennies down on top of whatever flooring you currently have," Sara says.
Part of the Ilses' process was painting the underlayment black, but that's because of the way they chose to stick the pennies to the floor.
Step Four: Adhere the Pennies
This is not at all a quick task and is very labor intensive, whether you choose grout or glue your pennies to the floor. There's no quick way to lay down these pennies—you're going to have to be on your hands and knees, so Justin definitely recommends investing in some knee pads or a cushion before you get started on this step.
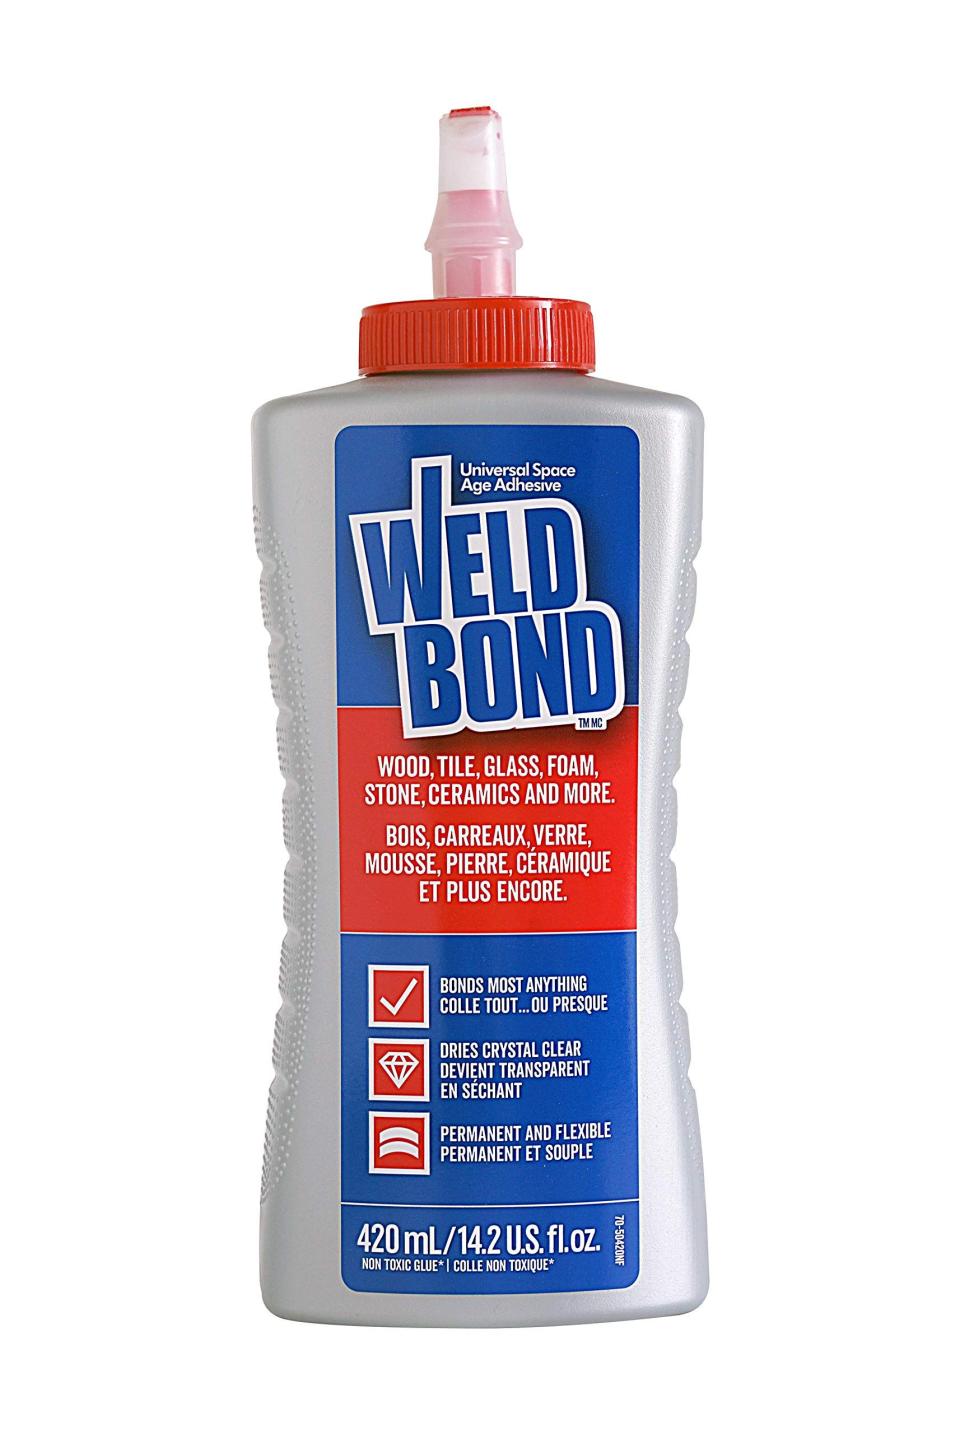
Sara explains that they decided to use glue to stick their pennies onto the floor rather than grout. "I decided not to grout because I had seen a lot of projects where the grout made the pennies foggy, and I just really didn't want to do anything that would've steered the pattern," she says. And if you're wondering—no, the Ilses did not glue them only heads- or only tails-up.
Multi-Surface Adhesive Glue
amazon.com
$13.31
If you're using glue like they did, keep in mind that whatever flooring you have underneath your penny layer will show through the sealant at the end, which is why the Ilses' decided to paint their plywood underlayment black. The glue they used is called Weldbond, and they "would highly recommend it because it's super strong and dries crystal clear, which is what we wanted," Sara says. They did mention it was difficult to find locally, even with their industry contacts, so they ordered it from Amazon.
Grout will also show in between the pennies, so if you're using it make sure to choose a color that will complement your space. A darker colored grout will complement the copper colored pennies, or you could find one in a similar coppery hue for a cohesive look.
To make it a bit easier on themselves, the Ilses first printed out a photo of the design to copy while they were gluing the pennies down. However, they quickly caught on and after a while didn't need the printout. We would suggest doing the same if you're interested in creating a pattern.

Step Five: Seal the Pennies
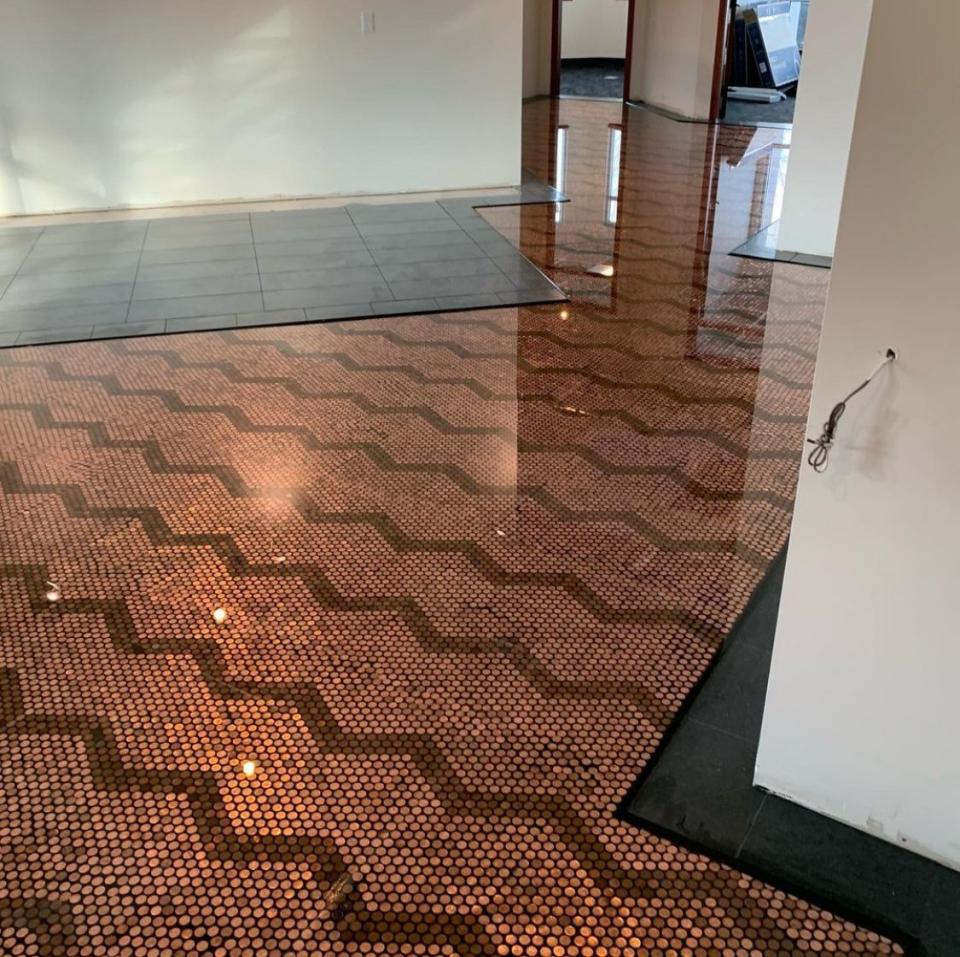
Once either the glue or grout is dry, it's time to seal your floor. This is a pretty personal decision based on the style of your penny floor. If you've used decided to use glue, before even choosing which kind of glue or sealant, you'll want to perform a few tests to make sure the glue and sealant don't react poorly. The Ilses used an epoxy because it worked well with their glue. "[Weldbond] hasn't seemed to react to the epoxy so far. Even in our test trials, we tried different adhesives, and this is the only one that did not react," Sara says. They're going to do three separate, very thin pours of the epoxy on top to ensure the smoothest surface as possible, as the epoxy will harden in between the individual pennies, similar to the way a grout would. After the last coat of epoxy hardens, they suggest doing one more top coat of a high solids urethane—a clear resin—which will "give us UV resistance and also really intensive scratch resistance," Sara says.
While they're professionals, they worked with other local contractors and paint stores that are familiar with these types of products to ensure they were using the best products possible with the best compatibility. Sara explains that they went through a "Minnesota-based company called Ultra Durable Technologies" to source both the epoxy and resin. "The epoxy is their MC Epoxy and the UV Urethane topcoat is their Ultra HTS," she says. "They did say that the epoxy company doesn't sell to just anyone—they make the reps take training so that they can pass their knowledge onto the customer." So keep that in mind while you're searching for the best products.
If you decided to go with a grout rather than glue, Amy Fedele, owner of Pretty Purple Door garden designs and someone who has completed her own penny floor project, suggests using a polyurethane as a sealant. "Polyurethane is meant to be applied in very thin, even coats. Therefore, trying to fill the holes between the pennies with polyurethane is not a great solution. The poly may not dry between the pennies, and that wouldn't be a good thing," Fedele writes.
How Much Does It Cost to Install a Penny Floor?
We won't lie to you: It'll cost you a pretty penny to install one of these floors. If you did the math earlier when we first stated how many pennies the Ilses used for their 230-square-foot entryway floor, then you know on pennies alone, they spent $655.07. On the high-quality underlayment, they spent $360; on a gallon of black paint, they spent $55; on a liter of Weldbond glue, they spent $60; on miscellaneous supplies, like squeegees for the epoxy, they spent $90; on the sealant supplies, they spent $630. That brings their total to $1,850.07, which equates to roughly $8.04 per square foot. "Which is, I would say a higher quality flooring—maybe mid-to-high," Sara adds. "I guess I wasn't too concerned about the cost. I knew I wanted to do it regardless."
However, this price doesn't at all cover their labor. "We did at first try to keep track, but it just got really daunting, so we stopped because it was discouraging," she says. "But I've had people ask me what I would charge if we did this for a client, and I can't say because the labor is just a lot. I don't know if anybody could afford that labor."
Andrey Zherikhov, owner of Zeran Floors, has completed a penny flooring project before and says that they would charge "about $300 to $400 per day" for labor. It's definitely something to weigh the costs and benefits of before you get started. "I believe that it's necessary to hire professionals on this type of sophisticated project. It’s very important to make a good preparation with proper equipment," Zherikhov says.
Things to Consider Before Installing a Penny Floor
You already know by now how time consuming a project like this can be, and you've been made aware of the costs. However, there are other aspects you may want to consider before starting a penny floor project.
In order for the project to look professionally done, even if you're a DIY master, you'll likely need to cut some of the pennies the way you would regular tile. While the Ilses didn't have to worry too much about cutting the pennies because their drywall isn't finished and the baseboards aren't on, they did have to cut around a floor register. "We had to cut the pennies so there was a nice transition, and so that way we could do our inset register in there as well," Justin says. "I just used a bench vise and a hacksaw. I didn't want to use any power tools on it, just because I found it a little easier to be more precise using hand tools with cutting the pennies."
Sara and Justin have pets in their household, so pouring the epoxy and resin was nearly impossible to do without trapping some pet hair in the coats. "I vacuumed the floor probably 10 times before we started, and then we sealed off the area and kept our pets out of it for a few days while vacuuming multiple times a day just to try our best," Sara says. "But I also did kind of think, 'You know what, they're part of it now.'" However, if you don't think you'd be so chill with the idea of pet fur in your floors forever, that's something to keep in mind.
There's also the changing tastes of it all—what if you wake up one day and hate your penny floor? You may want to remove the coins eventually (maybe you needed some change?), and not everyone is as familiar with removing epoxy as they are, say, carpet or tile. There are a few ways you can remove an epoxy flooring, according to Epoxy Colorado, like sanding or grinding it down or using a stripping solution. It would be good to keep track of exactly what epoxy you used so if the day does come where you don't have a penny to your name, you'll be able to look up the best ways to remove it.
For Sara, the hardest part of the project, aside from the amount of time it took, was the disruption to their daily lives. While she loves completing puzzles—and this felt like one 65,507-piece puzzle to her—it was a tedious, time consuming, and painful (thanks to all the leaning, bending, and kneeling) project. However, if you choose to start a penny floor project, you could always follow in the Ilses' footsteps and play audiobooks while completing it to pass the time. "I'm already a little sad that it's over. I'm like, 'What is my next project now that this giant one that's taken up literal years of my life is over?'" Sara says.
Working on a design project? Let us guide you.
Follow House Beautiful on Instagram and TikTok.
You Might Also Like

