Smoke Ninja review: elevate your creativity with safe smoke effects
If you’re a portrait, food or product photographer, chances are you’ve used your fair share of smoke machines. But if you’re looking for a safe, portable solution that you can chuck into your camera bag and take on a flight, then PMI’s Smoke Ninja will certainly be of interest.
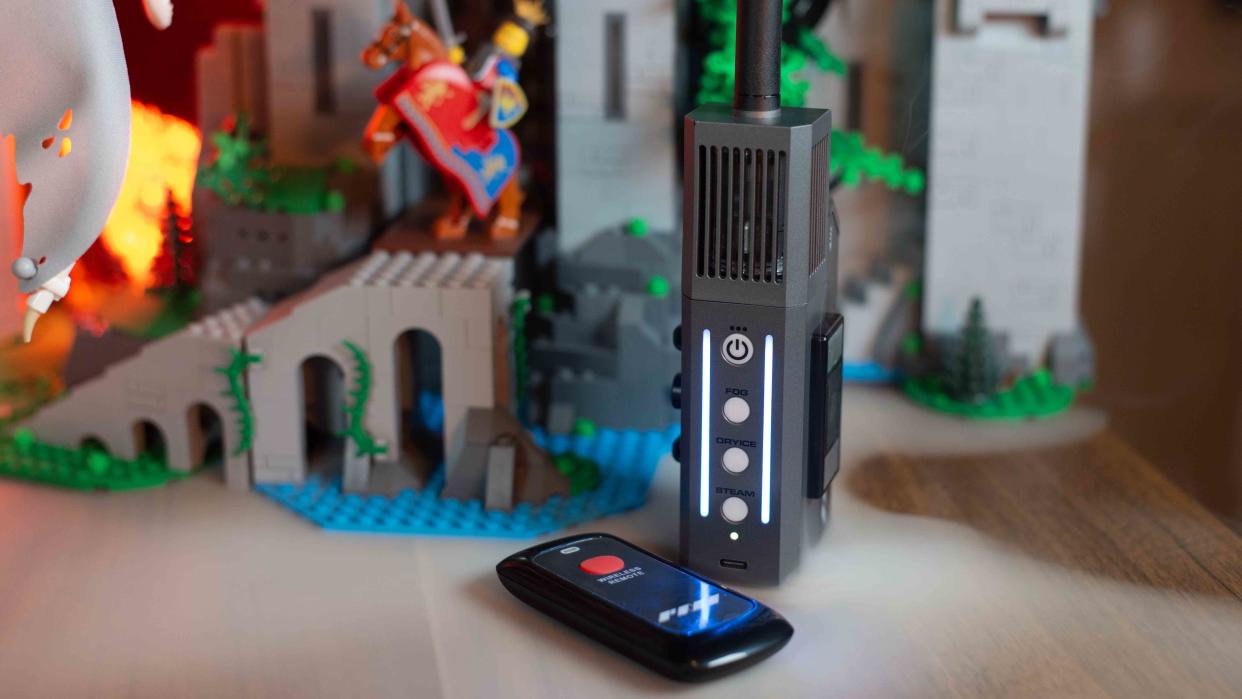
This pint-sized smoke machine is barely the size of a bottle of shampoo and yet its tiny reservoir manages to kick out sizable plumes of smoke for extended periods of time. But it’s much more than a simple smoke machine, three smoke settings provide a wealth of creative options, making this a versatile piece of creative kit for a variety of photography and videography applications.
The Smoke Ninja is not to be confused with PMI’s other portable smoke machine, the Smoke Genie. This larger, more powerful, and pricier device boasts features that make it more suitable for use on set and in larger productions. And while the Genie is still a viable tool for snappers, the smaller Smoke Ninja is specifically targeted towards photographers and run-and-gun videographers.
So, is the Smoke Ninja worth adding to your creative arsenal? Or is it just full of hot air?

Smoke Ninja: Specifications
Dimensions: 1.4 x 2.4 x 5.6in / 3.6 x 6.1 x 14.2cm
Weight: 0.63lb/286g (incl. battery and full tank)
Main battery: 3.5V (3000mAh+)
Remote battery: 23A 12V
Charging port: USB-C
Chamber capacity: 0.3fl oz/9ml
Full tank runtime: 15mins (max output)
Battery life: 15mins (max output)
Carry case: Hard shell
Smoke Ninja: Key features
The Smoke Ninja requires a very small amount of assembly and features a few accessories. It’s therefore welcome that it comes in a hard-shell case – roughly the size of a box of tissues. Inside, you’ll find a standard tripod mount, magnetic mount, USB-C cable, rubber seal, long bottle nozzle, PMI’s Cloud Formula liquid, a few Smoke Shaping Nozzles, a wireless remote, the liquid chamber, and the device itself. The kit will set you back $249 / £299, which is a healthy reduction on the larger Genie’s RRP of $595 / £500.
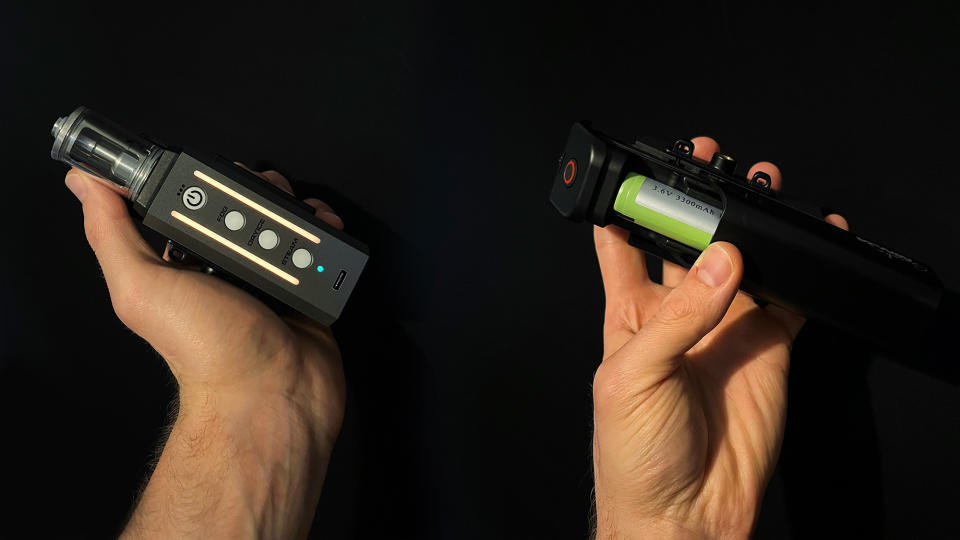
The Ninja’s 3.6V (3300mAh) battery is removable, which is useful if you anticipate using the machine for longer sessions and wish to invest in a spare. However, it can still be charged in situ using the included USB-C cable. PMI quotes 1.5 hours for a full charge and this lined up with my experience.
Both a full reservoir and charge will provide 15 minutes of smoke, but not continuously. This is the big difference between the Ninja and its larger sibling, the Smoke Genie. The Ninja’s Fog setting will cut out after roughly one minute; Dryice, 30 seconds; and Steam, two minutes of constant use to prevent overheating. If you anticipate requiring much longer periods of output, then the larger Genie is the better option.
The smoke itself is produced via the included Cloud Formula, made from vegetable glycerin and propylene glycol. A 100ml bottle is included and the Smoke Ninja’s chamber capacity is 9ml, so one bottle should provide you with plenty of uses (200 minutes of smoke). PMI makes it very clear that the Smoke Ninja is safe to use, describing it as: “100% harm free (...) Tested and whitelisted by both the SGS and the Actors Equity Association”. While also stating, “the entire smoke generation process is CLEAN, ODOURLESS, and FREE from any burning smell.”
Much of this is down to the Coil Protection System, which the Ninja has inherited from the Smoke Genie. This prevents the device from overheating and as PMI puts it: “eliminates the chance of creating toxic chemicals”.
PMI has created a ‘Smoke’ ecosystem with the release of the Smoke Ninja. This is because the batteries, chambers, and some attachments are interchangeable between both the Genie and Ninja – great news for existing Genie users or anyone wanting to pick up multiple machines. The chamber's cross-compatibility is a particularly neat feature. If you have, say, a Genie and a Ninja and are taking only one out on a shoot, you can preload the second chamber with Cloud Formula, keep it sealed in its capsule, and simply swap it in should the chamber in the machine run dry.
Smoke Ninja: Design
Setting up the machine is extremely simple. You remove the isolation tab from the remote and main battery and then charge the Smoke Ninja via the included USB-C. When fully charged, the LED strips will turn green. You then need to remove the heat shield on the device, take the chamber out of its air-sealed capsule, and screw the capsule onto the thread you've just uncovered by removing the heat shield.
Rather handily, the Ninja will tell you when the chamber is nearly tight enough via the pair of LED strips. The manual then tells you to give it a half turn to secure it in place, all preventing you from over tightening it.
I’ll admit to making a mistake when filling the chamber. The manual tells you to fill the chamber by lifting up the silicone tab. I managed to miss-identify this as the silicone tab on the heat sink and tried to pour the Cloud Formula in there… To avoid my mistake, ensure you remove the heat sink and pull back the silicone tab that sits directly on the chamber. This is explained in the manual via a diagram, so I’ll take the heat on that one.
Once the chamber is adequately filled, you pop the heat sink on, remove the heat-sink tab and you’re good to go. To turn the Smoke Ninja on/off, you need to press the power button three times in quick succession. This might seem a little unusual, but it’s actually a very welcome feature, because it safeguards you from accidentally turning on the machine. Extremely useful when in transit.
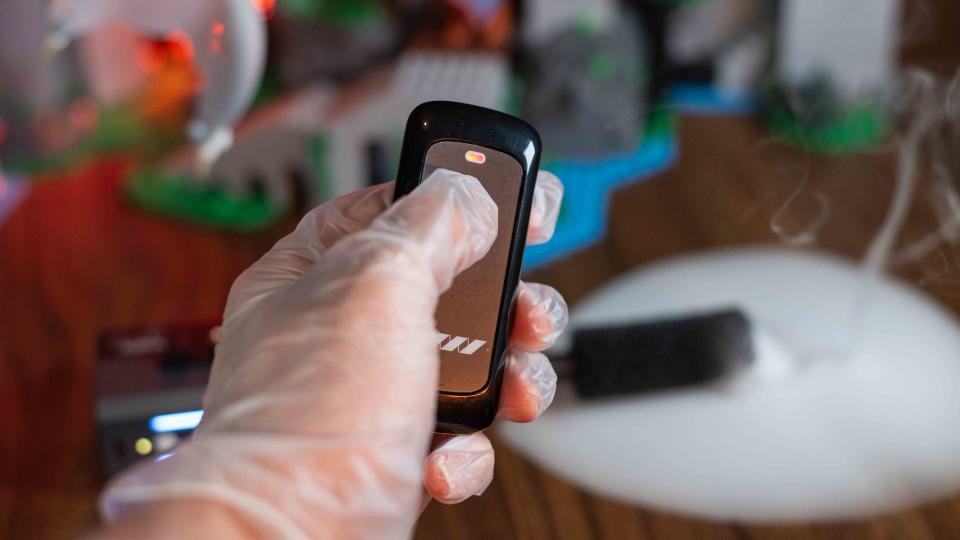
Once the machine is activated, you simply select your preferred mode by pressing the corresponding button. Rather helpfully, the LED lights will change white, blue or orange, depending on whether you've selected Fog, Dryice and Steam respectively. You then press and hold the red trigger button on the Ninja itself (or its remote) to activate the smoke. You can even control the brightness of the LEDs, or turn them off completely, by cycling through these options by pressing the mode button that you’re currently on. This is extremely helpful if you want the device to remain as invisible as possible.
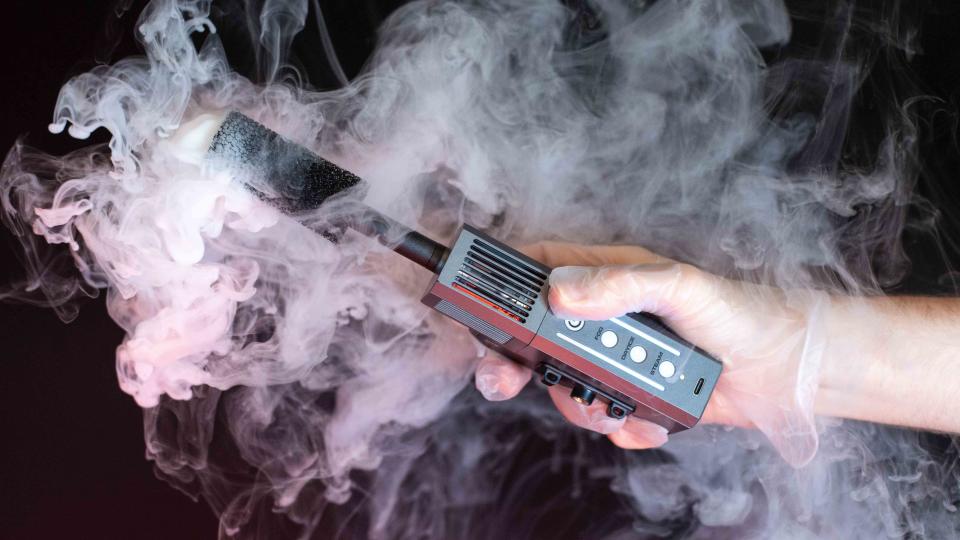
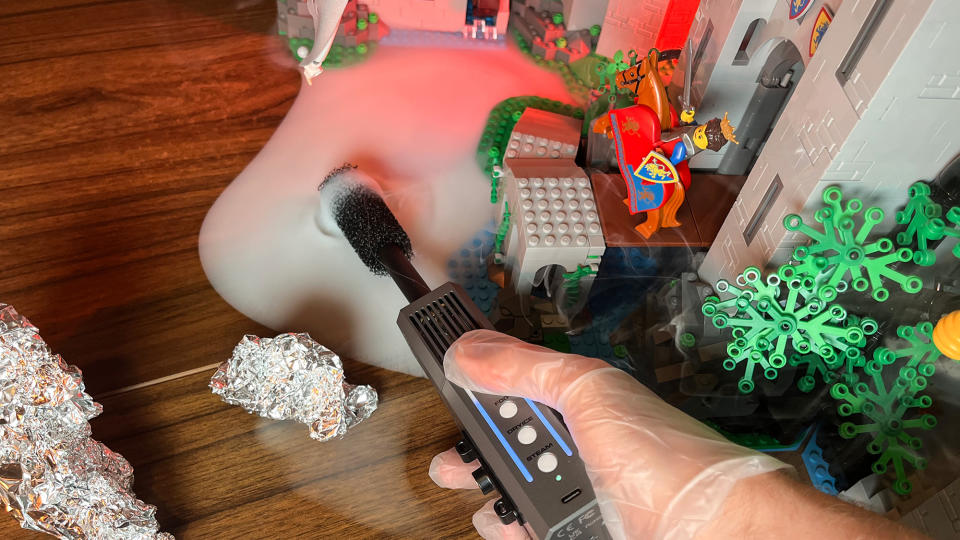
To get the best out of the Smoke Ninja, you’ll want to attach the Short Tube and Jet Tip or Long Tube and Dryice Nozzle, using the former for steam and fog, and the latter for dry ice. The nozzles also provide additional safety, since the smoke coming directly out of the steam outlet can run very hot. PMI's instruction video makes it very clear that nozzles are essential when operating the machine near anyone. The nozzle tips do require a little bit of force to push onto the steam outlet, but that’s a good thing, as there’s no danger of them falling off.
The device also comes with a single tripod mount and a single magnetic mount, which slide into a pair of grooves (one on either side). These lock in place once the battery compartment is attached. It’s a shame there aren’t mounts on the bottom and back of the unit and I would have preferred if they were simply built in, rather than separate components.
Something that I loathe when working with devices such as the Smoke Ninja is any kind of regular maintenance. And for that reason, I really like the air-sealed capsule. It exists to house the chamber when it’s not in use (make sure it has sufficiently cooled before removal). This prevents the need to remove any leftover Cloud Formula by keeping it in a usable state for up to 12 months. It’s also worth noting that PMI has ensured that the entire kit is air-travel friendly. Essential for working professionals. As you’d expect, the Smoke Ninja is not designed to work with third-party liquids. So ensure that you only ever use the Cloud Formula.
Smoke Ninja: Performance
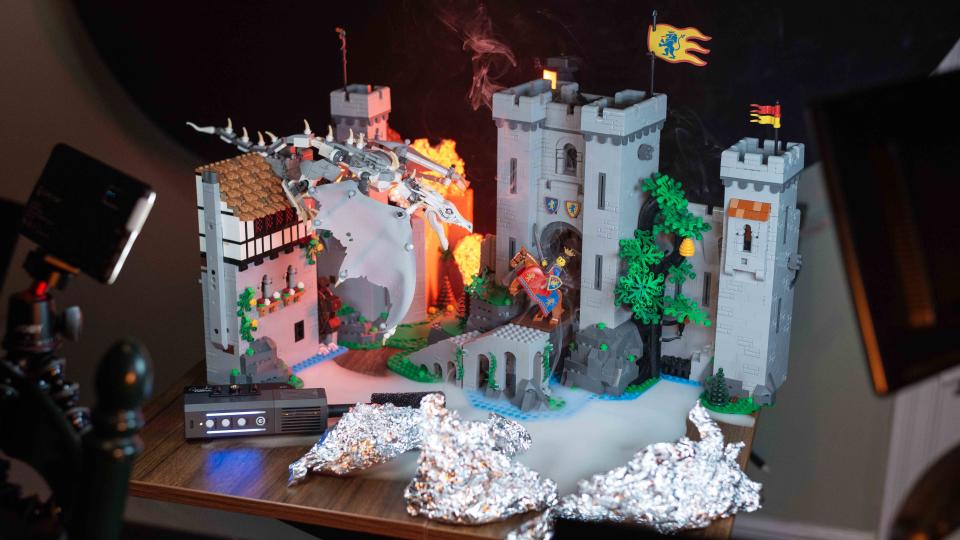
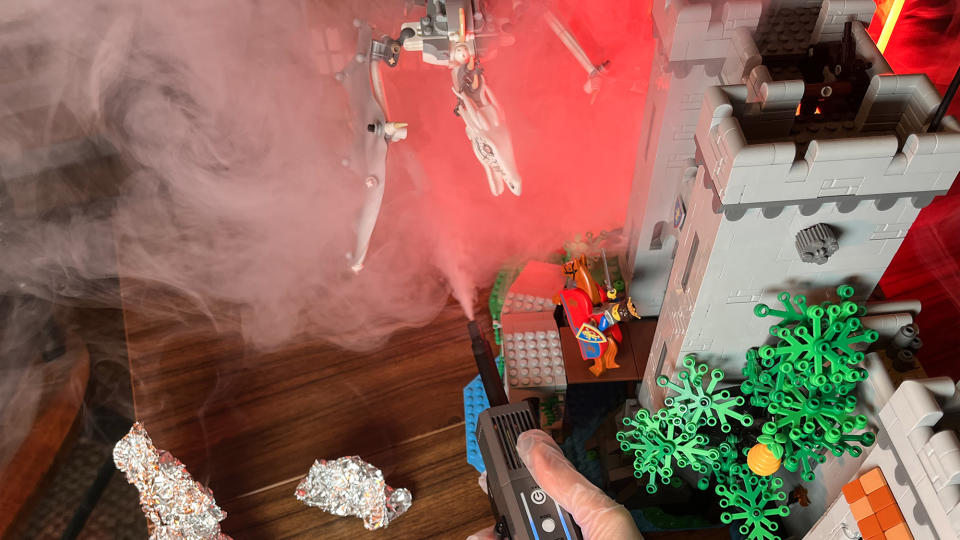
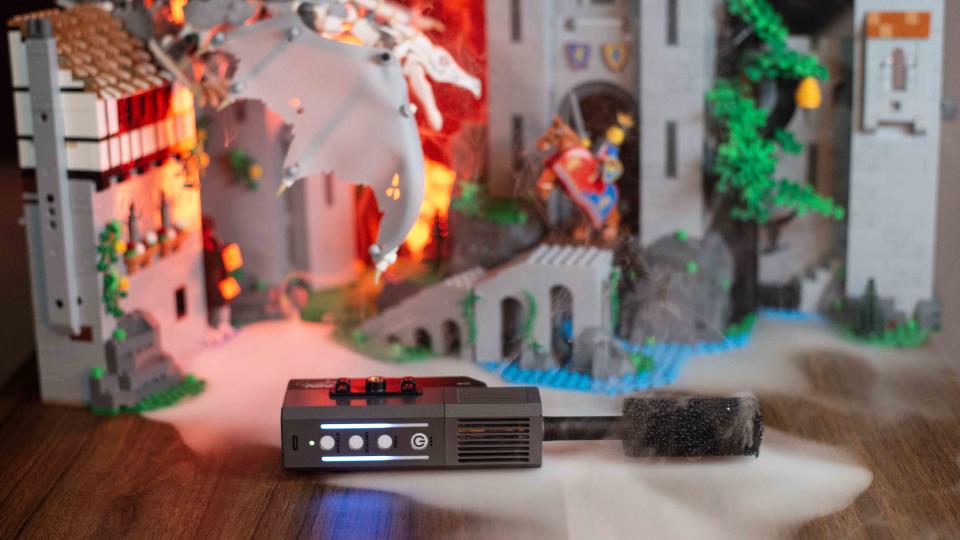
The Smoke Ninja kicks out a surprising amount of smoke for its diminutive size. You get three smoke settings: Fog, Steam, and Dryice. Fog is perhaps the most versatile. The machine billows out thick plumes of smoke, which quickly builds up a layer of haze, too, useful when capturing portraits. Steam is more subtle. Noticeably thinner ribbons of smoke, curl from the nozzle. This setting is ideal for food photography. But the most impressive setting is Dryice. Here, you use the included Dryice Nozzle to allow thick swathes of smoke to filter out of its spongy end, spreading out across your chosen surface. I also found that wafting something in front of the pooling dry ice disturbed it, forcing plumes of photogenic smoke up into the air.
Pairing different smoke settings with different nozzles can create a variety of additional effects, too. For example, if you attach a Curve Tube and Long Tube (sold separately) and then switch to the Dryice setting, you can create a very cool-looking effect, which PMI calls liquid smoke.
An unwanted side effect, which I experienced when using the Dryice setting, was a thin layer of residue, left when the smoke had cleared. This tacky patch of moisture didn’t seem to dry of its own accord, so I had to wipe it away with a surface cleaner. It didn’t leave a mark, but it’s worth noting if you’re planning on using it with an expensive or delicate prop that cannot be easily cleaned.
I used the Smoke Ninja to photograph a toy photography setup and found the quality of the smoke and the device’s ease of use to be a winner. The device will still kick out smoke if the desired nozzle isn’t attached, but I found that in every instance a nozzle was preferred. This is because the included attachments help increase the accuracy of the device, essential when working with miniatures. However, the exception might be using the smoke device to replicate a smoke bomb, where you want the smoke to billow instantly out of the device and require less accuracy. And that’s the Smoke Ninja’s genius. It's an incredibly versatile device, yet small enough to keep in your kitbag, when inspiration strikes.
Dryice residue aside, my time spent with the Smoke Ninja was extremely enjoyable. I didn’t notice any strange smells and so long as you don't remove the heat shield prematurely, or touch the smoke outlet, you've no need to come into contact with the chamber when it's hot. I emptied the canister for review purposes (something PMI does not recommend) and experienced no issues. And while I cannot say how well the device will hold up over time, the way PMI has pushed the Smoke Ninja’s robustness and safe-centric design – plus the Genie’s generally favorable reception – makes it a much more attractive option than a cheap, unbranded device.
As far as I’m concerned, if you’re going to be using a smoke machine on a regular basis, then picking up a well-made, well-designed and safe device should be your top priority.
Smoke Ninja: Verdict
The Smoke Ninja really is a paired-down Smoke Genie, but that’s not to say it’s inferior. This little device has been built as a portable solution for photographers and videographers who don’t require the Genie’s superior continuous output. The upshot is that it’s easier to use, smaller, and much more affordable. And yet, it still delivers a wide range of great-quality smoke effects and, crucially, matches the Genie’s penchant for safety, thanks to PMI’s Coil Protection System. If you’re a food, toy, portrait, or product photographer, or a run-and-gun videographer looking for a highly portable smoke machine, the Smoke Ninja is a great creative solution. And I’m not just blowing smoke…
Read more: Interested in product photography? Check out our guide for the best tripod for photographers, or the best LED light panels in 2024.

