How to set up your new Windows 11 laptop

So, you’ve got a new laptop, and you can’t wait to get it up and running. No matter what you want to use your new laptop for, you’ve still got to set it up. This is probably the most arduous part of buying a new gadget, and unless you have an existing Microsoft account, this won’t be as simple as syncing a new Apple device.
For the benefit of security and ease of signing back in or setting up a new laptop later down the line, I would suggest making a Microsoft account; if you’re an Xbox user, you’ll probably already have one, or if you made an account to use Microsoft 365 or use a free Outlook email account, you can log in using that. Using Windows Hello (biometric login which uses your fingerprint or webcam to identify you) or two-stage authentication means your laptop will be more protected and logging back in (if you’ve lost your password) is much easier.
Setting up your security preferences can be done after the initial set up, to make your laptop’s setting as personal to you as possible, along with downloading preferred apps and shifting necessary files from your old computer.
Likewise, you can remove any software you don’t want on your laptop once the set up is complete. These are all things you can fiddle with once your device is up and running. But here’s where you need to start.
Tools & requirements
Laptop
Windows 11 OS
Charger
Quick steps
Turn on your new laptop
Plug in charger
Select country, press yes
Select preferred keyboard layout, press yes
Agree to Ts & Cs
Connect to wireless network
Name your device
Set up for personal use
Sign in to your Microsoft account or create one
Click ‘Restore from previous device’ or set up as new device
Create a pin
Chose privacy settings
Follow steps to customise your device’s primary use or press skip
Press skip and decline to further steps until your device begins automatically finishing the set up
Step by step guide
Firstly, I suggest ensuring that the charger is plugged in to your laptop and that the device is charging throughout this process, as your battery life may drain, and if your laptop dies, you’ll potentially have to begin this process again.
1. Choose your location
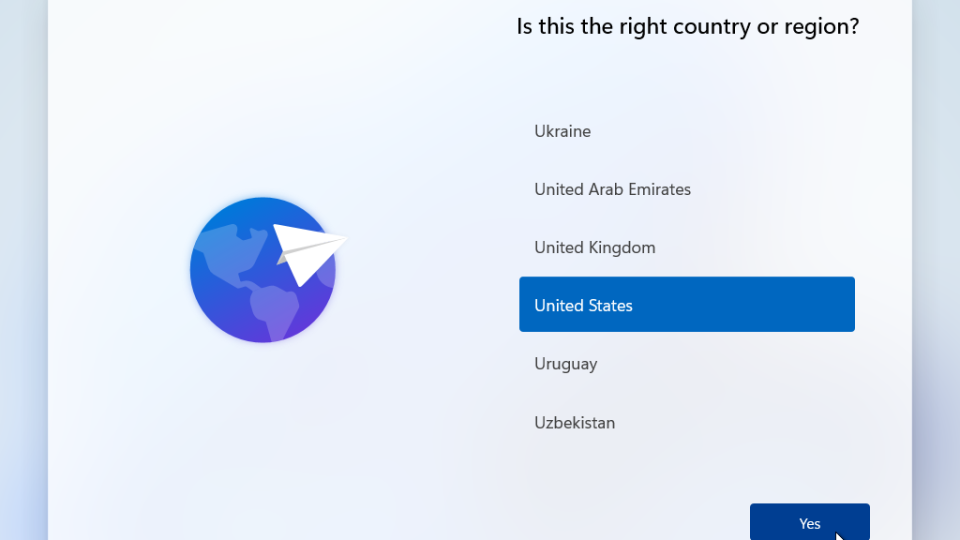
(Image: © Microsoft)
When you first turn on your laptop, you should be prompted to select a country or a region (as is common when setting up any device).
If you are in the United States, select United States from the list. Once you have selected your country, press the Yes button in the bottom right-hand corner. The next screen should ask you to select the right keyboard layout, once you have selected the one you prefer to use, press the Yes button to continue.
2. Accept Terms and Conditions
(Image: © Claudio Schwarz / Unsplash)
Following this, the usual Terms and Conditions will appear, and you will need to select ‘Accept’ to move on to the next step; for most of us, you don’t need to read the entire License Agreement, but if you prefer to then you can do this before pressing ‘Accept’.
3. Connect to the internet
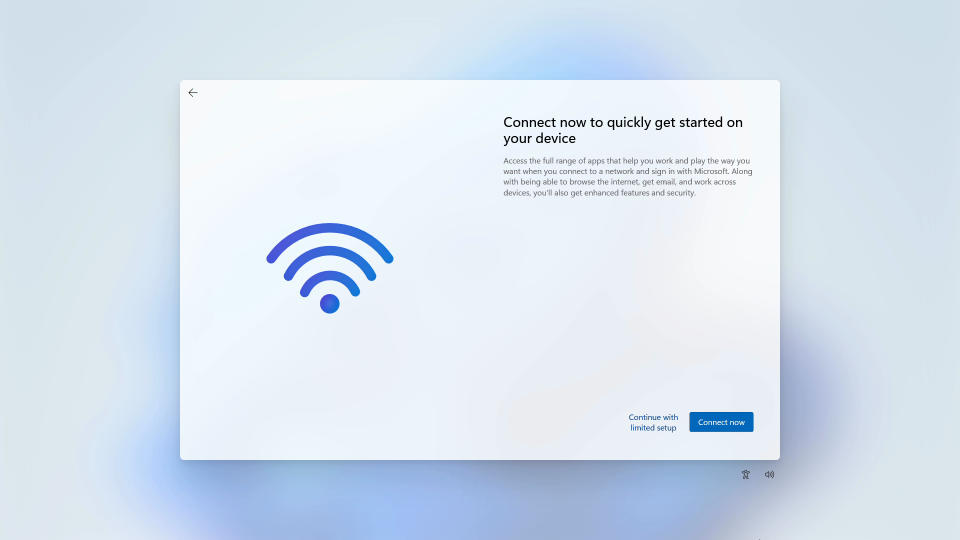
(Image: © Microsoft)
You should then be asked to select and connect to your wireless internet (if you are using a wired connection such as an ethernet cable, you will automatically connect).
Select the correct Wi-Fi and put in the password if prompted to. If you don’t have internet access where you are trying to set up your new laptop, you won’t be able to continue until you have connected to the internet.
4. Name your laptop

(Image: © Glenn Carstens-Peters / Unsplash)
You will then be prompted to name your new laptop, and you can call it pretty much anything within the 15-character limit.
For example, ‘Office Laptop’, if the laptop’s intended use is for work only. Or for personal use, you could call it ‘Fred’s Laptop’, or something funny if you will be the only person using this device.
Once you have come up with your chosen name, press ‘Next’, or if you don’t want to name your laptop at this stage you can press ‘Skip’ and come back to it later via Settings.
5. Select how you'll be using your laptop
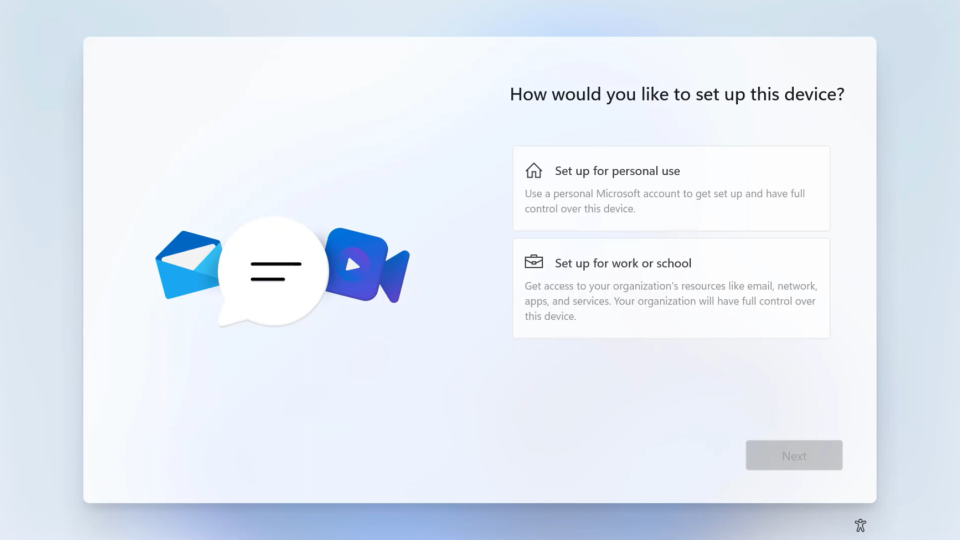
(Image: © Microsoft)
The next screen should ask you to select your preferred set up for your new laptop. If you are setting up this device for work, and are planning to sign into your organization’s account, select ‘Set up for work or school’ and follow the instructions that follow.
This How To is designed to help you set up a personal device, so when prompted select the ‘Set up for personal use’ option and then click ‘Next’.
6. Sign into your Microsoft account
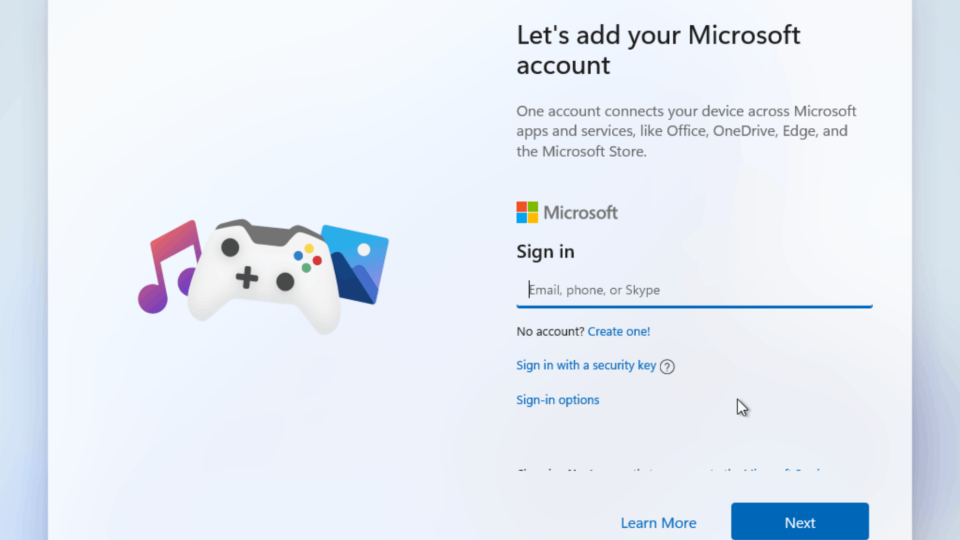
(Image: © Microsoft)
You will then be asked to sign into your existing Microsoft account. As stated previously, if you have made a Microsoft account to use an Xbox or Microsoft 365, you can use this log in. If this is your first Windows product and you have never created a personal Microsoft Account, select ‘Create one’ and follow the steps to make an account.
Assuming you have an existing account, put in the details as prompted and then click ‘Next’. You’ll then need to put in your password and confirm said password as would be expected when logging into any account.
7. Import settings from previous laptop
(Image: © dasytnik / Shutterstock)
Now the next step is where this becomes personal to you. You will be presented with a screen that asks if you would prefer to restore from a previous laptop – if you have had a previous device under this Microsoft account.
If you would like to do this then select the option ‘restore from Fred’s Laptop’ (or whatever you named the old laptop) and continue with the instructions to continue the set up.
For the purpose of this How To, select ‘more options’ and then ‘set up as new device’. This is not to say you cannot transfer any desired files from your previous device, it just allows for you to continue with the setting-up process by determining the settings you would prefer for this new Windows 11 laptop.
8. Create a PIN

(Image: © Unsplash)
You will then be asked to create a PIN – this is required to then set up Windows Hello.
Confirm the PIN then press ‘OK’. Following this screen, you will see a page that asks you to select your preferred privacy settings, and choices for advertisement and tailored widgets on your Start Menu.
Whatever you select can later be changed in Settings. Once you’ve opted in or out of the prompts, press ‘Accept’ to proceed.
9. Optional settings
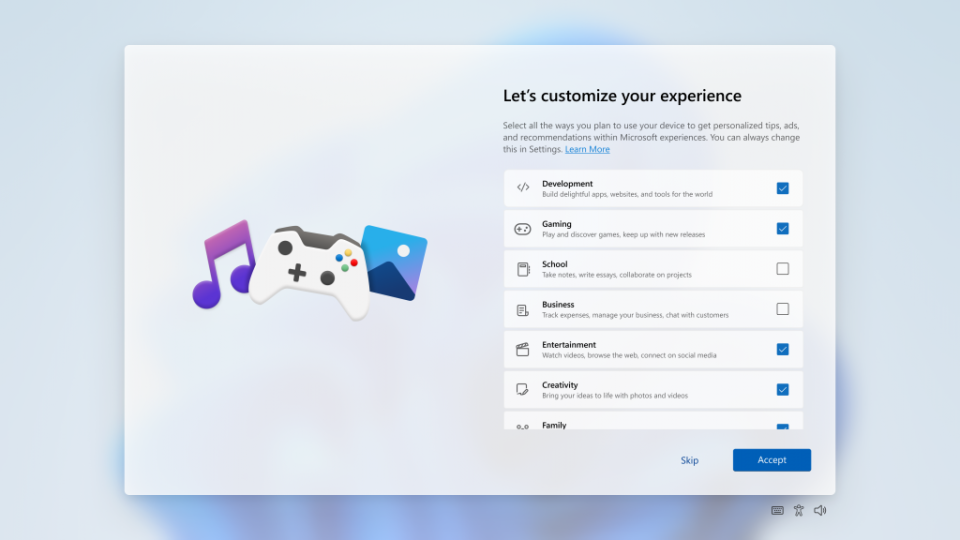
(Image: © Microsoft)
The next few steps are mostly optional; you can choose to set up your laptop for primarily Entertainment, Gaming, School or Creativity – or you can skip this step.
If you have an Android phone, you will be presented with the option to sync your devices, or you can choose to do this later. You will be prompted to set up Office and OneDrive or chose to skip for now. And if you have a Game Pass subscription, you will be given the chance to set that up on your laptop now or skip.
10. Final steps
(Image: © TechRadar)
Following this, your laptop will continue automatically setting itself up. Once this is completed, your laptop will be good to go. Any steps you skipped through, you can go back into Settings to change or set them up as you like.
As well, you can go into Settings and then Apps, Installed Apps and then go through to remove those that were pre-installed by the manufacturers. Just click on the Menu icon (three dots) next to the app you want to remove and then click the ‘Uninstall’ option.
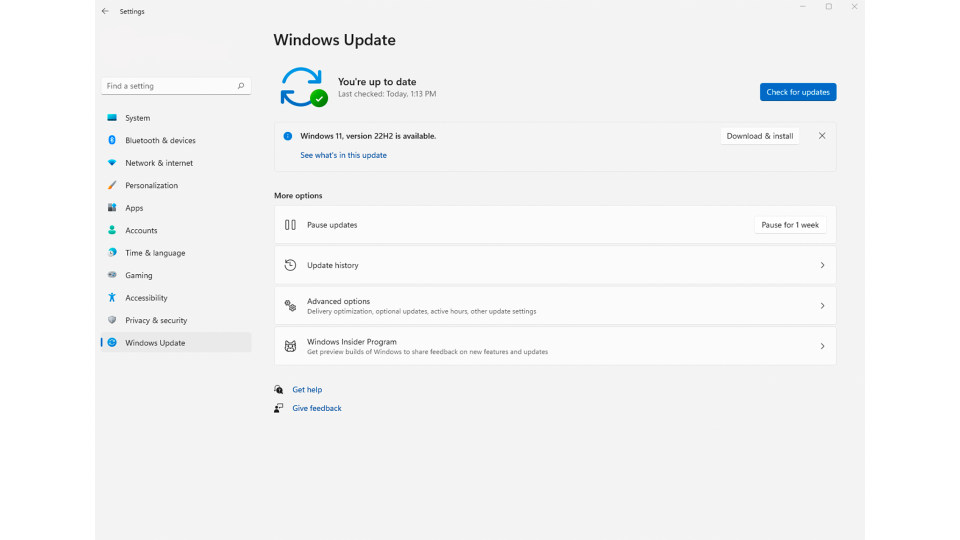
And if you want to ensure you have the most up-to-date version of Windows, go into Settings and select Windows Update, then hit ‘Check For Update’, if you’re a version behind then you can update quickly and painlessly in a matter of minutes. If you haven’t bought a laptop yet and are considering a Windows computer, check out our Best Windows Laptops guide for our top picks!
Final thoughts
Windows 11 remains a popular operating system; if you’re like me, it's a software I have used for years and grown increasingly familiar with. If Windows isn’t for you, check out the best MacBooks or the best Chromebooks instead.
But in terms of setting up a Windows laptop, its fairly easy and painless, and offers a good amount of personalisation when it comes to how you want to use the laptop and customizing your experience through recommended adverts and tips.
And as stated, a Microsoft account doesn’t just allow you to sign back in quickly, it also can be used on an Xbox console and other Microsoft products. While Apple is renowned for its privacy and security, features such as Windows Hello and two-step authentication does offer an added layer of security to your laptop that keeps it safe and private, without making the log-in process difficult or time consuming, allowing you to get back to work or go back to gaming within seconds

