How to Restore Furniture
1. Find the Right Piece
You don't want to buy a fixer-upper that's going to cost a fortune to restore, and you don't want to invest time and money in something that was never that great to begin with.
Three Things to Look For
According to Mike Kollman of I Like Mike's Mid-Century Modern, a furniture restorer in Brooklyn, New York, the most important aspect of a piece is its "bones." Real wood, not surprisingly, is better than particleboard. Hardwoods clean up more easily than soft. Traditional joints will be easier to work with.
Most old furniture is going to have damage, but it's much easier to deal with issues on the sides and legs, where fewer people will notice.
A lot of people overlook items with chipped veneer, but this can be easier to repair than it might seem. If you're buying at a garage sale, these pieces are more likely to be undervalued.
2. Take Care of Major Issues
If the piece has cracks and breaks and will require a lot of gluing, do that first. The mess made by sanding and stripping can interfere with the tight fit required for a good glue job. Otherwise, skip to step 3 and sand the whole thing so you have a bare wood surface for other repairs.

Cracks
A wobbly leg or major crack can often be treated with wood glue. The key is to clean it out completely. You'll know you got everything when the pieces fit easily together like a puzzle, Kollman says.
Gently rebreak the joint or crack with the mallet, so you can get to the surfaces where glue will be applied.
Excavate any globs of glue from previous repairs. Small chisels and razor blades are good for getting into nooks and crannies.
Clamp the pieces together without adhesive to make sure you can achieve a good fit. If the pieces are curved or oddly shaped, you may need shims or a jig to apply enough pressure with the clamps.
Liberally apply wood glue, then clamp. You want to see "squeeze-out"-excess wood glue around the perimeter of the joint. Wipe it off with a damp paper towel.
Once the glue is dry, remove the clamp and sand the joint smooth.
Chips and Dents
Chips, dents, and other deformities can be fixed using an epoxy putty like KwikWood.
First, use a razor to clear the damaged area of any loose wood or old glue.
Next, prepare the epoxy according to the manufacturer's instructions. Then apply it to the furniture as needed.
Once it sets, treat it like wood, sanding and refinishing it like the rest of the piece. Beware: Color matching epoxy is a fussy process.
Veneer
Veneer, a thin layer of wood glued to a different underlying material, lets furniture look beautiful when it's not practical to build the whole piece from one type of wood. But repairing it can be complicated. Here's what you need to know:
Make sure to note the thickness of the veneer before you start sanding. On older furniture, the veneer can be thick, but on newer pieces, you can easily sand through it.
If a gouge or chip in a surface goes through the veneer into the substrate below it, don't even try sanding it out. Fill it with epoxy as you would a dent in the wood.
Veneer tends to chip around the edges, where something can catch on it. Use a razor to gently check that the veneer isn't loose from the substrate. If it is, glue it down. Then use epoxy putty to fill the chips.
3. Remove the Old Finish
Oil Finishes
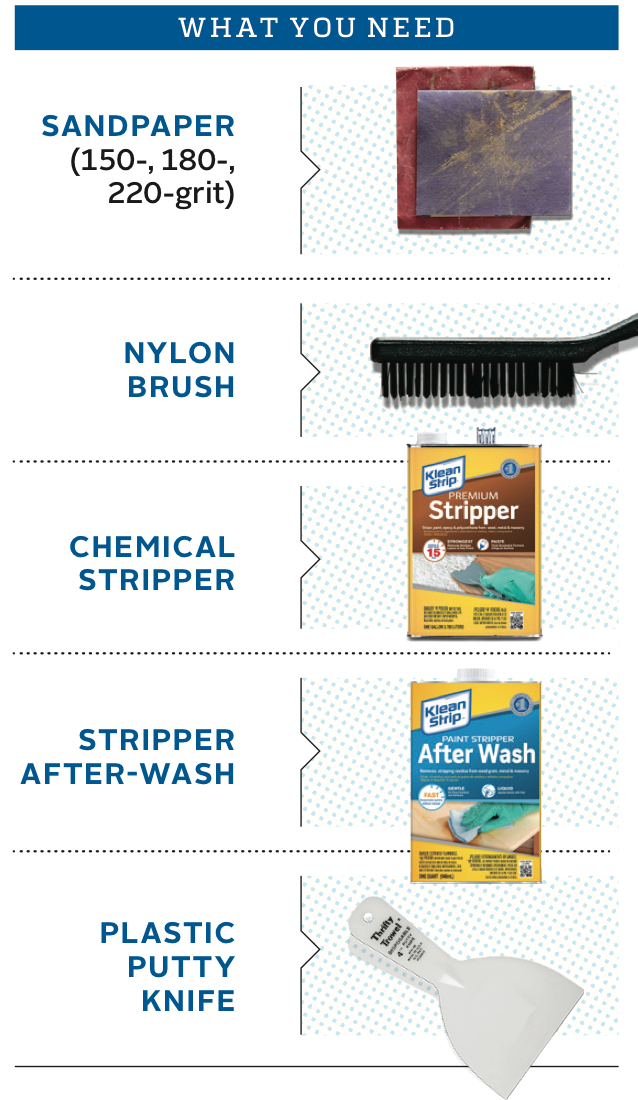
Sandpaper and elbow grease will be better than a chemical stripper. Start with 150-grit sandpaper, and use a sanding block to avoid accidentally rounding square edges. Applying medium pressure, make a few passes, then switch to 180-grit sandpaper and repeat. Work your way to 220-grit, then stay with that until you reach bare wood.
Paint and Other Finishes
Use a chemical stripper and, depending on the type, a stripper after-wash. Apply the stripper with a nylon brush. Follow the instructions on the can to determine how long to let it sit-usually about ten minutes. Scrape off the gunk with a plastic putty knife. (Metal scrapers are more likely to cause damage.) Then apply the stripper after-wash with steel wool. Repeat at least twice.
4. Reupholster
Although most reupholstery is best left to professionals, one of the most common upholstery jobs, a dining chair, is quite simple. Here's how to do it.

5. Refinish
Wait at least 24 hours after stripping and repairs, then it's time to start the finishing process.
What you need:
Sandpaper (600-grit for deburring. 1,000-grit or finer for finishing)
Wood stain
Finish
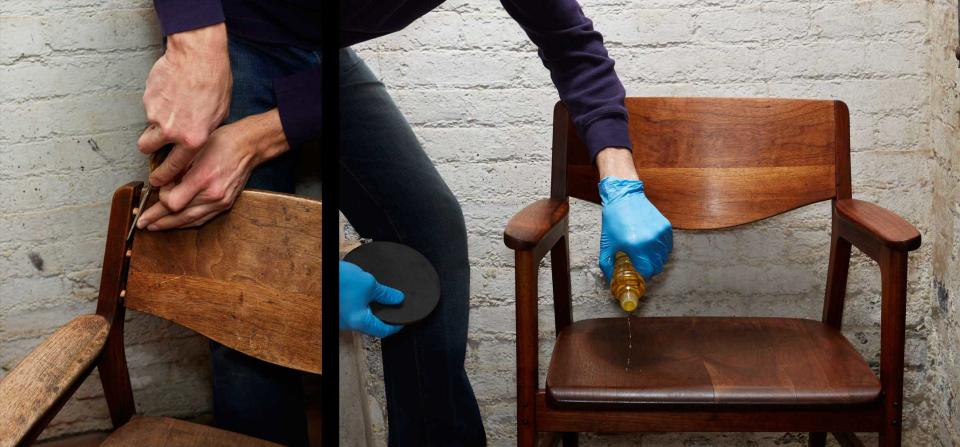
The Oil Finish
Using oil finishes means you don't have to work in a perfectly dust-free environment to get professional-quality results.
Pour finishing oil on the wood, then spread with a lint-free cotton cloth. Apply excessively-it should look like there's too much.
Let sit for 15 to 30 minutes before wiping off any excess.
Let dry for 24 hours.
Deburr with a very fine sandpaper, at least 600-grit. Clean dust with a lightly dampened cloth.
Repeat steps 1 through 4 for at least two coats. If any areas have less of a sheen, put oil on a cloth and gently even out the appearance.
Let dry for 72 hours.
Use lemon oil and superfine sandpaper of at least 1,000-grit to buff the finish to the desired level of polish.
With additional thanks to Clyde and Sharon Horrocks of Home Furniture Service in Granite Bay, California.
This story appears in the March 2016 issue of Popular Mechanics.

