How to Set up Your New iPhone: 13 Settings You Should Change Right Now

Congratulations! Someone got you that new iPhone you were hoping for. Now it’s time to sit down and make it work the way you want.
Hidden in its Settings app, you’ll find hundreds of switches and sliders that can make a huge difference in your iPhoning experience.
Most of the factory settings are fine the way they are. And some of the really important settings — such as your account information or your security fingerprint — aren’t secret at all; the phone asks you to set up those things the first time you turn on the phone.
But a number of important but not-so-obvious settings don’t come the way you probably want them. Here, for your iPhone-enjoyment pleasure, are 13 that are most worth changing.
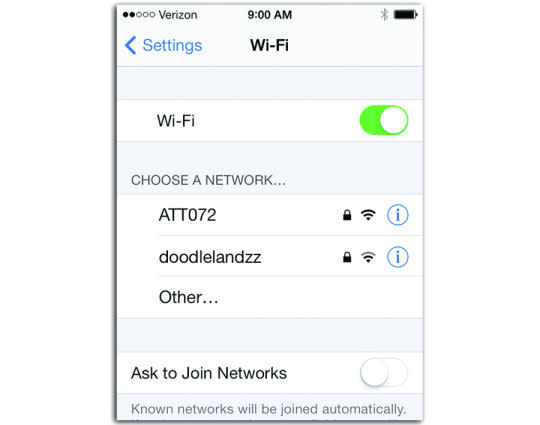
Stop Harrassing Me About Networks
Under Wi‑Fi, you’ll find an option called Ask to Join Networks. If this option is On, then the iPhone will continuously sniff around to find a Wi‑Fi network. If it finds one you haven’t used before, a small dialog box invites you to hop onto it.
So why would you ever want to turn this feature off? To avoid getting bombarded with invitations to join Wi‑Fi networks — which can happen in heavily populated areas — and to save battery power. (The phone will still hop onto hotspots it’s joined in the past, and you can still view a list of available hotspots by opening Settings → Wi‑Fi.)
Stop Eating Up Data for Nothing
In Settings → Cellular, the Use cellular data for list offers individual on/off switches for every single Internet-using app on your phone. Each one of those items could consume Internet data without your knowledge. But on this list, you can shut up the data hogs you really don’t feel like spending megabytes on.
Stop Switching to Cellular Data Without Telling Me
Thousands of iPhone fans know about the old Flaky Wi‑Fi Trick: If the phone is struggling to load Web pages or download email messages on a Wi‑Fi network, it often helps to turn off Wi‑Fi altogether. This forces the phone to hop over to the cellular network instead, where it’ll usually get a better connection.
In iOS 9, Apple offers Wi-Fi Assist: a feature that does all that automatically. If the phone is having trouble with its Wi‑Fi connection, it hops over to cellular data all by itself. (You’ll know when that’s happened by the appearance of the cellular-network indicator on your status bar — it’ll say 4G or LTE — instead of the Wi‑Fi symbol.)
If you’re worried about this feature eating up your data allowance, you can, of course, turn Wi-Fi Assist off (in Settings → Cellular). Apple notes, however, that even when Wi-Fi Assist is enabled, it won’t kick in under certain circumstances: when you’re data roaming; for background apps (it only helps the app that’s in front); or if large amounts of data would be consumed (such as audio- or video-streaming or transmitting email attachments).
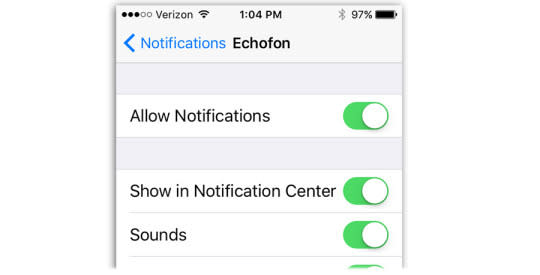
Stop Whiny, Irrelevant Apps from Bugging Me
The Settings → Notifications panel lists all the apps that think they have the right to nag you for your attention. Flight-tracking programs that alert you when there’s an hour before takeoff; social-networking programs that ping you when someone’s trying to reach you; games that let you know when it’s your move; instant-messaging apps that ding to let you know that you have a new message: All of those notifications can add up to a lot of interruptions.
But on the Notifications panel, you can tailor — to an almost ridiculous degree — how you want to be nagged. For each app you don’t really care about, just turn off Allow Notifications.
Stop Waking Me Up
When you turn on Do Not Disturb (from the Control Center or Settings → Do Not Disturb, the phone remains quiet and dark. It doesn’t ring, chirp, vibrate, light up, or display messages. A moon symbol appears on the status bar to remind you why it seems to be so uncharacteristically depressed.
Yes, Airplane Mode does the same thing, but there’s a big difference: In Do Not Disturb, the phone is still online. Calls, texts, emails, and other communications continue to chug happily away; they just don’t draw attention to themselves.
Do Not Disturb is what you want when you’re in bed each night. You don’t really want to be bothered with chirps for Facebook status updates and Twitter posts, but it’s fine for the phone to collect them for the morning.
Bedtime is also why Do Not Disturb comes with two fantastic additional settings: one that turns it on and off automatically on a schedule, so that the phone goes dark each night at the same time you do; and another that lets you designate important people whose calls and texts are allowed to get through — for emergencies, say.
To set it up on a schedule, open up Settings → Do Not Disturb. Turn on Scheduled, and then tap the From/To block to specify starting and ending hours. (There’s no separate setting for weekends; Do Not Disturb will turn on and off for the same hours every day of the week.)

Then: What if your child, your boss, or your elderly parent needs you urgently in the middle of the night? Turning the phone off completely, or putting it into Airplane mode, would leave you unreachable in an emergency.
That’s why Apple built in the Allow Calls From option. When you open Settings → Do Not Disturb and then tap Allow Calls From, you’re offered options like Everyone (all calls and texts come through), No One (the phone is still online, but totally silent), or Favorites, which may be the most useful option of all.
That setting permits calls and texts from anybody you’ve designated as a Favorite in the Phone app. Since those are the people you call most often, it’s fairly likely they’re the most important people in your life.
You can also create an arbitrary group of people — just your mom and sister, just your boss and nephew, whatever. You have to create these address-book groups on your computer (or using an app like Groups by Qbix). Once you’ve done that, their names appear on the Allow Calls From screen under Groups. You can designate any one of them as a lucky exception to Do Not Disturb.
The Do Not Disturb settings screen also offers something called Repeated Calls. If you turn this on, then if anybody tries to call you more than once within 3 minutes, the call will come through. The idea here is that nobody would call you multiple times unless he needed to reach you urgently. You certainly wouldn’t want Do Not Disturb to block somebody who’s trying to tell you that there’s been an accident, that you’ve overslept, or that you’ve just won the lottery.
The final option on the settings screen is Silence. If you choose Always, then Do Not Disturb works exactly as described above. But if you choose Only while iPhone is locked, then the phone will ring and vibrate when you’re using it. Because, obviously, if the phone is awake, so are you. It’s a great way to ensure that you don’t miss important calls if you happened to have awakened and started working early.
Stop Eating Up Data in the Background
The list that appears in General → Background App Refresh identifies apps that try to access the Internet to update themselves, even when they’re in the background. Since such apps can drain your battery, you have the option here to block their background updating.
You can also turn off the master Background App Refresh switch. Now the only apps that can get online in the background are a standard limited suite (music playback and GPS, for example).
Stop Auto-Correcting Me
The iPhone, like all smartphones these days, thinks it’s doing you a favor by auto-correcting your spelling as you type. Of course, if you’re a creativistical wordsmith who has the hotz for fresch spellings, you’ll find its rigidity somewhat flustrating. In General → Keyboard, you can turn off Auto-Correction.
Let Me See the Type
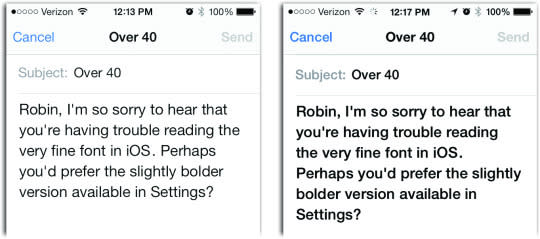
Apple has finally realized what anyone over 40 already knows: As you age, small type becomes harder to read. Fortunately, there’s a universal text-size slider that can boost the size of text in every app on your phone.
In Settings → Display & Brightness → Text Size, you can drag the slider to make the type in most apps bigger. And if the spindly fonts of iOS 9 are a little too light for your reading tastes, you can flip the Bold Text switch on.
Ring With Better Sounds
The iPhone is, of course, a cellphone — and therefore it sometimes rings. The sound it makes when it rings is up to you; by tapping your way to Settings → Sounds → Ringtone, you can view the iPhone’s list of 25 built-in ringtones, plus 27 “alert tones,” plus any new tones you’ve added yourself.
Tap a ring sound to hear it. After you’ve found one you like, confirm your choice by tapping Sounds to return to the Sounds screen. (In fact, you can choose a different ringtone for each person in your phone book, within the Contacts app.)
But why stop with a ringtone? The iPhone can make all kinds of other sounds to alert you — to the arrival of a new voicemail, text message, or email; to the successful transmission of an outgoing email message, tweet, or Facebook post; to calendar or Reminders alarms; to the arrival of AirDrop files; and so on.
This is a big deal — not just because you can express your individuality through your choice of ringtones, text tones, and so on, but also because you can distinguish your iPhone’s blips and bleeps from somebody else’s in the same family or workplace.
For each of these events, tap the light-gray text that identifies the current sound for that event (Tri-tone or Ding, for example). On the resulting screen, tap the different sound options to find one you like; then tap Sounds to return to the main Sounds screen.
Show My Battery Percentage
In the Battery settings, you can turn on the Battery Percentage switch. That way, instead of just a “filling-up-battery” fuel-gauge icon at the top of your screen, you see exactly how fully charged the battery is (“96%”).
Double My Battery Life
More than ever, the iPhone is a real-time window into the data stream of your life. Whatever changes are made to your calendar, address book, or email back on your computer at home (or at the office) can magically show up on your iPhone, seconds later, even though you’re across the country.
That’s the beauty of “push” email, contacts, and calendars, which you get if you have a Yahoo Mail account, iCloud account, Gmail account, or corporate Microsoft Exchange account, for example.
Having an iPhone that’s updated with critical information in real time is amazingly useful, but there are several reasons why you might want to turn off push. You’ll save battery power, save money when you’re traveling abroad (where every “roaming” Internet minute can run up your cellular bill), and avoid the constant “new mail” jingle when you’re trying to concentrate.
And what if you don’t have a push email service, or if you turn it off? In that case, your iPhone can still do a pretty decent job of keeping you up to date. It can check your email every 15 minutes, every half-hour, every hour, or only on command (Manually).
The iPhone always checks email each time you open the Mail app, regardless of your setting here.
You set all of this up in Mail, Contacts, Calendars → Fetch New Data settings panel. (Keep in mind that more frequent checking means shorter battery life.)
Bold the Titles of My Notes
Now that Notes comes with ready-to-use type styles like Title, Heading, and Body, you can use the New Notes Start With option (in the Notes settings panel) to choose which of those is the first line when you create a new note. If, , for example, you usually start notes with a title, choose Title.

Also: Most people use Notes with online accounts like iCloud, Gmail, Yahoo, and so on, so that their notes are always backed up and synced to their computers. But if you select On My iPhone as the default account for Notes, then you’ll have another option: Creating notes that live only on your phone, and aren’t transmitted, synced, or backed up. Handy if you have deeply personal information, or you just don’t trust those online services.
Fill In My Passwords and Credit-Card Numbers For Me
Finally: In the Safari browser, your phone can offer to fill in the stuff on Web pages that’s a royal pain to type: Website passwords and card numbers, for example. You set all of that up in the Safari → General settings, under Passwords and Saved Credit Cards.
There is, of course, lots more to explore in the Settings app; it’d probably take you until next Christmas to figure out what everything does. In the meantime, the changes you’ve just made here should help make your new-iPhone-experience that much merrier.
David Pogue is the founder of Yahoo Tech; here’s how to get his columns by email. On the Web, he’s davidpogue.com. On Twitter, he’s @pogue. On email, he’s poguester@yahoo.com. He welcomes non-toxic comments in the Comments below.
