How to fix Blue Screen of Death errors on Windows 11
On Windows 11, the "Blue Screen of Death" (BSoD) refers to the error on the screen when the system cannot handle a specific operation that causes the device to crash without warning.
Usually, you will see a "blue screen" (also referred to as "stop error," "system crash," or "bug check") during an upgrade, starting up the system, or "out of the blue" when you're actively working with applications. Furthermore, you will only see a blue background with a sad kaomoji and insufficient information to determine the reason for the problem.
However, the issue can usually be narrowed to a buggy update, device driver, compatibility issues with a specific app, or a piece of hardware that needs replacing.
This how-to guide will walk you through different steps to troubleshoot and resolve most problems causing blue screen errors on Windows 11.
How to resolve blue screen errors during an upgrade on Windows 11
A Blue Screen of Death is not uncommon while upgrading to Windows 11. Usually, the error may occur because of a compatibility problem with an application or security software. However, it can also happen because of corruption in the current setup or damaged files in the installation media.
If the installation wizard rolled back to the previous setup, uninstalling non-essential apps, disconnecting non-essential devices, re-downloading the setup files, or performing a clean installation can fix the problem.
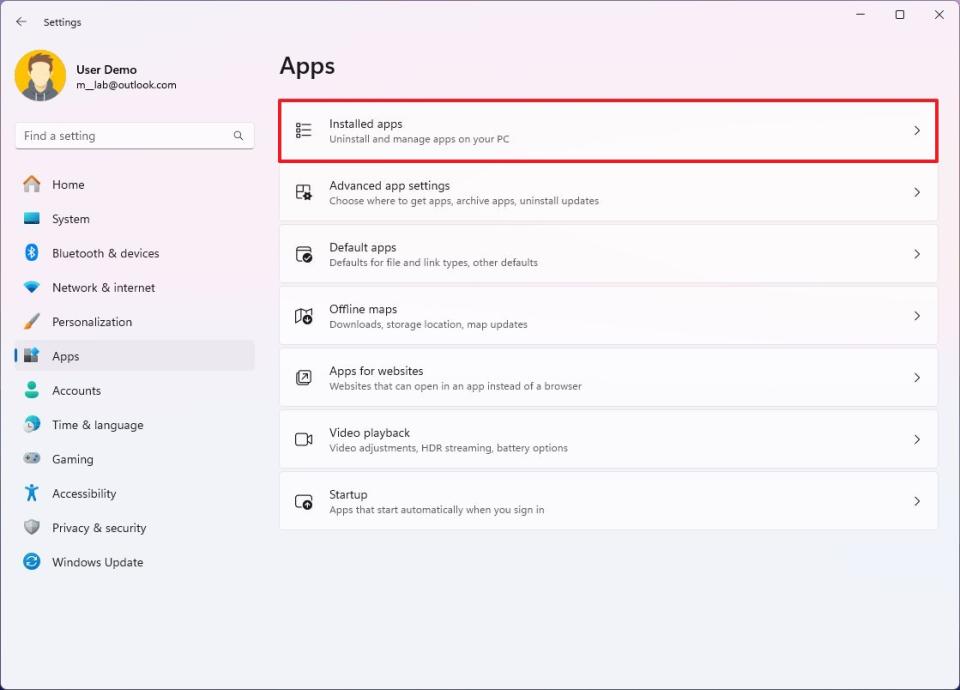
Uninstall problematic apps
To uninstall an application causing a blue screen on Windows 11, use these steps:
Open Settings.
Click on Apps.
Click the "Installed apps" page on the right side.
Under the "App list" section, click the menu (three-dotted) button and choose the Uninstall option for the incompatible app.
Click the Uninstall button again.
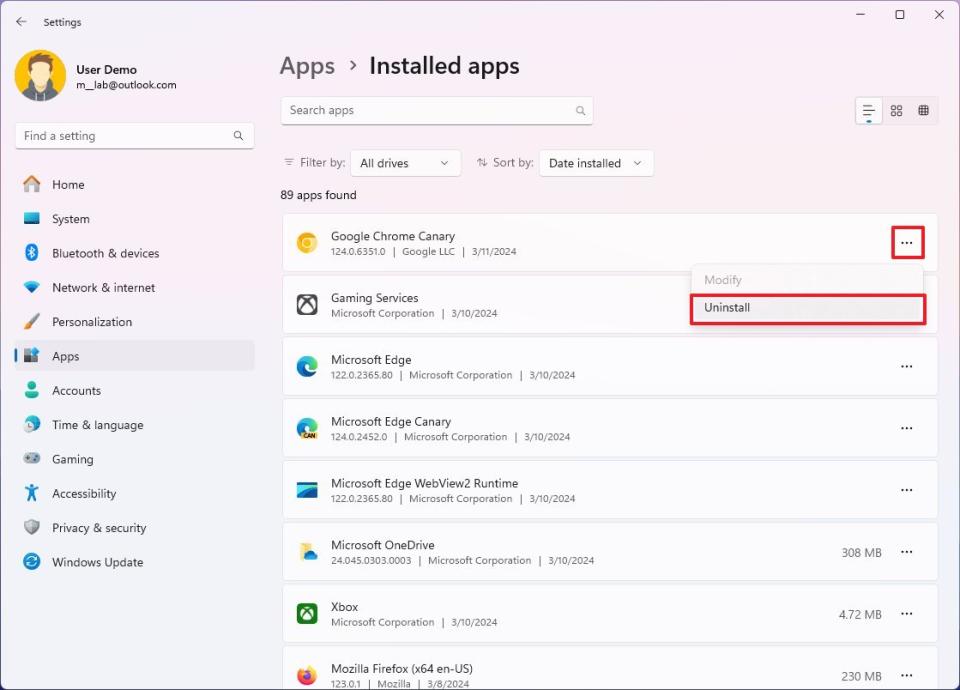
Continue with the on-screen directions (if applicable).
Once you complete the steps, you may need to repeat the instructions to uninstall other non-essential apps. After removing all the conflicting applications, you may try to continue with the installation process.
Disconnect non-essential devices
When a hardware problem is detected, you will likely see a blue screen of death. As a result of this potential issue, it's a good idea to disconnect the non-essential peripherals from your computer.
For example, you may want to disconnect external hard drives, printers, secondary monitors, phones, and other USB or Bluetooth devices.
After the installation, you can reconnect the peripherals.
It might be a compatibility issue if you continue to see the problem.
Updating the device driver to the latest version can resolve the issue. However, if the computer already has the most recent driver, the problem may be with the new version of Windows 11, or the hardware coincidently got damaged and needs to be replaced.
Microsoft lists all the known issues for the different versions of Windows on the health dashboard page.
Redownload setup files
If you try to use the upgrade option from the Windows Update settings and you see a blue screen, it may be that one or more files are damaged. In this case, you can clear out the files and try to re-download the setup files one more time.
To clear and download the Windows 11 installation files again, use these steps:
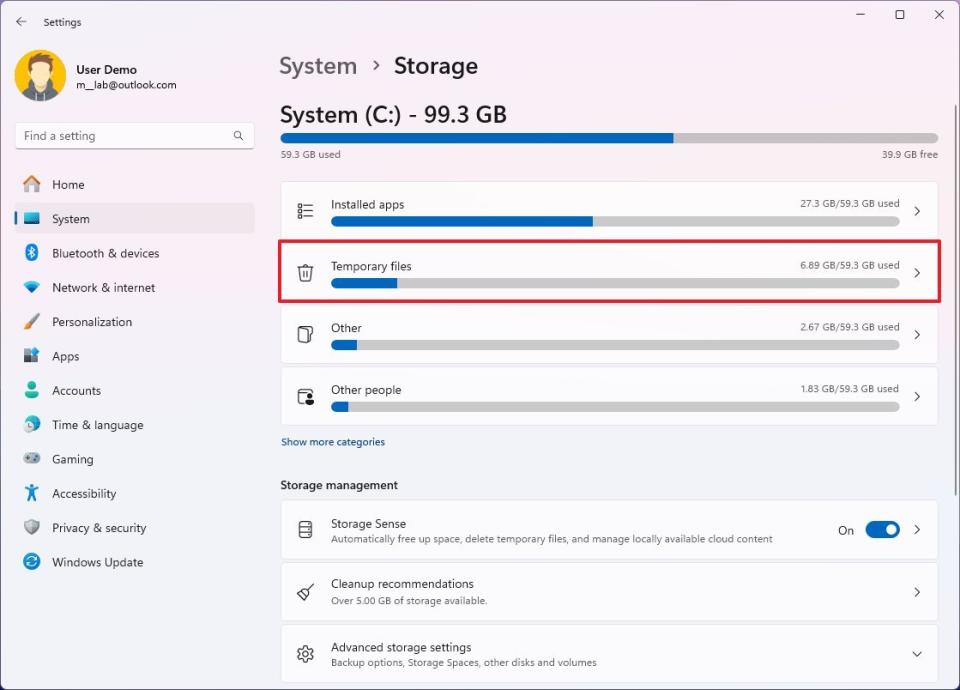
Open Settings.
Click on System.
Click the Storage page on the right side.
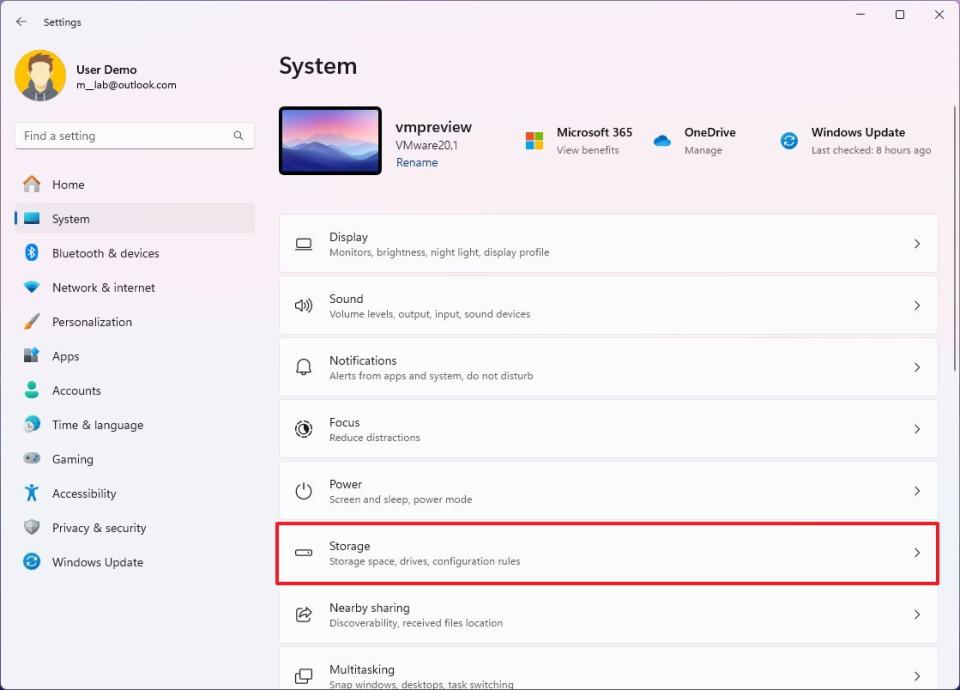
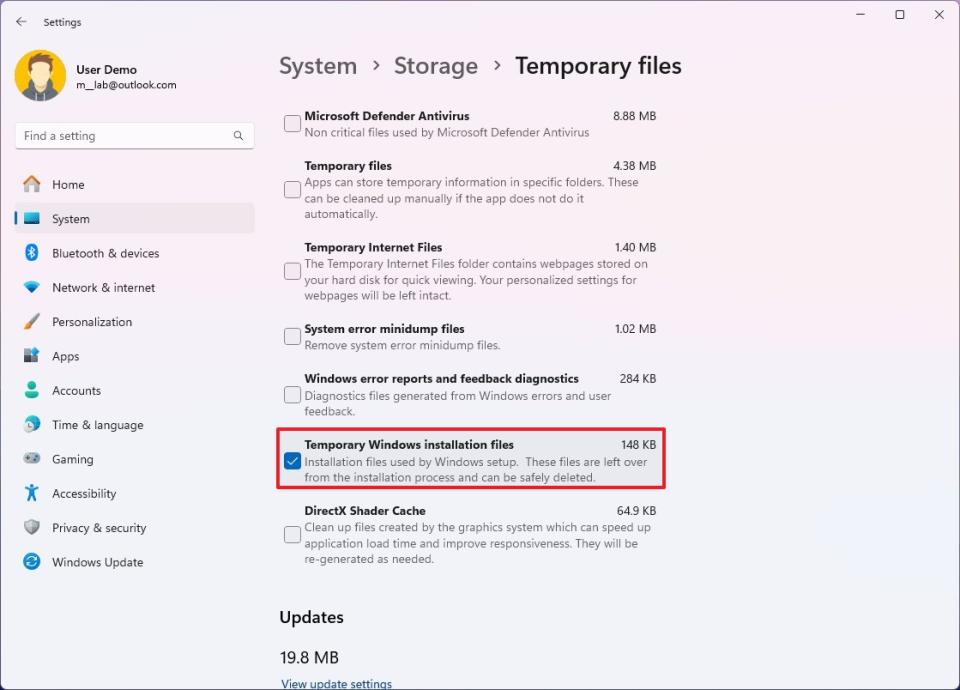
Click the Temporary files setting.
Clear the default options.
Check the "Temporary Windows installation files" option.
Click the Remove files button.
After completing the steps, click the "Check for updates" button to re-download the installation files in the Windows Update settings.
If the problem remains, you may have to use the Installation Assistant to perform an in-place upgrade.
Check upgrade logs
Microsoft's SetupDiag is a tool for administrators that can help troubleshoot and determine why an installation failed. This information could be critical to resolving the problem.
To determine why the upgrade failed to apply to the SetupDiag tool, use these steps:
Click the Download SetupDiag button to save the installer on your computer.
Right-click the "SetupDiag.exe" and select the Run as administrator option.
Right-click the SetupDiagResults.log file and select the Open option.
Once you complete the steps, the app will open the log file for review with the default text editor.
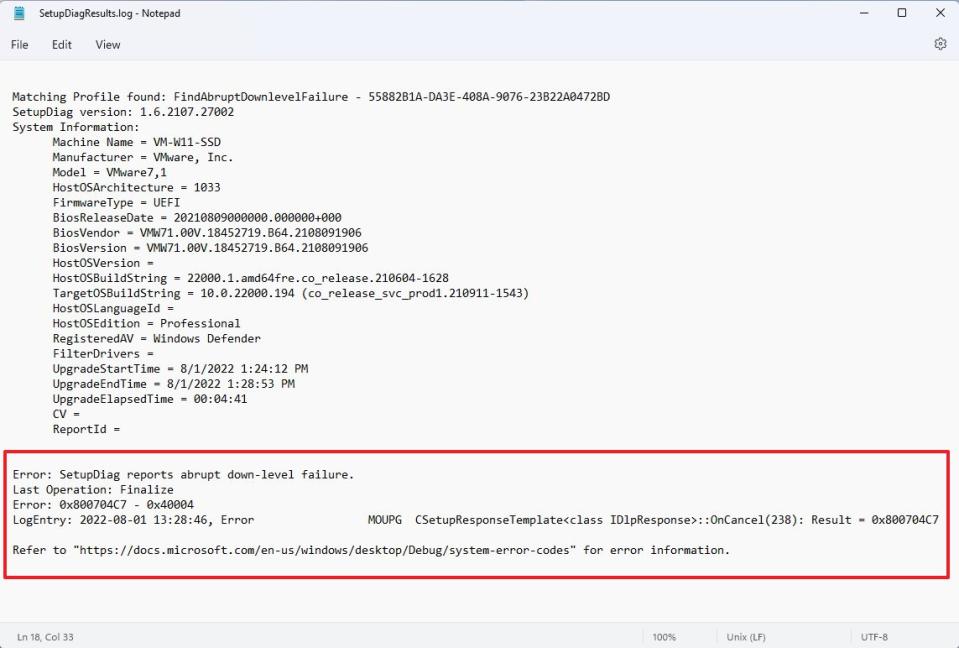
If an error was recorded and it's a known issue, the log should include details on resolving it. If the file has no details, you may find a link with the error code that you can use to research and fix the problem.
Reinstall from Windows Update
Before going through the clean installation process, Windows 11 has an feature that allows you to reinstall the operating system without losing your files, apps, and settings.
The feature uses the "Windows Update" settings to download and reinstall the current version of the operating system with ease to resolve issues, which may also be causing the Blue Screen of Death.
To reinstall Windows 11, use these steps:
Open Settings.
Click on System.
Click the Recovery page on the right side.
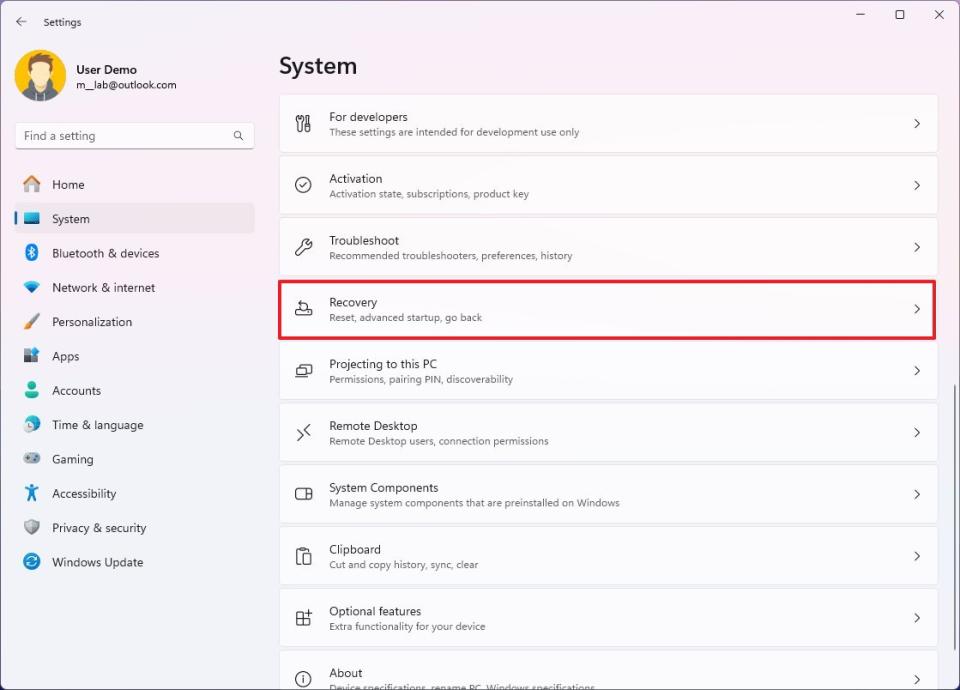
Click the Reinstall now button.

Check the "Automatically restart my PC 15 minutes after installation" option.
Click the OK button.
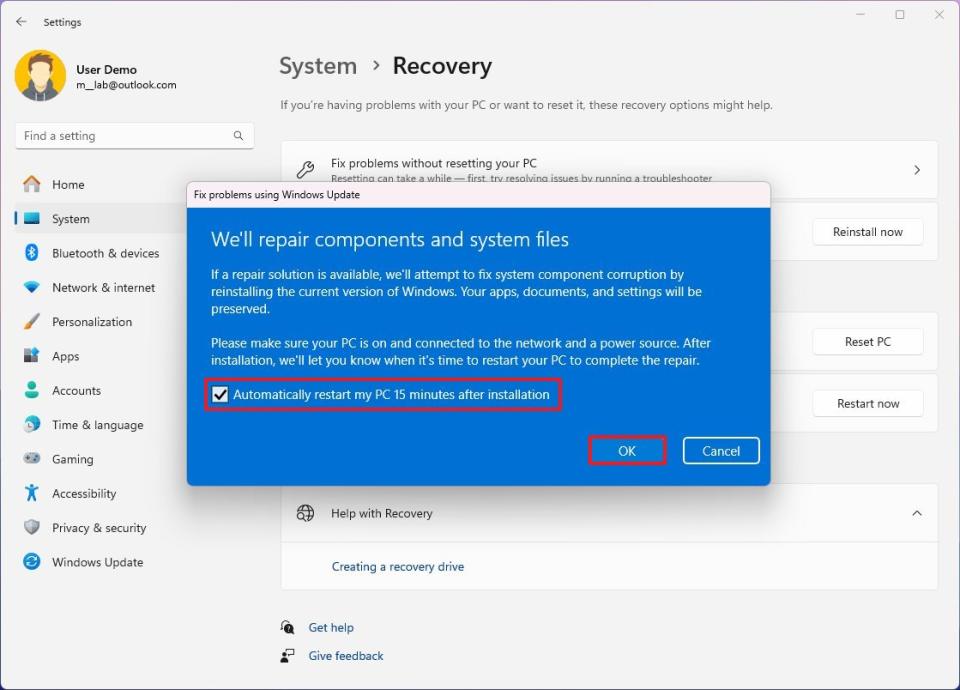
After you complete the steps, the feature will reinstall the operating system, fixing the problem causing the BoSD. (This option is available after installing the Windows 11 Moment 5 update.)
Clean installation
If you want to prevent problems, such as blue screens, the best way to upgrade to a new version of Windows 11 is to perform a clean installation since this process will erase everything and set up a fresh copy of the system, which can also help to resolve other issues and improve performance.
A clean installation requires the device to start from a USB flash drive. If your computer can't start from a USB, you will have to change the boot order in the Unified Extensible Firmware Interface (UEFI) firmware.
Usually, to access your device firmware, you must use one of the function keys (F1, F2, F3, F10, or F12), the "Esc" key, or the "Delete" key during startup. However, since the settings are different per manufacturer and device model, you should check your computer manufacturer for more specific details.
While in the firmware, you must navigate to the "Boot" page and change the boot order to start from a USB flash drive. After completing these steps, you must create an installation media and use that media to continue with the clean installation.
To delete everything on the hard drive and do a clean install of Windows 11 to prevent the blue screen of death errors, use these steps:
Start PC with installation media.
Click the Next button on the "Windows Setup" page.
Click the Install Now button.

Click the "I don't have a product key" option to continue (assuming your computer was already properly activated).
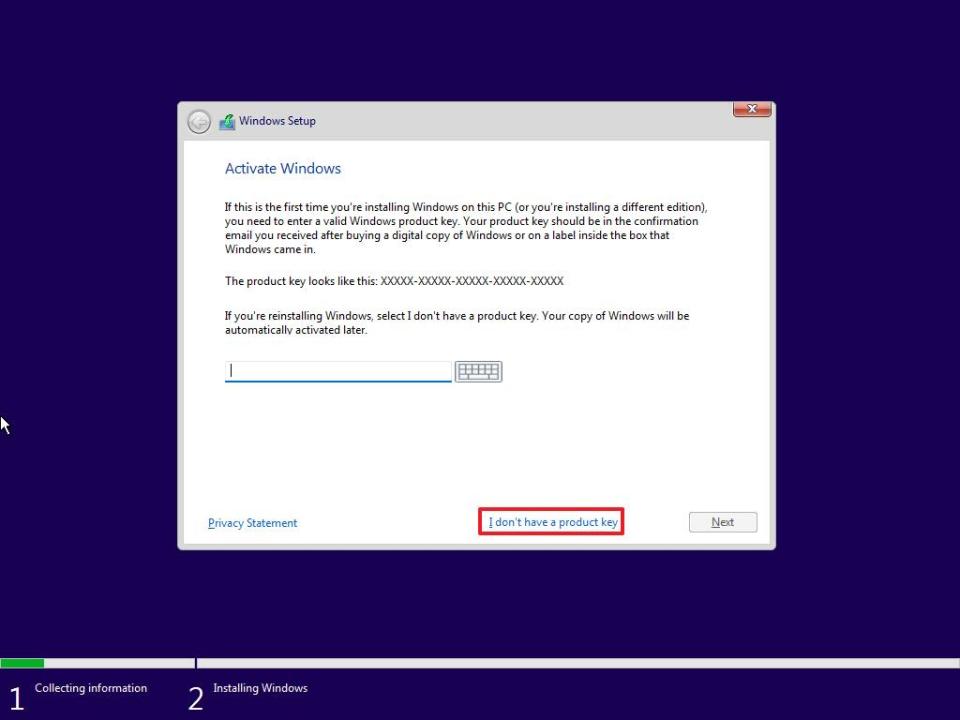
Select the edition of Windows 11 that the product key activates (if applicable).
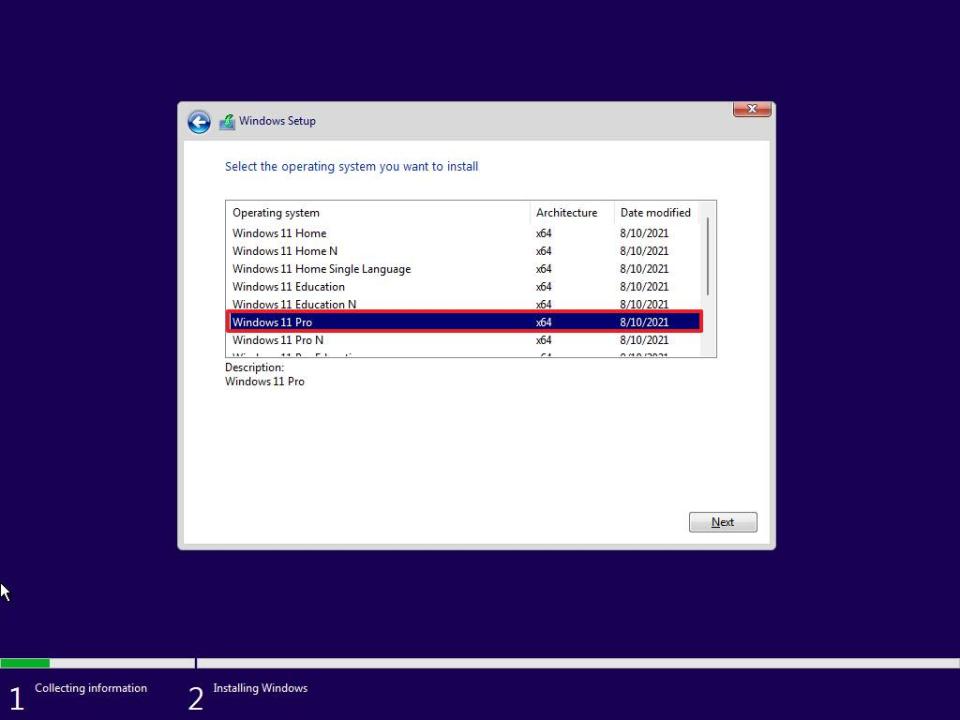
Click the Next button.
Check the "I accept the license terms" option to continue.
Click the Next button.
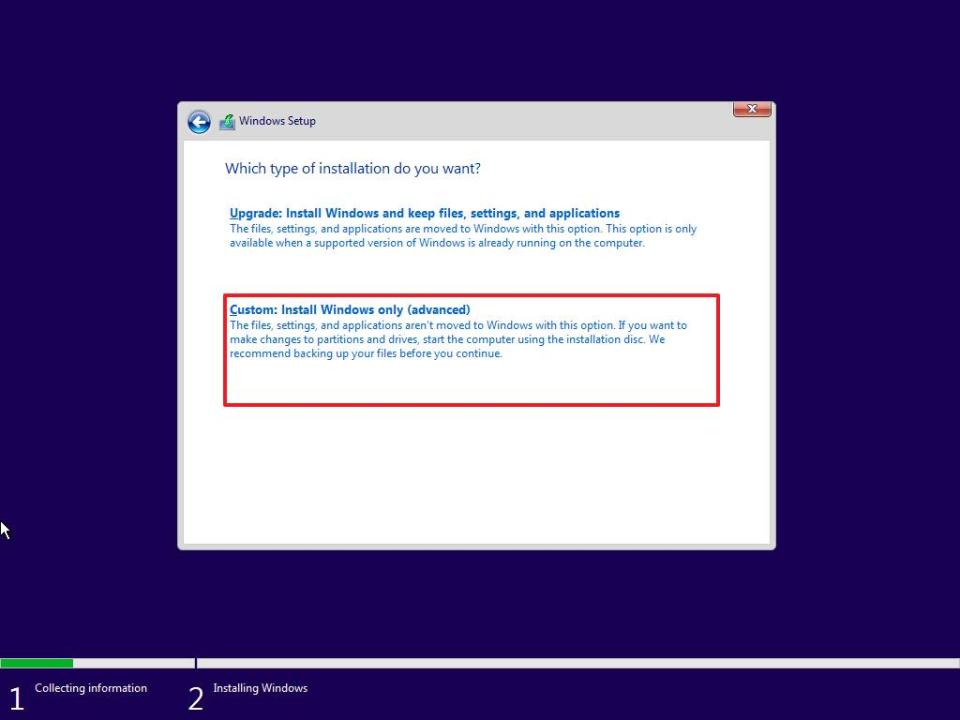
Click on the "Custom: Install Windows only (advanced)" option.
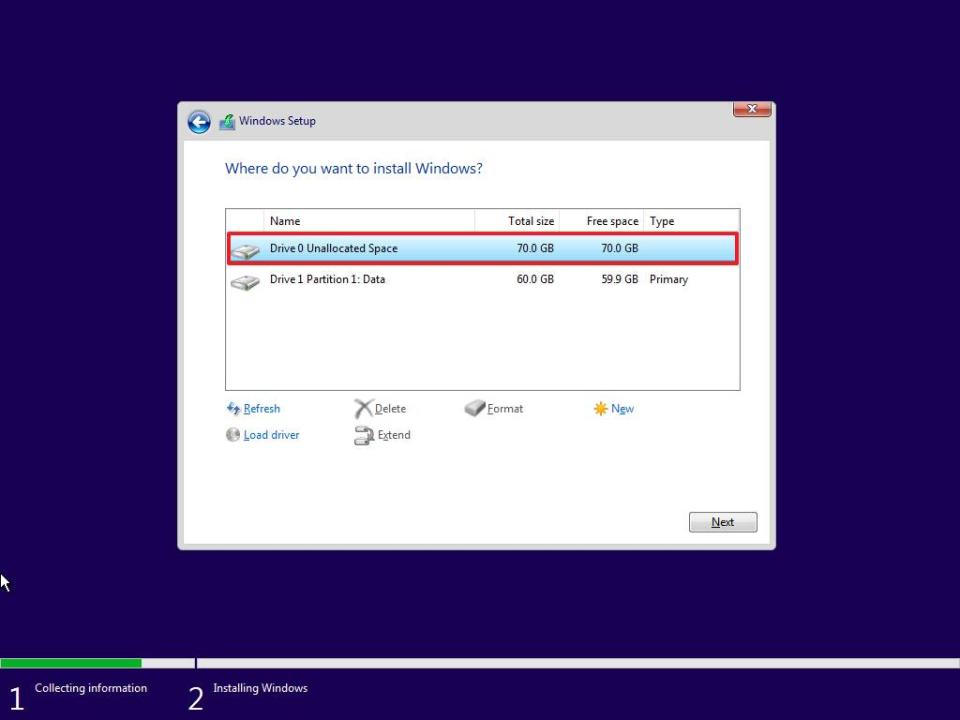
Select the partition with the current installation of Windows (usually "Drive 0"), and click the Delete button to remove it.
Quick tip: If you have multiple partitions on the primary hard drive (Drive 0), select and delete each one. The setup will recreate the required partitions automatically. You don't need to delete partitions from secondary drives.
Select the empty drive labeled Drive 0 Unallocated Space.
Click the Next button.
Once you complete the steps, the setup will begin installing Windows 11, avoiding many blue screen errors. After the installation, you'll need to continue with the out-of-box experience (OOBE) to finish setting up the device.
How to resolve blue screen errors during startup on Windows 11
If the device has problems starting up, you can use the Windows Recovery (WinRE) environment to troubleshoot and resolve the blue screen error with System Restore, Safe Mode, or Advanced Startup settings.
Fix errors with System Restore
Windows 11 still includes the legacy System Restore tool, which enables you to undo changes to resolve problems after installing a bad driver, system update, or application. (This feature will only work if you have previously enabled it manually.)
You can access the tool through the Advanced Startup settings to use System Restore.
Access Advanced Startup from boot
To launch the Advanced startup settings to access System Restore, use these steps:
Start PC.
As soon as the Windows logo appears, press and hold the power button to interrupt the boot sequence.
Repeat steps 1 and 2 two more times.

After the third interruption, Windows 11 should open the recovery environment and continue with the steps below to access System Restore.
Access Advanced Startup from USB
Alternatively, you can use installation media to open the advanced settings with these steps:
Start PC with USB media.
Quick tip: If the computer isn't starting from USB, you must change your system's UEFI settings to ensure it can. You can usually access the UEFI by powering up your device and pressing one of the functions, "Delete" or "Esc" keys, but be sure to check your manufacturer's support website for more specific details.
Click the Next button.
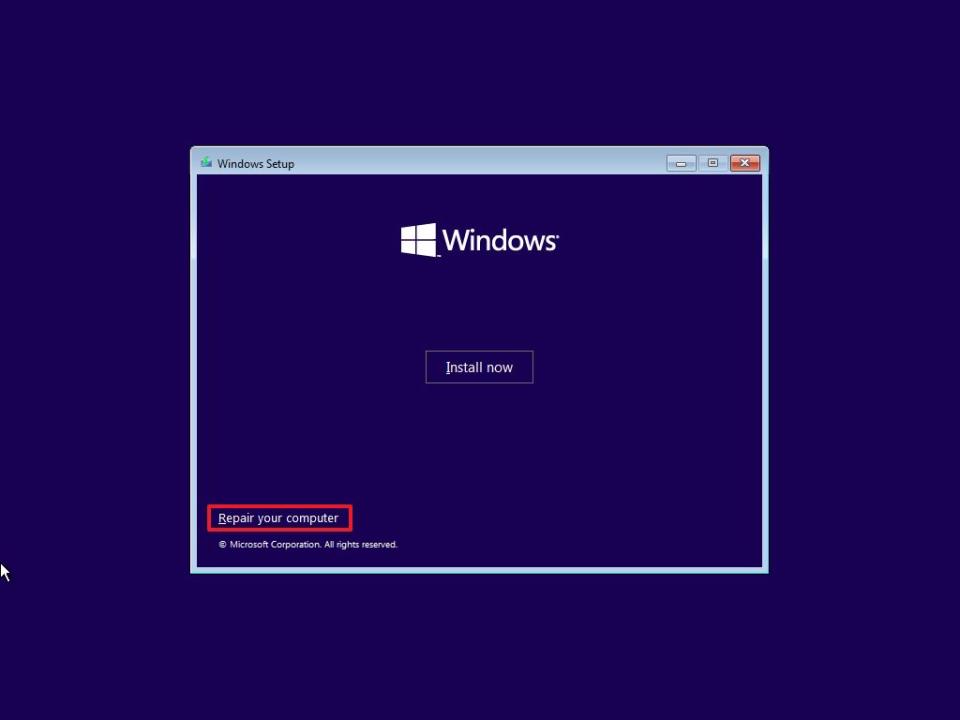
Click the "Repair your computer" option from the bottom-left corner.
Once you complete the steps, continue with the "Restore Point" instructions below.
Fix blue screen of death with Restore Point
To fix blue screen problems with a restore point on Windows 11, use these steps:
Click the Advanced Startup option.
Quick note: The "Advanced Startup" option is only available when using the Windows automatic repair feature, not when using USB media.
Click the Troubleshoot option.
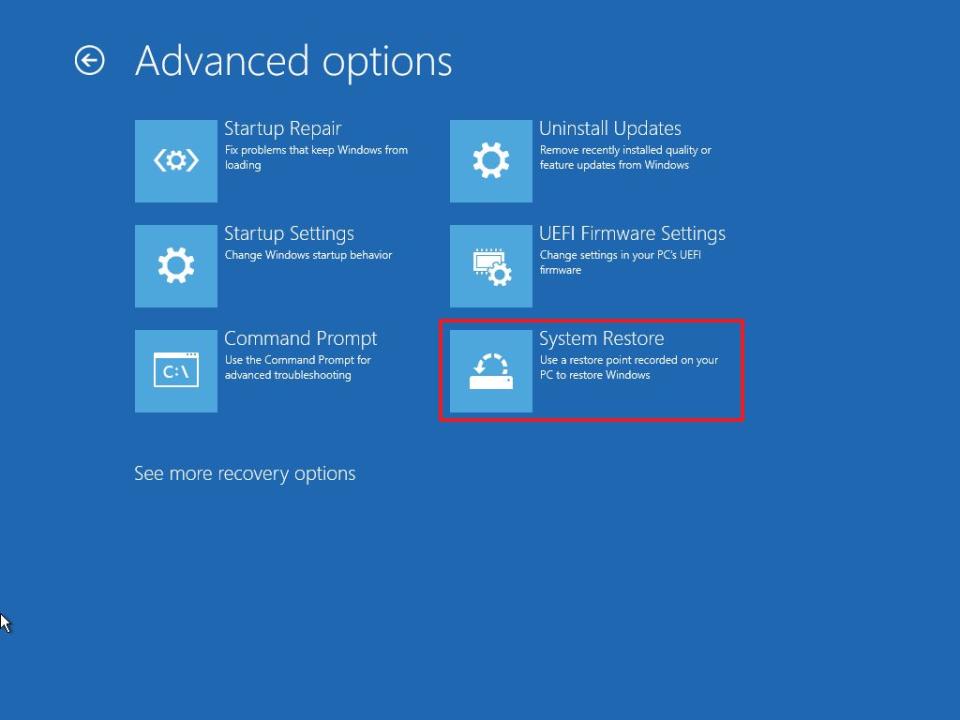
Click on Advanced options.
Click the System Restore option.
Click the Windows 11 option.
Confirm your account credentials (if applicable).
Click the Continue button.
Click the Next button.
Select the restore point to apply to the blue screen error.
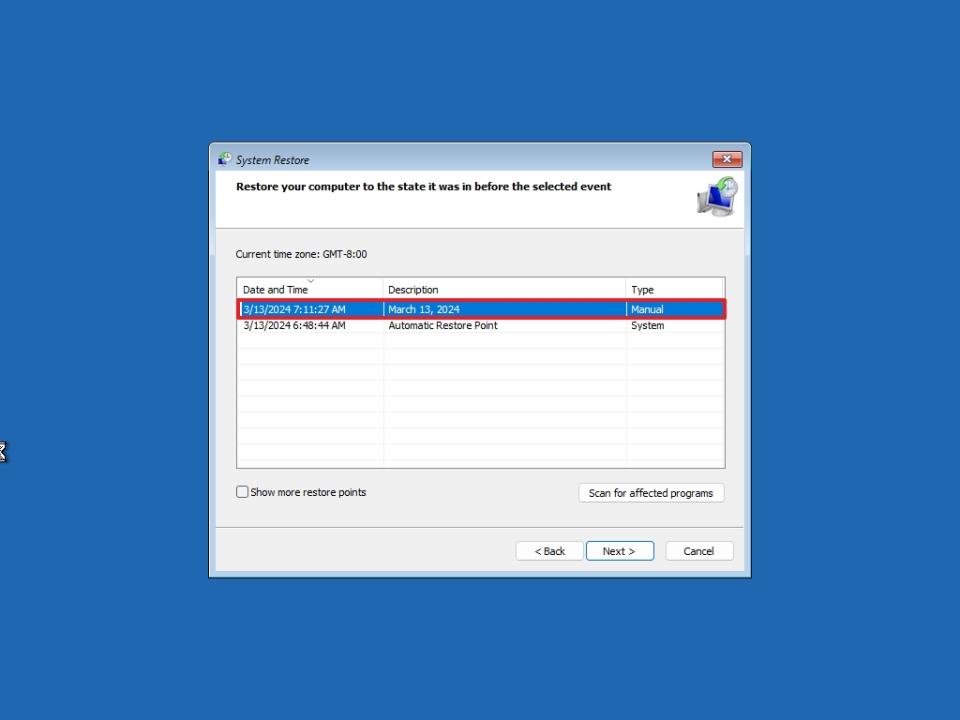
(Optional) Click the "Scan for affected programs" button to determine the apps that may be affected using a restore point.
Click the Close button.
Click the Next button.
Click the Finish button.
After completing the steps, Restore Point will apply the selected checkpoint, which will undo updates, drivers, apps, and system changes to the problem.
Fix errors with Safe Mode
On Windows 11, Safe Mode is an environment that loads only the essential services, drivers, and apps to access the desktop to troubleshoot problems.
If you don't have access to the desktop, you can boot your computer through the Windows Recovery environment.
Access Advanced Startup from boot
To launch the Advanced Startup settings to access System Restore, use these steps:
Start PC.
As soon as the Windows logo appears, press and hold the power button to interrupt the boot sequence.
Repeat steps 1 and 2 two more times.
After the third interruption, the system should enter the recovery environment and continue with the steps below to access the Safe Boot option.
Access Advanced Startup from USB
Alternatively, you can use installation media to open the Windows Recovery environment with these steps:
Start PC with USB media.
Click the Next button.
Click the "Repair your computer" option from the bottom-left corner.
Once you complete the steps, continue with the instructions below to access the Safe Mode environment.
Fix bug check on Safe Mode
To access Safe Mode to diagnose Blue Screen of Death errors, use these steps:
Click the Advanced Startup option
Click the Troubleshoot option.
Click on Advanced options.
Click the Startup Settings option.
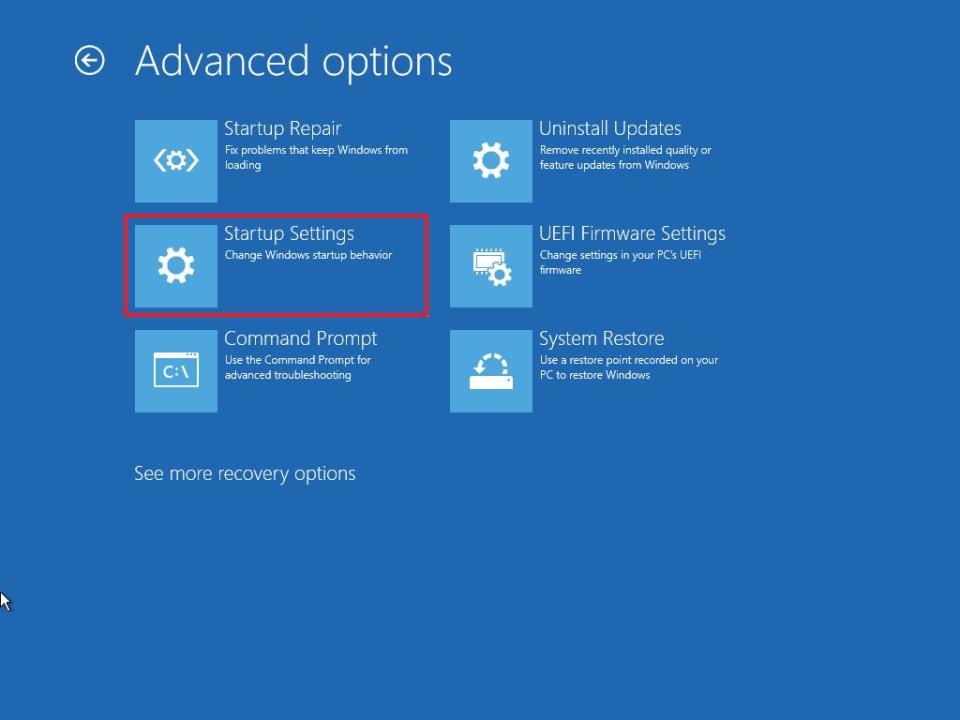
Click the Restart button.
After your computer reboots, press the F4 (or 4) key to select the Enable Safe Mode option.
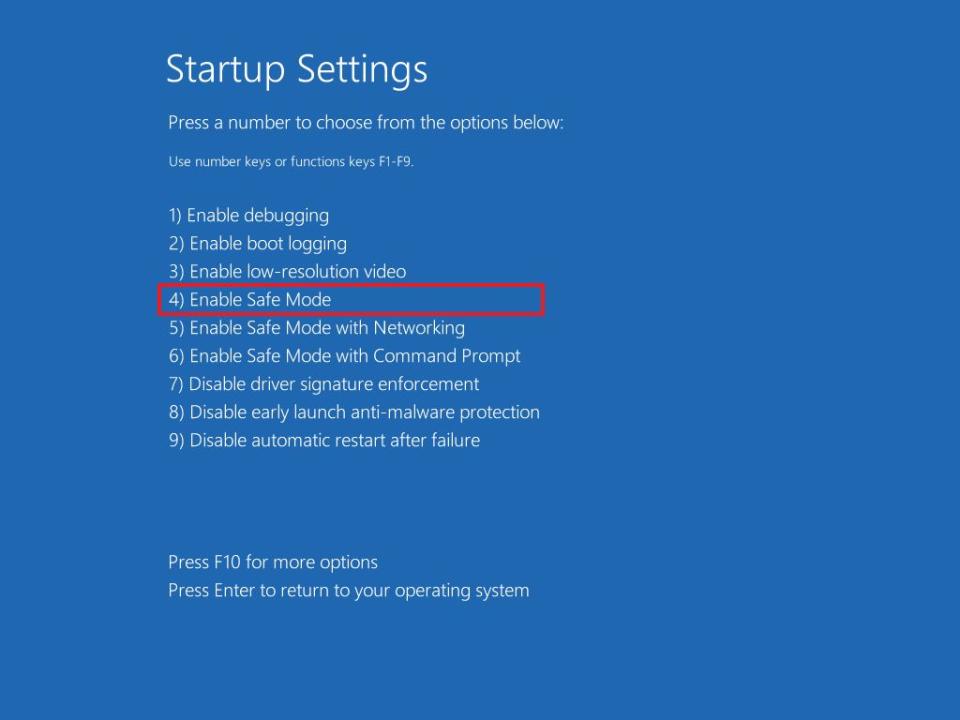
After completing the steps, you can use the next set of instructions to uninstall updates and drivers that may prevent your computer from operating correctly.
Fix errors with WinRE
Since the Safe Mode environment loads the essential elements, you can still use Device Manager to remove drivers and Event Viewer to troubleshoot errors. However, the Settings app won't work to uninstall updates, but you can still use Command Prompt to complete the task.
Uninstall conflicting update
To uninstall a system update with Command Prompt, use these steps:
Use the "Windows key + R" keyboard shortcut to open the Run command.
Type cmd and click the OK button to launch Command Prompt as an administrator.
Type the following command to view the most recent installed updates and press Enter: wmic qfe list brief /format:table
Confirm the HotFixID and InstalledOn information to determine the update to remove.
Type the following command to uninstall the update from your computer and press Enter: wusa /uninstall /kb:KB-NUMBER
In the command, replace KB-NUMBER for the KB number of the update to uninstall. This example removes the update KB5013889 from Windows 11: wusa /uninstall /kb:5034457
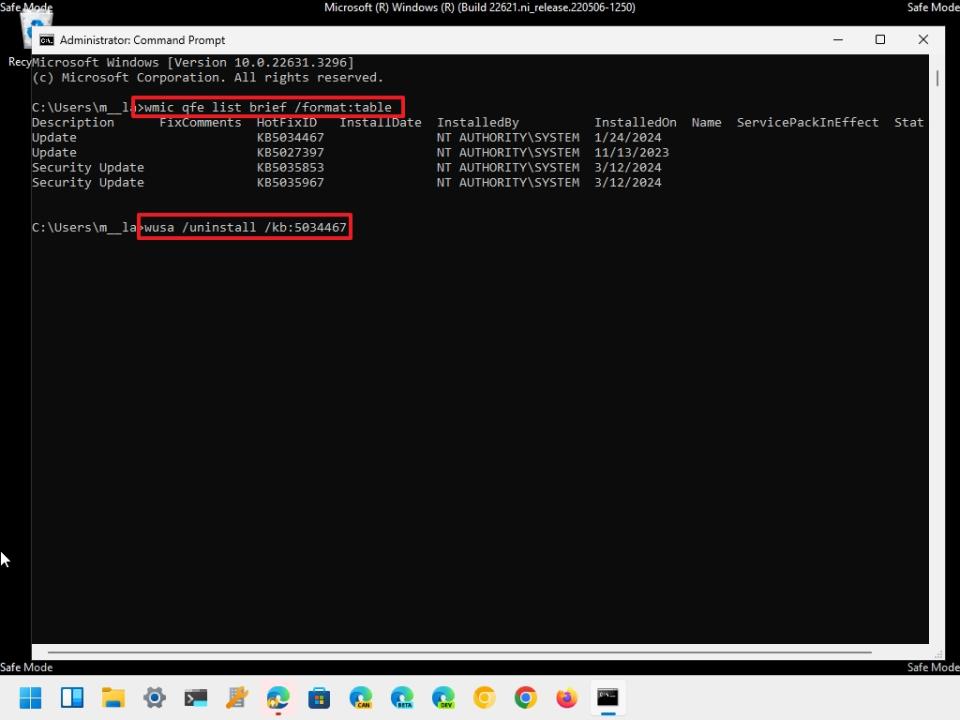
Click the Yes button.
Continue with the on-screen directions (if applicable).
Once you complete the steps, you may need to restart the computer to apply the changes.
Uninstall conflicting driver
To uninstall an incompatible driver with Safe Mode, use these steps:
Use the "Windows key + R" keyboard shortcut to open the Run command.
Type the devmgmt.msc command and click the OK button to open the Device Manager app.
Expand the branch with the device causing the problem.
Right-click the device and choose the Uninstall device option.
Click the OK button.
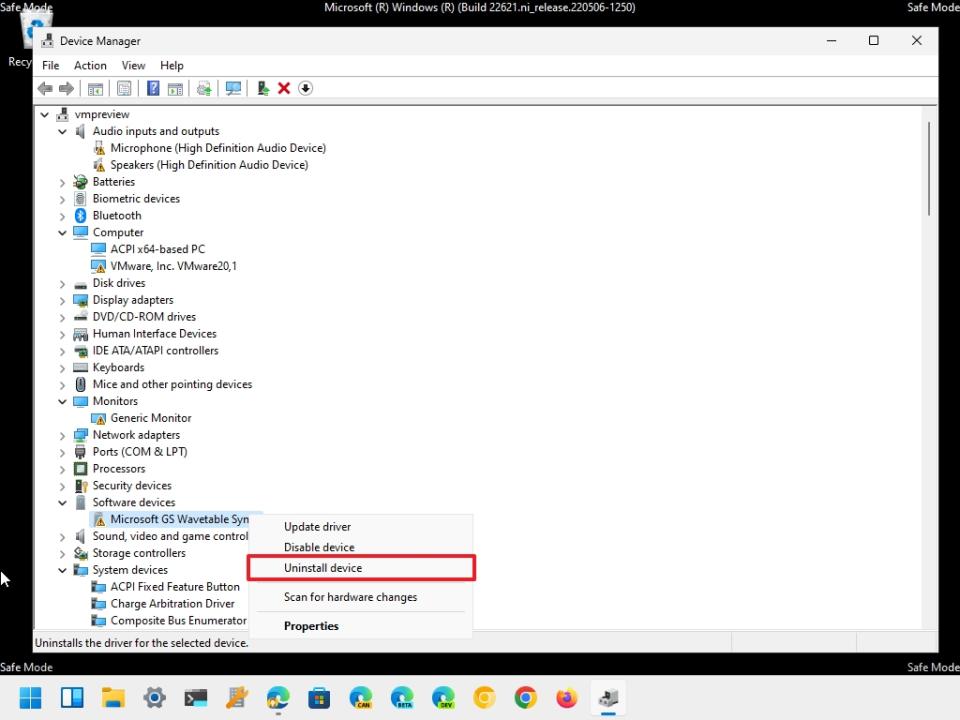
After you complete the steps, repeat them to remove other drivers as necessary, and then restart the device to see if the problem has been resolved.
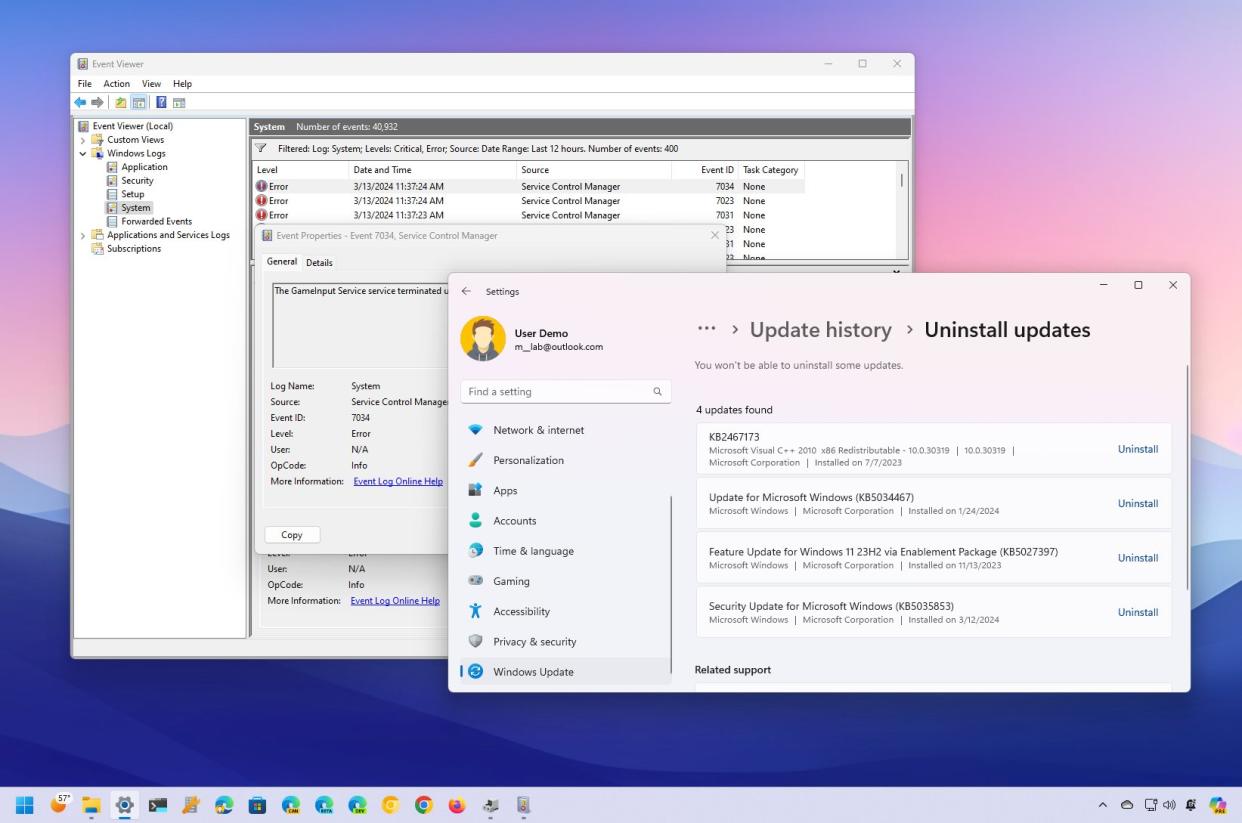
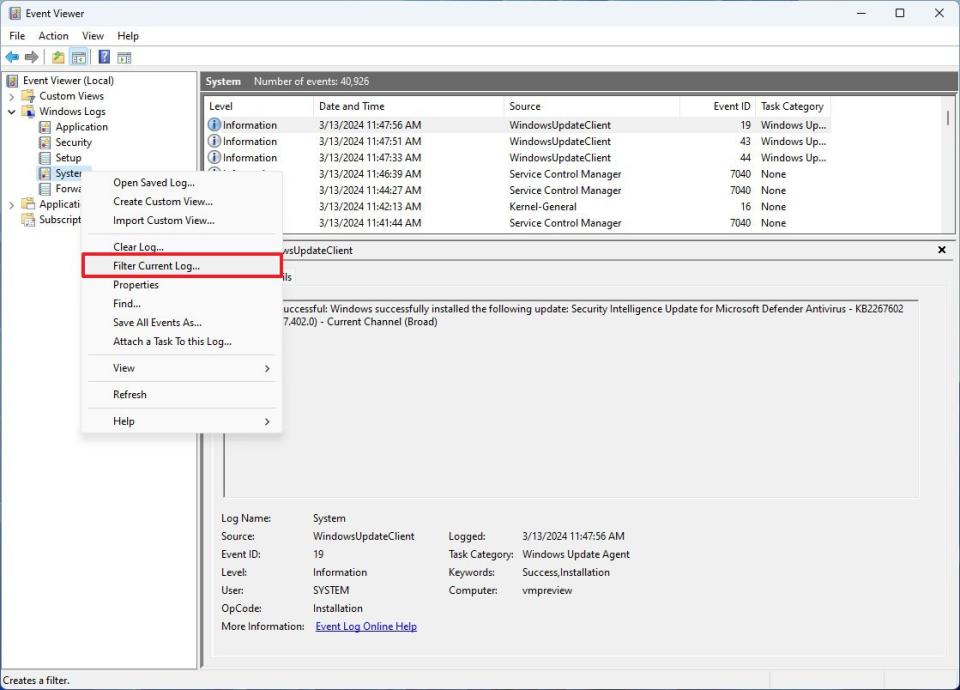
Check Event Viewer
The Event Viewer is another tool that you can use to find out more information about the Blue Screen of Death error to diagnose the issue.
To troubleshoot blue screens with the Event Viewer on Windows 11, use these steps:
Use the "Windows key + R" keyboard shortcut to open the Run command.
Type the eventvwr. msc command and click the OK button to open the Event Viewer app.
Expand the Windows Logs group.
Right-click the "System" category and choose the "Filter Current Log" option.
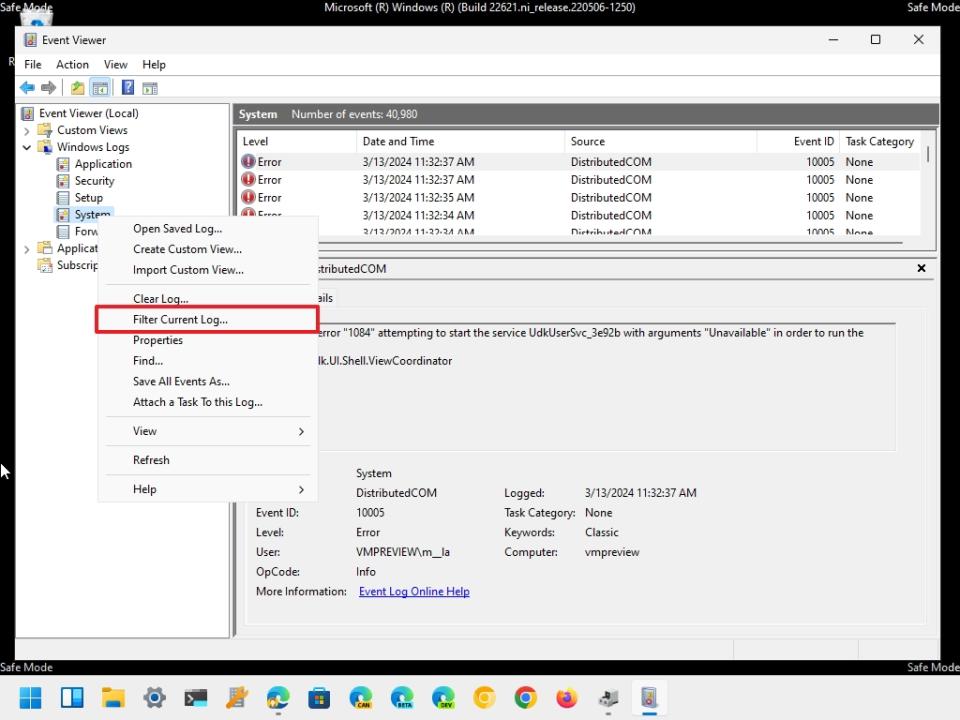
Click the Filter tab.
Use the Logged drop-down menu and select the time range when the error occurred — for example, Last 12 hours.
Under the "Event level" section, check the Critical and Error options.

Click the OK button.
Double-click to open each log to learn more details about the problem.
Quick note: The blue screen errors may appear as "BugCheck" in the "Source" column.
Check event log details for clues about the error.
Once you complete the steps, the "General" tab will give you some technical details you can use to diagnose and resolve the blue screen problem.
If the error doesn't provide enough information, copy the description, source, and event ID and use it to search online for a possible solution.
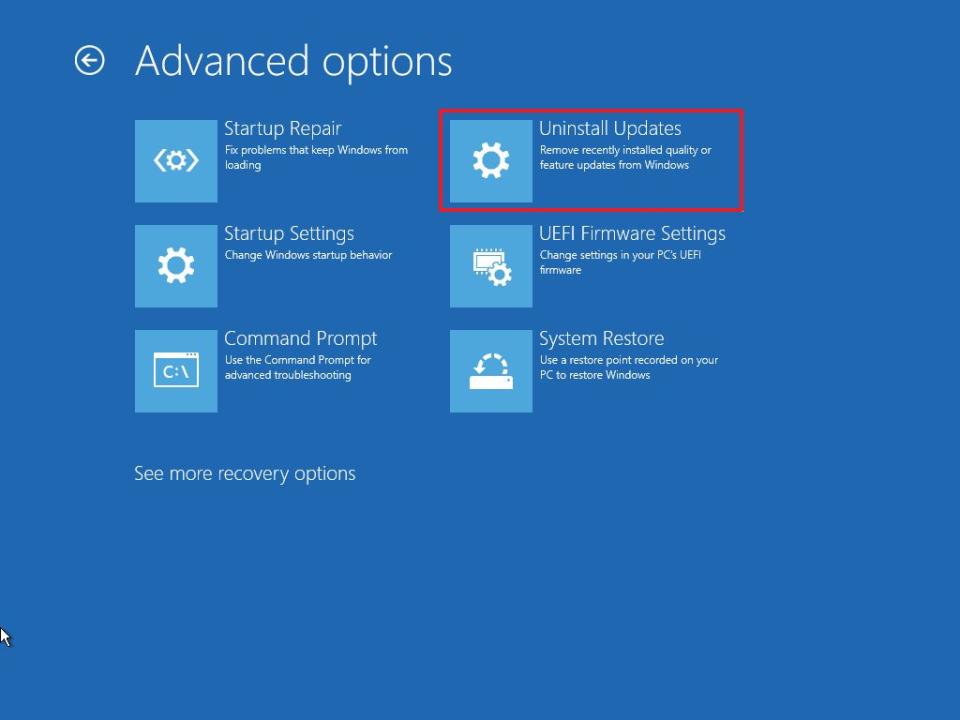
Fix blue screen error from Windows Recovery
If a recently installed update is causing the computer to have a blue screen, use the Advanced Startup settings in Windows Recovery to uninstall it.
Access Advanced Startup from boot
To launch the Advanced Startup settings, use these steps:
Start PC.
As soon as the Windows logo appears, press and hold the power button to interrupt the boot sequence.
Repeat steps 1 and 2 two more times.
After the third interruption, the system should enter the Windows Recovery Environment and continue with the steps below.
Access Advanced Startup from USB
Alternatively, you can use installation media to open the Windows Recovery Environment with these steps:
Start PC with USB media.
Click the Next button.
Click the "Repair your computer" option from the bottom-left corner.
Once you complete the steps, continue with the instructions below.
Uninstall quality or feature updates
To uninstall the most recent update causing the bug check error, use these steps:
Click the Advanced Startup option.
Click the Troubleshoot option.
Click on Advanced options.
Click the Uninstall Updates option.
Click the "Uninstall latest quality update" option to remove a recent update or the "Uninstall latest feature update" option to roll back to a previous version.
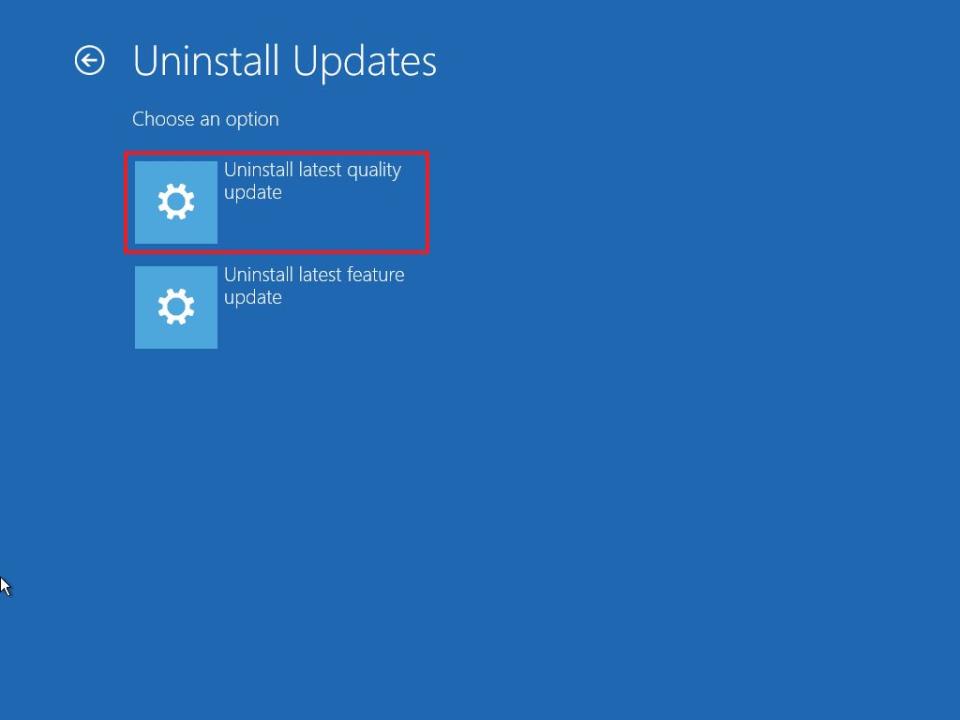
Confirm your account credentials (if applicable).
Click the Continue button.
Click the Uninstall quality update button.
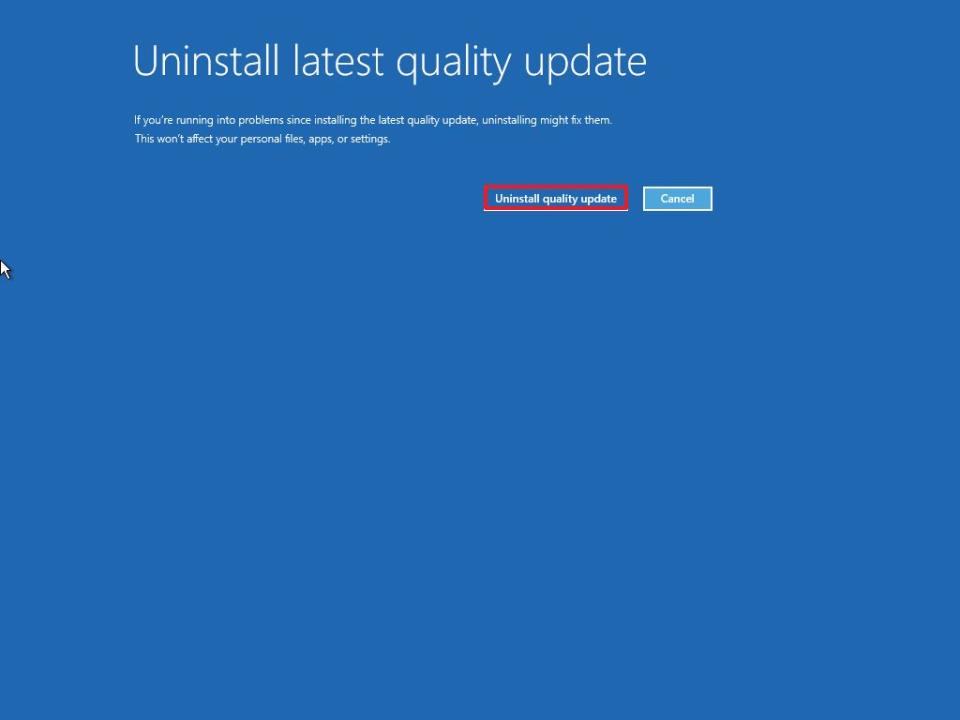
Click the Done button.
Click the Continue option.
After you complete the steps, the system will remove the update, resolving the Blue Screen of Death error.
How to resolve blue screen errors during normal use on Windows 11
When the blue screen occurs after signing into your account, the problem is typically a driver, missing update, or application.
Install latest updates
If you still have access to the desktop, you may be able to fix the bug check by installing the latest system updates, drivers, and apps.
System updates
To check for updates on Windows 11, use these steps:
Open Settings.
Click on Windows Update.
Click the "Check for updates" button.
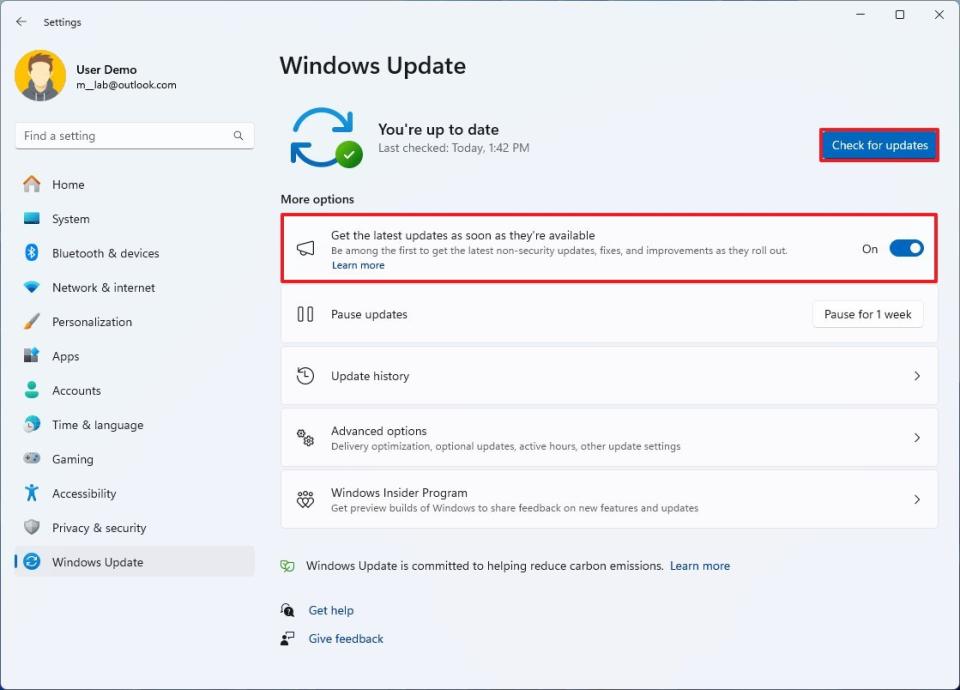
(Optional) Turn on the "Get the latest updates as soon as they're available" toggle switch to install upcoming updates that may include fixes for the current problem
Once you complete the steps, if the computer is missing an update, the system will download and install them automatically.
Driver update
To check for driver updates on Windows 11, use these steps:
Open Settings.
Click on Windows Update.
Click the Advanced options page on the right side.

Click the Optional updates setting under the "Additional options" section.
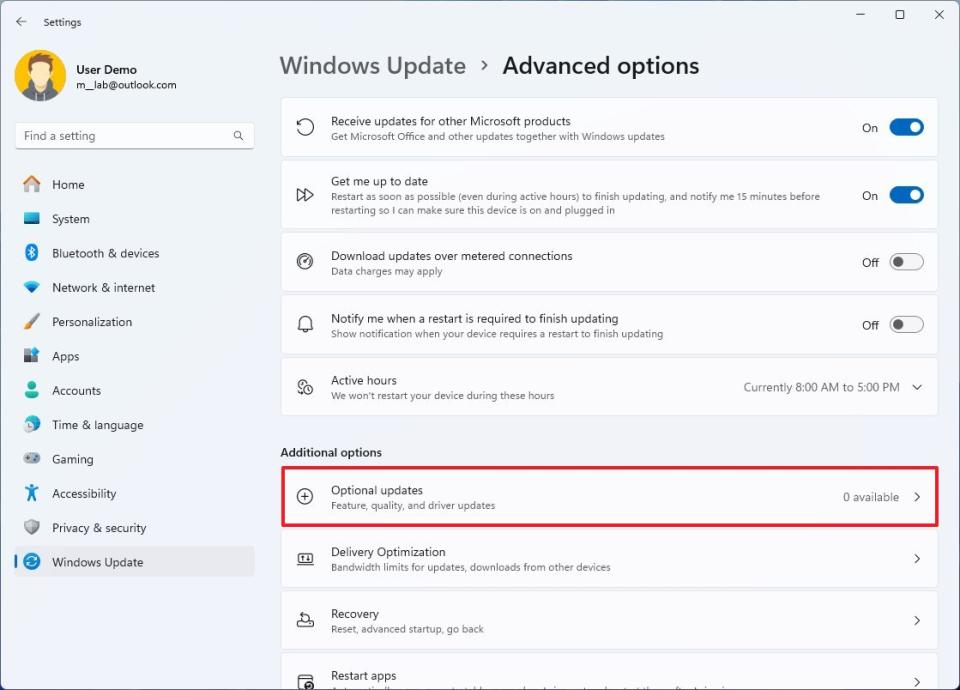
Select the driver update to install.
Click the "Download & install" button.
Once you complete the steps, the most up-to-date driver should download and install automatically.
If the system cannot detect new updates, check the manufacturer's support website and follow their instructions to download a more recent driver. (If the problem is the driver, you may want to consider trying out a beta version since it may include a fix for the problem.)
App update
If a compatibility issue causes the blue screen with an app, installing the latest version may resolve the problem.
To update apps on Windows 11, use these steps:
Open Microsoft Store.
Click on Library.
Click the Get updates button.
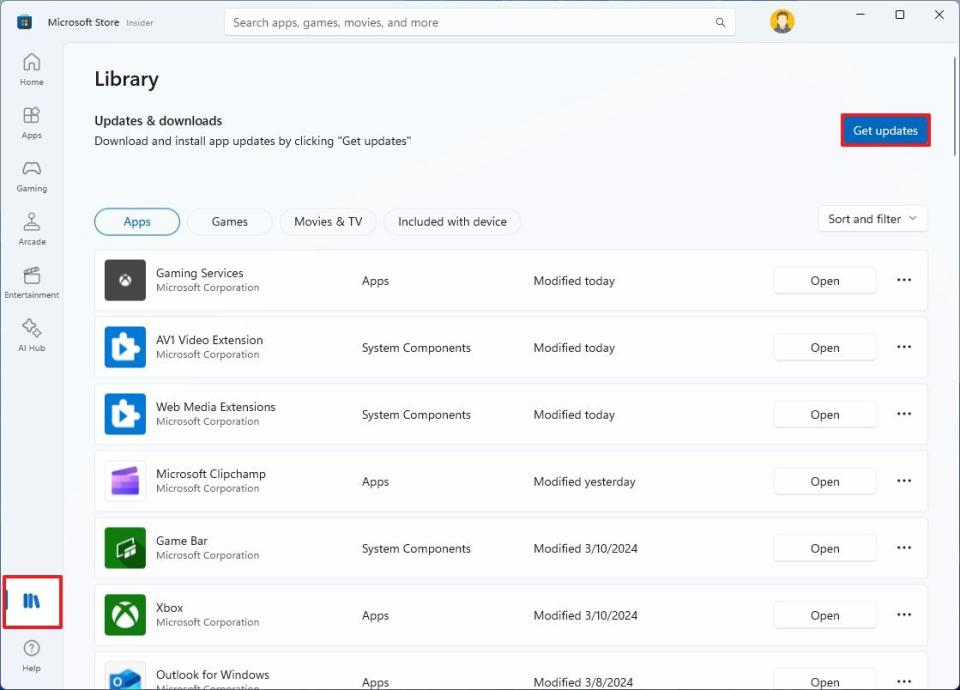
Once you complete the steps, any available updates will download and install automatically.
If you are dealing with an app you acquired outside the Microsoft Store, check for updates in the app's settings or the software vendor support website to download the latest available version.
Uninstall problematic apps, drivers, and updates
Software and hardware companies sometimes release updates with bugs that can cause the Blue Screen of Death, among other issues.
If you have access to the desktop, you can remove these system updates, drivers, or apps to mitigate the problem until a newer version rolls out with a permanent fix.
Remove updates
To uninstall updates on Windows 11, use these steps:
Open Settings.
Click on Windows Update.
Click on Update history.
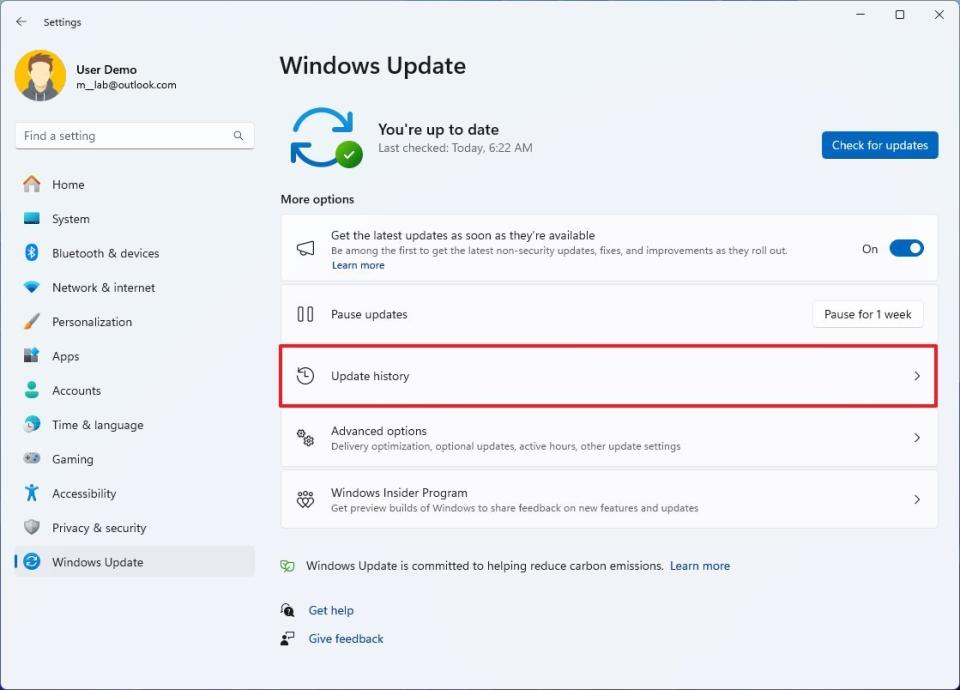
Click the Uninstall updates option under the "Related settings" section.
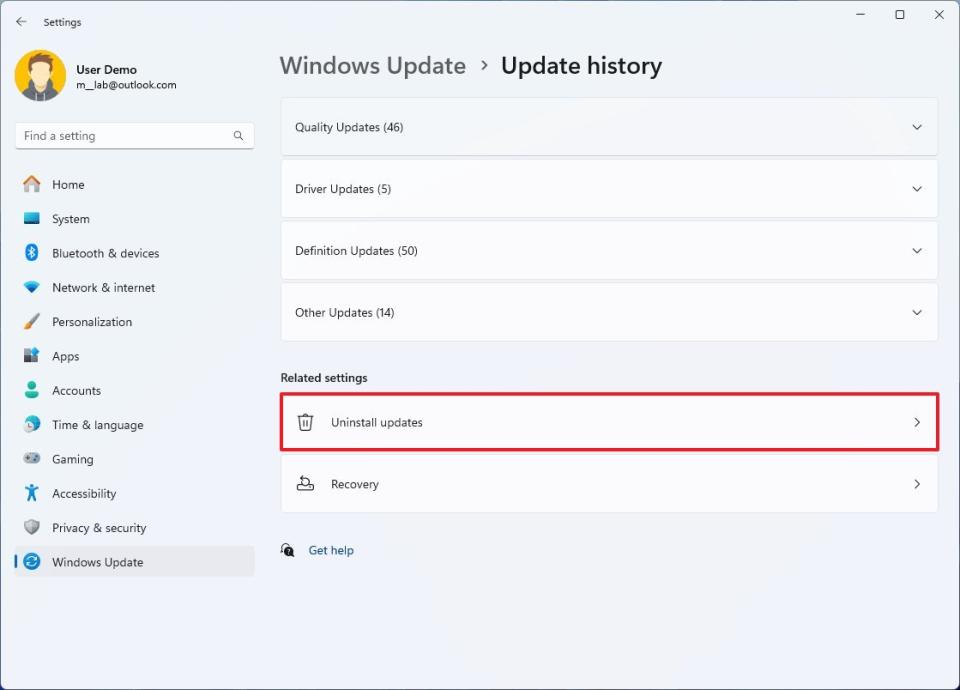
Click the Uninstall button for the update to remove.
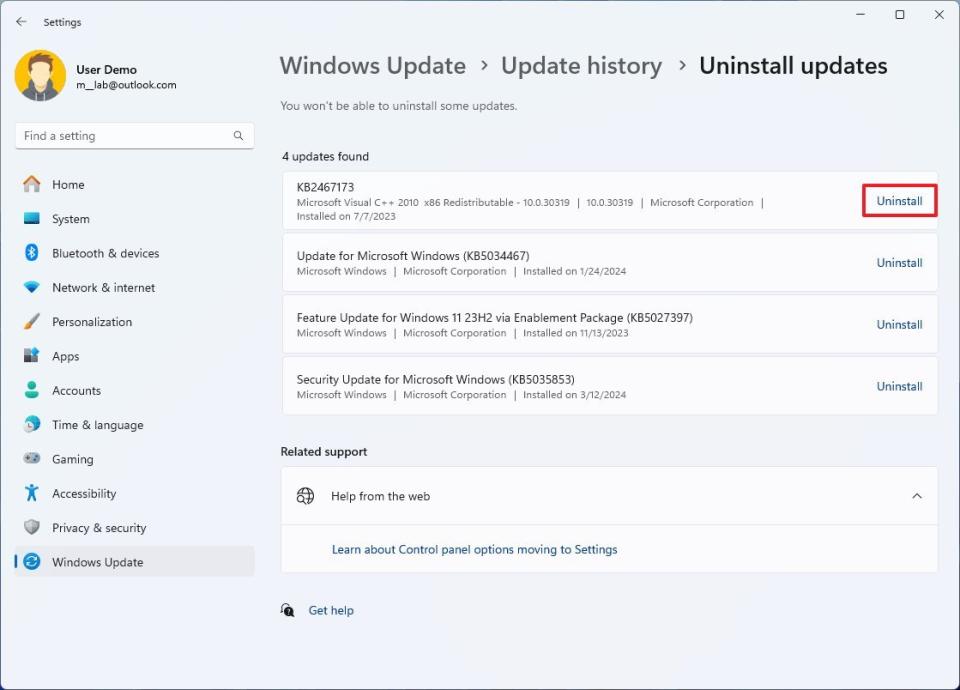
After completing the steps, the update will be removed from the computer, hopefully fixing the bug check problem.
Remove drivers
To uninstall a device driver on Windows 11, use these steps:
Open Start.
Search for Device Manager and click the top result to open the app.
Right-click the device and select the Uninstall device option.
Click the OK button.
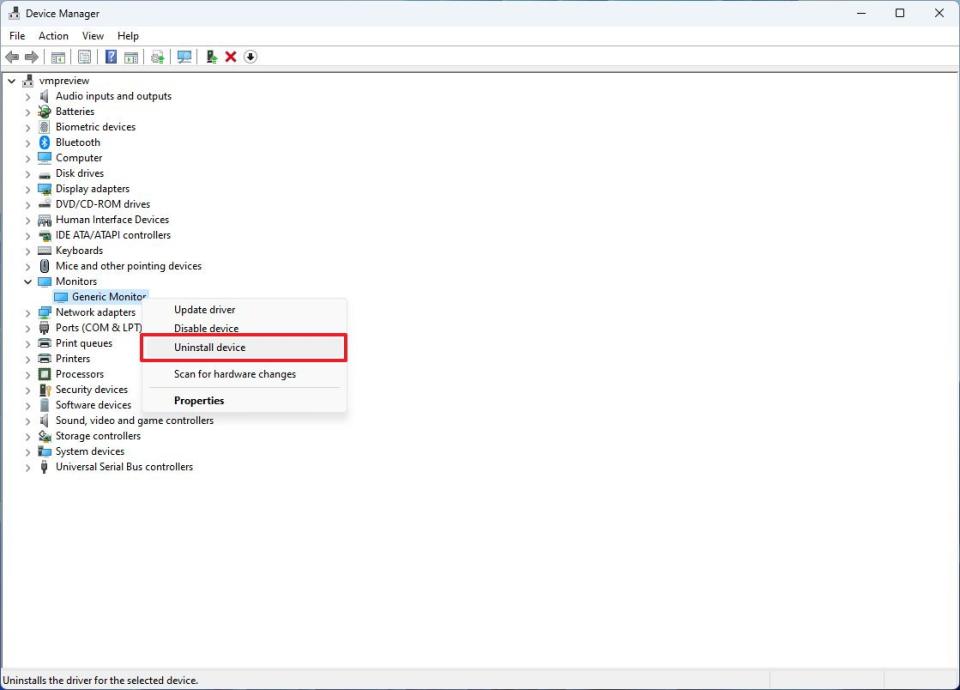
Once you complete the steps, the driver will be removed from the computer.
If the graphics card driver causes the problem, you can use the Display Driver Uninstaller (DDU) tool to fully remove the driver since using the manufacturer tool may not get rid of all the components.
Rollback driver version
Alternatively, you can try rolling back to the previous version of the driver if a newer version is causing BSoD on Windows 11.
To rollback to a previous version of a driver, use these steps:
Open Start.
Search for Device Manager and click the top result to open the console.
Expand the category of the device with the problem.
Right-click the device and select the Properties option.
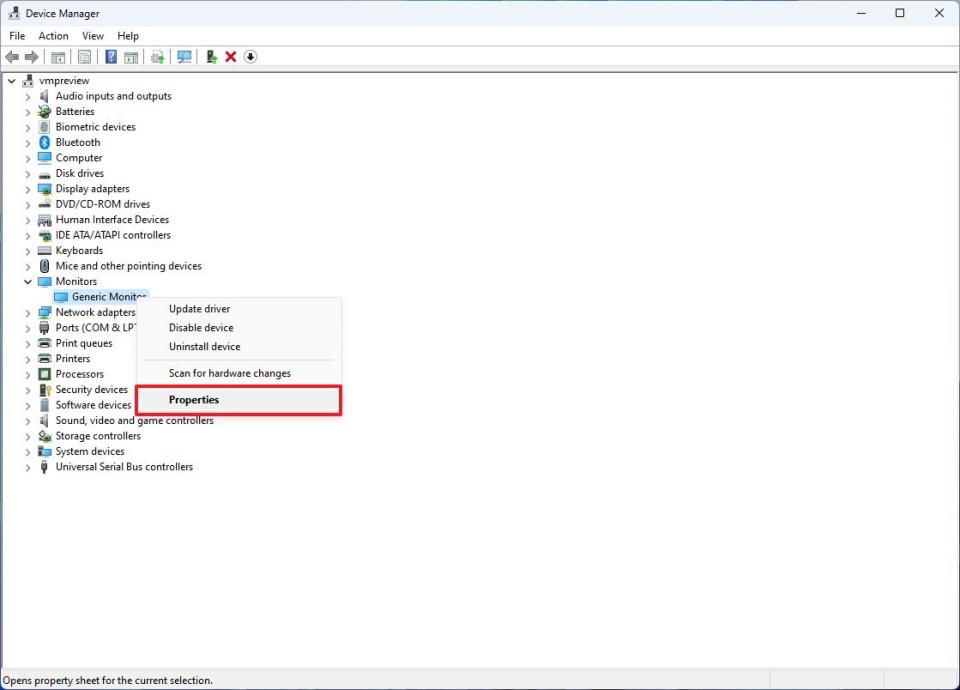
Click the Driver tab.
Click the "Roll Back Driver" button (if available).

Quick tip: If the option isn't available, the system doesn't have a backup of the previous driver.
Select one of the available options to answer the question.
Click the Yes button.
After completing the steps, the driver will roll back to the previous version to resolve the blue screen problem.
Disable drivers
If you don't want to uninstall or roll back the driver, you can disable it to confirm whether the device is causing the issue.
To disable a device driver on Windows 11, use these steps:
Open Start.
Search for Device Manager and click the top result to open the app.
Expand the category of the device with the problem.
Right-click the device and select the Disable device option.
Click the Yes button.
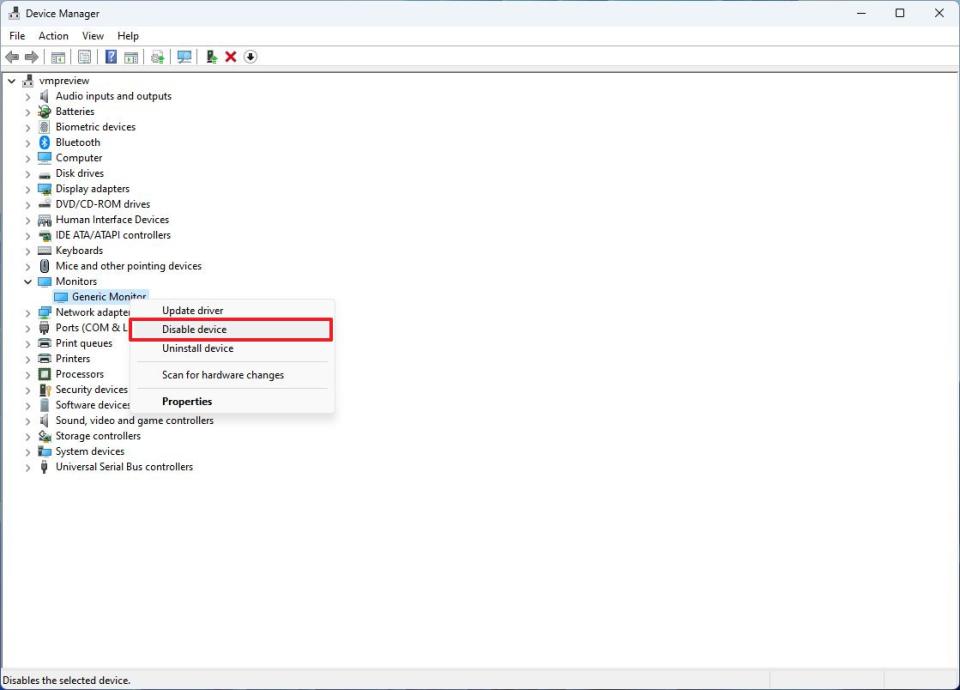
Once you complete the steps, the device will no longer be available on Windows 11 but will remain installed.
Remove apps
If you are dealing with a compatibility problem, you will probably experience a Blue Screen of Death randomly or upon launching the app. In this case, you can try updating the app to a newer version or uninstall the app in question to overcome the problem.
To uninstall an app on Windows 11, use these steps:
Open Settings.
Click on Apps.
Click the "Installed apps" page on the right side.
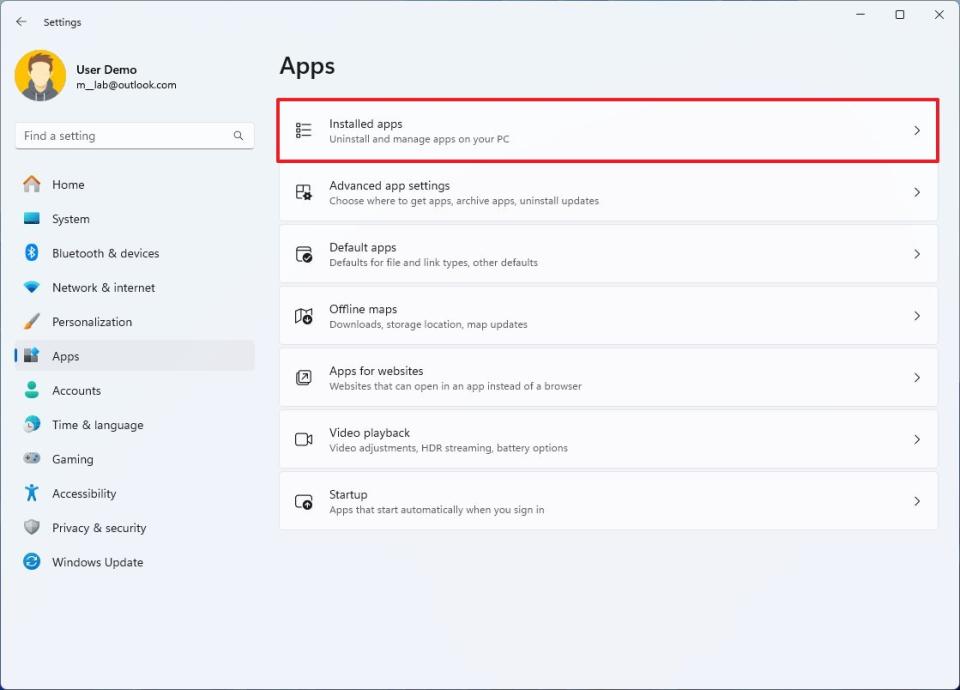
Select the app, click the menu (three-dotted), and choose the Uninstall option.
Click the Uninstall option again.
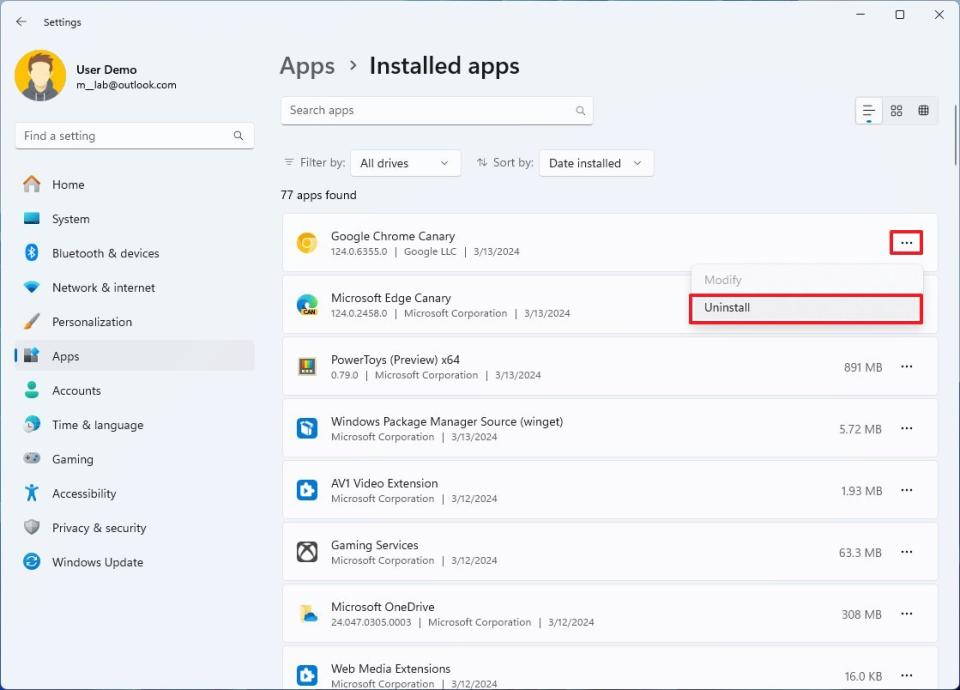
Continue with the on-screen directions (if applicable).
After completing the steps, the app will no longer be available on the computer, mitigating the blue screen problem. Once an update becomes available to resolve the bug check permanently, you can then reinstall the app.
Disconnect non-essential devices
On Windows 11, a Blue Screen of Death error message may appear after connecting a new piece of hardware (for example, a USB drive, graphics adapter, etc.). If this happens, you are probably facing a compatibility issue, the hardware is broken, or the system is installing the wrong driver.
If you encounter a compatibility issue, you can contact support for assistance, or you may need to replace the hardware with a compatible alternative.
If the system tries installing the wrong driver, uninstall the current one and install the correct version using the manufacturer's support instructions.
Run DISM and SFC commands
If you see a blue screen due to an installation problem, you may be able to resolve the issue using the Deployment Servicing and Management (DISM) and System File Checker (SFC) tools.
To resolve installation problems with DISM and SFC commands on Windows 11, use these steps:
Open Start.
Search for Command Prompt, right-click the top result, and select the Run as administrator option.
Type the following command to repair the Windows 10 image and press Enter: DISM /Online /Cleanup-Image /RestoreHealth
Type the following command to repair the Windows 11 setup and press Enter: SFC /scannow
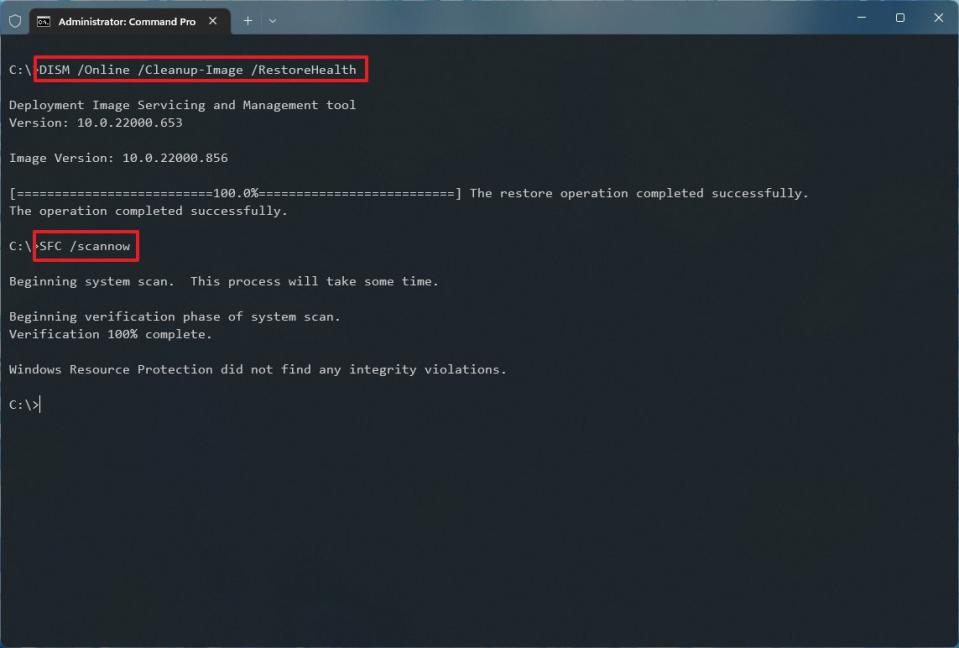
Quick tip: If errors exist, run the command multiple times to ensure that everything has been repaired correctly.
Once you complete the steps, the DISM command will repair problems with the local system image, and the SFC command will use the files in the system image to repair damaged files in the current setup of Windows 11, hopefully fixing the Blue Screen of Death.
Check Event Viewer
If you still have access to the desktop, the Event Viewer can help find out the reason the device is getting bug-check errors.
To review event longs on Windows 11, use these steps:
Open Start.
Search for Event Viewer and click the top result to open the app.
Expand the Windows Logs group.
Right-click the "System" category and choose the Filter Current Log option.
Click the Filter tab.
Use the Logged drop-down menu and select the time range when the error occurred — for example, Last 12 hours.
Under the "Event level" section, check the Critical and Error options.
Click the OK button.
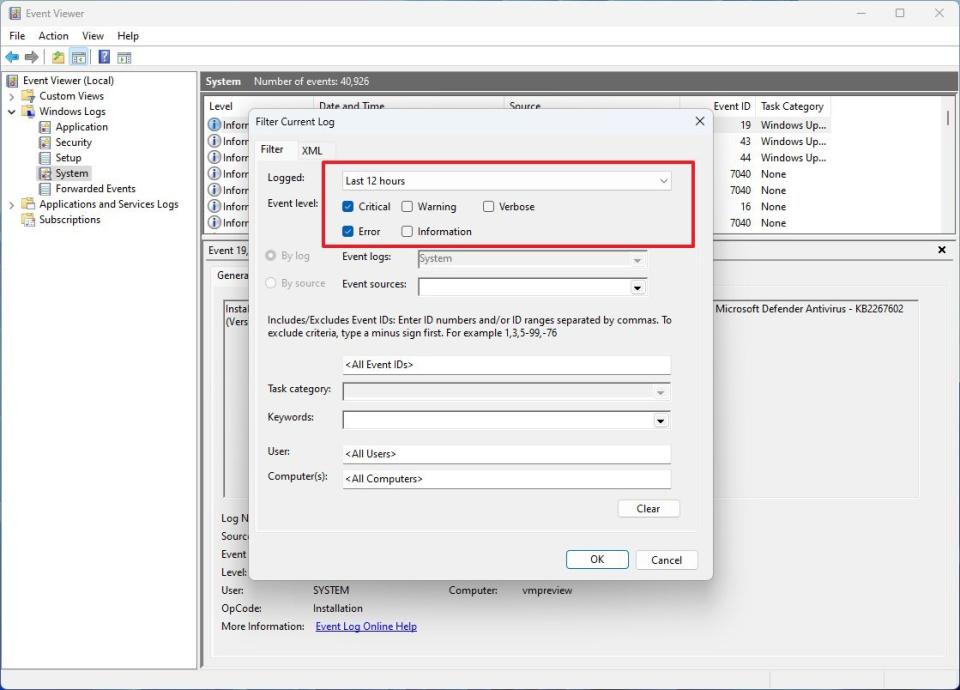
Double-click to open each log to learn more details about the problem.
Quick note: The blue screen errors may appear as "BugCheck" in the "Source" column.
Check event log details for clues about the error.
Once you complete the steps, the "General" tab will give you some technical details that you can use to diagnose and resolve the blue screen problem on Windows 11.
If the error doesn't provide enough information, you can copy the description, source, and event ID and use it to search online for a possible solution.
Troubleshooting and fixing Blue Screen of Death errors can be difficult and time-consuming. However, typically, it's an issue with a driver or application conflicting with Windows 11 (or vice versa).
Finally, in addition to blue screens, you may also come across a black screen, which is usually related to display connection issues, graphics driver problems, or something else happening in the system.
More resources
For more helpful articles, coverage, and answers to common questions about Windows 10 and Windows 11, visit the following resources:

