Spicy, icy and chocolatey: Baking up a holiday cookie board
The holidays can sometimes get a little crazy. We get so caught up in the shopping and the wrapping and making things look just Martha Stewart perfect that we forget to focus on the things that make us smile.
Lately, I’ve been reflecting on the things that made Christmas special to me as a child. It might surprise the young me of 50 years ago that none of those things came wrapped up in boxes or bows. Instead, they were far simpler.
They had to be. I grew up in the 1970s in a tiny town in Northwest Iowa. Back then, Melvin had roughly 250 people, and I was probably related to most of them. We had one grocery store, one bank, and the big excitement for the week was watching the high school teams play basketball at the Community Building on Friday night.
Christmas was simpler there, too. Every year my parents would pile us kids into the station wagon, and take us for a drive around town to look at the holiday lights. It couldn’t have taken more than 5 minutes to drive the length of the town – Melvin was four blocks from north to south - and yet, I still remember the beauty of the giant evergreen on the front lawn of Kenneth and Martha Graves’ home. It was always decked out in what looked like a thousand white lights from top to bottom. I remember the big wooden star – homemade, no doubt – that was hung on the front of the Melvin Elevator. And I remember a plastic light-up Santa Claus perched high atop the radio aerial outside of Art’s Electric. I just learned that my uncle often helped Art place that Santa there by climbing up the tall tower.
The holiday lights at home were simple, too. One year, my dad hung a string of colored lights along the front peak of our house. For some reason, the green light always had to be at the very top. Another year, he wrapped a pillar on our front porch with evergreen boughs. It was beautiful. Inside, my mother always prominently displayed a Santa Clause that someone had made for her from the glass chimney of a kerosene lamp. Inside, there were always hard candies that I would snatch from time to time when I wanted something sweet.
The “real” Santa was a lot simpler back then, too. Every year, the children of Melvin would gather at the fire station on the last Saturday before Christmas. In my mind, it was always the coldest day of the year, but still, we would wait until St. Nick came riding into town on the fire truck, the sirens blaring. Inside the station – where it was barely warmer than outside – we would get a brown paper sack filled with unshelled peanuts and an orange.
To be honest, I hated those peanuts. I would have much rather had a nice candy bar. Still, I remember them fondly along with the lights and the trees and the orange and green decorations that lined Main Street.
I try and keep a bit of that simplicity with me as I bake each holiday season. While I love the challenge of making a beautiful bouche de Noel or a croquembouche, in reality, people appreciate a basic tray of cookies just as much.
But what should you put on that tray? Like the holidays I loved as a child, I enjoy a cookie tray that is simple. That means it should be simple for you to assemble and simple for your recipient to eat.
It also should have variety. With that in mind, I’ve come up with a silly little rhyme that I am going to try to follow this year when I do my holiday cookie/candy making:
Something Nutty, Something Iced, Something Chocolate, Something Spiced.
Of course, it’s up to you to figure out what each of those things may be. If people love your chocolate chip cookies, put them on there, even if they are not a holiday favorite. If you are known for peanut brittle, by all means, put it on the tray.
Below, you will find a few recipes that should get you started.
Happy Holidays!
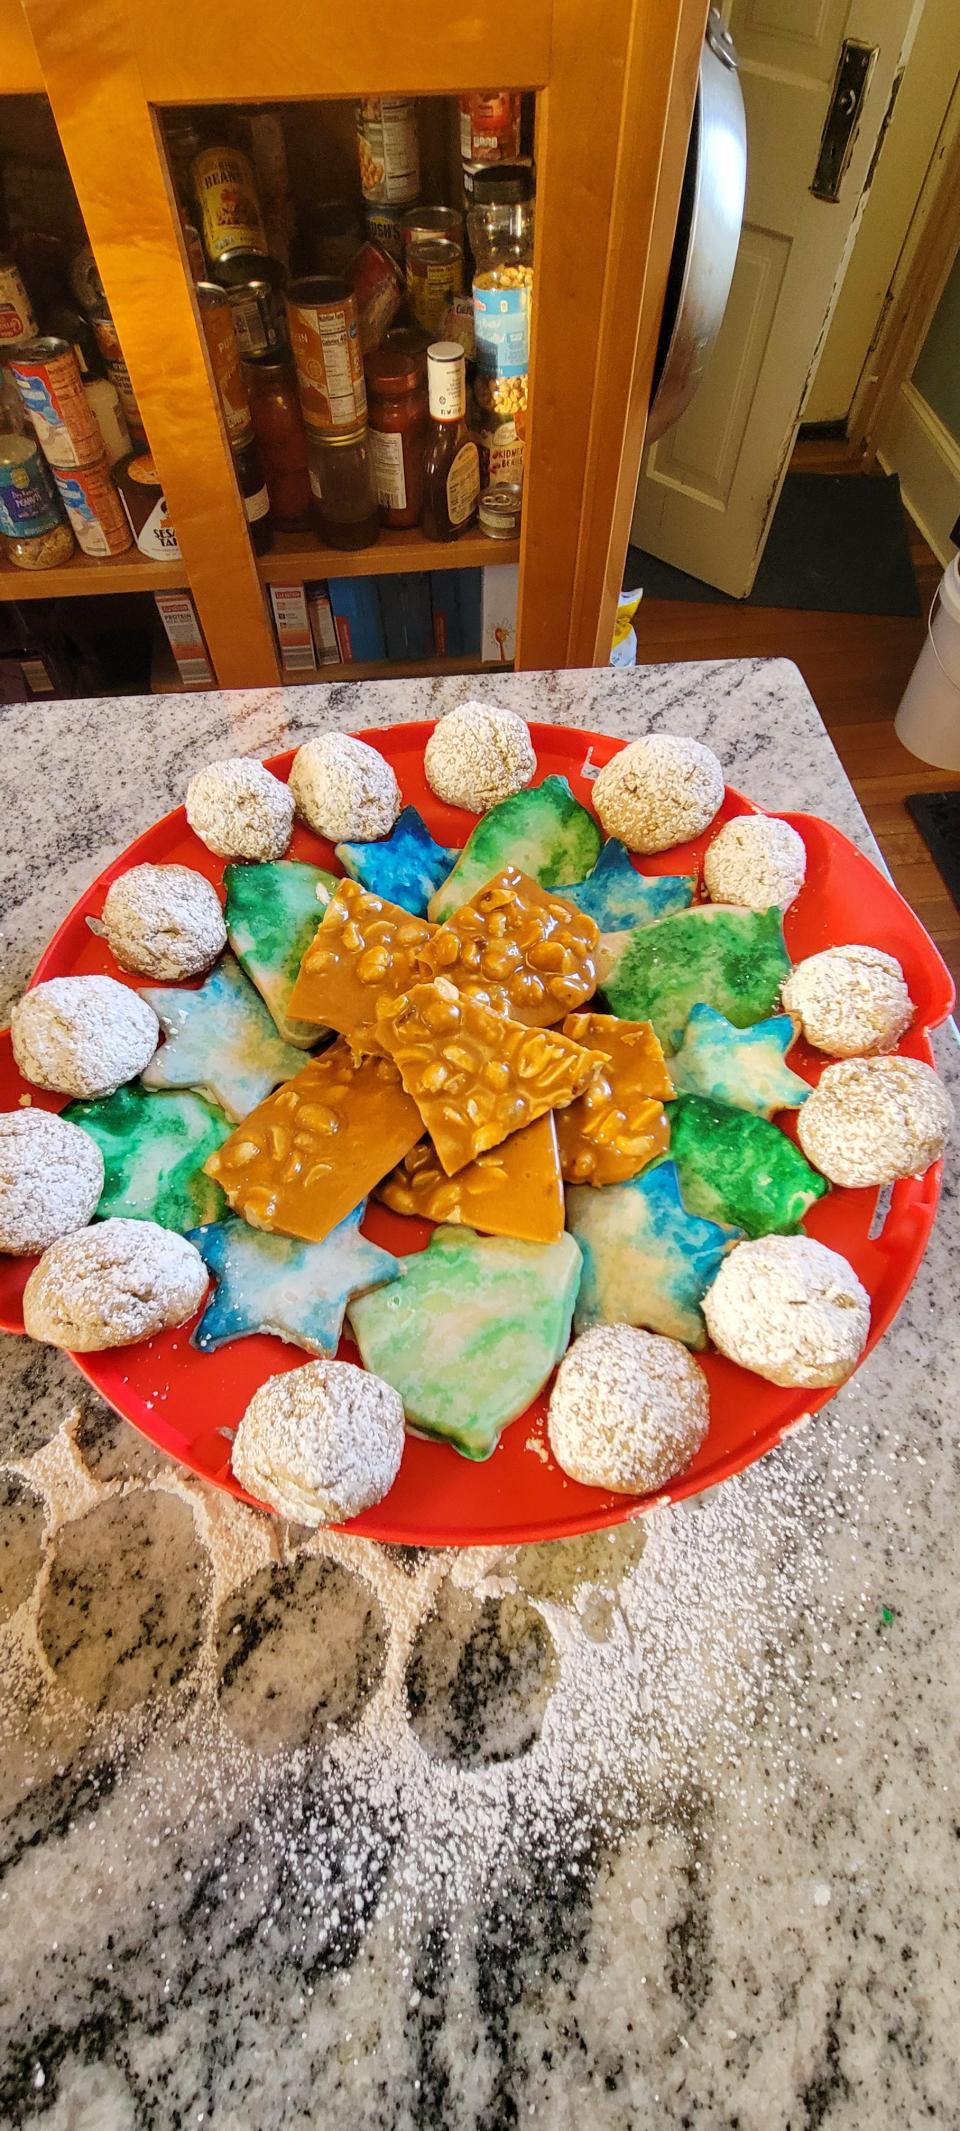
Something Nutty: Cayenne Peanut Brittle
This is a variation on a recipe I found on the Food Network website. Specifically, I added the cayenne pepper because I really like that little kick of heat that it brings to the sweet candy. Of course, you can leave it out if you don’t like your holidays to be so spicy.
The other change came after I read the comments that followed the recipe. Like many of the readers, I thought that heating the mixture to 340 degrees was too high. However, several of the commenters said to trust the recipe with this exception: stop stirring the mixture once it comes to a boil. Just let the temperature rise to 340 degrees and everything will be fine. It worked. I love the texture of this brittle, and it didn’t burn.
Ingredients
2 cups sugar
½ cup light corn syrup
½ cup water
6 tablespoons butter, cut into tablespoons
½ teaspoon cayenne pepper
½ teaspoon baking soda
1 ½ cups roasted salted peanuts
Line a large rimmed baking sheet with parchment paper. Lightly spray the paper with nonstick spray. Set aside.
In a medium saucepan combine the sugar, light corn syrup, and water. Stir together over a medium heat until sugar melts, and then stop stirring. Add a candy thermometer, and heat the mixture until it reaches 340 degrees.
Remove from the heat. Add the butter and the cayenne pepper followed by the baking soda and stir until butter melts. Stir in the peanuts.
Pour mixture onto prepared baking sheet. Allow to cool and then break into pieces.
Something Iced: Jake Cohen’s Hanukkah Cookies with Icing
Hanukkah begins this year on December 18. That gives you plenty of time to bake up these beautiful, delicious and very simple cookies from Jake Cohen.
Cohen is one of my favorite Instagram bakers. Like most butter cookies, his recipe goes together very easily. What makes it so special is his dreamy/swirly technique for icing the cookies.
They aren’t just for Hannukah, however. You can make these cookies for any holiday and with any shaped cutter.
Ingredients for the Cookies
1 cup (2 sticks) butter, room temperature
¾ cup sugar
1 egg
2 teaspoons vanilla extract
1 teaspoon almond extract
2 ½ cups flour
1 teaspoon kosher salt
¼ teaspoon baking powder
Ingredients for the icing
2 cups powdered sugar
¼ to ½ cup half-and-half
1 tablespoon vodka
1 teaspoon almond extract
Pinch of kosher salt
Cream together the butter and sugar with an electric mixer. Add the egg, followed by both the vanilla and almond extracts. Add the flour, salt and baking powder, and mix until just combined.
Use your hands to separate the dough into two roughly equal balls. Flatten slightly, wrap in plastic, and chill for 30 minutes.
On a lightly floured counter roll out half your dough to about a 1/8-inch thickness. Use cookie cutters to cut out your dough. Place on a parchment lined baking sheet, and chill for another 30 minutes.
While the dough is chilling preheat the oven to 350 degrees.
Bake your cookies for 10-11 minutes (cookies should just begin the brown around the edges). Repeat with the second half of the dough.
While your cookies are cooling, make the icing. Stir together all of the ingredients except for the food coloring. Jake says to use ¼-cup half-and-half, but I found it necessary to add a bit more to make the icing the correct consistency.
When you are ready to ice your cookies, add a few drops of food coloring into the icing. Use a knife or a skewer to swirl – but not stir – the food coloring into the icing. You want pretty swirls of color.
Dip the top of each cookie into the icing, and place on a sheet of waxed paper to dry.
Something Chocolate: Catherine’s Cookies
These are akin to candy than they are cookies. Still, they are a family favorite, and so I am including them here.
The “Catherine” mentioned in the recipe’s name was my Grandma Kruse’s best friend from Little Rock, Iowa, yet another small town in which I have deep roots. Don’t let their simplicity fool you. These “cookies” are usually the first to go whenever our family gets together for the holidays.
Ingredients
1 cup peanut butter (I use smooth)
1 cup Rice Krispies cereal
1 small jar ( oz.) marshmallow cream
Chocolate almond bark
Line 1-2 baking sheets with parchment paper or waxed paper.
In a large bowl, stir together the peanut butter, Rice Krispies, and the marshmallow cream. Roll into balls (roughly the size of a chestnut) and place on your prepared baking sheets. Chill for about an hour, or until firm.
Once the cookies have chilled, melt your chocolate almond bark. Dip each cookie in the chocolate and return to the prepared baking sheet. Chill until the chocolate hardens.
Something Spiced: Pfefferneusse
I can’t believe that I’ve never made pfefferneusse before. The traditional German pepper cookie is a staple of holiday baking. Yet, I’d never tried making them myself until this week. The result is a cookie that is lightly spiced and a little addictive. It’s easy to sit down to eat one or two and discover you’ve eaten a dozen.
This recipe comes from the book, “Dorie’s Cookies” by Dorie Greenspan. Dorie is, perhaps, my favorite baking book author. Her recipes are simple and straight-forward and good. That includes this one, which has a lot of ingredients, but is easy to throw together.
Ingredients
2 cups flour
1 teaspoon cinnamon
½ teaspoon salt
½ teaspoon black pepper
½ teaspoon nutmeg
½ teaspoon ground cloves
¼ teaspoon cardamom
¼ teaspoon dry mustard
½ teaspoon baking powder
1/8 teaspoon baking soda
2/3 cup sugar
Zest of one orange
6 tablespoons butter, room temperature
2 eggs
½ cup finely chopped pecans (optional)
Powdered sugar for dusting
Preheat the oven to 350 degrees. Line two baking sheets with parchment paper. Set aside.
Whisk together the flour, all of the spices, the baking powder and baking soda.
In your mixing bowl, combine the orange zest with the sugar. Use your fingers to rub the zest into the sugar until it is aromatic. Add the butter and beat on medium speed for about 2 minutes. Add the eggs, one at a time, beating for 1 minute each. Use a rubber spatula to scrape the bottom and sides of the bowl. Add the dry ingredients, and mix until most of the flour is incorporated. Add the chopped nuts, and mix only until the flour has disappeared into the dough. Use your spatula again to scrape the bottom and sides of the bowl.
Scoop out roughly teaspoon-sized balls of dough. Roll them into balls and place on your prepared cookie sheets, leaving about 1 ½ inches of space between them (these cookies do not spread much).
If you are baking both sheets at once, bake for 20 minutes total, stopping to rotate the baking sheets from top to bottom and back to front after 10 minutes.
Cool cookies completely. Dust with powdered sugar, and serve.
Note: You also can dip the tops in melted chocolate for a different look and taste.
This article originally appeared on Iowa City Press-Citizen: Michael Knock Holiday Cookie board recipes

