9 Christmas Nail Designs That Are Merry And Bright
For the majority of the year, my nails are the same nude shade. But during December, I remove my neutral polish and upgrade to a Christmas nail design that shines brighter than my holiday decorations. Usually, I head to my nail salon to get my seasonal look, but because of the pandemic, I'm doing my manicure at home. And thanks to the help of some talented pros, you can do your own nails, too, with these Christmas nail ideas. (Of course, you can also show these options to your technician. Just make sure you're wearing a mask inside the salon.) These manis feature a variety of designs of colors to suit everyone's style. Some are fairly simple, and others are more intricate, so practice the look you love until you get it just right for December 25.
Christmas Nail Supplies
All of these manicures are gorgeous and unique, but many of them require a few of the same tools and polishes. Remember, no matter which one you're emulating, start with a base coat and finish with a top coat, which you can find below. Here are some other items and polishes you might need before you begin.
Manicure Nail Tool Kit ($24, Sephora)
OPI Natural Nail Base Coat ($11, Ulta)
OPI Top Coat ($11, Ulta)
Nail Art Kit With Pouch ($19, Etsy)
Sally Hansen Hard As Nails Xtreme Wear Sparkly Green Polish ($4, Ulta)
Exclamation Point Silver Holographic Glitter Polish ($8, Olive & June)
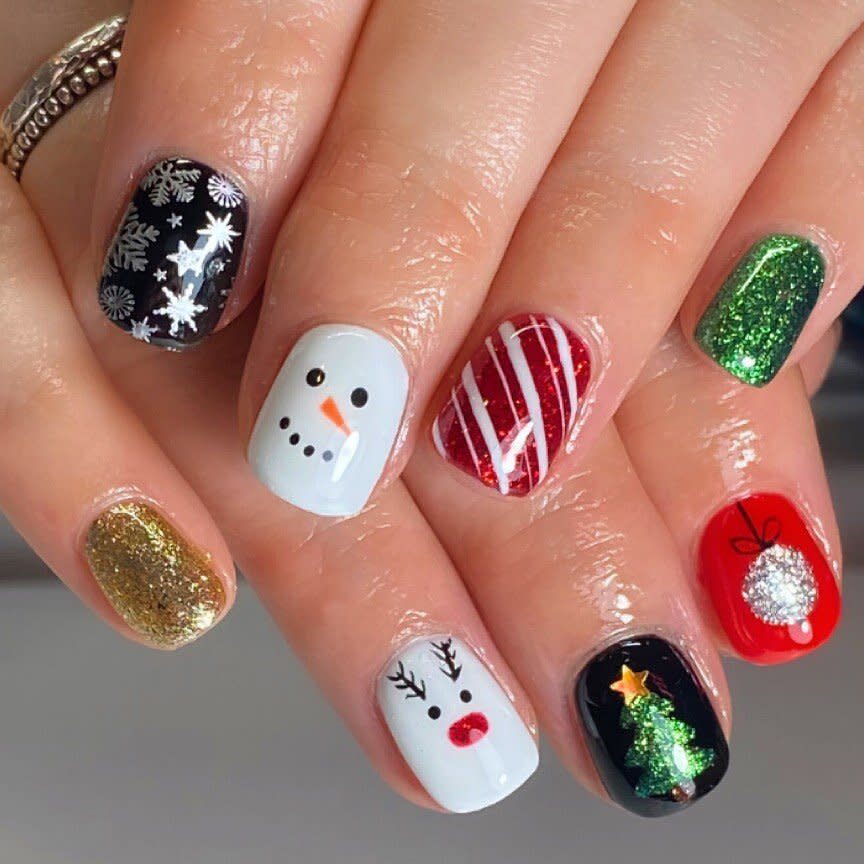
Courtesy of @the_beauty_fountain
Classic Christmas Nail Art
When you can't decide on a holiday theme, why not do something a little different on every nail like @the_beauty_fountain? Start by painting your pinky on the right hand with glittery gold polish, the ring finger with a white polish, your middle with black polish, the pointer finger with red, and your thumb whatever you'd like. On the left, do the pinky with a green, your ring finger with a sparkly red polish, your middle nail with white, the pointer with black, and the thumb with your choice. Next, on the right hand, draw the reindeer with a sparkly red for the nose, the black for the eyes, and brown polish ($12, Butter London), for the antlers. Use a sparkly green for the tree with a gold star ($4, Etsy) on top and paint a tiny brown trunk. Use a sparkly silver)for the ornament on the pointer finger, and add a tiny black bow. For the left hand, add white stripes to the ring finger. For the snowman, add black dots for the eyes and mouth, and use orange polish ($8, Olive & June) for the nose. Finally, add silver snowflake stickers (from $4, Etsy) to the pinky nail.
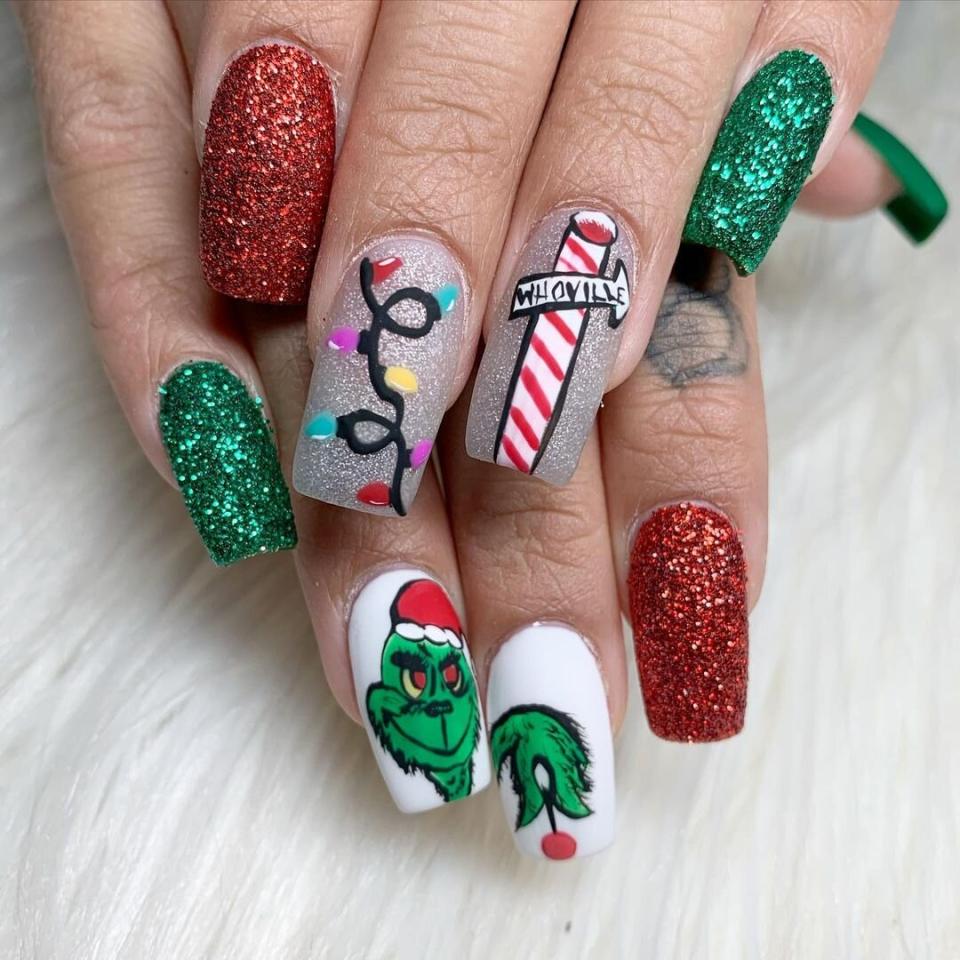
Courtesy of @nailsby_jackiee
Whoville Nail Designs
The Grinch has never looked so cute, thanks to @nailsby_jackiee. This is definitely a more intricate design, but with some patience, you'll get better and better. To begin, paint your pinkies, pointers, and thumbs with either sparkly green or sparkly red polish. On one hand, paint the ring finger and the middle finger white, and on the other, apply a sparkly silver to the same nails. Paint on your Grinch on the white nails with red, white, and black polish. On the other hand, paint your middle nail with a string of lights with black and multi-colored polishes ($48, Olive & June). After that, draw on your Whoville sign with red, white, and black polish.

Courtesy of @nailsbyrosie
Retro Christmas Nails
This look by @nailsbyrosie is reminiscent of the vintage Christmas ornaments my grandma would hang on her tree. After you've applied white polish to every nail, draw on some ornaments with multi-colored polishes ($48, Olive & June). Add some stars with black lacquer and dots with glittery gold polish.

Courtesy of @nailsby.hails
Festive Gnome Nail Designs
Classic Christmas gnomes get a mini makeover on this manicure by @nailsby.hails. Paint every nail except for your ring finger red. On each ring fingernail, apply nude polish. Add a coat of sparkly red lacquer to your pointer and pinky fingers. After that, paint on a plaid pattern to your middle fingers with black polish, and paint on little gnome heads to your ring nails with black, red, and white polishes.

Courtesy of @designbyjanec_
Christmas Charlie Brown Nails
Try out this adorable mani by @designbyjanec_ as you're watching A Charlie Brown Christmas. First, apply nude polish to every nail. On one ring finger, draw a string of lights with multi-colored polishes ($48, Olive & June) and black polish for the strand. On that same hand, draw on Snoopy with black, red, and white lacquers. On the other hand, sketch Charlie Brown's famous tree with black, red, green, brown ($12, Butter London), and blue ($8, Olive & June) polishes. Then, draw Woodstock with yellow ($8, Olive & June), black, red, and white polishes. Finish by drawing on snowflakes with white polish and a tool on the other nails. (Don't worry; they don't have to be perfect!)

Courtesy of @ccnails__
Red Christmas Nails
These glitzy nails by @ccnails__ are super fun and not difficult to emulate. Paint every nail with a sparkly red polish. Using white polish, paint candy cane stripes on the ring fingers, stars on the pinkies, and snowflakes on the pointer nails.

Courtesy of @aimee_mcguire
Glittery Ornament Nails
There's nothing wrong with classic Christmas colors, but @aimee_mcguire is making a case for showing off gorgeous golds and pretty pinks on your nails during the holiday season. For this glam look, paint your thumbs and pinkies with glittery gold polish. After that, apply light pink polish ($18, Butter London) to the other three fingers on each hand. Draw on ornaments with gold and white lacquers to the ring fingers and pointer fingers, and apply a swipe of gold polish to just the base of the middle fingers.

Courtesy of @steffthenaildesigner
Christmas Snowfall Nails
The beauty about this manicure by @steffthenaildesigner is though it looks intricate, it's actually secretly simple. Paint every nail with a rose gold polish ($9, Ulta). Then, press on white snowflake stickers ($9, Etsy) to each finger. That's it!

Courtesy of @houseofbeautykh
Green Christmas Nails
Upgrade your French manicure with this festive look by @houseofbeautykh. Carefully apply a small amount of glittery gold polish to the tops of each nail. Then, draw on the garland with berries to each nail using green and red polishes.

