The ultimate Intel Z170 motherboard shootout: Battle of the flagships
Battle of the extreme Intel Z170 motherboards
Since the Haswell-based Devil’s Canyon chip dropped in June 2014, we’ve been lacking a new performance desktop part. Our wishes came true a few months back when Intel released a total of 48 Skylake processors – comprising both desktop and mobile parts – that featured improvements in the areas of performance, power consumption, and overclocking.
After the haphazard Broadwell launch, Skylake promised new performance-oriented CPUs that offered up to an 80% gain on 5-year-old systems. Since then, we’ve had the opportunity to pit a bunch of high-end Intel Z170 motherboards against each other, paired with the new Intel Core i7-6700K. For an overview of what Intel Z170 brings to the table, you can refer to that article as well.
This time however, we’ve decided to up the ante by picking only the flagship Z170 boards for our shootout. Our previous review of the boards made do with just high-end boards from the various brands, but this crop of boards comprises the top models from ASRock, ASUS, Gigabyte, and MSI.
There is literally no other Z170 board that sits above these boards in their respective product line-ups. As of the time of writing, these are the best boards that our tested brands have to offer. A quick glance at their specifications sheets reveals that quite nearly every effort has been made to arm these boards to the teeth. Other than a generally inordinate amount of power phases, the boards are crammed with overclocking-oriented features like an assortment of dedicated overclocking buttons and knobs, dual BIOS and extra power headers for more power.
Who are these boards for? Well, basically anyone who wants the best of the best when it comes to the Intel Z170 platform. It’s lonely at the top, but we’ve singled out the flagship boards from the major brands to give you an idea of your options. And make no mistake, these boards do not come cheap.

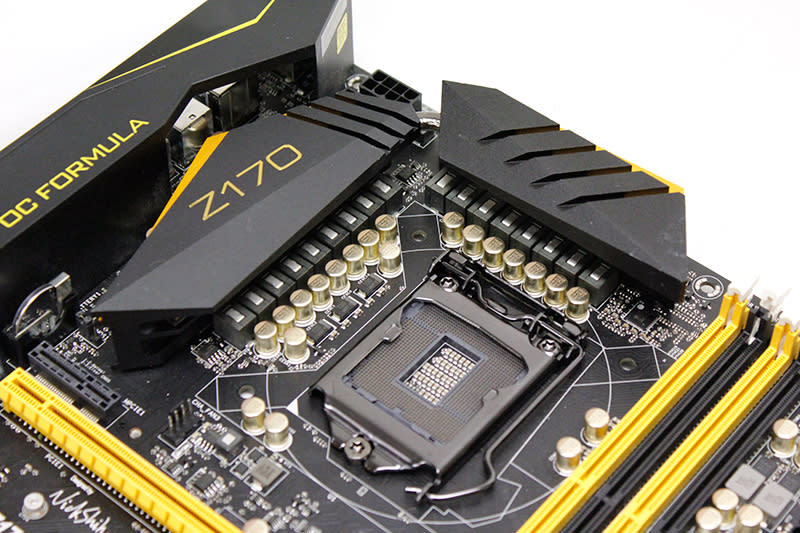
ASRock Z170 OC Formula

ASRock’s Intel Z170 motherboard line-up can be broadly divided into three distinct series – Gaming, Extreme, and OC Formula. As its name suggests, the Z170 OC Formula fits into the last category and has been designed unabashedly with overclocking in mind.
In comparison, Gaming series motherboards like the Z170 Gaming K6+ are intended to appeal to gamers with an eye-catching aesthetic and key features like upgraded onboard audio for better in-game sound. Similarly, Extreme series motherboards like the Z170 Extreme 7+ that we covered in our previous shootout feature a broader range of features to cater to a wider segment of users don’t necessarily see themselves as serious gamers or overclockers.
The latest addition to ASRock’s OC Formula series retains the bright yellow motifs of its predecessors, while adding new design elements like a matching I/O cover (ASRock is calling this I/O Armor as it is more than just an aesthetic choice and can protect crucial components from static electricity). The solid yellow VRM and PCH heatsinks on the Z97 OC Formula have also been replaced with more staid-looking black heatsinks on the Z170 motherboard. There are still subtle accents of yellow present, but the overall look is a lot more tasteful now.
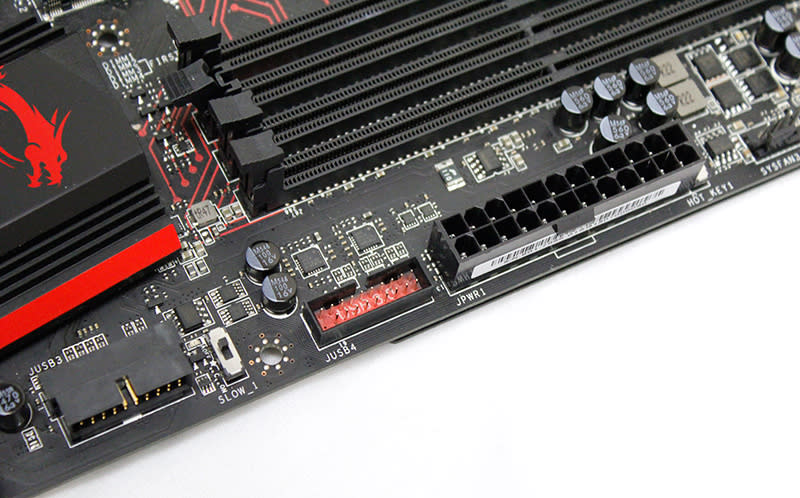
The board boasts an 18+2-phase digital power design, with the two additional phases dedicated to the memory components. While the number of power phases is a poor indicator of a board’s ability to support high overclocks, it does serve as a general guide of overclockability.
The greater number of phases allows the board to step down the 12V power delivered from the power supply unit (PSU) to the board in smaller increments, reducing the chances of voltage drops – when the voltage drops below the vCore setting – that might cause the system to crash or become otherwise unstable.
Power phases aside, as a board targeted at overclockers, the Z170 OC Formula unsurprisingly comes with a host of other features to improve stability. This includes 60A power chokes for cleaner Vcore voltages, premium memory alloy chokes to feed power more reliably to the memory modules, and dual-stack MOSFETs that double the die area over traditional MOSFETs and make the power delivery for the CPU Vcore more efficient.
Then there’s the matte black eight-layer PCB that features four sets of two ounce copper inner layers that can reportedly ensure lower temperatures and better energy efficiency during overclocking. The PCB also utilizes a high-density glass fabric that protects against high humidity environments and guards against short circuits.
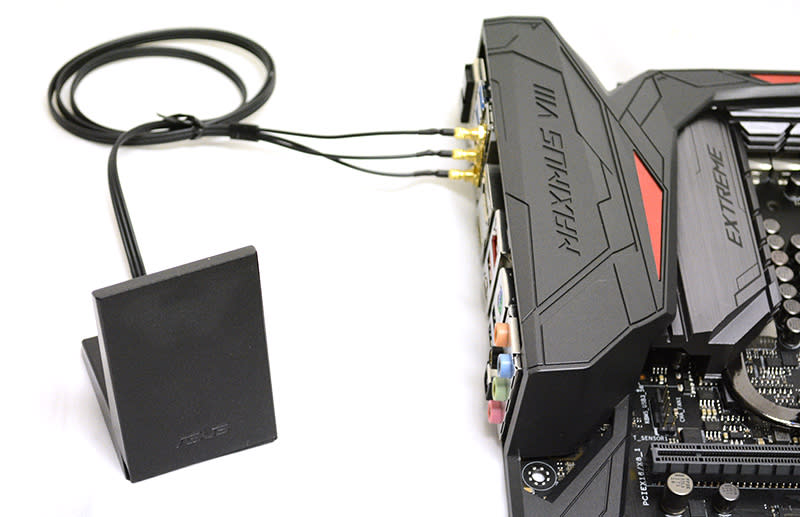
And as we noted on the Z170 Extreme 7+, ASRock has a tendency to cram its high-end boards with a wide selection of connectivity options. The Z170 OC Formula features four PCIe 3.0 x16 slots (with two-slot spacings between them), one PCIe 3.0 x1 slot, and one PCIe 2.0 x1 slot. The single PCIe 3.0 x1 slot has an open end, so it can accommodate larger add-in cards. There’s even a vertical half-size mini-PCIe slot for a network adapter as the board lacks onboard Wi-Fi.

The board officially supports both NVIDIA Quad SLI (that is, two dual-GPU cards) and four-way AMD CrossFireX (four discrete cards). Only the first and third slots are rated to run in PCIe x8 mode, NVIDIA’s minimum requirement for SLI, which is why the board can only support a maximum of two NVIDIA cards.
But if you did have four AMD cards, this would force the cards to run in x8/x4/x4/x4 mode – it’s not ideal, but it’s workable. However, since the Z170 platform really only allocates 16 PCIe 3.0 lanes to the GPUs, ASRock has wired the second PCIe slot to the Platform Controller Hub (PCH) to tap on the PCIe 3.0 lanes from the chipset to enable better multi-GPU performance. Still, this is a far cry from the maximum 40 PCIe 3.0 lanes available on the Intel X99 platform and a CPU like the Core i7-5960X, so that is still your best bet if you want to run that many cards.
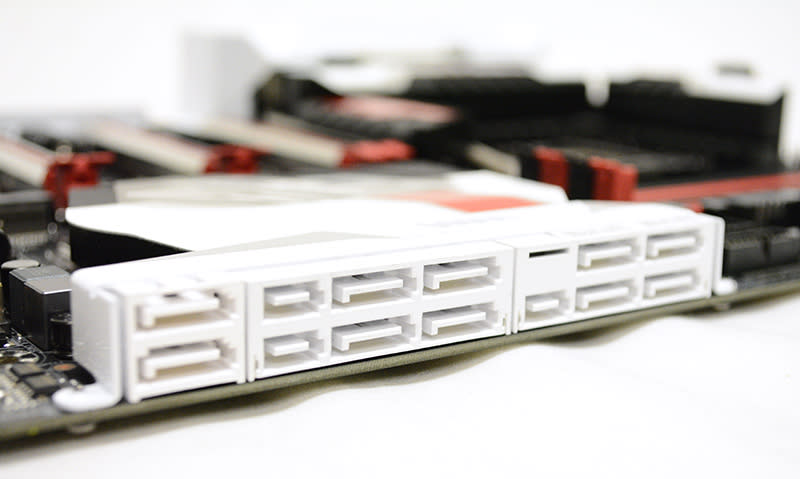
There are also a total of 10 SATA 6Gbps ports (including three SATA Express connectors) – six from the chipset itself and the other four from a third-party ASMedia ASM1061 controller. We also weren’t surprised to find three M.2 sockets on the board, all of which support both SATA and PCIe 3.0 x4 devices and up to 32Gb/s of bandwidth. You can install type 2230/2242/2260/2280/22110 drives in any of the sockets with no problems and also pair them with an ASRock U.2 kit to install a 2.5-inch PCIe 3.0 x4 drive like the Intel 750 series SSD.

But as we noted in our overview of the Z170 platform, having a huge selection of connectivity ports doesn’t mean that you are going to be able to use all of them because of the finite number of PCIe 3.0 lanes available through the chipset. In this case, each M.2 socket shares four of the chipset’s PCIe 3.0 lanes with two SATA 6Gbps ports and a SATA Express port, so if either one of them is in use, the other will be disabled. This is something to take note of during installation to make sure you don’t install your devices in conflicting ports and end up wondering why they aren’t working.
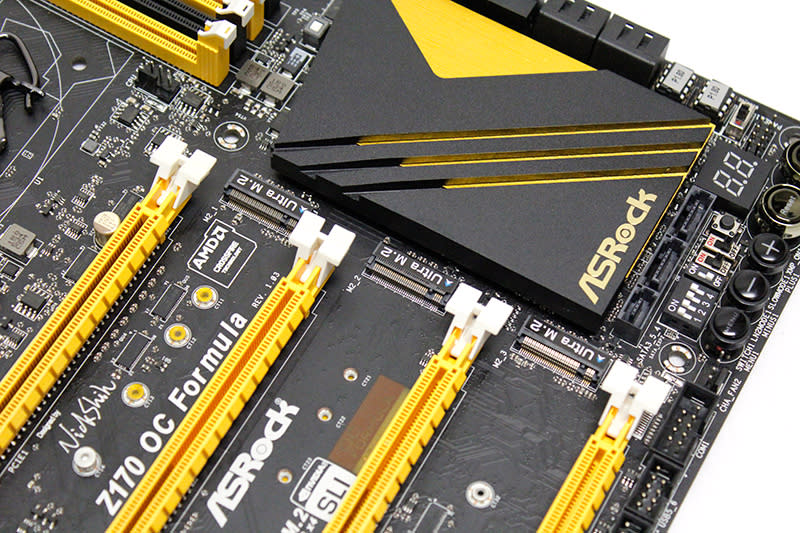
And because the M.2 sockets are located in the spacings between the PCIe 3.0 x16 slots, you may want to pick and choose which slot to install your drive in. For instance, if you’re running just a single graphics card and one M.2 SSD, you may want to install the drive in either the second or third slot so it won’t be covered by the graphics card (this could lead to issues with temperature and performance throttling).
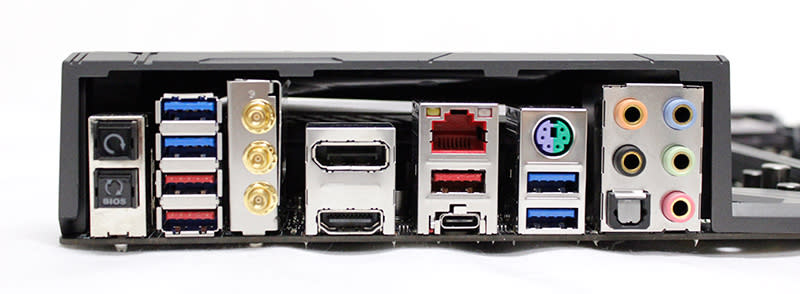
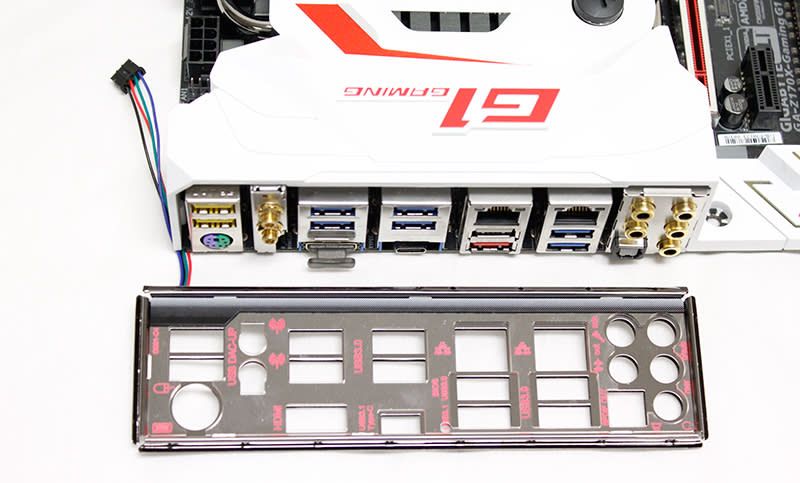
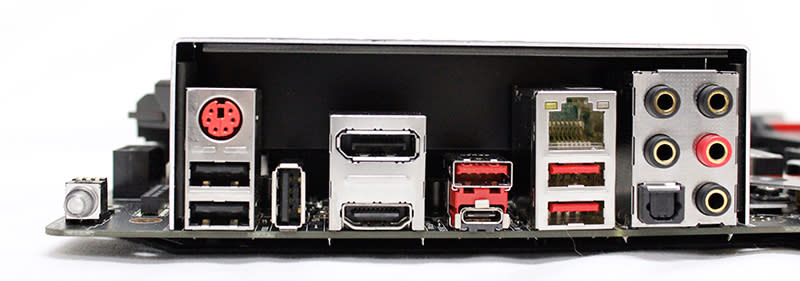
The rear I/O panel hosts the usual selection of USB ports and display connectors. There are four blue USB 3.0 ports (also known as USB 3.1 Gen 1) running off the Z170 chipset, and two USB 3.1 (or USB 3.1 Gen 2) Type-A and Type-C ports (pale blue) provided by an ASMedia ASM1142 controller. USB Type-C ports used to be something of a novelty, but we’ve now become used to seeing them on motherboards, especially on the higher-end models. We also like that there is a clear CMOS button (beside the PS/2 port) on the back, which means you don’t have to reach into your case to hit the button.

It’s worth noting that there is just a single Gigabit LAN port provided by the Intel I219-V controller. If this were a gaming-oriented board, we might have even seen dual LAN ports with support for teaming. But because it is aimed at overclockers, one Ethernet port appears to have sufficed.
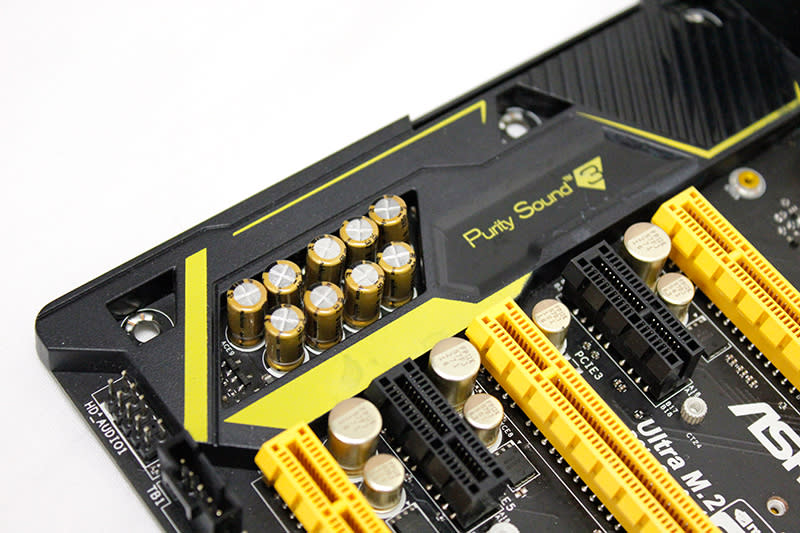
Onboard audio is handled by ASRock’s Purity Sound 3 solution, which comes with quality components like Nichicon Fine Gold series audio capacitors, a 115dB SNR DAC, and a TI NE5532 amplifier that can drive headsets up to 600ohm. The audio circuitry is hidden under the plastic shielding and has also been isolated from the rest of the PCB to reduce interference from other sources.
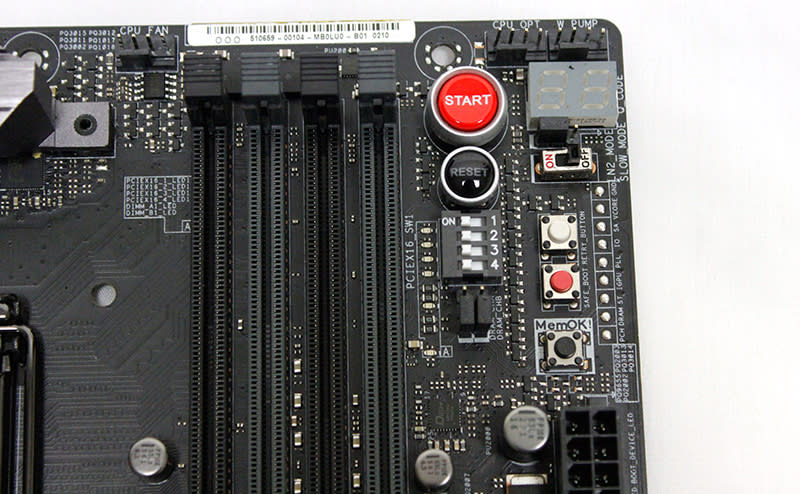
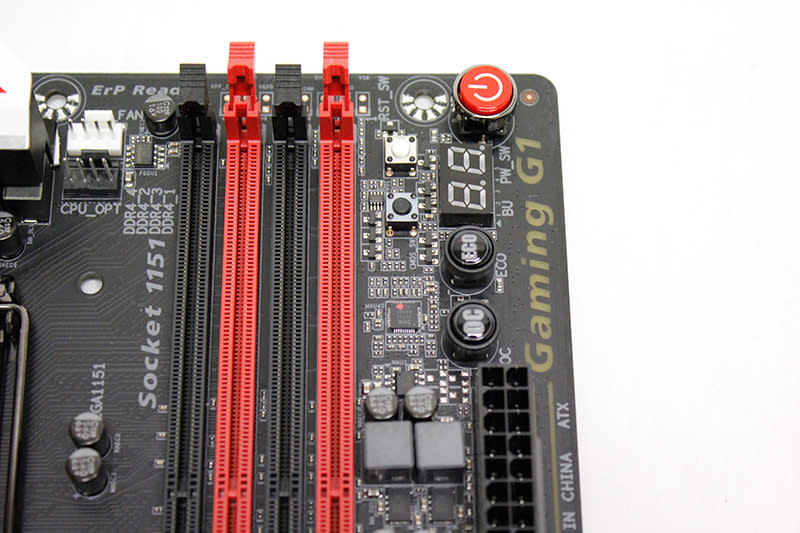
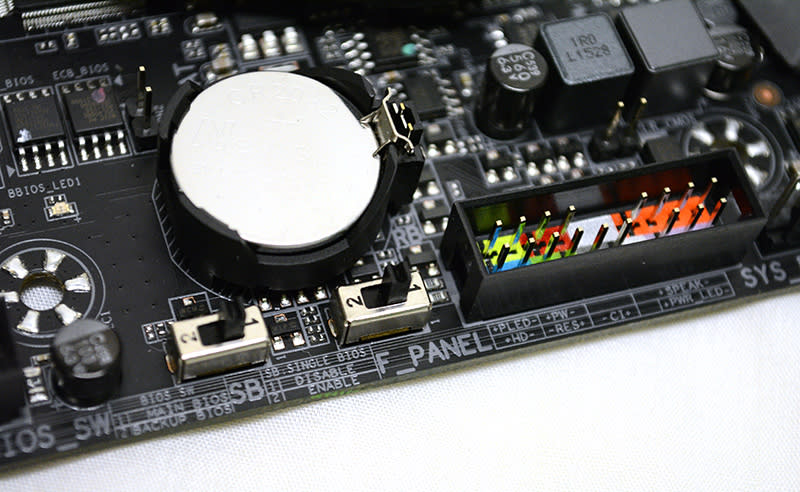
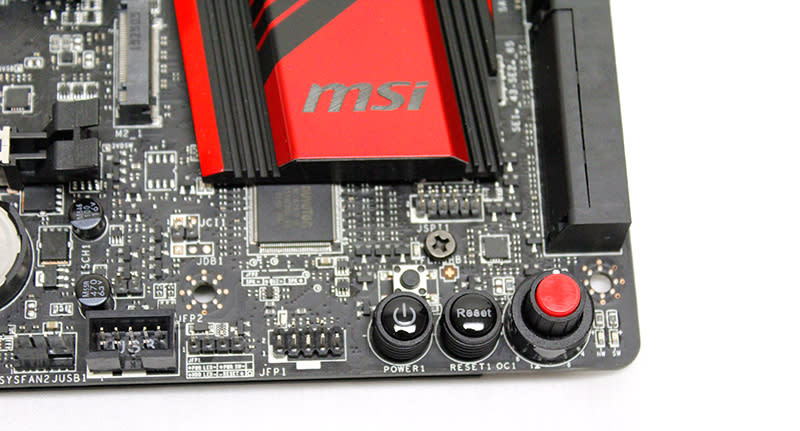
At the bottom right, the board also features a plethora of dedicated hardware switches to allow quicker access to overclocking settings in an open test bench, in addition to the standard power and reset buttons, and a debug LED. In the picture below, you can also see the two BIOS ROM chips located just beside the SATA ports. They have both been labelled "P1.80", signifying the BIOS version the board shipped with.

The “+” and “-” Rapid OC buttons allow you to tweak your CPU frequency in the Rapid OC Windows application by adjusting the base clock, CPU multiplier, CPU core voltage and CPU cache ratio. An LN2 mode DIP switch (white, above the "-" button) helps eliminate cold-boot bug issues when on LN2 cooling, while the Slow mode DIP switch (black, left) sets the processor to automatically run at the lowest frequency. The XMP switch next to the former allows you to quickly load XMP profiles to automatically configure your overclocked DRAM voltages, while the small black Direct Key button lets you boot directly into the UEFI BIOS (no need to madly tap the Delete button!).
Furthermore, the array of numbered DIP switches serve to disable the corresponding PCIe 3.0 x16 slots. This simplifies the troubleshooting process somewhat if you’re running multiple GPUs because you can use the switches to identify the faulty card by a simple process of elimination.
Finally, as expected of an overclocking-oriented board of this caliber, a dual BIOS switch enables you to switch between the two BIOSes (A or B) and recover from failed overclocks.
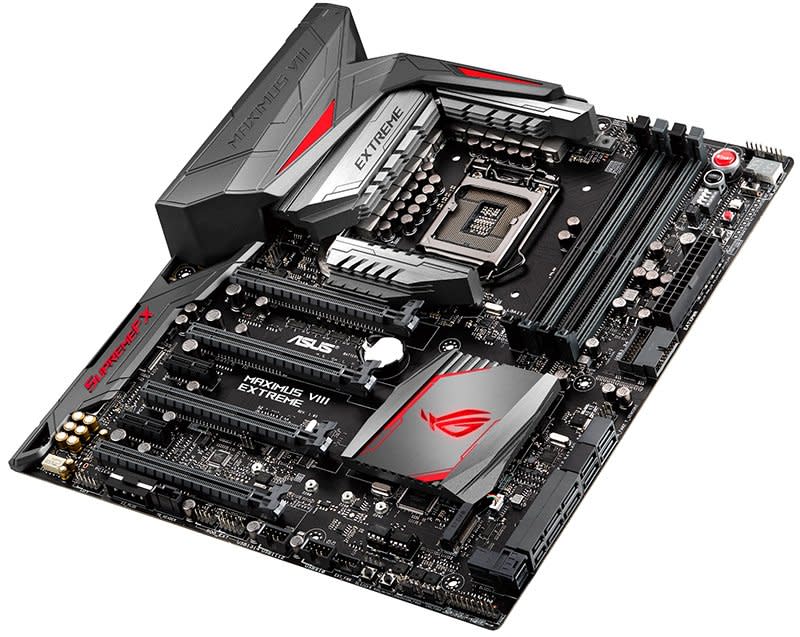
ASUS ROG Maximus VIII Extreme
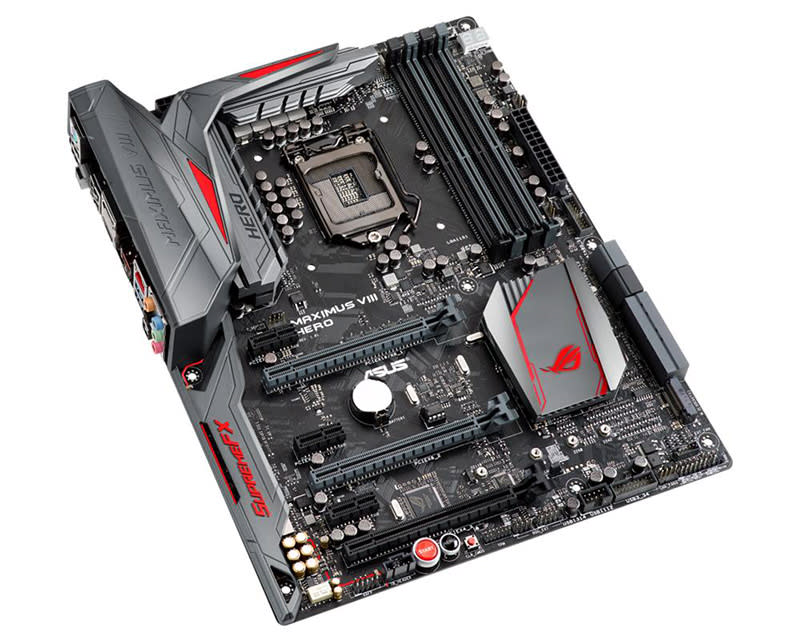
While the ASRock Z170 OC Formula was designed with overclocking in mind, the ASUS ROG Maximus VIII Extreme is an all-round premium board that is intended to offer the best performance to both gamers and overclockers. It is also the only other E-ATX board in this shootout (together with the Gigabyte Z170X Gaming G1) – ASUS apparently needed more space to cram more goodies on board.
Like all other Republic of Gamers (ROG) products from ASUS, there is a heavy emphasis on creating an eye-catching aesthetic that befits its performance gaming DNA. But compared to the traditional bright red-and-black color scheme that dominates the majority of ROG products, the Maximus VIII Extreme utilizes a more subtle variation on that theme to create a board that screams less for your attention, but is even more attractive because of it.
The design change was motivated by ASUS’ goal to enable greater color compatibility with the different lighting effects on the PCH heatsink that can be enabled via the Lighting Control application. As we noted in our coverage of ASUS’ Bangkok launch event, Lighting Control lets you set the onboard lighting to do cool things like pulse in time with your favorite tunes and change color according to your CPU temperature. Alternatively, you can choose from the following four fixed lighting effects – static, pulsating, strobing and rainbow.
But that’s not even the end of your customization options as you can also play around with the color wheel and choose from a nearly unlimited selection of tones and hues. Finally, a white-to-gray bar at the right lets you return to the original white lighting and adjust the brightness level.

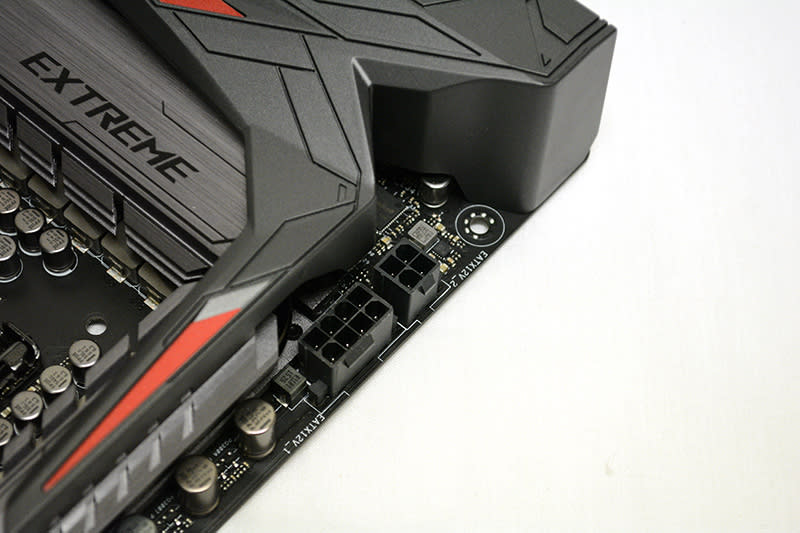
Of course, ASUS has also paired this pretty-looking board with enthusiast-level features to appeal to the performance crowd. As we mentioned before, the number of power phases is just that – a number. The quality and implementation of the entire voltage regulation module (VRM) matters far more. To this end, ASUS has utilized a 13+2 design, with two phases covering the the memory modules. According to ASUS, its new all digital power design, which it has dubbed DIGI+ Power Control, has full control over all elements of power delivery to the CPU, like the Vcore and Vsa voltages. This means smoother and more stable power for the CPU, which should translate into more stable overclocks.
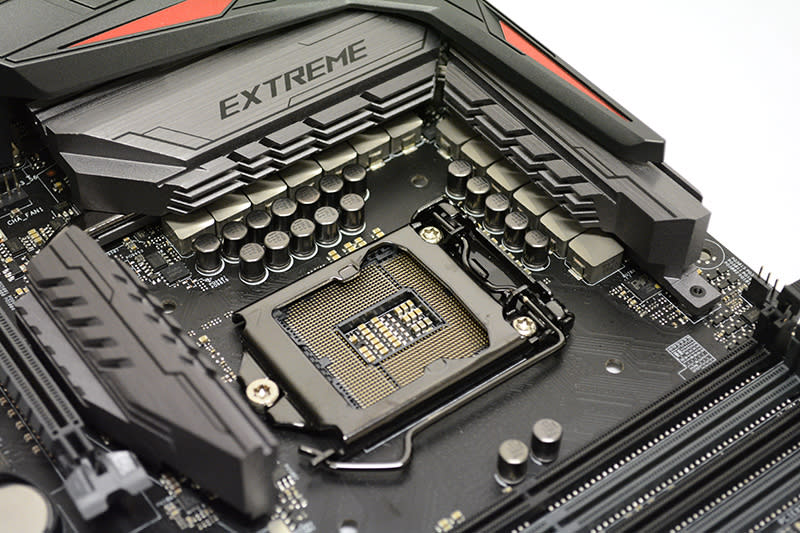
An additional 4-pin ATX 12V power connector is present to deliver even more power for more extreme overclocks. But if you don't intend to do anything too crazy, just hooking up the regular 8-pin CPU header will do.
On top of that, the board has beefed-up its VRM design with microfine alloy chokes that feature small, uniform granules that improve efficiency, enable larger current capacities and result in lower temperatures. The OptiMOS MOSFETs have also been designed for a similar purpose – to enable higher current delivery and still better power efficiency. Finally, what ASUS calls its 10K Black Metallic capacitors are intended to last far longer than traditional capacitors and endure more extreme temperatures, and consequently withstand the increased stress that overclocking imposes on the system.
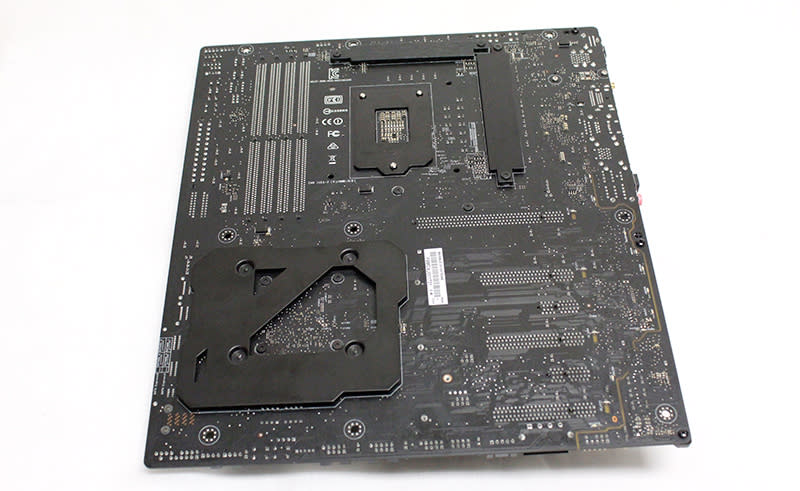
Speaking of stress, ASUS has installed backplates fitted with thermal pads on the board’s rear to provide additional cooling and structural reinforcement. The plates are located in the regions of the CPU, VRM, and PCH heatsinks, so system builders who are installing particularly heavy tower coolers on board will probably appreciate it.
When it comes to expansion options, the ROG Maximus VIII Extreme has four PCIe 3.0 x16 slots and two PCIe 3.0 x1 slots. It officially supports both NVIDIA Quad-SLI and four-way AMD CrossFireX, although the last PCIe 3.0 x16 slot can only run in x4 mode. Unlike the ASRock motherboard, ASUS has wired the x16 slots slightly differently. Triple-GPU configurations will run in x8/x4/x4 mode (with the second slot sharing lanes with the third slot), and it is only the fourth slot that shares PCIe lanes with the PCH and two SATA 6Gbps ports – the other three draw on the 16 PCIe 3.0 lanes from the CPU.

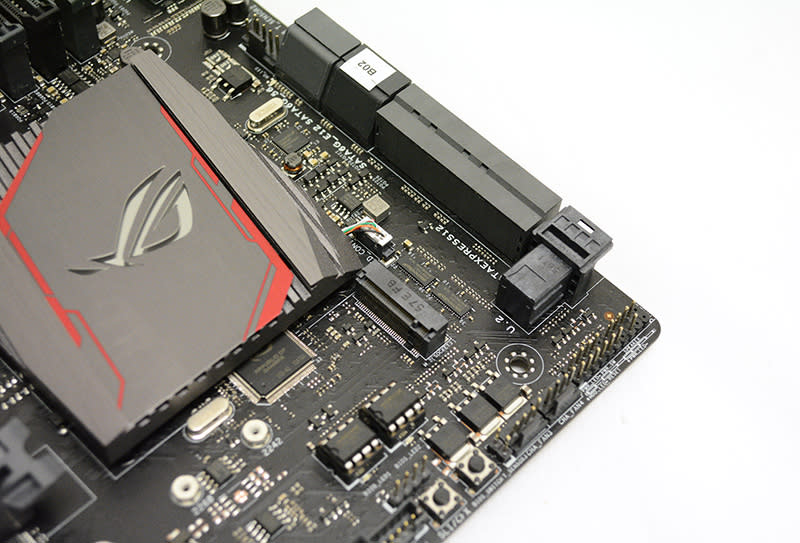
There are a total of eight SATA 6Gbps ports (including four SATA Express ports), where six are provided through the chipset and the other four by the usual third-party ASMedia ASM1061 controller. In addition, there is a dedicated U.2 port located behind the SATA ports, which means there is no need to go through the hassle of installing an M.2-to-U.2 adapter if you want to install a 2.5-inch form factor PCIe 3.0 x4 drive like the Intel 750 series SSD. In fact, the U.2 interface (formerly known as SFF-8639) was designed by Intel to support its latest PCIe-based drives and has certain advantages over M.2, like better heat dissipation because 2.5-inch drives can accommodate larger heatsinks and be installed away from the motherboard.

And as we saw on the Z170 Deluxe, the flagship of ASUS’ Signature series boards, there is just a single M.2 socket on board. It supports both PCIe and SATA drives and can accommodate type 2242/2260/2280/22110 drives. Compared to what the other manufacturers are offering, a single M.2 slot appears a little wanting, but it may be that ASUS is trying to avoid a situation where the M.2 drives end up overheating – and throttling – beneath a crowded multi-GPU array. This would also explain why ASUS has located the M.2 socket toward the outer edges of the board, where it is least likely to be affected by heat from the graphics components.
Nevertheless, should you really want to run multiple M.2 drives in RAID, you can just use ASUS’ Hyper M.2 x4 mini card adapter to install an M.2 drive in one of your available PCIe 3.0 x16 slots. Unfortunately, you’ll have to purchase this separately as it is not bundled with the board.
The U.2 interface is also part of the PCIe 3.0 x4 interface family, so there’s the option to set it up in RAID with an M.2 drive installed via a ASUS Hyper mini card. However, because the M.2 and U.2 slots actually share the same four PCIe 3.0 lanes, you will not be able to use the two together.
We actually prefer ASUS’ implementation of its storage connectivity options to what ASRock has done (10 SATA 6Gbps ports and three M.2 slots!). We see little point in implementing so many connectivity options if you cannot take full advantage of them, and the ROG Maximus VIII Extreme’s design makes more practical sense.
On the rear I/O panel, the ASUS board has the usual selection of USB ports and display connectors. However, ASUS hasn’t been content to pay merely lip service to USB 3.1 as a bonus feature. Instead, there are actually an equal number of USB 3.1 (red) and USB 3.0 ports (blue) – four each – on the back, including a single USB 3.1 Type-C port for compatibility with the next generation of peripherals.
The USB 3.0 ports on the back run off the Z170 chipset, while the four USB 3.1 ports are provided by the ASMedia ASM1142 and Intel Alpine Ridge controller. While the bandwidth on both solutions adheres to the 10Gbps USB 3.1 standard, the Alpine Ridge controller for Thunderbolt 3 actually exceeds that with four PCIe 3.0 lanes over the ASM1142’s two lanes, which translates to up to 40Gbps of bandwidth. This enables the supported USB 3.1 Type-C port to also support DisplayPort with a compatible display.
We were also surprised to see that there was just a single Gigabit Ethernet port handled by the Intel I219-V controller. Most high-end boards are split between this Intel controller and the Killer E2400, but the Intel solution reportedly reduces CPU overhead in order to allot more processing power for gaming and improves overall network throughput.
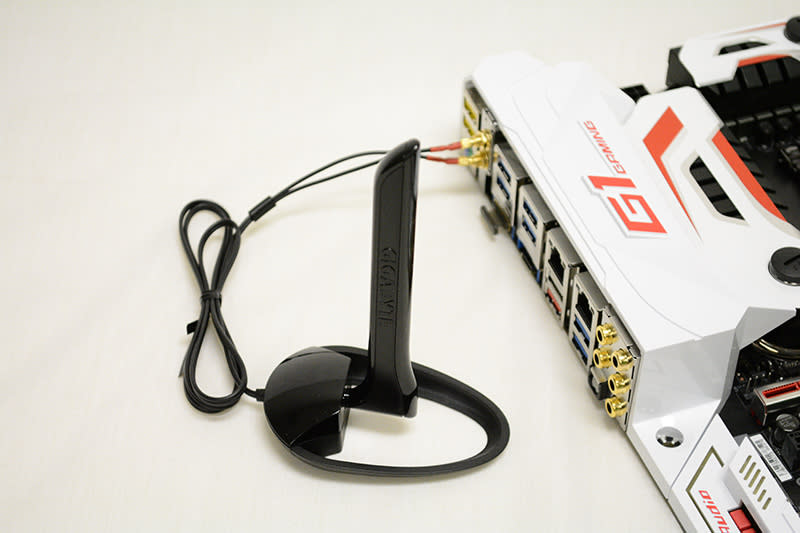
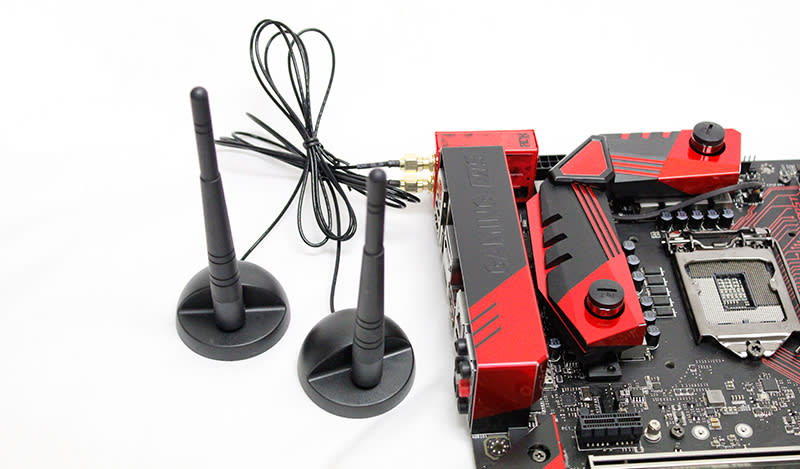
If you prefer to go the wireless route, there is a bundled 3x3 Wi-Fi module that supports 802.11ac Wi-Fi and Bluetooth 4.0. The 3x3 array is also a nice feature as it means that you can take advantage of the latest AC1900-class routers.
The onboard SupremeFX 2015 audio has also been upgraded over last year’s solution. ASUS has added a total of four new discrete components – an onboard DAC, a dedicated clock, a TI RC4580 op-amp, and a de-pop relay – to provide better performance for live streaming applications and high-impedance headphones. In sum, this means a cleaner audio signal that is free from jitter, the ability to drive headphones up to 600ohm, and the elimination of loud popping noises when you plug in your audio components.

And when it comes to dedicated overclocking features, the ROG Maximus VIII Extreme absolutely shines. A special area called the OC Zone hosts a selection buttons, switches, and voltage readout points to make overclocking easier. For instance, the ReTry button addresses the issue of lockups during POST by setting the system to continually attempt to reboot until it succeeds. Boot failures don’t necessarily signify overly aggressive settings, and this button is a quicker way to attempt to get the system to boot without having to long-press the power button.
If that fails, the Safe Boot button allows you to boot using safe parameters without erasing your existing settings. This saves you from having to hit the Clear CMOS button and starting from scratch, so you can quickly readjust potentially problematic values and try again.
We also like the LN2 mode switch and the Slow mode jumper. The former helps increase the overclocking margin for extreme overclockers using LN2 cooling, while enabling the Slow mode jumper when you think a crash is imminent will immediately set the CPU to run at the lowest frequency and give you time to tweak the temperature and power the PC down properly.
And in addition to the PCIe x16 lane switches that we saw on the ASRock Z170 OC Formula, there is a DRAM channel jumper that serves the same purpose, allowing you to rule out faulty modules or slots without needing to remove the installed DIMMs.
It also goes without saying that the board features dual BIOSes as a fail-safe measure while overclocking.
Finally, the board comes bundled with the ASUS OC Panel II, which lets you hook it up directly to the hardware and tweak your overclock settings and fan speeds without utilizing the system resources. This supposedly increases the overclockable margin for extreme overclockers.
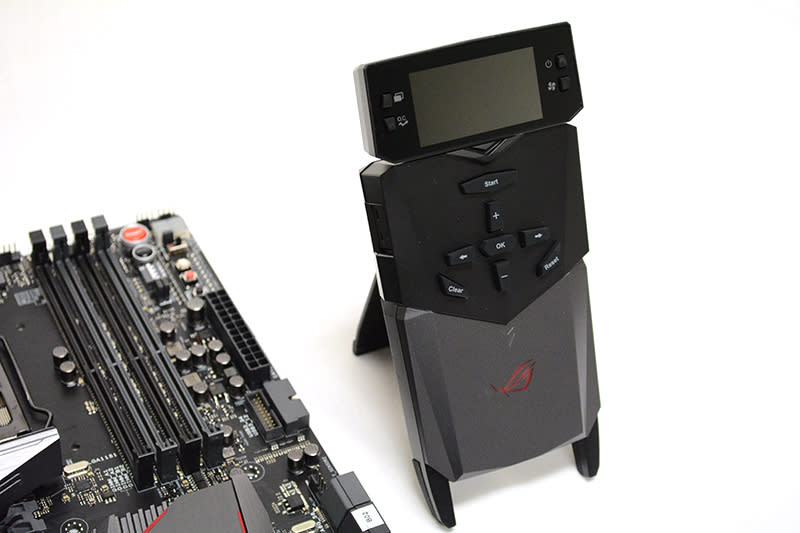
In truth, the panel really only caters to serious enthusiasts. It can tap into onboard digital thermometers for on-the-fly temperature monitoring, and also includes a VGA hotwire with a set of six variable resistors and voltage sensors for close monitoring of their GPU overclock. Seriously, you’re not going to be using all this if you’re just a regular Joe. But if you’re a hardcore speed demon, we bet you’re already drooling over this board.

Gigabyte Z170X Gaming G1
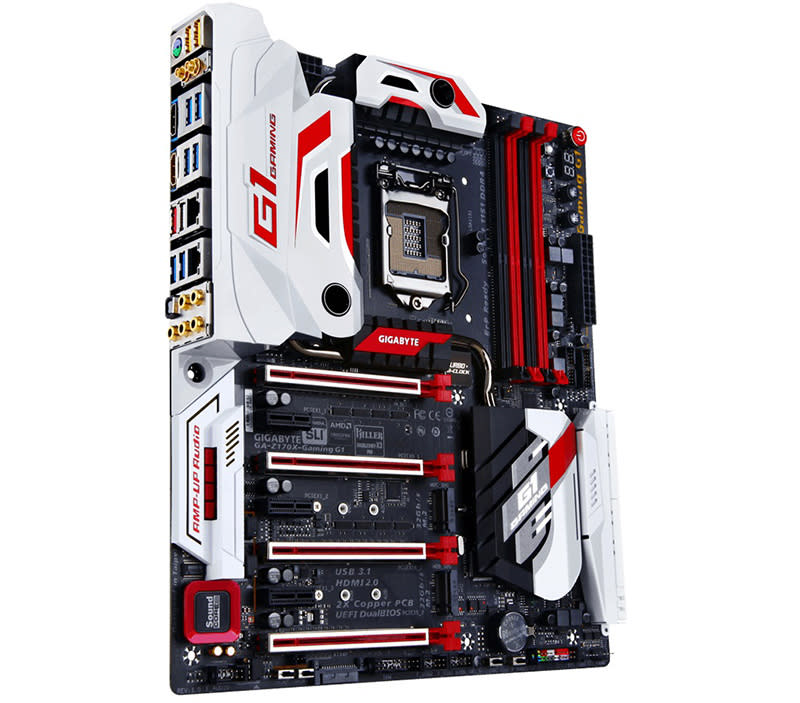
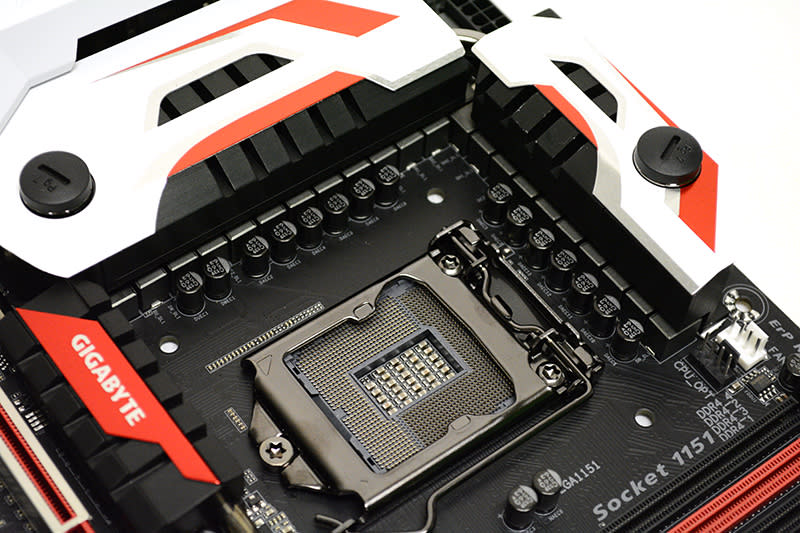
There are high-end motherboards, and then there is the Gigabyte Z170X Gaming G1. Overclocking comprises the cornerstone of performance for any enthusiast-level board, and the Z170X Gaming G1 incorporates a whopping 22-phase digital power delivery design to help with overclocking stability. This includes a combination of IR digital power controllers and PowlRstage ICs to detect the current more accurately. According to Gigabyte, this will help to distribute the thermal load more evenly among the individual ICs, which will in turn improve reliability.
Moving around to the VRM heatsinks themselves, we see that they are equipped with built-in G1/4 threaded fittings that will work with the majority of water-cooling systems. This feature was also included in the Z97 Gaming G1, so it’s no surprise that it makes a return here.
However, we've to say that we don't quite like the jarring red-and-white color scheme. It's not exactly easy on the eyes, and we'd have preferred a more subtle design. However, that's probably what Gigabyte is aiming for - a head-turner, and this board most certainly is with its race car-like color scheme.
Nevertheless, a look at the PCIe slots shows that Gigabyte is going all out in every aspect of the board’s features. There are a total of four PCIe 3.0 x16 slots, all of which are reinforced with metal. Given that you may pair this board with multiple high-end – and heavy – cards this is definitely a welcome feature. And in addition to the four PCIe 3.0 x16 slots, there are a further two PCIe 2.0 x1 slots.
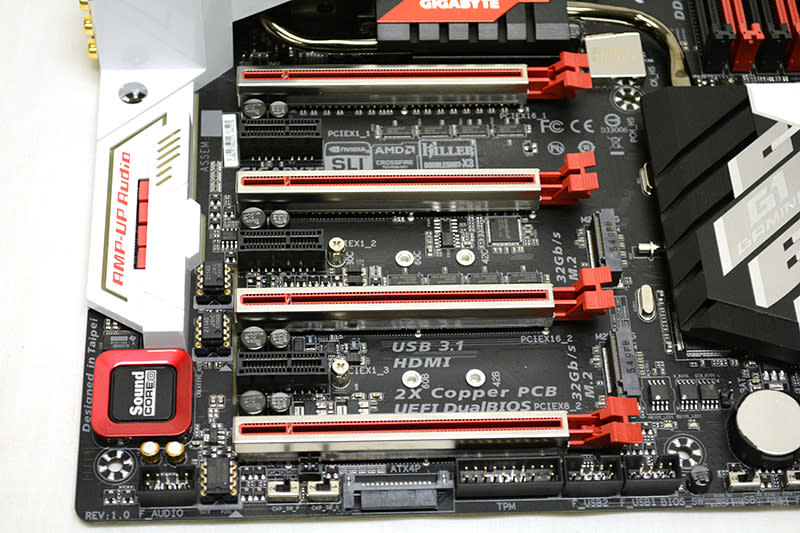
The board is also equipped with a PCIe lane switcher – a PLX PEX8747 to be exact, located under one of the heatsinks – which allows for four-way graphics setups in x8/x8/x8/x8. What it does is allow Gigabyte to direct the PCIe 3.0 lanes however it wants to the slots.

Intel Z170 is no Intel X99, and this is a step toward overcoming the PCIe lane limitations of the former chipset. However, do note that this doesn’t actually involve the provision of extra PCIe lanes. Rather it involves on-the-fly lane switching to allow PCIe lanes to be channelled to the GPUs that need it, providing access to a total of 32 PCIe 3.0 lanes. This isn’t the same as having additional PCIe lanes to work with, but it approximates it. And for the sake of comparisons, this also makes it the only board in our shootout to officially support four-way NVIDIA SLI instead of just Quad SLI because all the lanes now meet the minimum PCIe 3.0 x8 requirement.
The onboard audio solution is a similarly extravagant affair. The Gaming G1 uses a dedicated quad-core Creative Sound Core 3D audio processor that takes the audio processing load off the CPU for better performance. It also features a Burr-Brown 127dB DAC that supports 192kHz/24-bit audio, audiophile-grade WIMA and Nichicon capacitors, and upgradeable op-amps. In fact, there are a total of three op-amps – two JRC NJM2114 for back panel mono-output and one TI Burr Brown OPA2134 for the front panel output – so you should take care to upgrade the right ones if you plan on swapping them out. This also means that you can enjoy equally good audio quality even if you plug your headphones into the front panel.
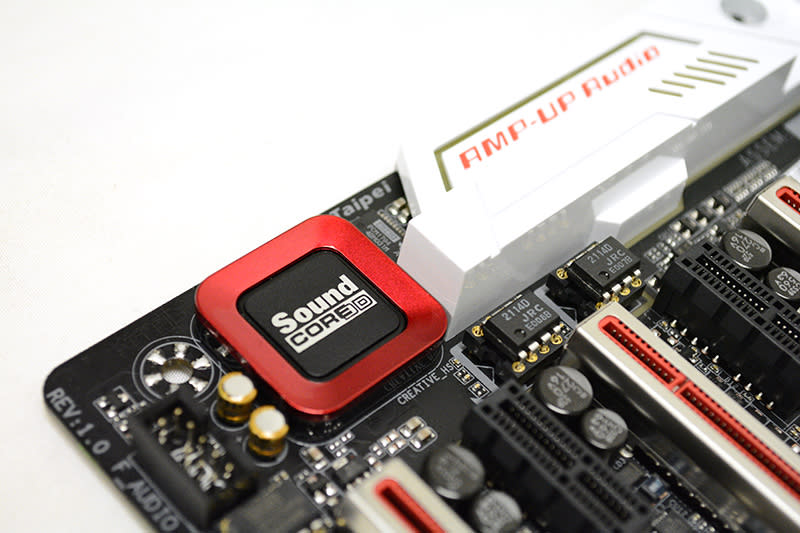
The entire audio solution is Creative Sound Blaster ZxRi-certified, and according to Gigabyte, delivers sound quality on par with the Sound Blaster ZxR discrete sound card.
Moving on to a slightly frivolous note, no high-end board would be complete without some LED-infused extravagance, and the AMP-UP Audio cover features some LED trace path lighting that can be configured from up to seven different colors.
Round the back, the rear I/O panel features one USB 3.1 Type-A port (red), one USB 3.1 Type-C port, seven USB 3.0 ports, and two USB 2.0 ports. The two USB 2.0 ports are colored yellow, and these are actually dedicated USB DAC ports for cleaner power delivery – because of their isolated power – to your DAC of choice. The single white USB 3.0 port is in turn connected to an iTE EC 8951E controller located beneath the PCH heatsink to allow you to update the board’s BIOS with only a PSU connected.

Gigabyte relies on a Renesas USB 3.0 hub to power the two USB 3.0 ports above the HDMI port and the topmost port above the USB Type-C connector. USB 3.1 support is provided by Intel's Alpine Ridge controller, which more than exceeds the full data rate of the official USB 3.1 specification because of the four PCIe 3.0 lanes available to it. This is a Thunderbolt 3-certified board as well, so this effectively means up 40Gbps of bandwidth available over the USB Type-C connection. In comparison, other USB 3.1 controllers like the more common ASMedia ASM1142 only support PCIe 3.0 x2.
We’d also like to point out that the I/O shield has actually been wired up with its own LEDs that connect with a dedicated header on the board. This may not be too everyone’s tastes, but those of you who like to dress your system up like a Christmas tree will probably appreciate it.
For networking, the board likewise boasts a comprehensive combination of wired and wireless options. The dual Gigabit Ethernet ports rely on the latest Killer E2400 chips, but there is no support for teaming.
But together with the Killer Wireless-AC 1535 network adapter, they do support the Killer DoubleShot-X3 Pro technology, an intelligent control system that optimizes your network connection for the lowest latency.
It does this by picking the lowest latency network connection – one of the two Ethernet ports or the wireless connection – and sending all high-priority traffic like gaming network packages over that interface. Regular traffic is then sent over the next fastest interface, while bulk traffic is sent over the last. Gigabyte told us that they believe this approach to be superior to an implementation that supports teaming because a single, dedicated, and fast network channel can do more to lower latencies while gaming.
For storage connectivity, the board has six SATA 6Gbps ports (including three SATA Express connectors) and two M.2 sockets provided by the Intel Z170 chipset. An additional four SATA 6Gbps ports are supplied by a third-party ASMedia ASM1061 controller. Support for different M.2 drive types is also slightly more limited compared to the other boards as the Z170X Gaming G1 will only take type 2242/2260/2280 drives.
Like the other boards reviewed here, the Gigabyte motherboard also has a selection of onboard buttons and switches to make it easier to tweak your system. One unique feature is the ECO button that helps you save power by automatically reducing the overall power consumption according to the current system load. Then there’s the OC button that loads an optimized overclocking configuration for your hardware, sort of a simplified version of what MSI offers with its Game Boost knob. This may sound convenient, but we don’t see serious enthusiasts using it as they likely want to adjust everything manually to squeeze out every ounce of possible performance (the same goes for similar solutions on other boards). Voltage measurement points at the top of the board also allow overclockers to use a multimeter to measure specific board voltages to more closely monitor their overclock.
Finally, the board of course comes with a dual BIOS feature, and two switches at the bottom allow you to toggle between the main and backup BIOS and even switch between single or dual BIOS mode.
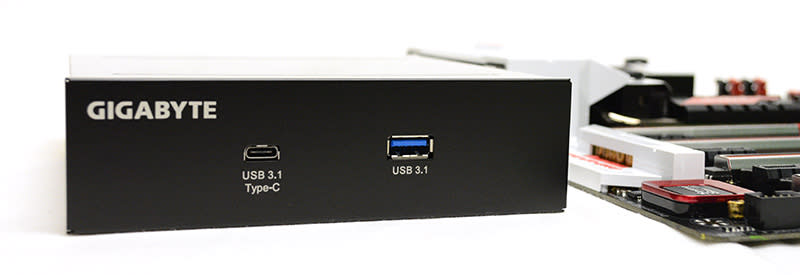
But that's not all. Also included in the box is a USB 3.1 front panel with Type-A and Type-C connectors. As it turns out, one can never have too many USB 3.1 ports.
MSI Z170A Gaming M9 ACK
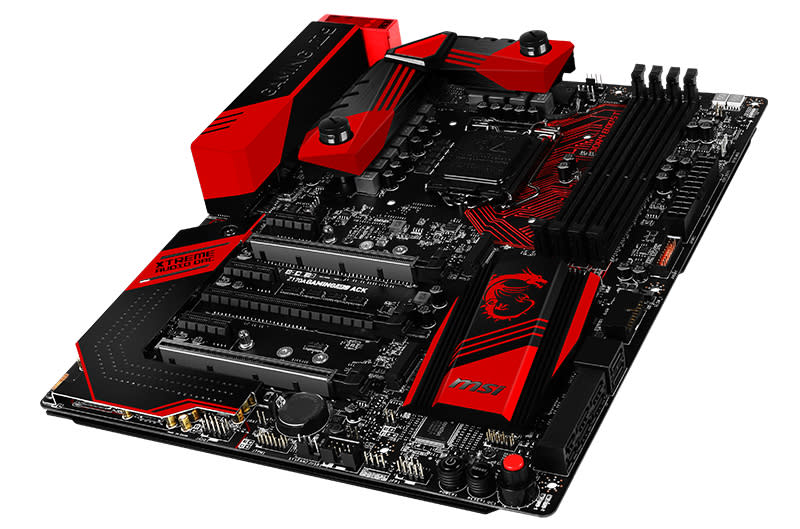
The MSI Z170A Gaming M9 ACK sits at the top of MSI’s enthusiast-oriented Gaming series of boards. It shares a lot in common with the other boards we’ve talked about so far, and looks every inch like a board designed to hold the gaze of gamers. In fact, it appears to us to be a board that is geared more toward the gaming crowd as opposed to overclockers. But don’t get us wrong, that doesn’t mean that it is a poor overclocker.
While ASUS might have opted for a more subtle color scheme this time around, MSI has gone the other way with a bright red-and-black board design. The heatsinks and I/O and audio shields feature bold panels of red that really stand out against the black PCB. Even the memory traces are highlighted in the same bold red, but more on that later.
To start off, the Z170A Gaming M9 ACK features a total of 11 power phases in a 6 (Vcore) + 4 (iGPU) + 1 (system agent) design. This may seem like a less comprehensive solution than is offered on the other boards, but as we’ll see later, the MSI board was by no means the worst overclocker. As we mentioned before, the quality and implementation matters more than the number of power phases.

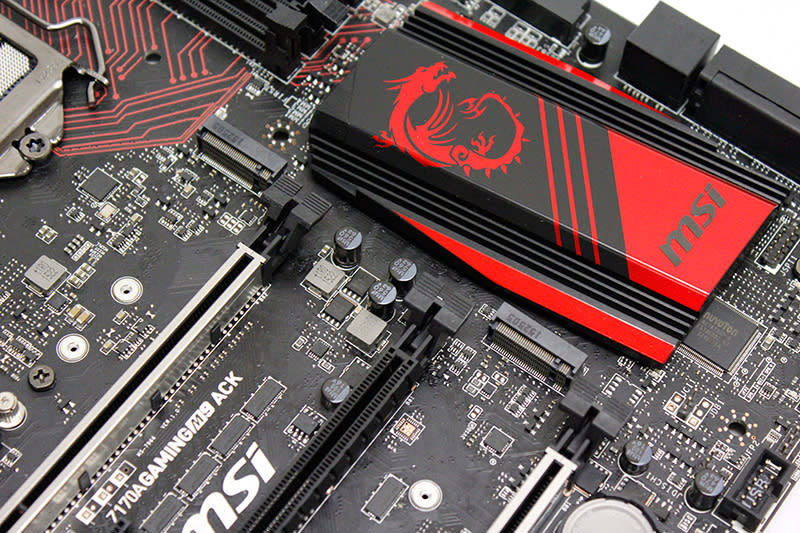
Like the Gigabyte Z170X Gaming G1, the MSI board also has G1/4 threaded fittings built into its VRM heatsinks should you choose to go the water-cooling route. A look under the VRM heatsinks also reveals the titanium chokes that the board uses, similar to what we saw on the Z170A XPower Gaming Titanium. Compared to regular SFC chokes, these titanium ones are reportedly more durable and have a higher temperature limit, a longer life cycle and higher current capacities.
The titanium chokes fall under what MSI has termed its Military Class 5 components, which also include Hi-C CAP capacitors to improve power efficiency and aluminium-core Dark CAP capacitors for cleaner power.
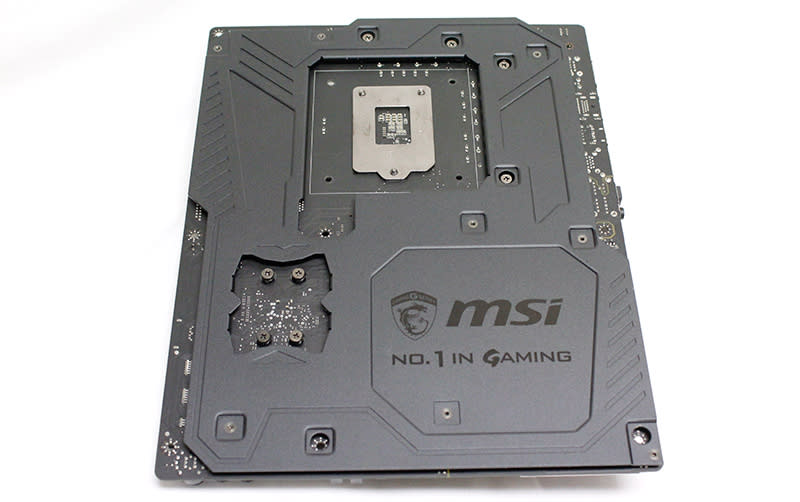
We also appreciated MSI’s inclusion of a full length motherboard backplate, as opposed to ASUS’ selective implementation of reinforcing plates around only the PCB and heatsink. The backplate also houses LEDs on the underside of the board, so this should give you a subtle red underglow when installed in your case.
One standout feature in particular is something MSI calls DDR4 Boost, as highlighted by the bright red memory traces. By fully isolating the memory circuitry from the other components, DDR4 boost ensures that the memory signal remains free from interference in order to achieve the best possible performance and stability. This feature has been cropping up on a lot of MSI’s LGA 1151 motherboards, including the Z170A XPower Gaming Titanium, Gaming M7 and even the G45 Gaming.
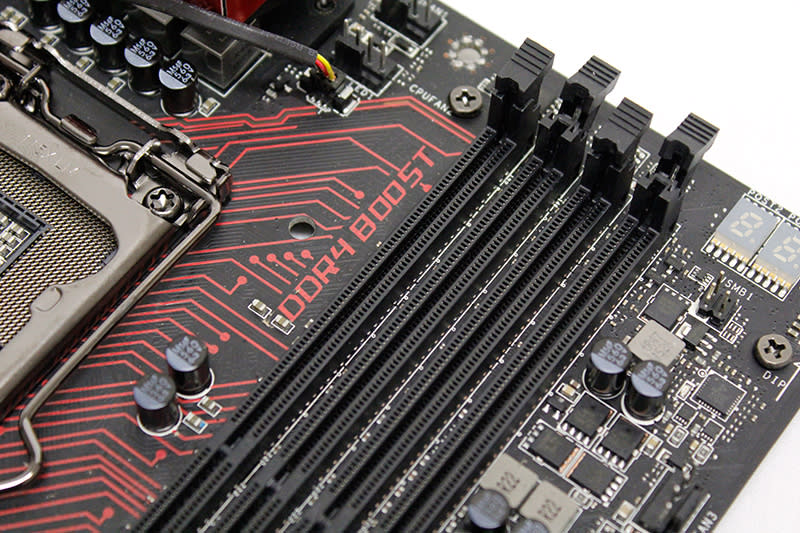
When it comes to expansion card options, MSI has included just three PCIe 3.0 x16 slots on board, making it something of an outlier here as the other boards all have four. Still, we don’t really feel inclined to penalize it for this because of the PCIe lane limitations of the Z170 chipset, and the fact that support for three graphics card is still plenty. Of course, you could argue that as a flagship board, it should still have included a fourth slot anyway.
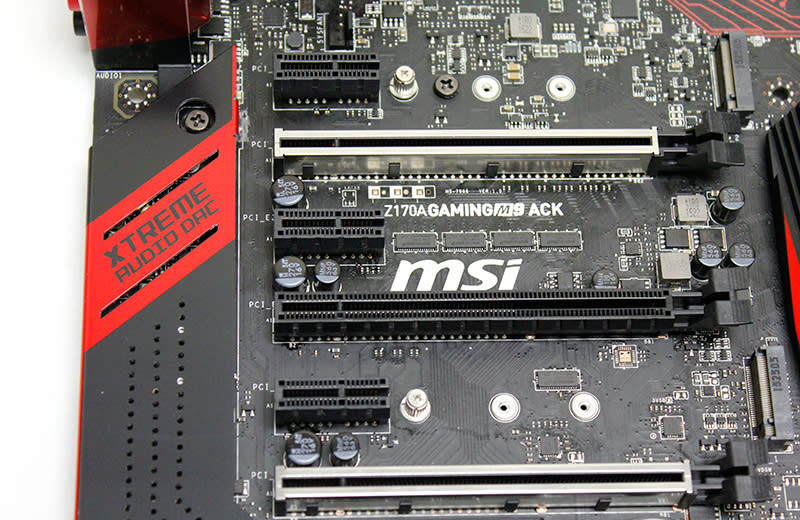
If you have an eye on a multi-GPU setup, the board officially supports up to three-way AMD CrossFireX and two-way NVIDIA SLI. With three graphics cards installed, the PCIe 3.0 x16 slots will run in x8/x4/x8 mode, while dual graphics configurations will run in x8/x8 mode. The slots are wired such that the first and third slot draws from the CPU’s 16 PCIe 3.0 lanes, whereas the second x4 slot relies on lanes from the chipset itself. The four PCIe lanes are also shared with the other three PCIe 3.0 x1 slots, so populating the second x16 slot will preclude using all the x1 slots and vice versa.
But in all likelihood, you’re just going to be using the first and third x16 slots for dual graphics configurations. This is also why MSI has reinforced only these two slots with what it refers to as Steel Armor, which features more solder points on the PCB for added strength and better support for heavy graphics cards. And with a four-slot gap between them, your cards will have plenty of room to breathe.
As expected, the onboard Xtreme Audio DAC audio solution has also being upgraded with supposedly audiophile-grade components like a Sabre HiFi ESS 9016K2M DAC that is used in devices like the US$12,000 Mark Levinson N°585 Paresound Halo Integrated Amplifier. In addition, the C-Media CM6632A HD audio processor supports high-definition audio playback at 384kHz/32-bit for compatibility with even high-resolution audio files. On top of that, MSI has implemented what it calls Audio Boost 3, comprising enhancements like dual TI OPA1652 amplifiers, a de-pop circuitry, and separate PCB layers for the left and right audio channel to minimize interference between channels.

Then there’s the Nahimic Audio Enhancer technology that MSI has been going on a lot about lately. What it does is basically offer audio enhancements like virtual surround, frequency and voice levelers, and tweaks for voice clarity, so you’ll be able to get a clearer and more immersive sound. We can see this appealing the most to gamers who play first person shooters and often communicate through Skype or TeamSpeak as accurate positional audio and clear voice communications are a priority to these gamers.
On the storage front, there are fewer SATA ports than we’re used to because MSI has apparently decided not to rely on any third-party controllers to supplement its port selection. This leaves us with just six SATA 6Gbps ports (including two SATA Express ports), all of which are provided by the Z170 chipset.
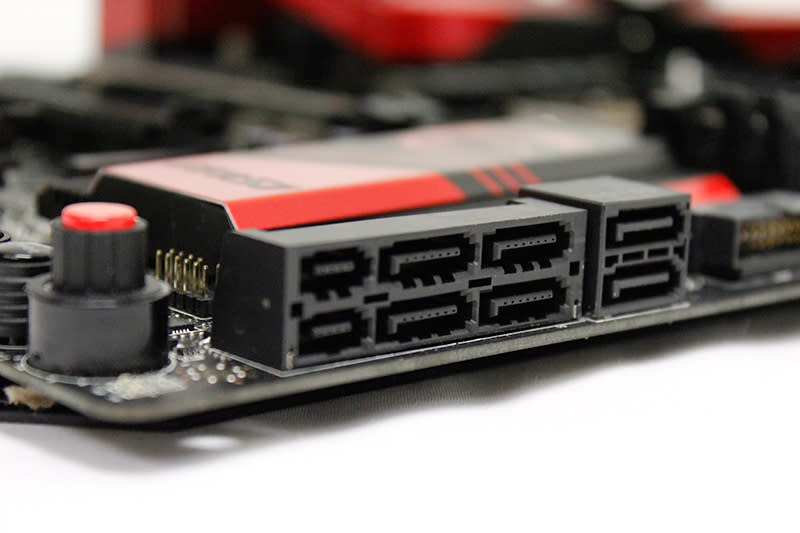
But don’t worry, there’s still support for those gumstick-shaped SSDs with two M.2 sockets that support type 2242/2260/2280 drives. The sockets are positioned quite thoughtfully, located as they are above the first and third PCIe 3.0 x16 slots, so you are less likely to end up in a situation where one of them is being covered (or suffocated) by a graphics card.
One of the SATA Express ports, and consequently two SATA ports, share bandwidth with the second M.2 socket, so you won’t be able to use the two together. Similarly, the first M.2 socket shares four PCIe 3.0 lanes with two other SATA ports, which again prevents you from populating both at once.
On the rear I/O panel, there are actually considerably fewer USB ports than expected. Not counting those available through internal headers, there are just three USB 2.0 ports, two USB 3.0 ports, and two more USB 3.1 ports (1 Type-A, 1 Type-C). It isn’t that there are a whole lot fewer USB ports available through the board – if you include the internal connectors, there are a total of six USB 3.0 ports and five USB 2.0 ports available – but rather that MSI has favored making the most of the USB 3.0 ports available through the internal headers instead. We’re not sure we agree with this approach as you’ll need to rely on a front USB panel and optional rear expansion USB headers if you want more available ports.
The vertically-oriented USB 2.0 port also doubles as the BIOS Flashback+ port for use with MSI's BIOS update feature. In addition, the USB 2.0 port directly adjacent to the PS/2 port serves as the HotKey port, which allows you to plug your keyboard in and use it to quickly access certain overclocking settings like the CPU BCLK and ratio. As we'll see later, the board lacks certain physical overclocking controls like we saw on the ASRock Z170 OC Formula and ASUS' OC Panel II, so this somewhat makes up for that.
Furthermore, there is just a single Gigabit Ethernet port provided by a Killer E2400 LAN controller, but the board also supports 802.11ac Wi-Fi via a separate 2x2 Killer Wireless 1535 module, so you’ll have the option to cut loose if you so wish. The Killer module plugs into a jack next to the 8-pin CPU header, and two separate antennas fit into the back. Unfortunately, we don’t quite get why MSI needed to use two long and fairly unwieldy antennas as ASUS’ more compact 3x3 array is more manageable and works far better.

Finally, there is a dedicated control for hassle-free overclocking in the form of the new Game Boost knob. It has eight different positions that correspond to different overclocked frequencies. For instance, setting the knob to position 2 will crank the base frequency up to 4.4GHz, while position 11 can boost it all the way till 5.0Ghz, although you’ll probably need water-cooling for the latter at the very least. Of course, your results will also vary from CPU to CPU, and MSI is not guaranteeing that you'll be able to achieve stability at the speeds offered.
Frankly, we found the marketing for the feature a bit confusing, if not misleading. The knob has a range from 0 (default) to 11, but as we mentioned before, there are only eight different settings you can choose from. Another thing to note is that the knob doesn’t offer on-the-fly overclocking – you’ll have to reboot the system before any adjustments take effect because the overclock is achieved by modifying the BCLK setting.
In addition, you'll find a small BIOS flashback button located above the power button to update the board's BIOS with just a power supply connected. There’s also a Slow mode switch located near the middle of the board’s right edge that sets the CPU to boot at stable frequencies to help overcome problems with booting when using LN2 cooling.
Unfortunately, we were surprised to find that the Gaming M9 ACK does not in fact come with dual BIOes, a feature we felt was sorely missing from a flagship motherboard. The board may not be overtly focused on overclocking (that would be the Z170A XPower Gaming Titanium), but it is something that all boards at this price point should have, especially when its competitors all feature it.
Test Setup
This is the test configuration for our Intel Z170 motherboard shootout:
Intel Core i7-6700K (4.0GHz)
2 x 4GB Corsair Vengeance LPX DDR4-2133 (Auto timings: CAS 15-15-15-36)
Gigabyte GeForce GTX 980 Ti G1 Gaming (GeForce Driver Version 355.82)
Kingston HyperX 3K 240GB SATA 6Gbps solid state drive (one single NTFS partition)
Windows 10 Home (64-bit)
As we noted in our opening paragraph, this is a shootout among the flagship motherboards from the major brands. There’s no equal to them and at the time of writing, everything we tested represents the best that the various brands have to offer on the Intel Z170 platform.
As it turns out, there isn’t a single way to approach a top-end board and the different manufacturers have all taken a slightly different approach to their flagships. For instance, the ASRock Z170 OC Formula caters more to overclockers instead of gamers, while the ASUS ROG Maximus VIII Extreme and Gigabyte Z170X Gaming G1 attempt to go after both. On the other hand, the MSI Z170A Gaming M9 ACK focuses more on appealing to the gaming crowd instead of cramming the board with features to appeal to ultra-enthusiasts.
Benchmarks
The following benchmarks were used to test the motherboards:
BAPCo SYSmark 2014 (ver 1.5.0.37)
SPECviewperf 12.0.2
Cinebench R15
Futuremark 3DMark (2013)
Middle-earth: Shadow of Mordor
Motherboard Features Comparison Table
Before we move on to look at the performance figures, you can refer to the below table for an overview of the board’s specifications. The respective flagships share a lot of common features like high-end onboard audio solutions and dedicated hardware buttons and switches to make overclocking features. However, as mentioned above, their different focuses are such that they are each wholly unique products in their own right.
Like the Z170 Extreme 7+, the ASRock Z170 OC Formula stands out because of its exceptionally wide array of storage connectivity options – three M.2 sockets and 10 SATA 6Gbps ports! Enough to satisfy anyone who can't make up their mind on which storage options to invest. Furthermore, it has a range of dedicated OC buttons and switches to facilitate and simplify the overclocking process. On the other hand, the ASUS Maximus VIII Extreme attempts to offer the best of both worlds by cramming a slickly designed gaming board with a plethora of overclocking features like a special OC Zone with a selection of buttons, switches, and voltage readout points to ease the overclocking process.
The Gigabyte Z170X Gaming G1 earns the dubious distinction of being the priciest of the lot, while also going all out with four-way SLI support courtesy of a PCIe lane switcher and a focus on audio quality with a quad-core Creative Sound Core3D processor and upgradeable op-amps. Finally, the MSI Z170A Gaming M9 ACK has positioned itself to attract the attention of gamers (as opposed to overclockers) with an eye-catching design, a comparatively reasonable price, and Nahimic Audio technology with audiophile-grade components.
|
|
|
|
— |
|
|
|
|
|
|
|
|
|
|
|
|
|
|
|
|
|
|
|
|
|
|
|
|
|
|
|
|
|
|
|
|
|
|
|
|
|
|
|
|
|
|
|
|
|
|
|
Performance Benchmarks
SYSmark 2014
SYSmark is a general productivity benchmark suite that measures the response times of tasks on a PC using real-world applications like Microsoft Office 2013 and Adobe Photoshop and simulated user input. Task response times are used to generate a performance rating that reflects actual user experience, so the faster a PC responds to application workloads, the higher its score will be. The method of measuring response times can take many forms, such as the time it takes for an application to show a pop-up completion message, or how long it takes a progress dialog to disappear and for a user to regain application control.
As expected, the differences between the systems were minimal as the motherboards aside, we were running virtually identical setups. For what’s it worth, the ASRock board did come out on top here, followed by the ASUS and MSI motherboards. The ASRock board did especially well in the Data/Financial Analysis test, which was what helped it come ahead.

Maxon Cinebench R15
Cinebench is a benchmark tool used to compare CPU performance across different systems, so we’ll be using it evaluate how well our Intel Core i7-6700K plays with the different motherboards. The test scenario uses all of the system’s processing power to render a photorealistic 3D scene, making use of various algorithms to stress all available processor cores.
The ASUS board came ahead here, followed closely by the ASRock. However, it’s worth noting that there are just 6 points separating the MSI board and the ASUS, so it’s not as if going for one board over another will net you a significant gain in CPU performance.

SPECviewperf 12.0.2
SPECviewperf is used to measure the 3D graphics performance of systems in professional applications. Each individual workload, called a viewset, represents graphics and content from an actual real-world application. Compared to SPECviewperf 11.0, this latest version of SPECviewperf includes updated traces from the latest application versions and is designed to provide a more accurate indication of GPU performance in the actual applications.
SPECviewperf actually runs a total of eight different viewsets, but we’ve picked just three to display here. The maya-04 viewset is derived from Autodesk’s Maya 2013 application. Lightwave-01 from PTC is no longer tested – instead, it’s been replaced by creo-01, also from PTC. We also included the new energy-01 viewset, which puts the board through some professional volume rendering applications.
Again, the results were remarkably close here – almost too close to call. Still, the MSI board did come out ahead here, while the ASUS and ASRock boards tied for second place and the Gigabyte board brought up the rear.

Futuremark 3DMark (2013)
3DMark is a synthetic gaming benchmark that tests graphics and computational performance at different resolutions, starting at 1080p and going all the way up to 4K. A series of two graphics test, one physics test, and then a combined test stresses your hardware in turn to assess its performance. And because of the physics test that keeps the GPU load low while running gameplay physics simulations on the CPU, all three 3DMark Fire Strike tests scores also include an element of CPU performance. As a result, we might reasonably expect the board that teased out the best performance in Cinebench R15 to perform better here as well.
Indeed, this was the case as the ASUS motherboard was the clear winner here, coming ahead in both Fire Strike and Fire Strike Extreme. It was followed close behind by the Gigabyte and MSI boards respectively, while the ASRock board came in last.

Middle-earth: Shadow of Mordor
Unsurprisingly, all the boards turned out a very similar performance here, with just minuscule frame rate differences across the board. While the ASUS board again took first place here, the MSI board was a close second. The ASRock and Gigabyte boards then came in third and fourth respectively.

Temperature, Power Consumption & Overclocking
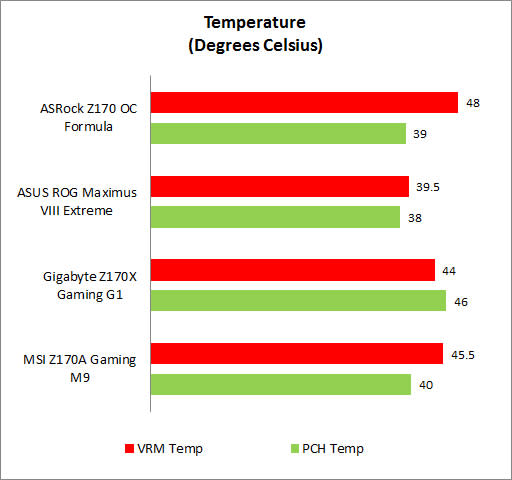
Temperature
We measured the temperatures of the VRM and PCH heatsinks after looping 3DMark Fire Extreme (with 8x MSAA) for 15 minutes. The ASUS ROG Maximus VII Extreme turned out to be quite a bit cooler than its counterparts (especially the VRM temperatures) from the other brands, so there might just be something in ASUS’ claim that its use of microfine alloy chokes help enable lower temperatures. The MSI board also did quite well, with VRM and PCH temperatures that fell right in the middle of the pack.
Power Consumption
To test power, we ran the energy-01 viewset in SPECviewperf 12.0.2 and recorded the peak power consumption. As with the temperature tests, the ASUS card bested its competitors in terms of power efficiency with the lowest sustained peak power consumption. The ASRock was the next best, followed by the MSI motherboard. In fact, we were surprised by the Gigabyte board’s comparatively high power consumption, especially at idle. We suppose the extra components like the Creative hardware processor and the PCIe lane switching chip among others contributed to the notable delta in power consumption when compared to the other boards.

Overclocking
In order to assess the respective overclocking performance of the boards, we first tweaked the CPU multiplier ratio and raised the voltage accordingly. After ascertaining that the achieved clock speed was stable, we then proceeded to increase the BCLK value to get smaller overclock increments. This also enabled us to take advantage of the new overclocking capabilities of Skylake CPUs, which allow a wider range of BCLK values. Changing the BCLK values also overclocks the RAM, so we throttled its speed accordingly to maintain system stability. The table below shows the clock speeds we achieved, along with the CPU vCore, multiplier, and RAM frequencies. We've also included the respective BIOS versions of the boards for those who are keen to know such details.
Model | BIOS version | Maximum CPU Core Ratio Achieved | BCLK (MHz) | Vcore (V) | RAM frequencies (MHz) | Maximum Overclock Achieved (GHz) |
|---|---|---|---|---|---|---|
1.90 | 47 | 101.9 | 1.37 | 2139 | 4.79 | |
1202 | 46 | 105 | 1.37 | 2100 | 4.83 | |
F5 | 46 | 101.2 | 1.37 | 2125 | 4.66 | |
1.3 | 47 | 101.5 | 1.37 | 2132 | 4.77 |
The ASUS motherboard was the most capable overclocker here and we managed to hit a top speed of 4.83GHz, which translated to around a 17% improvement over default speeds. It is also the only motherboard that managed to run off a much higher BCLK and that's further testament to the board's capacity for overclocking. The ASRock and MSI motherboard also performed decently, coming in second and third respectively. Unfortunately, the Gigabyte motherboard didn’t live up to its whopping 22-phase power design at all, managing a top overclock of just 4.66GHz from our trials.

Conclusion
One of the standout features of Intel’s Z170 chipset has been the flexibility of its HSIO layout, giving motherboard manufacturers considerable freedom in implementing the desired selection of expansion card slots, ports and storage connectivity options.
The result is a variety of boards that often take different routes in offering support for the same things. For instance, the ASRock Z170 OC Formula and ASUS ROG Maximus VIII Extreme both support three-way AMD CrossFireX, but the ASRock board can allow triple-card setups to run in x8/x4/x8 mode (the ASUS supports x8/x4/x4) because the second slot draws from the chipset’s PCIe 3.0 lanes. This flexibility also means that board manufacturers are able to implement a wide range of connectivity options, like ASRock has done, even though all of them will not be available for use all at once.
In order to determine the winner, we took into account different aspects of the board in terms of performance and features. The performance score of each board takes into account the board's stock performance, overclocking capabilities, temperature and power performance relative to each other. In addition, we also considered individual board features like onboard PCIe slot layout, connectivity options, and any other standout features.
Model | Features | Performance | Value | Overall | Price |
|---|---|---|---|---|---|
ASRock Z170 OC Formula | 8.0 | 8.5 | 8.5 | 8.5 | S$540 |
ASUS ROG Maximus VIII Extreme | 9.0 | 9.5 | 8.0 | 9.0 | S$809 |
Gigabyte Z170X Gaming G1 | 9.5 | 8.0 | 7.0 | 8.0 | S$939 |
MSI Z170A Gaming M9 ACK | 8.5 | 8.5 | 8.0 | 8.5 | S$669 |
At the end of the day, it was the ASUS Maximus VIII Extreme that impressed us the most. It topped the majority of our test benchmarks, and was always among the top two performers for the tests it didn’t win. Furthermore, its blend of gaming- and enthusiast-oriented features is quite compelling as it manages to appeal quite successfully to both crowds, setting it apart from the other boards that often look like they are sacrificing one for the other. In addition to being the best board for overclocking, it also offers a range of hardware buttons – the ReTry button for instance – that speak to ASUS’ efforts to make the overclocking process as smooth as possible. It is this attention to detail and user experience, combined with its stellar performance and attractive design, that lead us to unreservedly declare it the winner. It will also cost you a pretty penny at S$809, but what you get is an exceedingly feature-rich board that performs great and looks the part as well.
The other standout performer was the ASRock Z170 OC Formula. While it is lacking in certain features like onboard Wi-Fi, its consistent performance across the board helped it edge ahead some of the competition. For instance, it was the next best overclocker after the ASUS board, more than proving its worth as a board targeted explicitly at overclockers. We also liked its selection of hardware buttons for overclocking and troubleshooting, which should make the process of tinkering with your system just that bit easier. Furthermore, it topped our SYSmark 2014 and Cinebench R15 benchmarks, and its wide range of connectivity ports will likely satisfy enthusiasts of all stripes. At S$540, it is also the most affordable board of the lot, which makes the feature set it offers even more worthwhile.
And even though the MSI Z170A Gaming M9 ACK seemed set on appealing more to gamers than overclockers, it performed decently in our overclocking tests, coming in only slightly behind the ASRock Z170 OC Formula. It also has a couple of unique features like the dedicated Game Boost knob for faster overclocking, DDR4 Boost for higher and more stable memory overclocks, and Nahimic Audio technology. Furthermore, it supports Wireless 802.11ac standard and is built to last with a full-length backplate and metal-reinforced PCIe slots. However, it lacks certain key features like dual BIOSes, which we feel should not be missing from a board of its class. Furthermore, its comparatively fewer SATA 6Gbps connectors and USB ports on rear I/O make it seem a bit wanting in the connectivity department. It is also more pricey than the ASRock board at S$669 while offering comparable performance, which is what makes it a slightly less attractive proposition on the outset. However if you scrutinize the board, you'll find that it offers a targeted set of features that are worth its asking price - you just need to be sure that you can live with the offered set of USB and storage ports and if so, you'll find that you've gotten yourself a bargain when compared to the ASUS and Gigabyte counterparts.
Finally, the Gigabyte Z170X Gaming G1 didn’t turn out the performance that its sky-high S$939 price suggested that it should. While it is by no means a poor offering, the stellar performance put out by its competitors, along with their lower prices, mean that it isn’t quite as appealing as the others. Furthermore, its lackluster overclocking performance may mean that overclockers are going to want to look for a better, and likely cheaper, alternative. Still, it is literally packed full of features and does have a handful of things going for it, like the PCIe lane switcher that makes it the only board in this shootout to support a true four-way NVIDIA SLI setup. Then there’s the emphasis on sound quality in the form of the Creative Sound Core3D audio processor, dedicated USB ports for plugging in your USB DAC, and upgradeable op-amps. Furthermore, the metal-reinforced PCIe slots and Killer DoubleShot-X3 Pro technology will also likely endear it to gamers who are on the lookout for this specific feature set. If you don't quite care for top performance, but rather the most well equipped board to meet your most demanding needs, Gigabyte's Z170X Gaming G1 has it where it counts.
 | |
 | |
 | |
 |

