How To Recover Deleted Photos on Your iPhone

Maybe you've accidentally hit the "Delete Photos" button instead of the edit option, or had to erase extra pictures to free up storage space, only to later regret that decision—after all, you can always upload them to iCloud.
Not to worry, though! There are some simple shortcuts and hidden workarounds that will let you recover the memories if you act quickly enough.
Check the Recently Deleted Folder
By far your best option for anything you haven't backed up—if you have an iPhone, that is—would be to check your "Recently Deleted" folder. If you're running at least iOS 8 (newer software works, too), your images will be kept in this semi-secret folder for up to 30 days after you've canned them.
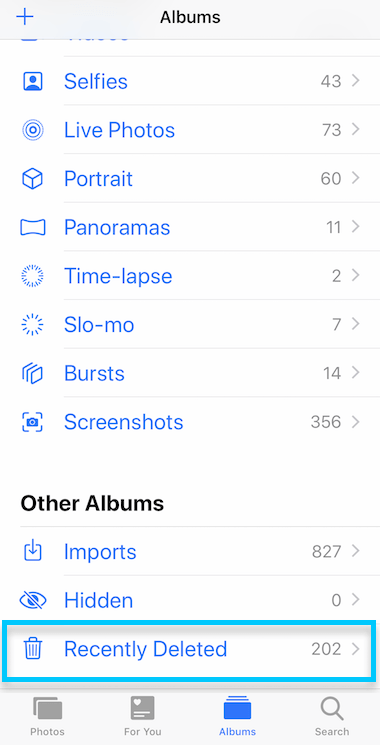
To find the folder, open Photos > tap Albums > and scroll down until you see Recently Deleted. Open this folder and search for whatever you've deleted. Once you've found the items you'd like to recover, select the images and tap Recover.
iCloud Backups
Unfortunately, if you've deleted the images in question over 30 days ago, you're going to have to use a backup to get them back. Here's the thing with iCloud, though: usually, when you delete a photo from your iPhone, it's also deleted from your iCloud account.
Technically, there are a few ways that you can stop this from occurring—you could turn off iCloud photo sharing, sign into another iCloud account, or use a second cloud server for photo sharing—but if this is a true emergency, there's a good chance you didn't have the foresight to set up this way.
However, there is a workaround that can come in handy if you use at least one cloud service, and it will work in most cases, even if you've inadvertently deleted the photo from both your device and the cloud. Backup extractor software, like CopyTrans Shelbee or EaseUS MobiSaver can bail you out.
💡You can also use backup extractor software and follow these steps to recover important messages or documents, too, assuming you've backed those up at some point.
Once you've downloaded the backup extractor software, make sure to back up the most recent copy of your phone's files—you'll want to revert back to this version when you're done. Then, search for the backup version that contains your deleted photo. To do so, go to Settings > Apple ID > iCloud > Storage > Manage Storage > Backups. Each backup version will note which device it was completed on, the date, and the size.
Next, you need to restore your phone to a previous backup version and restart your device. This will erase all content on your device, but since you've created a brand-new backup, you can revert back to it once you're finished. Go to Settings > General > Reset > Erase All Content and Settings. Finally, restart the device.
Then, go to Apps and Data > Restore from iCloud backup > log into your iCloud account. Select the backup in question and wait for the restore to complete. Copy all of these photos in the backup extractor software or save them to an external hard drive or jump drive. Finally, restore the most recent backup version to revert your iPhone and its contents to the way it was when you started this process.
Next time around, this won't be a problem if you make sure to back up your photos to at least two different cloud services, like Google Photos and Amazon Photos. You should also periodically back up your entire device's contents and save a copy to an external drive—you know, in the extremely unlikely event that your files get lost in the ether.
You Might Also Like

