Your Everyday Cycling Habits Mights Be Destroying Your Cycling Gear
"Hearst Magazines and Yahoo may earn commission or revenue on some items through the links below."
Cycling gear is expensive, and you do your best to take care of it so it lasts. But there might be things you’re doing unintentionally that can greatly shorten the life of that gear, which means you have to buy replacements.
From destroying racks to rear derailleurs, here are 10 common ways that riders unwittingly trash their riding gear and how to fix them:
Ignoring a Noise
Lots of bikes have occasional creaks and squeaks, but if your machine is making a persistent racket, that’s a sign of a bigger problem, says Marty Caivano, mechanic for the Boulder-based Smart Cycling Service and board member for the Professional Bicycle Mechanics Association.
“You might hear a creaking you can’t trace, and it can be anything from overtightened stem bolts to a press-fit bottom bracket that’s backing out of the frame,” she says. “That’s kind of a dramatic example, but it can ruin the frame.”
What to do: Use some deductive reasoning and diagnose what you’re hearing, says Caivano. Does it happen all the time or only when pedaling? When standing, sitting, both? Is it coming from the front or the back of the bike? Those questions will help you narrow down what might be producing the offending sound.
The type of sound can also be helpful. A creak when standing and pedaling might be over-torqued stem bolts; a squeak during the same could simply be your cleats squirming on the pedal. Whether you’re fixing it yourself or having a mechanic do it, zeroing in on the source and type of noise helps you fix things faster and more efficiently.
Storing Your Bike Wet
It’s certainly okay to ride in the rain, and even to leave a bike wet for a brief period of time. But if you let it sit longer than a day or so, you’re doing unnecessary harm to your bike. Carbon frames won’t rust, but corrosion affects almost all metals to some extent—especially steel parts like your chain and cassette, and bearing braces. The magic combo is humidity + acids, so if you live in an area that sees regular snow, watch out in winter for road salt and magnesium chloride, an even more corrosive de-icing brine used in some states.
What to do: When you get back from a rainy ride, put the bike in a dry place. If your bike doesn’t have drain holes at the bottom bracket shell, pull the seatpost (mark your seat height first with some tape or a permanent marker) and flip the bike upside down to help water drain from the frame. As soon as possible, wash the bike with a mild detergent (dish soap is fine, or a bike-specific cleaner) and dry it thoroughly. Re-apply lube to the chain and critical spots like brake pivots, derailleur springs and pedal springs.
Finally, go buy a pair of fenders. If your bike won’t fit full fenders at the brakes or lacks fender eyelets, no-tools versions like SKS’s RaceBlade set attach in seconds and help keep the worst of the road spray off while riding.
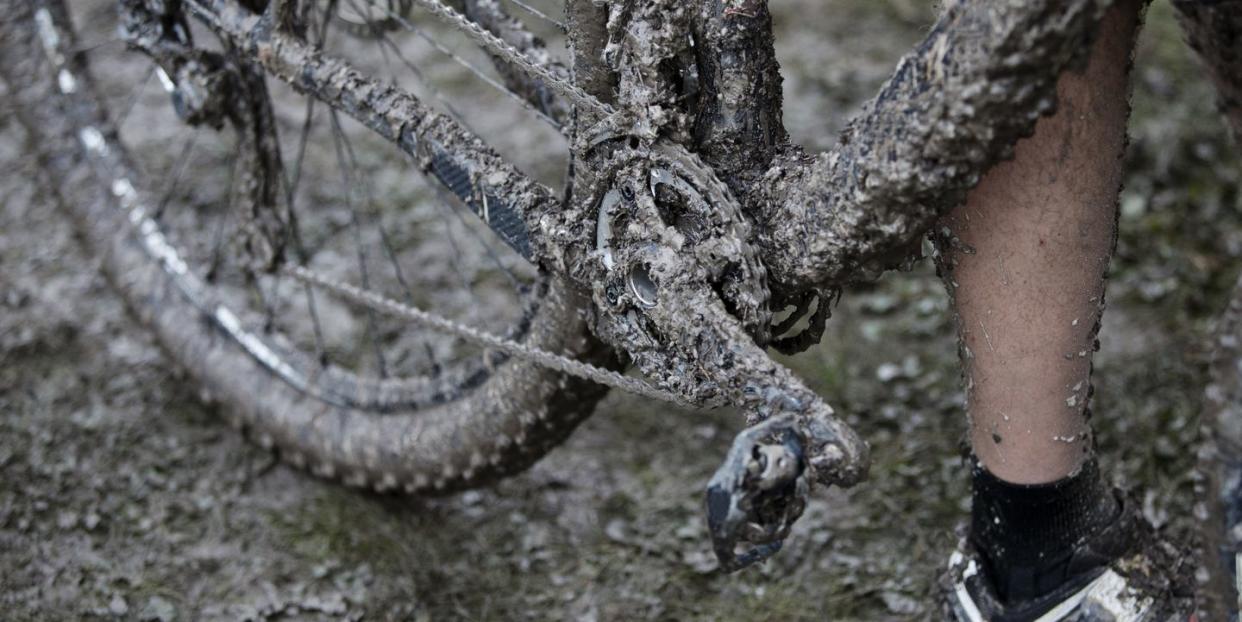
Running a Filthy Drivetrain
How long has it been since you cleaned your bike? I mean really cleaned it? If it’s been a month or more of solid riding since its last bath, put your bike in the stand and take a close look at your rear derailleur pulley wheels. Chances are you’ll see a ridge of black sludge on each side of the pulley wheel. That sludge is like a fine-grit sanding paste for your drivetrain. With every pedal stroke, it wears down metal on the chain, cassette, and chainrings until eventually your whole drivetrain is trashed. It also affects shifting quality and pedaling efficiency; testing by Friction Facts shows a dirty drivetrain adds up to four watts of friction resistance compared to a clean one.
What to do: Clean that bike! First, use a chain wear indicator to check chain condition with a simple tool like Park’s $11 CC3.2. (Currently on sale at Performance.) If the chain is toast, replace it. Scrub the rest of the drivetrain during the bike wash. A small flat-blade screwdriver is ideal for lifting that ridge of grime off the pulley wheels, says mechanic Caivano. Rinse the drivetrain thoroughly, and dry by running the chain through a rag or old towel until it doesn’t leave black marks anymore. Let the drivetrain dry fully—even overnight—before re-lubing the chain.
Inspect your chainring and cassette teeth for wear. You’re looking for teeth that are worn down or have a shark-fin like point to them. That’s a sign you may need new rings or cassette. Lube the chain thoroughly with a lube that’s appropriate for where you live. It takes about a minute longer, but the best method is to dab a drop of lube on each roller link rather than slather it on indiscriminately. When done, backpedal the chain for 30 seconds and let it sit for a few minutes to work the lube into the rollers, then dry with a towel until it runs clean.
Leaving Your Hitch Rack On
Want to know a secret? Hitch racks are designed to take all kinds of abuse, but being left on your car 24/7 isn’t on the list. Still, “that’s common practice for many people,” says Ian Betteridge, product integrity lead at Yakima. But if you do it, expect reduced performance and lifespan, he adds.
Hitch racks face all the same issues that roof racks do, like unrelenting UV radiation and extreme temperature swings. Unlike roof racks, they also have to deal with intense heat from your car exhaust that can melt plastic parts, and corrosive wheel spray during winter months. The bumps you encounter in everyday driving can create slop in hardware connections, which causes the rack to sway alarmingly when loaded. That puts even MORE stress on the hardware.
Finally: Because it sticks out even when folded up, there’s always a chance some inattentive knucklehead backs into it in a parking lot, damaging the rack or even your hitch mount and car. For a product you entrust with thousands of dollars worth of bikes, sometimes at freeway speeds, it pays to give it a little TLC now and then.
What to do: Check your rack for signs of corrosion, says Betteridge, like the telltale bubbling of a powdercoat paint finish that means metal is corroding from the inside. Keep the rack clean; a quick wash with soapy water uncovers a lot of hidden problems. Check hardware internals for signs of rust on fixing bolts. On hitch racks, Betteridge says inspect pivots, large fixing bolts and welds. “Put a dab of grease on the hitch bolt and pivots,” he says. Finally? Take the damn rack off the car if you’re not using it; you’ll save it immense amounts of wear and tear. Newer designs make use of lighter materials to knock 10 or 15 pounds off without harming stability (Yakima’s Dr. Tray is 35 pounds, compared to close to 50 for some racks), which makes them easier to install, remove, and maneuver. Get creative with rubberized storage hooks to create a garage wall mount for your system to keep it safe when you’re not using it.
Using the Wrong Tool
Nothing turns a simple repair into a knuckle-bleeding thrash quite like using the wrong tool. What’s more, it can damage your bike and make it more difficult to work on later, says Caivano. As an events mechanic, she sees a wide variety of bikes, including some that show clear signs of wrenching abuse: rounded bolt heads, overtightened seatpost clamps, or hamburgered derailleur limit screws, for three of the most common errors.
What to do: Just get the right tools already. You don’t need much to start—a set of quality hex wrenches in 2-10mm metric sizing, a 3-way Torx-head Y-wrench (T10, T20 and T25 cover most bike bolts), some tire levers, a chain tool, and a good floor pump will cover 75 percent of the work you need or want to do on your own bike and cost about $100-$125. You’ll want a good chain lube, too. A work stand is important, but you can do work without one if you’re careful (and flexible).
To add later, as needed: a cassette lockring tool and chainwhip, a pedal wrench, a chain scrubber, spoke wrench, and a torque wrench. If you get in too far, never be afraid to simply stop and take your bike to a good local bike shop for professional help.
Letting Your Stinky Kit Sit for a Week
Does this describe your postride routine: strip out of sweaty cycling kit, toss it in a hamper, and do a load of cycling clothes once a week or so? If so, you’re doing harm to some pricey threads. Bacteria thrive in warm, moist environments; the longer your kit sits, the harder it is to remove stains and odors set deep into the fibers. Concerned about wear from laundering? Washing doesn’t harm clothes nearly as much as not washing them does, says Ted Barber, former director of advanced development for Pearl Izumi. “Some people don’t wash their kit enough because they’re afraid it will affect durability,” he says. “Our fabrics are engineered so they can handle standard washing.” The bigger problem, he adds, is dirt particles that abrade yarns.
What to do: Instead of chucking sweaty kit in a pile post-ride, hang it to dry first (especially shorts). Do smaller loads more often, and don’t worry about hand-washing; most cycling clothing is made to withstand a delicates cycle. And most washers made in the last decade have load-sensing capability to conserve water. If you have a top-load washer with a central agitator, put items like warmers and bib shorts in mesh wash bags so they don’t get twisted around the agitator. An extra rinse helps fully clean out detergents. Don’t use fabric softener or dryer sheets; they’re designed to leave fragrance in clothes to help them smell better, but those residues can interfere with moisture wicking and heat transfer in technical garments.
Line dry or tumble on air only (except shell fabrics, where a low-heat dry helps revive the DWR water resistance). If you line dry bib shorts, make sure that they’re hung inside out so that the chamois can fully dry, and leave them in direct sunlight in order to kill any lingering bacteria.
If your kit is especially trashed from a muddy ride, just wash right away (hose it off outside first to rinse out as much dirt as you can so you don’t mess up your washing machine).
Not Reading Instructions
A little knowledge can be a dangerous thing sometimes. If you work on your own bike, you might think you know exactly how to maintain and repair it. And with the advent of wireless electronic shifting and hydraulic disc brakes on almost every above-entry-level bike, it's never been easier to ride, but harder to personally repair your bike.
As component makers come out with new versions of components, installation and maintenance can change. A Shimano Ultegra 8000 front derailleur has a different setup process than an older 6700 series does; dual-pivot brakes don’t adjust like single-pivot models; and unless you read the manual, you might learn the hard way that the titanium crankarm fixing bolt on a Campagnolo Super Record crankset is threaded opposite to the Record and Chorus versions.
What to do: RTFM (ahem, read the f%^&ing manual). Manuals give you an idea of recommended maintenance schedules and dos and don’ts. Threw away the manual? Check the manufacturer’s web site, or just Google the part name and “manual.” Components like stems, bars and seatpost clamps have recommended torque ranges often printed right on the part; follow them, or risk crushing expensive carbon stuff. Manuals will also often give you an idea of how long electronics will last between charges, so you can set reminders to yourself to charge your shifters and avoid the embarrassment of running out of battery mid-Fondo.
Need detailed instructions on maintenance? Some companies, like SRAM, are great about posting step-by-step videos about specific products. You can also ask the mechanic at your local shop to give you a tour of your bike and the repair basics—but always offer to pay them for their time.
Ignoring Your Brakes
Caivano says once a customer brought a bike to her that was making noise when braking. The disc brake pads were worn down completely to the metal shoes, which had started to grind through the rotors. That’s an extreme example, but we often do ignore our brakes until there’s a specific issue. Don’t. Neglected rim brakes can get glazed pads that are don’t brake effectively, and grit ground into the pad can groove your rim sidewalls over time and shorten wheel life. Rim and disc brake pads must be swapped out when worn, and hydraulic systems benefit from a brake bleed.
What to do: Keep an eye on pad wear and keep the brake surface clean. For rim brakes, clean the rims with a rag dabbed in rubbing alcohol to remove rubber and dirt. If the rim is really dirty, Caivano likes to scrub brake tracks on metal rims with steel wool first (don’t do this on carbon brake tracks). Use a file to rough up rubber brake pads and remove glaze. A small dental pick can help pluck out larger pieces of dirt or metal slivers.
For disc brakes, check pad wear by removing the pads from the caliper or just shining a flashlight in there. If there’s less than 1mm of pad material left, swap ‘em. Clean rotors with rubbing alcohol and inspect for deep gouges and warping and check that bolts are tight. Caivano says brakes can benefit from a yearly bleed even if they seem to be working fine, because the repeated heat-and-cool cycles from braking will degrade fluid over time. If you’re not sure about DIYing this, it’s worth the cost of taking it to the shop.
Mistreating Your Helmet
You already know not to leave your helmet in sunny spots like the seat of your car, right? UV light can degrade the oils used in the polycarbonate shell and EPS foam, says former Bell Sports’s Category Manager Sean Coffey. But, he adds, “heat in itself can be dangerous for helmets. The trunk of a car can get super hot, enough to deform the foam liner and the shell.” Extreme cold can also lead to decreased performance in a crash situation, so don’t store your helmet in an unheated garage in winter.
What to do: To get rid of stank, mud splatter, and those telltale white salt stains on the pads and straps, wash your helmet by hand with warm, soapy water (never use solvents and other chemicals; they can harm the plastic shell and foam). If you don’t have a laundry sink, a bath or shower works fine.
Make sure that your helmet straps and sunglasses are regularly getting cleaned carefully. Otherwise, you may end up with acne on your chin where your gross strap sits, or on the bridge of your nose thanks to the sweat and sunscreen that have built up on your glasses.
Finally, says Coffey, do what you can to avoid even minor dings and drops. Instead of casually draping your lid over a brake lever, secure it to the handlebar with the strap so it doesn’t fall off.
Not Checking Expiration Dates
Bad news, gear hoarders: Sunscreen, bars, gels and drink mixes can all expire. You can use leftover sunscreen from last season, but according to the Mayo Clinic, it’s only good for three years, and after that, it starts to lose its potency. If you’re not sure if yours is from 2020 or 2015, toss it and get some new sunscreen (and make sure you’re wearing it year-round, not just during the summer months).
When it comes to bars, powders and gels, it’s often a judgement call: If your drink mix is open, toss it after a few months or when it gets clumpy. Bars and gels are often safe to consume after their expiration date, but generally speaking, it’s smartest to stick to the expiration dates listed. Plus, if you haven’t eaten them by now, the odds are good it’s because you didn’t like the texture or flavor anyway.
You Might Also Like

