Gel Extensions Will Make You Ditch Acrylics Forever
Very few things are more satisfying and relaxing for me than a nail salon trip for a fresh set of acrylic nails. It’s the little things that I look forward to that make it so sweet. From picking a nail polish color to the buzzing sound of the electric nail drill smoothing out any roughness on my nail, and, of course, walking away with a set of freshly coated nails to tap, tap, tap on every surface I pass. Then comes the not-so-satisfying part like the nail breaking in half or breaking off completely; the painful removal process; and the thin, brittle nails I’m left to nurse back to health for weeks on-end. What do you do when you want the look of long acrylic nails without the risk or damage? Enter: gel nail extensions.
What separates gel and acrylics nails is the structure of the nail. An acrylic tip is made of plastic and requires a monomer liquid and polymer powder to create the sculpted nail. In contrast, gel nail extensions are “pre-shaped nail tips that are made completely out of the gel and cover the entire nail,” Trenna Seney, NYC freelance nail manicurist, tells ELLE.com. Think press-on—sans nail glue—but more durable and versatile. Gel nails are a healthier alternative to acrylic nails; they are quicker to apply and even quicker to remove—damage free. Although the pandemic has forced many people to channel their inner nail artist until salons are entirely safe and operating, Seney recommends resisting the urge to do gel extensions yourself until you can see a professional. Until then, here’s a guide of everything you need to know about gel extensions.
Yes, gel extensions are better than regular acrylic.
What makes gel extensions the superior in this situation is that it’s not only made of gel for long-wear and durability, but it doesn’t require any harsh chemicals. “There are plenty of benefits, including no damage to your natural nails, the tips are lightweight, there are no fumes, strong odors, and heavy filing. When my clients remove their gel extensions, their natural nails are longer and stronger,” Seney adds. When you get acrylic tips, the removal process involves drilling, soaking, and filing. With gel extensions, you remove them by simply soaking your nails in acetone, and the gel tips dissolve. You don’t have to worry about gel extensions preventing you from doing your everyday tasks, either. “The gel tips are pretty strong, so you can do normal daily things without being worried your nail will pop off or lift. I tell my clients try not to touch too much-rubbing alcohol or acetone,” Seney adds, as alcohol and acetone can weaken the gel tip.
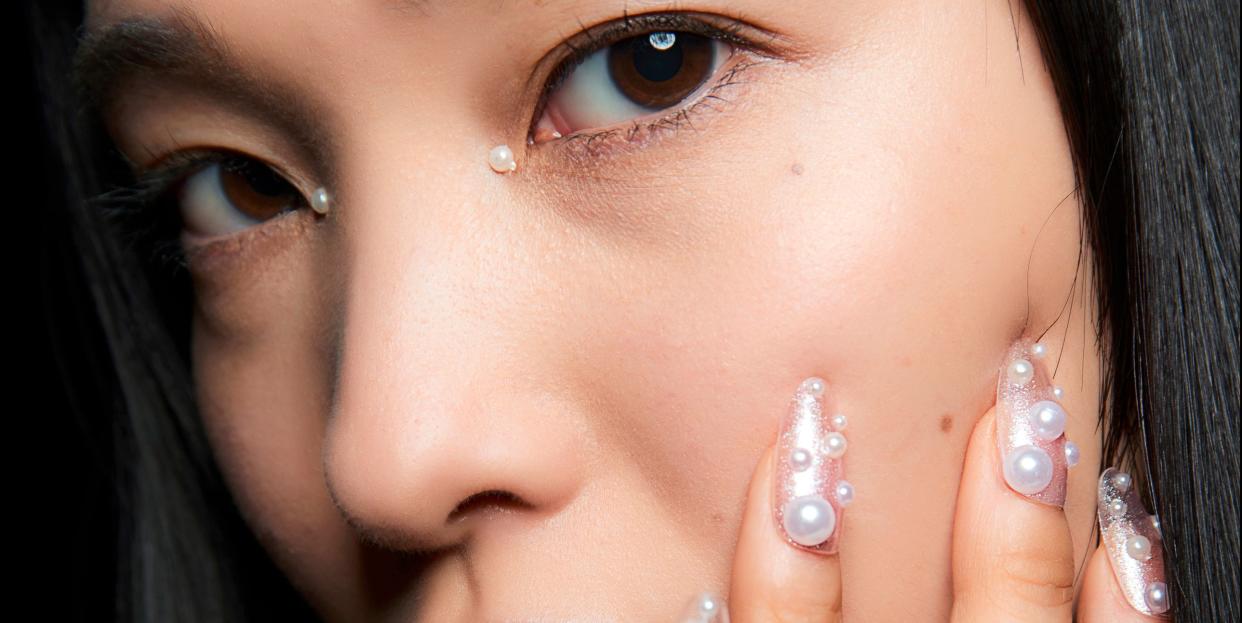
Pearls & 🍀🌼🌟 for @wuzg00d Nails by me💅🏽😊💚
A post shared by Trenna • Nail Artist (@lovetrenna) on Jul 27, 2020 at 4:04am PDT
How long do gel nail extensions last?
When done professionally, Seney says gel extensions can last up to three to four weeks. Seney adds that investing in your craft and quality products can extend the client’s wear-time for up to five weeks. Seney uses the popular Apres Gel-X system and Medusa Gel Polish for her nail art designs.
How much do gel extensions typically cost?
They will cost you a few extra dollars more than the normal acrylic tip rate because of how strong and long-lasting gel extensions are. Seney explains that “rates depend on the nail tech’s level of expertise and what the client wants on the nails. Swarovski crystals, hand-painted designs, charms, etc. all come with a hefty price tag. Gel extensions range from $85-$350, the more intricate [the design], the pricier it gets.”
How are gel extensions applied?
Step 1: Prep the nails. The nail tech will file the client’s nails, push cuticles back, trim dead cuticles, and buff nails. The nails must be clean (and dry) before application.
Step 2: Find the right size. Take each finger and find the correct size tip that fits. All the nails in the kit have numbers to compare.
Step 3: Depending on your nail tech’s skill level, file the inside of the nail tips or apply a layer of acetone.
Step 4: Apply bonder liquid to natural nails. Bonder is a dehydrator and you want to make sure your natural nails are as dry as possible with no oils or debris.
Step 5: Apply primer liquid to natural nails. Primer makes your nails sticky so that it’s easier for the gel to attach. (Both the bonder and primer are included in the Apres Gel X kit)
Step 6: Apply a thin layer of extend gel to the natural nails. (Clear gel liquid also included in the kit)
Step 7: Put your hand in the UV/LED lamp for 60 seconds.
Step 8: Apply some gel to the tips. Make sure the client’s hand is straight. Apply the gel tip to the natural nail, and press down. As one hand is holding the tip on the client's hand, take your other hand holding a handheld LED light shine it directly on the nail for 30 seconds. Then have the client place her hand inside the UV/LED lamp for 60 seconds.
Step 9: Repeat on all fingers
Step 10: All done!

What about aftercare?
Soak off your gel extensions and let your natural nails breathe with nothing on them for a week.
You Might Also Like

