How to Recreate the Iconic ‘90s ‘Pamela Anderson’ Updo For Your Wedding Day
Jeff Kravitz/FilmMagic
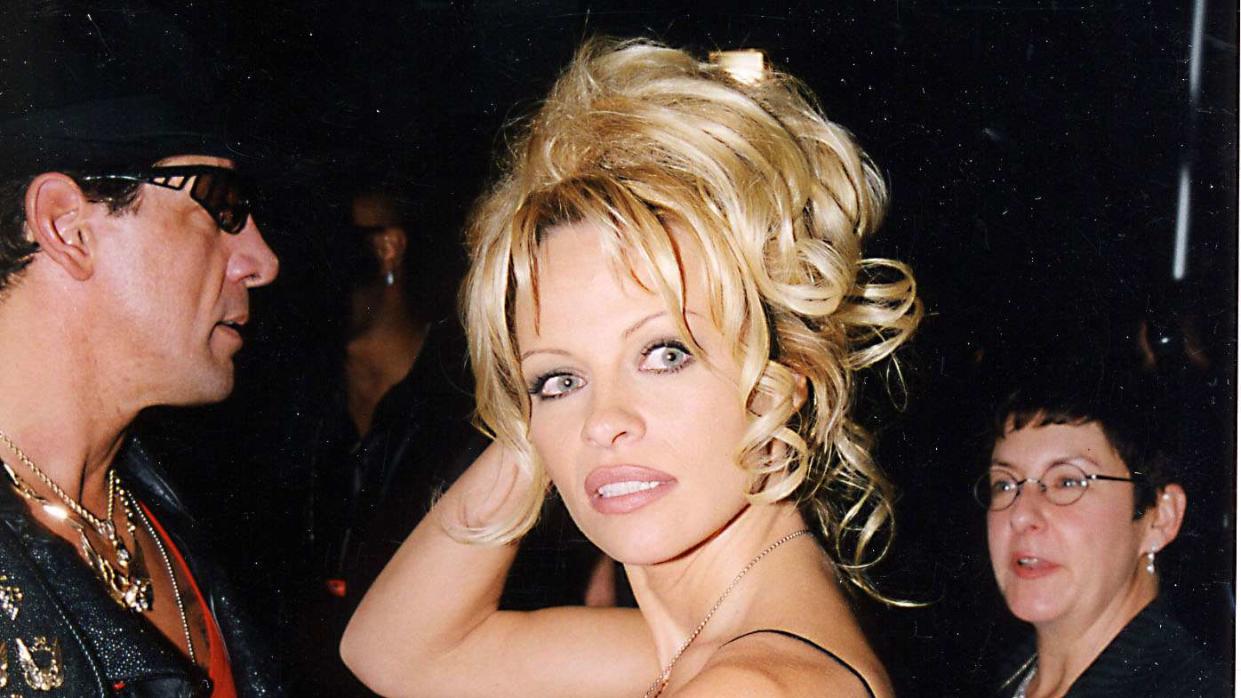
Pamela Anderson- Oops!Something went wrong.Please try again later.
- Oops!Something went wrong.Please try again later.
It’s no secret the ‘90s are back in a big way, with beauty and fashion trends from the decade making their way back into our lives. And with that also comes the resurgence of one of the early aught’s most popular icons: Pamela Anderson.
Not only is Pam gracing all of our TVs in her Netflix special “Pamela, a Love Story,” but we’re also seeing her signature updo hairstyle everywhere again. The messy, voluminous style features a piece-y French twist with curls framing the face and nape of the neck and is worn by everyone from Kim Kardashian to Cardi B to influencers on our feeds. And as gorgeous as the updo is, it’s just as easy to recreate for any hair type. And for the 2023 brides, specifically, Pam’s go-to style makes for one of the perfect wedding hairstyles for your big day.
Whether you’re planning a casual beachside wedding or black tie nuptials, the look is a fit for any aesthetic. And just like it has range when it comes to dress codes, its range also spans across any hair type, too. Ahead, we’ve enlisted feedback from three hair experts to detail the steps, products, and tools to use to replicate Pam Anderson’s ‘90s updo.
:Pamela Anderson Is On Everyone's Spring Beauty Mood Board
How to recreate on straight hair:
Alex Brown, a Chicago-based celebrity hairstylist and owner of her namesake salon loves seeing Pam’s go-to style on bride’s for their wedding day look. “This would be such a classic and timeless bridal style. It’s so romantic and feminine and can hold all day and night.” Brown directs people with straight hair to first prep their hair with OUAI Wave Spray and Maria Nila Styling Mousse. “Blow-dry the products into the hair with a round brush to add texture, hold, and to make sure the hairline is straight,” she advises.
Next, section front bang pieces out and clip them away with bang clips. “Then, spray the roots with a workable hairspray (my favorite is Maria Nila Styling Spray) and OUAI Texturizing Hair Spray all over the scalp, she shares. “If you have thick hair you really want to make sure you spray the root and mid strand so the hair is easier to control.”
From there, brush the hair back into a section like you’re creating a mid-ponytail. “You will want to make sure to take all of the hair is back in one section when creating this look so that it looks thicker once you start pinning,” she shares. Then, twist the hair upward toward the crown into a French twist and pin with large pins.
Now, it’s time to curl. Using a 1.25” curling iron, curl the ends of the pieces that are sticking out of the twist on top of the head. Then, spray those same pieces with OUAI Texturizing Hair Spray again to mold the hair into place and pin in place depending on your preference. Use the curling iron to give the bangs a slight wave and finish off the look with strong hold spray.
“When inserting a veil, make sure there is plenty of backcombing in the crown of the style for the veil comb to grip on to. Add bobby pins to the comb of the veil for extra support,” she concludes.
How to recreate on type 2 waves:
Whether your hair has a lot or a little wave, celebrity hairstylist and founder of NTRL by Sabs, Sabrina Rowe Holdsworth advises to first use a volumizing mousse throughout the hair for both volume and hold. Then, blow-dry the hair straight, create a center part, section out the front pieces, curl it before styling into the French twist, and secure with pins. Rowe Holdsworth suggests playing around with the curls and bang placement to see what works best with your face shape and even leaving some tendrils out in the back for added romance. “Give this iconic look your own personality by playing around with different bangs - I recommend trying out curtain bangs for maximum impact.”
Want a fuller, longer look? She suggests using clip-in extensions for added length and volume. “Sixteen-inch extensions are perfect, but keep in mind you will clip them upside down so all the hair is directed up.” For this style, flip the hair upside down and start inserting extensions starting at the back of the head and move toward the crown. Then, when you’re finished you’ll follow the above steps to complete the look. Finally, don’t forget to use a strong hold hair spray for all-day hold.
:All 4 Hair Types & How to Style Them, According to Celeb Stylists
How to recreate on type 3 curls:
For those naturally equipped with curly hair, Camille Zazou, a hair expert and Jessicurl ambassador, has detailed exactly how type 3a to 3c curls can achieve the Pam Anderson updo without adding any heat. To start, cleanse, condition, rinse, then add a bit more conditioner (like Jessicurl’s Aloeba Daily Conditioner) as a leave-in. Then, flip the wet hair upside down and using your hands spray and work a curl enhancer through the ends of the hair. Next, lightly scrunch the hair using a microfiber towel to remove excess water. Finally, add a curl styling solution (like Confident Coils Styling Solution) and scrunch it through the hair. To dry, let air-dry or use a defusing attachment with a blow-dry on low-heat and low-airflow, and scrunch through the hair until hair is 75% dry.
To style, pull the hair into a ponytail at the crown and hold in place while using the end of a rat tail comb to pull out tendrils to frame the face and nape of the neck. Once the pieces are pulled out, then create a messy bun and secure with an elastic. Using the end of the comb, loosen the bun to create fluffy volume and then pin the hair around the base of the bun. Spray hair spray all over the style to hold the look in place.
How to recreate on type 4 curls:
Loose, soft curls are the MVP of this style — no matter the occasion. For Type 4 curls Jessicurl’s ambassador shares how to create soft, heatless curls using 1.5 inch wet set rollers to then work into the updo. Start out by shampooing, conditioning, rinsing, then adding a bit more conditioner as a leave-in. Lightly scrunch the hair dry using a microfiber towel. Then, begin sectioning the hair to fit on to a roller. Before rolling, use a curl styling solution followed by Jessicurl’s Spiralicious Styling Gel and roll into the roller and clip into place. Repeat for each section of hair. You can then choose to airdry without heat, or use a dryer on medium heat and air-flow setting until hair is completely dry. Once hair is dry, remove the rollers, and gently separate the curls using your hairs.
You’re now ready to create the updo. Similar to the above, you can create a messy bun, leave curls out to frame the face and nape of the neck, then secure with an elastic. Use the end of a comb to loosen the bun, add volume, and secure with pins at the base of the bun. Finish off with strong hold hairspray.
For brides wanting to pair this updo with a veil on their big day, Zazou suggests placing the veil over top of the bun. She says to spread out the curly ends of the hair on the top of the head and leave half an inch of space between the front of the bun and where the edge of these curls will be pinned. Then, loosely pin the curly ends back toward the bun. “Do this by twisting, looping, and pinning the ends to create a bank of piece-y, loose, billowing curls [in front of the veil].”
For more InStyle news, make sure to sign up for our newsletter!
Read the original article on InStyle.

