Your iPhone has a hidden professional photography feature to make photos look more natural

Learning how to enable lens correction on iPhone is something every smartphone photographer should do. See, while iPhones are widely regarded as being some of the best camera phones in the business, you may have noticed that taking pictures with the wide-angle or front lenses on your iPhone can sometimes result in a fisheye or slightly warped look. This effect is also known as barrel distortion, and usually, it isn’t a great look.
Thankfully, iPhones give you a way to solve this effect, with a feature called lens correction. Put simply, when lens correction is enabled, your camera will cleverly detect and correct any distortion — enhancing your photos and helping them appear more natural. This is a feature you’ll commonly find on the best mirrorless cameras — which will apply a lens correction profile to every single lens to fix any optical distortion.
Lens correction is usually on by default when shooting with the Ultra Wide lens or front-facing camera, and it’s available on iPhone 12, iPhone 13, and iPhone 14 models. But it pays to make sure you’ve got it enabled, especially if you’re taking photos on someone else’s phone. Likewise, you may also want to turn lens correction off if you feel like getting creative by adding some deliberate barrel distortion into your wide angle shots.
Enabling lens correction is really easy to do. Simply follow the steps below:
How to enable lens correction on iPhone
Open Settings
Tap Camera
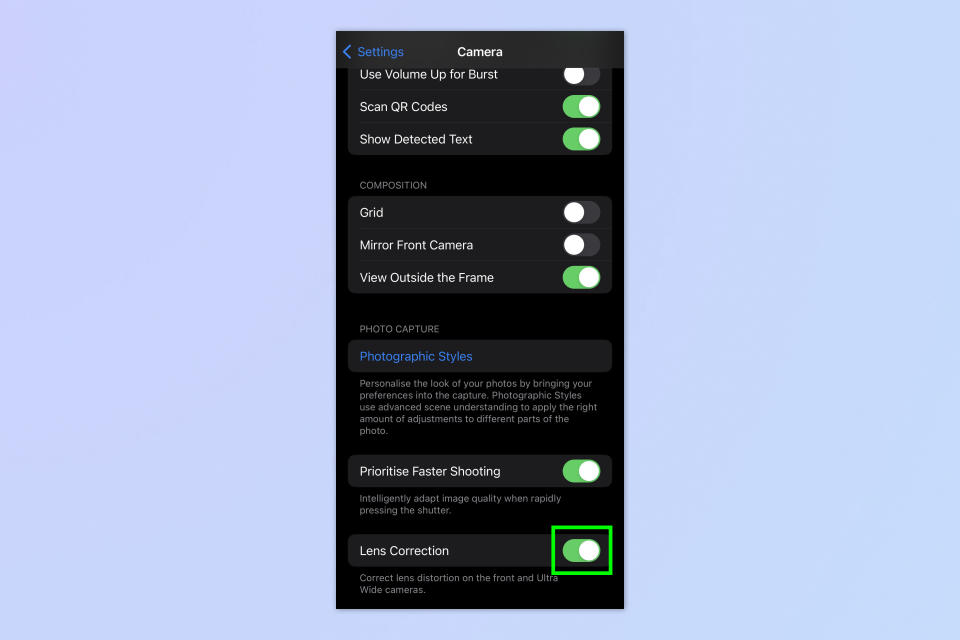
Toggle on Lens Correction
Read on to see full illustrated instructions for each step.
1. Go to Settings > Camera

(Image: © Future)
Open the Settings app and tap Camera.
2. Toggle on Lens Correction

(Image: © Future)
Scroll down and toggle on Lens Correction.
And there you have it — you can capture better photos in two basic steps. Whether you’re an experienced iPhone user or a newbie, it’s all about knowing how to make the most of your phone’s hidden features and settings to yield the best results. We have a range of tutorials to help you discover the hidden settings and get more out of your iPhone. If you’re a budding botanist, make sure you learn how to identify plants on iPhone with visual look up. If you like to take your photography out into the wilderness, make sure you know how to share your location via satellite on iPhone, in case you run into any trouble. And if you regularly hang up phone calls by accident, you’ll want to find out how to stop the iPhone’s lock button ending calls.

