Here's How To DIY Your Outfit For Virtual Prom
Just because we’re socially distancing doesn’t mean we have to miss out on the fun of a milestone moment like prom. In celebration of Teen Vogue's virtual prom we’ve put together the best tips and tricks to party with us from home. Join us (and tag us!). #TVGoestoProm
Getting creative during a pandemic can be difficult but it can also be a way to distract, quell anxiety, and outlet for energy. With the Teen Vogue Virtual Prom right around the corner we're starting to brainstorm ways to make something fancy and special out of the things we have at home. When it comes to breathing new life into our clothing we have a few tricks or two, but creating a look that is formal enough for a momentous event like prom is tough. First and foremost, fancy clothing is expensive so using a DIY technique that is irreversible can be really scary. Second, you might not have a lot of choices when it comes to special prom-worthy pieces. But we want to invite you to dig a little deeper in your closet and creativity! Sometimes all it takes is a little bit of sparkle, or length, or dye (or all of the above!).
You don't have to be an expert at DIY to be able to do these tricks. Sure maybe it's a dress you've worn over and over again, but that doesn't make it any less special and your peers might not even be able to recognize it once you're done with it. We've seen some impressive DIY prom dresses like this one ft. Angela Davis, Erykah Badu, and Lauryn Hill, and this one that only cost $4, and this leveled up Fashion Nova dress. It's not as easy-as-pie, but all it takes is some patience and creativity.
So let's go, you've mastered DIY-ing face masks and can do a mean pedicure. Ahead, four DIY techniques for DIY and non-DIYers alike! Can't wait to see what magic you guys create for virtual prom.

1. Add Length To Your Short Dresses
1 sparkly short dress + 1 long casual dress = your prom dress. There's something about prom that prompts dresses that are longer in length. If a floor length gown dress is what you're going for, consider layering your dresses. It will take some time to find the right combination, but stay patient! Go for something more simple and strapless for the short dress and something delicate and detailed for the long dress.

2. Low Commitment Bedazzle Your Blazer
If a tux was what you had envisioned yourself wearing for prom, create a makeshift one by first finding a blazer and matching (or not matching) pants! A blazer and pants might feel formal, but not special enough for prom night. Instead of bedazzling to add some sparkle, try pinning all of your fun earrings to the lapel of the blazer. You can easily remove them afterwards (which might just be what convinces your parents to let you borrow their fancy blazers).

3. Tie Your Scarves Into A Fancy Top
Don't have a fancy top? Hate sewing? Make your own by just tying a bunch of silk scarves together.
Step 1: gather all of the silk scarves you have.
Step 2: Determine the kind of neckline you want. The world is your oyster here! You can do a v-neck, one shoulder, halter top, strapless, etc.
Step 3: Stand in front a mirror and get tying! It's ok if the scarves aren't the same size. Don't feel constrained to tie the knots at the corner of the scarf.
Step 4: Wear with a similarly colorful and silky skirt.
Step 5: Dance the night away and fingers crossed no nip slips!
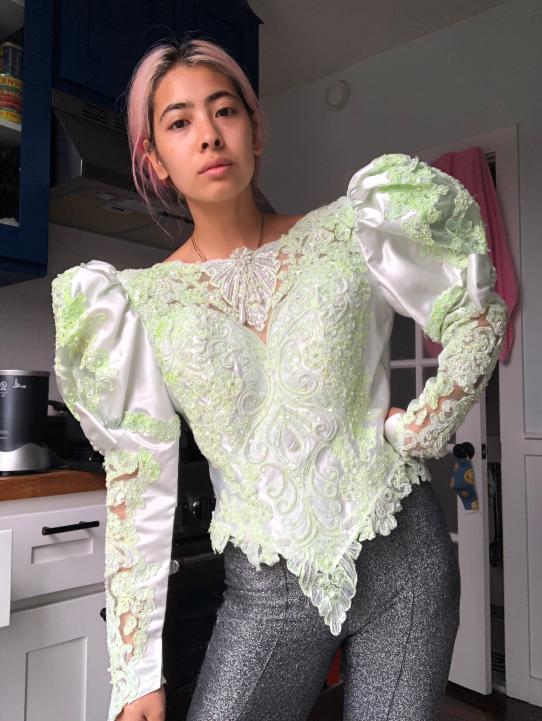
4. Dye Your Old Evening Dress (Bonus Points If A Wedding Dress!)
This top is from For Good Luck, a brand that specializes in repurposing vintage and evening bridal wear. Olivia Horan, the founder of For Good Luck gives us some tips on how to try making these puffy, nostalgic tops into something that feels like our style, including dying it to a color you love.
Step 1: "If you want to turn your dress into a top, a seam ripper is your best friend. Follow the natural design of the garment, you don't have to finish the shirt with a sewing machine sometimes keeping it un-hemmed is super cute!" Horan explains.
Step 2: "Make sure your garment is super clean! If it's vintage, I recommend soaking it in an Oxyclean solution overnight."
Step 3: When you've finished deconstructing your dress into a top, it's time to dye it. To do this Horan recommends: “Figure our what kind of fabric your garment is made of. Synthetic fabrics won't take dye and can leave a disappointing finished product so make sure your garment is made of mostly natural fibers, I've found cotton works the best! Don't worry if there is a combination of fabrics on your piece, the end result may not look entirely the same color but can turn out really cool.”
Step 4: "Before you dye, you want to soak the garment in a soda ash fixative solution. This ensures that the dye adheres to the fibers and makes your colors last longer. If you're dying the garment all one color, I recommend the liquid Rit dyes. They're super easy to get your hands on and are also inexpensive. I would NOT recommend these for tie dying. For tie dye, use fiber reactive dyes and get creative! I like using a scrunch pattern or classic swirl. The twisting is all up to you, it’s one of the things that makes your tie dye unique."
Step 5: “When tie dying I tend to gravitate towards rainbow hues but my best selling pieces are black dyed tops. It adds super beautiful tones to the underlying colors and transitions a formal garment into something more wearable that can be styled into any season or occasion. But, if black isn't for you, and you want to do a solid color, hot pink is never a bad option.”
Originally Appeared on Teen Vogue

