How to Care for Irises Like an Expert
Irises are beautiful flowers with incredible diversity! With more than 70,000 registered varieties, these striking perennials can be planted across almost the entire U.S., except some extremely hot regions in the South. “Irises come in every single color of the rainbow,” says Gary White, immediate past-president of the American Iris Society. “Their heights range from a few inches tall to up to five feet so they can be planted in the middle, back, or front of borders, in rock gardens, and all kinds of garden settings.” Even better? They’re relatively inexpensive and will multiply so you can divide and transplant elsewhere in your garden or share with friends in a few years.
Here’s what else you need to know about these stunning flowers.
There are two main categories of irises.
The two groups are bearded irises and beardless irises. Bearded irises are the most popular; on the lower petals, they have an elongated tuft of hairs that looks like (you guessed it!) a little beard on large colorful flowers. Beardless irises don’t have the telltale “beard,” but rather a blaze of color at the throat of the flower. The most widely grown of this type are Siberian irises, which are tolerant of a wide variety of climates and soils, says White. Other types of beardless irises include Japanese, Louisiana, Spuria, and Pacific Coast.
What kind of light do irises need?
For starters, most irises prefer full sun, which means at least 6 hours of direct sun per day. “Some irises will tolerate a little shade as long as they’re getting the minimum of 6 hours,” says White. In warm climates, Siberian and Japanese don’t mind afternoon shade because they don’t like heat. In northern areas, these types will tolerate full sun.
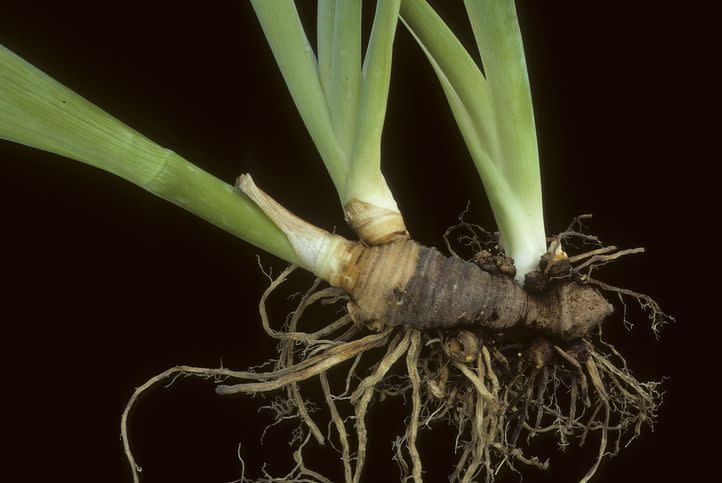
How do I plant irises?
Iris bulbs, which actually are called rhizomes, look like a long, skinny sweet potato. “Rhizomes technically are elongated stems,” says White. “The leaves and flowers come off this stem.” Work some compost into the soil in your planting area, then space out rhizomes about 1 to 2 feet apart for bearded and 2 to 3 feet apart for beardless. Don’t crowd them because good air circulation helps prevent disease.
Now here’s the important part: Do not plant irises too deep! It’s one of the most frequent mistakes, and it’s a common reason irises won’t bloom. For bearded irises, place the top of the rhizome at or an inch below the soil surface so that the top portion shows above-ground. That’s right: They like to sunbathe! Beardless irises can go a bit deeper, about 2 to 3 inches below the surface. If mulching, do not cover the rhizome—just mulch up to it. Water newly planted irises well, and water again if you haven’t had rain in a week. The first winter, cover new plants with evergreen boughs or pine needles to protect rhizomes from the freeze-thaw cycle.
When is the best time to plant irises?
If you bought a potted iris, get it in the ground as soon as possible, regardless of the time of year. For rhizomes, plant no later than about six weeks before the ground freezes, says White. For bearded irises in the northern part of the country, plant and divide them in July to September. In southern climates, plant and divide from July to early November. Beardless irises should be planted in the spring or fall because don’t like heat and it’s too stressful for them to try to get established during the summer.
You should cut back your irises after the blooms fade.
It not only looks better, but you remove the possibility that the seed pods (which form on the end of the stem where the bloom was) will drain energy from the plant. Use a sharp knife or garden pruners to cut take off the entire stalk at the base, all the way down to the rhizome, says White. Do not cut off the leaves, which still are making food. But in late fall after a frost, cut back the leaf fans of bearded irises with scissors or a knife to about 2 to 4 inches above ground. Beardless die back on their own.
Should I fertilize irises?
If your soil is fertile, you don’t have to fertilize at all. But if you have average or ho-hum soil, feed after their first year in the ground. In late winter or early spring, give them a balanced granular slow release formula of 10-10-10, 6-10-10, or 6-12-12 ratios of Nitrogen (N), Phosphorous (P) and Potassium(K). “You don’t want that first number, which is nitrogen, to be too high or you’ll get great foliage but no flowers,” says White.
Divide irises when they become too crowded.
Irises typically needed divided every few years but a lot depends on your growing conditions. When you see a clump with rhizomes pushing each other up, overlapping and growing up over each other, or no longer blooming well, it’s time to divide. You can dig out the entire clump and reset pieces elsewhere, or you can take chunks from the edges of the clump.
With bearded irises, use a fork or spade to get under and lift the rhizomes out of the soil. You’ll see new baby rhizomes, which are called “increases,” all around the mother rhizome. The mother rhizome will have the end of the bloom stalk attached to it; you can discard it because this part of the rhizome will not bloom again, says White. Beardless irises have a fibrous root system (it can be tough to cut through them!), so you use a spade to take a chunk of the edge and replant elsewhere.
Do irises have any problems?
The other common problem is iris borers, which affect all types of irises, and are moths that lay eggs on old foliage in the fall. “If you live in the eastern half of the country, sooner or later you will see iris borers,” says White. It’s hard to spot the signs until it’s too late but you may see pinkish grub-like larvae or little notches along the leaves. Your best bet is to treat with a granular systemic product specifically for iris borers or a spray containing spinosad, a bacterium that is toxic to insects. In the fall, cut back and remove leaves to prevent the eggs from overwintering.
You Might Also Like

