The Best Stretches for When You’re Recovering from Low Back Pain
This article originally appeared on Yoga Journal
I know a lot of yoga students who experience low back pain. And I’ve observed that many of them keep a more limited range of motion in their yoga practice and their everyday movements than their actual pain or tightness necessitates. I think a lot of it has to do with the underlying fear that pain is imminent, which keeps students from moving their bodies in certain ways.
When low back pain is intense, limiting your range of motion is necessary and practical. Even after the pain subsides, there can be a tendency to hold back on movement. You’ve begun to distrust the body and disconnect from it due to an understandable fear of recurring pain. But as intuitive as it might seem to move as little as possible, prolonged restraint of your body actually limits rather than helps mobility in your back. When you’re moving your back only in a certain direction or a limited range of motion, then that’s all your body is going to be able to do.
Avoiding movement isn’t the answer to low back pain
When the pain is intense, practicing simple passive stretches, such as supported forward folds and light twisting, facilitates mobility in a way that’s accessible and can help you regain trust in your body. As you come out of low back pain and return to your yoga practice, there’s often a tendency to hold back from trying certain poses because you think you’re not practicing yoga if you’re not trying to take a pose beyond your usual range of motion. Many students take the perspective of “let’s find a deeper shape” and think that’s the only expression of the pose, when actually we need to pay attention to our own unique range of motion and how we can engage in smarter muscular engagement.
How to stretch smartly with low back pain
When you’re past the point of intense discomfort and at the place where you’re considering a return to yoga, you’re probably still stretching. But if you’re passively stretching, you’re not actually readying your body to practice poses, even if they take your body in shapes similar to the stretches you’ve been doing passively. The actual yoga poses require engagement. Practicing only passive stretches as you’re preparing to come back to yoga actually increases your chance of injury.
Ultimately you want to practice active stretches. Anytime you engage a muscle group, you stretch the opposing muscles. This is known as reciprocal inhibition. You want to find sufficient engagement in your core so that your back body can loosen, so the stretch becomes more of an effort to rebalance where your body is engaging muscularly to help your low back release.
I’m often asked how long to stay in these stretches. There isn’t a set amount of time. About 12 breaths is a good amount of time, but always give yourself what it feels like you need.
Dead Bug
Why this pose helps with low-back pain: This pose is an example of how reciprocal inhibition assists with stretching. When you engage your core, you stretch and release your low back.
How to: Lie down on your back, bring your knees over your hips, and straighten your arms above your shoulders or rest your arms along your sides with your palms facing up. Keep your knees bent 90 degrees as you extend one leg down until your heel touches the ground. Draw the navel into your core to lightly engage the belly to help you engage your transverse abdominus. You also want to use your pelvic floor. I explain to students that it’s like you’re trying to hold in a fart. If you find your belly pops out, you’re not properly engaging your core. Repeat on the other side.
Lazy Pigeon
Why this pose helps with low-back pain: It’s useful to keep in mind that where we experience pain is not always the problem area. In this posture, you engage your outer glutes, which for a lot of yogis tends to be a weak area, so it’s a muscle group that needs to be strengthened. I do this pose even when I’m not injured.
How to: Face the front of your mat with your weight on your left hip and your left thigh parallel to the short side of the mat. Keep your knee in line with your hip. Bend your back knee a comfortable amount and let that leg rest on your left leg. Bring your hands to the mat, fingers pointing toward the front of the mat, and start to twist and turn your chest toward the ground any amount as long as you don’t feel discomfort. Press the left knee into the ground while engaging your core to engage your glutes. To deepen the stretch, you can twist your chest a little more and bring both hands or forearms to the mat. You want the same pelvic floor engagement as in Dead Bug. Repeat on the other side.
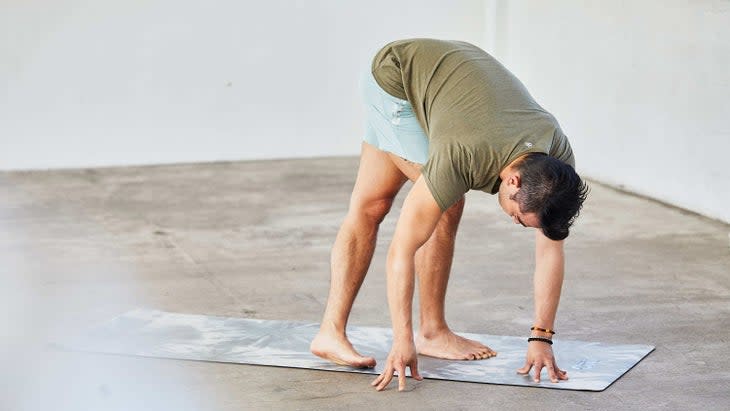
Runner’s Stretch
Why this pose helps with low-back pain: This stretch targets the glutes. Depending on the severity of the injury, a lot of time low-back pain radiates into the hips, and you feel like they’re pretty tight, as well. This is a great way to stretch any referral pain. Also, if tight hips were the issue to begin with and caused the low back pain, this stretch can bring relief.
How to: From standing at the front of the mat, cross one leg behind the other and slowly bend forward. If you don’t feel any discomfort, then you can start to bring more weight to the foot that’s crossed behind you. For an even deeper stretch, press through your back heel. Repeat on the other side.
Tabletop With One Leg Extended
Why this pose helps with low-back pain: The challenge in this pose is keeping your core engaged and not backbending while you’re extending the leg back. This will help retrain any postural misalignments that may have caused the injury. It’s actually more challenging than people think, because there are so many ways the body compensates that we’re unaware of. Keeping the back leg lifted any amount without backbending is extremely beneficial, not just to recovering from back injury but also for your movement patterns in general. This stretch incorporates strength and mobility, especially in the hip complex.
How to: Come to Tabletop. Draw your navel in and engage your core and pelvic floor as if you were holding in a fart. Extend one leg straight back but keep the ball of the foot on the mat. From there, keep your leg straight and your core engaged as you slowly lift the leg using just your glutes or hamstrings and without coming into a backbend. Breathe here. Repeat on the other side.
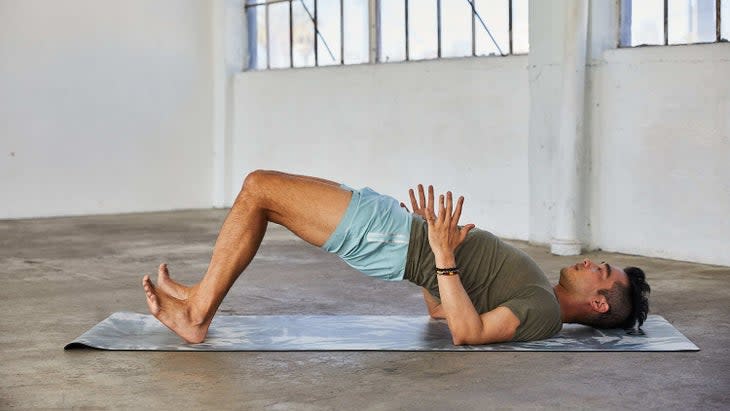
Bridge Glute Raises
Why this pose helps with low-back pain: A lot of low back pain, especially for yogis, can come from overfocusing on stretching the glutes with little attention to strengthening them. This variation of Bridge Pose isn’t about the backbend. Instead, it’s about reintroducing strength into the glutes and hamstrings. Rather than lifting your chest as high as possible, your goal is simply to engage the glutes. That’s it. Even if you don’t have low back pain but just experience tightness, strengthening your glutes can help prevent low-back pain.
How to: Come onto your back, bend your knees, and bring your feet toward your hips. They don’t need to be underneath your knees. Bring your arms alongside your body, bend your elbows, and then really press your triceps down into the ground. This provides you with support from the chest up through the thoracic spine. Push your feet down into the ground and lift your hips. Instead of thinking about backbending, think hip extension, like you’re trying to drive your feet down into the ground more. That’s going to help you engage your glutes. If you want to introduce more hamstring engagement, you can think about trying to drag your heels toward your butt, which will also help engage your glutes more.
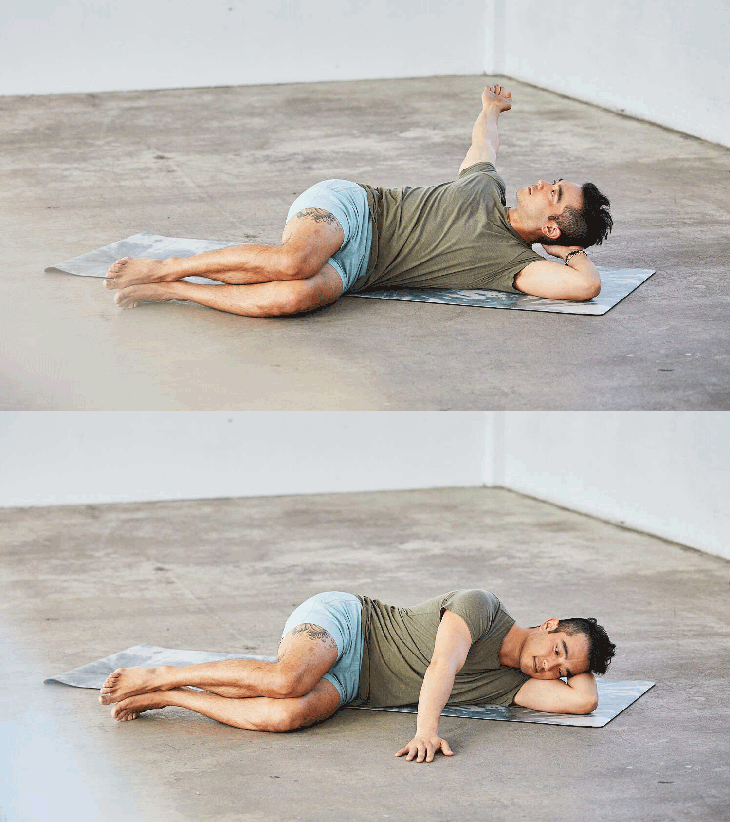
Reclining Twist
Why this pose helps with low-back pain: In my opinion, this stretch is actually more about learning to trust your body again more than it is the physical stretch. There’s always an element of fear after injury about how far you can move without pain, especially with a twisting action in your spine.
How to: Lie on your back and drop your legs to one side, stacking your knees. You’re trying to keep your spine in a straight line, but often the hips are pretty off from the middle of the mat in this pose, so after you stack your knees, you might need to shift your bum a little to keep your spine aligned. From there, find your core engagement. Bring one hand on top of the other. Then open and reach your top arm to the side to open the chest. You’re simply twisting within your range of comfort without trying to get your top shoulder down onto the ground. Only twist as far as you have control in your core. For this move, it’s about repetition more than depth, because your trust grows stronger with repetition and evidence that you can move without pain. So if you do a movement and notice you’re safe, keep repeating it. Even if you go a single percent deeper, you’re going to feel a lot more confident and your nervous system is going to feel a lot more regulated.
More from Hiro Landazuri: It’s Not About the Shape
About our contributor
Hiro Landazuri is the founder of Body Smart Yoga. He empowers others with the necessary tools to grow into their ideal selves. He regularly teaches in-person and online workshops and shares teaching videos on Instagram.
For exclusive access to all of our fitness, gear, adventure, and travel stories, plus discounts on trips, events, and gear, sign up for Outside+ today.


