13 Ridiculously Awesome DIY Gifts for Your BFFs
Not sure what to get your besties, siblings or secret santa this year? If you're feeling extra creative, these DIY pressies are super easy and affordable — plus, you'll score bonus points for creativity and thoughtfulness. Even better, you won’t need next-level DIY skills to make them and they're basically impossible to mess up. So, you can become your own creative director and make the projects below your own way.
Custom bookmarks
Supplies:
Directions:
Measure and cut the construction paper into 3 inch wide by 6 inch long strips.
Add the mod podge all over the strips on both sides.
Wrap the construction paper to the fabric strips and let it dry as long as needed.
Trim the edges to make sure they match and are even.
Punch a hole toward the top of one end of the bookmark.
Loop the string in the hole and secure it.
Deck of Reasons You're Friends
Supplies:
Directions:
Write as many reasons on the blank cards.
Write on reason per card.
Customize each card you use to your liking.
Punch a hole in the corner of each one.
Connect them all with a key ring.
Watercolor Jewelry Dish
Supplies:
X-Acto knife or plastic clay knife
Small rolling pin or glass
Directions:
1. Roll each color of clay that you want to use into a small snake 4-6 inches long.
2. Combine the different color rolls into one big roll and twist together.
3. Fold the snake in half and twist the two ends together.
4. Roll the large twist into a snake about twice the original length to combine the colors. Repeat steps 3 and 4 a few times.
5. Squish clay into a ball.
6. Use a rolling pin or glass jar to roll out the marbled ball flat, so it's about 1/4" thick.
7. Use a round bowl at least 6" wide as a template and place it face down on the flattened clay. Cut away the clay around it with an X-Acto or plastic clay knife.
8. Place clay circle in an oven-safe bowl or ramekin and bake in the oven according to the clay package directions (ours was 15 minutes at 275°F). Remove the bowl from the oven and allow to cool before turning the larger bowl upside down. If needed, tap lightly until the clay dish falls out.
9. Use an oil-based Sharpie marker to color the rim of the dish and allow to dry.
10. Place monogram sticker in center and seal the dish with a clear glaze.
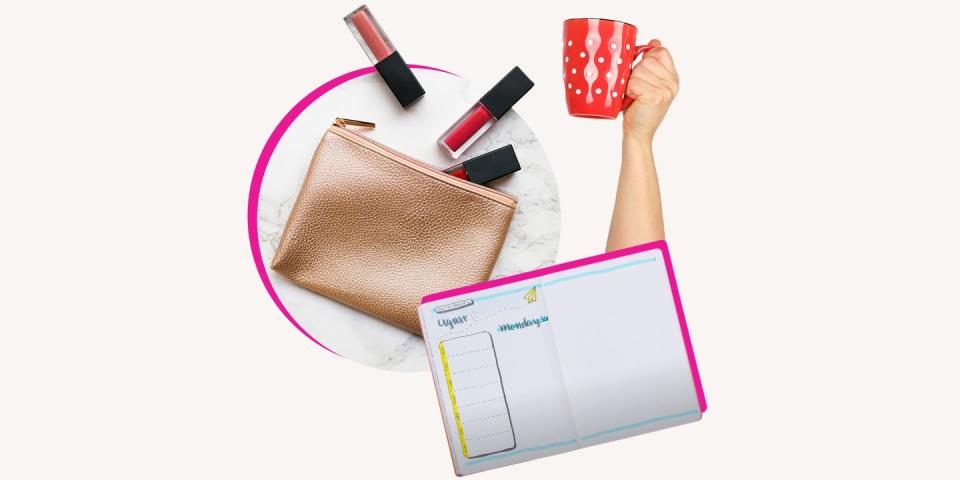
Monogrammed Makeup Bag
Supplies:
Directions:
1. Cut iron-on glitter fabric to desired size.
2. With a hot iron, warm the area on the cosmetic bag where the glitter strip is going to be placed.
3. Place glitter strip with the sparkly side up on bag. Place a thin towel or napkin over it and heat with a hot iron.
4. Allow to cool and glue letter patch to center of glitter fabric.
Friendship Bracelet
Use embroidery thread to make a friendship bracelet that you can affix to another gift or just wrap up on its own.
Supplies:
Directions:
1. Cut thread 3-4 times as long as you want the bracelet to be. Tie strings together in a knot and safety pin (or tape) to a pillow or the knee of your pants. Starting on the left, make a "4" by pulling the first string across the second one.
2. Loop the end of the first string around second string.
3. Pull the end through center.
4. Pull up tight toward the top to create a knot.
5. Do this twice, then move on to the next strand.
6. When you get to the last string, start again on the left.
Tassel Bracelet
Supplies:
Directions:
1. Knot end of clear fish wire. String 2-4 different colored beads on fish wire in desired pattern.
2. Knot the closure on one end.
3. Knot clasp on the other end.
4. Make a tassel with gold thread by wrapping gold string around one hand several times.
5. Remove from hand and cut end of string end. Squeeze two sides of string circle together and thread small piece of string through center.
6. Pull both ends of the string tightly at top of circle.
7. Tie into knot.
8. Knot entire circle at the top end that has been tied and pull tightly.
9. Cut the bottom of the loop to create a tassel.
10. Tie tassle onto closure and knot several times.
BFF Phone Case
Supplies:
Directions:
1. Cut square of glitter paper about twice the size of one phone case.
2. Draw heart on back of vinyl glitter paper.
3. Cut out heart.
4. Draw designs with Sharpie marker on front of heart.
5. Cut heart in half vertically and remove adhesive cover from back.
6. Attach one half of the heart to each phone case.
Decorated Notebook and Pens
Supplies:
Directions:
1. Layer washi tape along corners of notebook.
2. Add vertical strips of washi tape in another color or pattern along the binding.
3. Add washi tape in another color or pattern as accents, if desired. Add alphabet stickers in corner or center of notebook desired to spell out recipient's name or monogram.
4. Wrap pencil with washi tape keeping it as tight as possible. Use pretty ribbon to tie pen around notebook.
Glittery Tube Necklace
Supplies:
X-Acto knife or plastic clay knife
Directions:
1. Roll clay into thin, small snake.
2. Cut bead about 1-2 inches long with X-Acto or plastic clay knife.
3. Push skewer through center of bead to make a hole in the center. Wiggle around to make hole large enough for chain to pass through.
4. Bake bead in the oven according to directions and let cool completely.
5. Place clear tape around bottom of bead before painting to help you create a neat line.
6. Paint end of bead with small paint brush and let dry completely.
7. Once paint has dried, draw a thin border with Sharpie marker. Glaze entire bead and allow to dry.
8. String chain through center of bead.
Personalized Nutella
Supplies:
Directions:
1. Peel label from Nutella Jar.
2. Cut 2-inch wide strip of glitter adhesive paper.
3. Peel and wrap paper around front of Nutella jar.
4. Print photos and cut out. Glue photo on white construction paper and cut a 1/4-1/2" border around the photo to create a Polaroid like frame. Write cute message if desired.
5. Apply glue to back of photo.
6. Attach photo to front of jar in center of glitter paper.
7. Tie ribbon around top of jar, leaving enough slack on each side to make a bow.
8. Place spoon handle in center of ribbon and tie a bow around the spoon's handle to attach it to the jar.
Bobby Pin Case
Supplies:
Directions:
1. Peel sticker from Tic Tac container.
2. Decorate sides and top with gold Sharpie marker.
3. Apply small dots of glue to outside of container in desired pattern.
4. Apply glitter over glue dots for a more precise design, or sprinkle glitter on top and shake off excess.
Photo Locker Magnets
Supplies:
Directions:
1. Cut 2 small squares from glitter paper for every magnet.
2. Print photos and trim to fit inside glitter paper square.
3. Apply thin layer of glue to back of photo.
4. Place photo in center of glitter paper.
5. Use X-Acto knife to cut an inner square from the second glitter square a little smaller than the photo.
6. Remove inner square to create a frame.
7. Glue frame over photo.
8. Attach stick-on magnet to back of photo.
Monogrammed Mug
Supplies:
Directions:
1. Place sticker letter in center of mug.
2. Use gold marker to outline sticker in small dots. The dots should be very dense around edges of letter.
3. Continue adding dots around letter, making them more spread out as you move away from the sticker.
4. Remove sticker.
Sparkly Tic Tac Toe Game
Supplies:
2 varieties of small figurines (you'll need 3 of each)
Directions:
1. Paint wood plaque and allow to dry completely.
2. Use ruler to divide board into 9 equal-sized squares and outline the checkerboard in pencil. Cut the same-size square from the glitter paper to use as stencil.
3. Use the stencil to cut 5 small squares from glitter paper.
4. Remove adhesive cover on back.
5. Place squares on painted plaque to create tic-tac-toe board.
6. Decorate edge of board with Sharpie marker and let dry completely.
7. Place figurines on board and play!
Click play for more adorable DIY gift ideas!
You Might Also Like

