10 OneNote tips every student should know on Windows 11
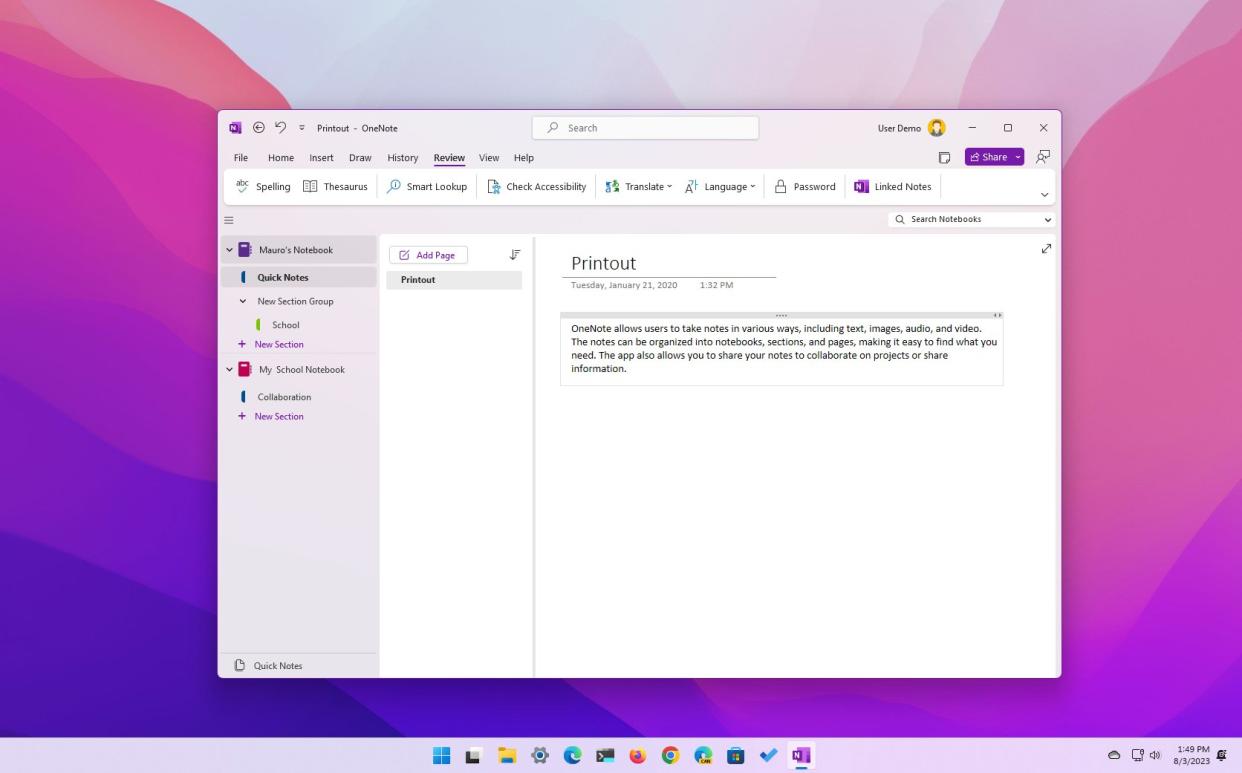
On Windows 11, Microsoft OneNote is a digital note-taking app, which is part of the Office suite and, since 2014, has been available for free on every platform outside the suite. However, you need a Microsoft 365 subscription to unlock the premium features.
OneNote allows users to take notes in various ways, including text, images, audio, and video. The notes can be organized into notebooks, sections, and pages, making it easy to find what you need. The app also allows you to share your notes to collaborate on projects or share information.
If you're gearing up to go back to school, the OneNote app is a must-have since it's perfect for taking notes in class, creating outlines and plans, brainstorming ideas, storing research, tracking tasks with to-do lists, collaborating with others, and studying.
In this how-to guide, you will learn ten features to get the most out of OneNote on Windows 11.
Best tips to know using OneNote on Windows 11
OneNote is a powerful tool that can be used for a variety of tasks, and these are the best features that everyone going back to school should know to stay organized and productive.
1. Create pages and sections
In OneNote, each notebook can contain sections and pages that allow you to organize your content. In addition, you add colors to each section to make them easier to identify at a glance.
To create new sections and pages in OneNote, use these steps:
Open OneNote.
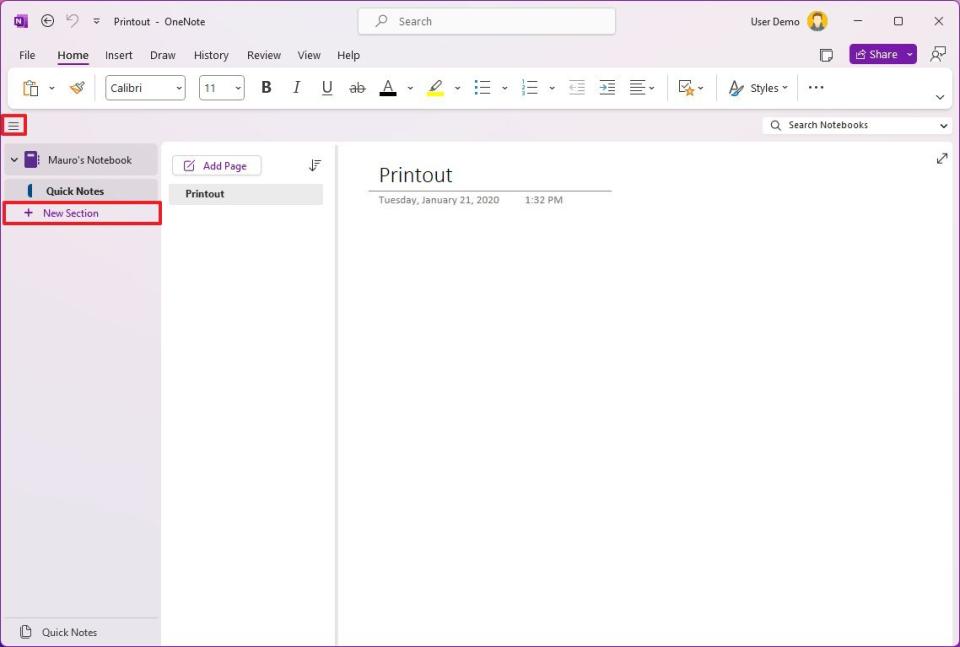
Click the Expand sidebar (three-line) button on the left side.
Click the New Section option to create a new section.
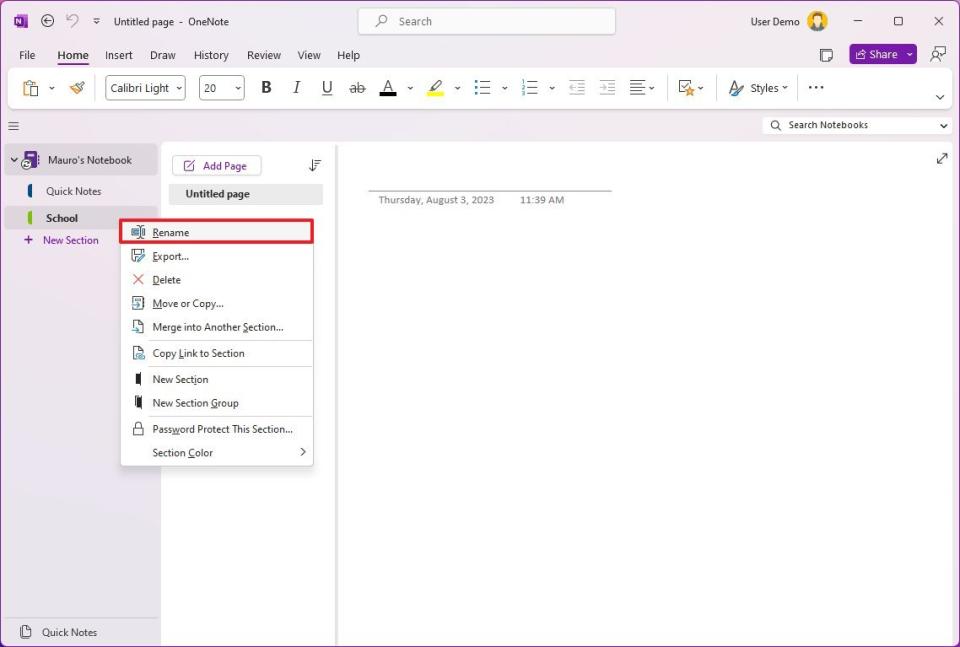
Right-click the newly created section and choose the Rename option.
Confirm a logical name of the section and press Enter.
Right-click the section again, select the Section Color menu, and choose a color.
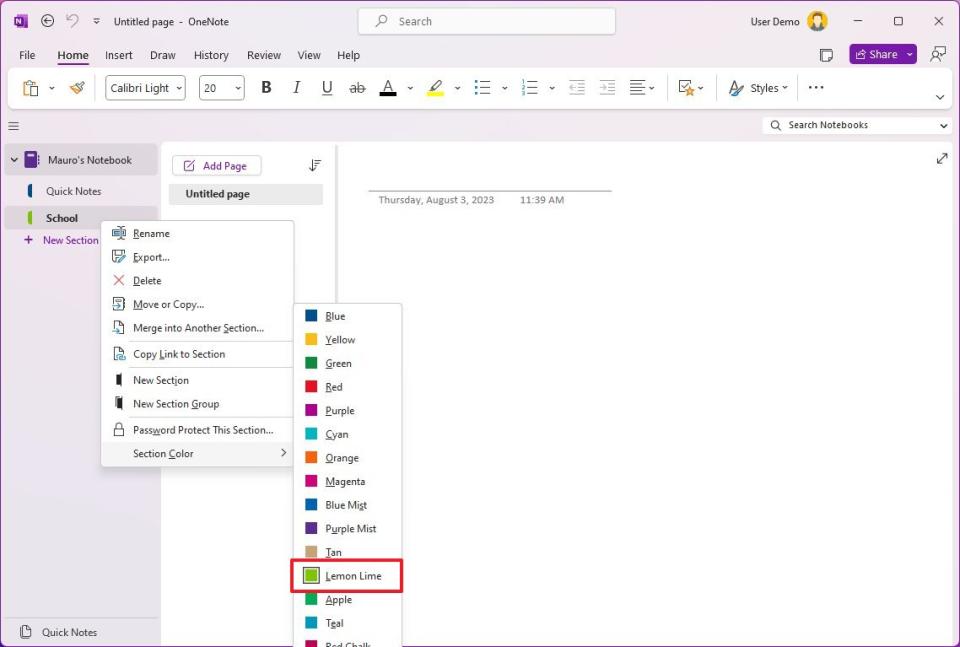
Quick note: This step is optional but recommended to make it easier to jump between sections.
(Optional) Right-click the sidebar and choose the "New Section Group" option.
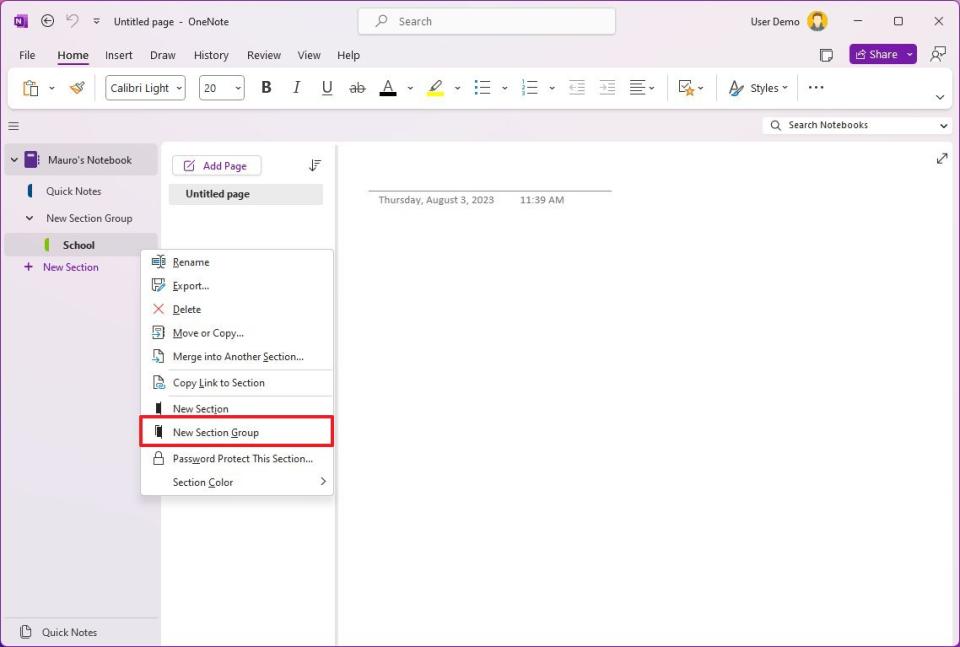
Quick note: This option allows you to group sections with different pages instead of creating additional notebooks.
Click the Add page button to create a new page on the right side.
Confirm the name of the page in the top-left corner (above the date and time).
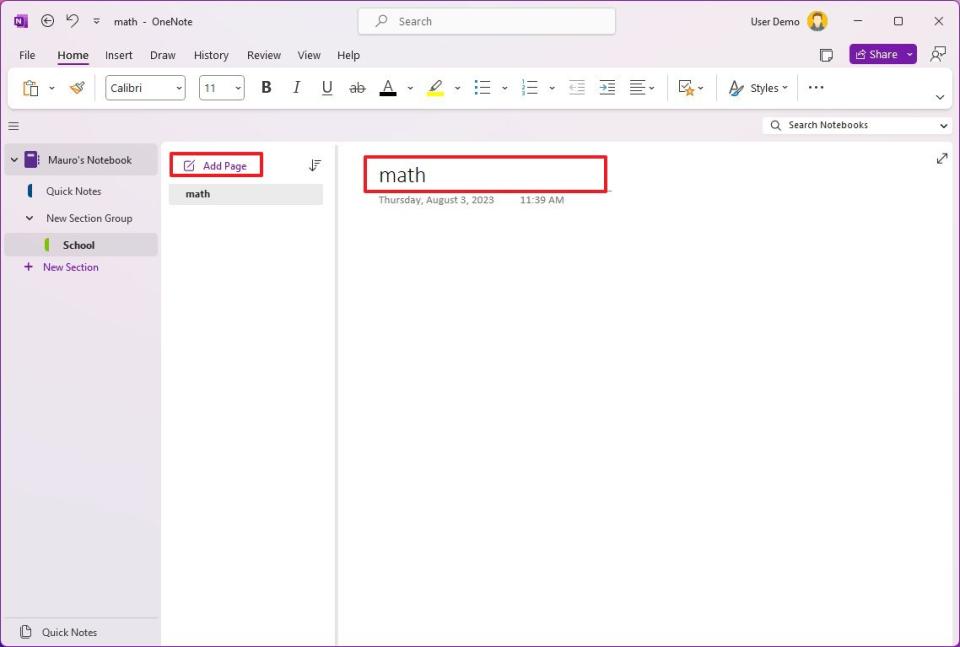
Once you complete the steps, you may need to repeat the steps to create additional pages and sections as needed to organize your schoolwork.
2. Create notebooks
If you plan to use OneNote in school, you can separate your notes from other activities by creating different notebooks.
To create a new notebook in OneNote, use these steps:
Open OneNote.
Click the Expand sidebar (three-line) button on the left side.
Right-click the sidebar and choose the New Notebook option.
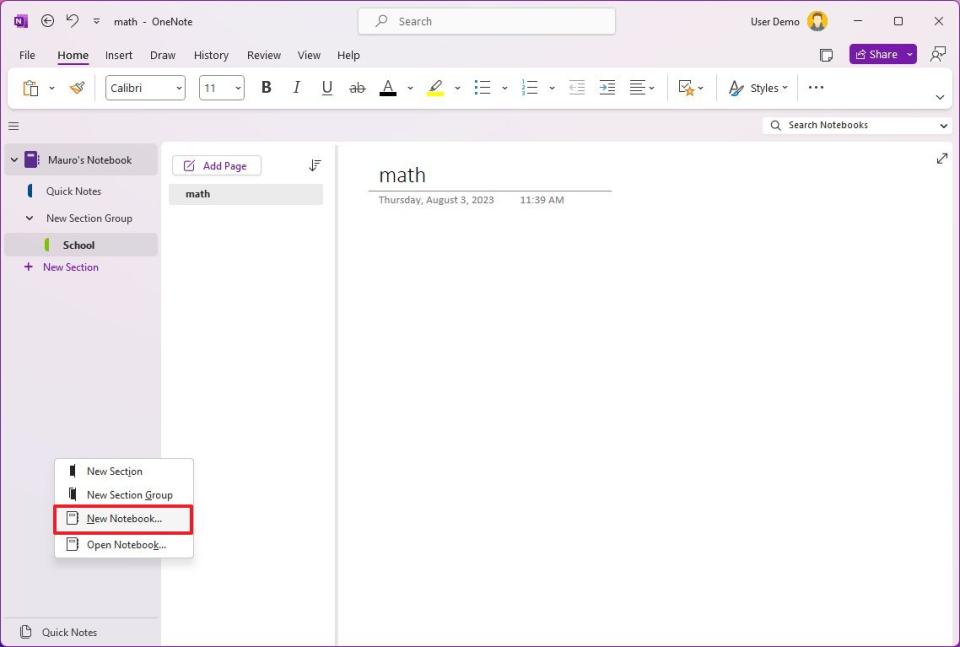
Choose the location to store the notebook.
Quick tip: Usually, you want to keep all your notebooks accessible from a single location, such as the default folder (Documents) in OneDrive.
Confirm a name for the notebook.
Click the Create Notebook button.
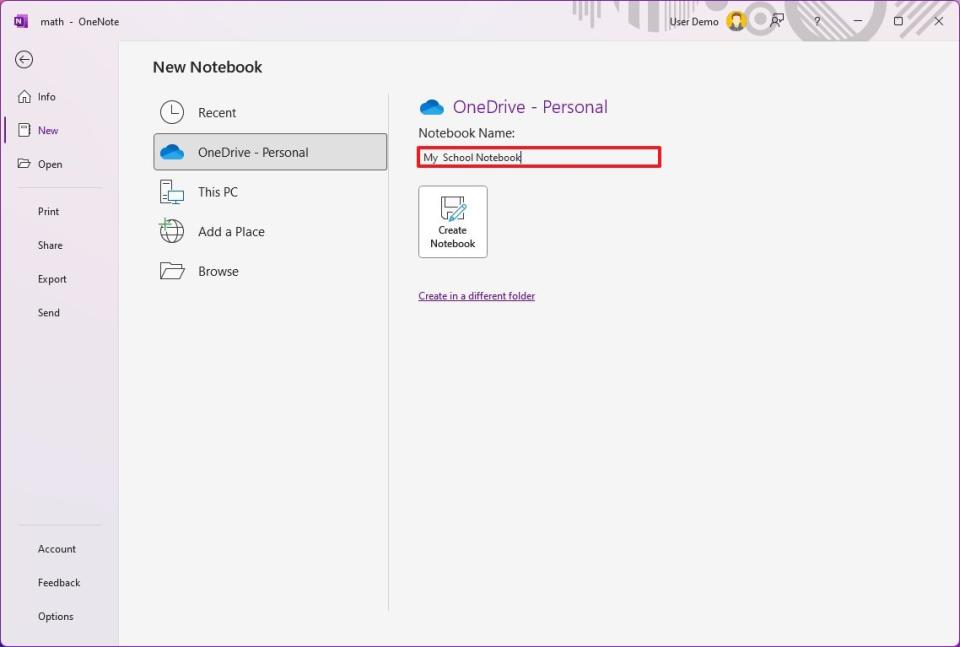
Click the Not now button (if applicable).
After you complete the steps, you can use the instructions outlined previously to create sections and pages.
3. Secure notes
If you store sensitive information in OneNote, it's possible to add an extra layer of security by adding a password to lock and unlock a section.
To secure a OneNote section with a password, use these steps:
Open OneNote.
Click the Expand sidebar (three-line) button on the left side.
Select the section to protect with a password.
Click the Review tab.
Click the Password option in the command bar.
Quick note: You can also right-click the section and choose the "Password Protect This Section" option.
Click the Set Password button.
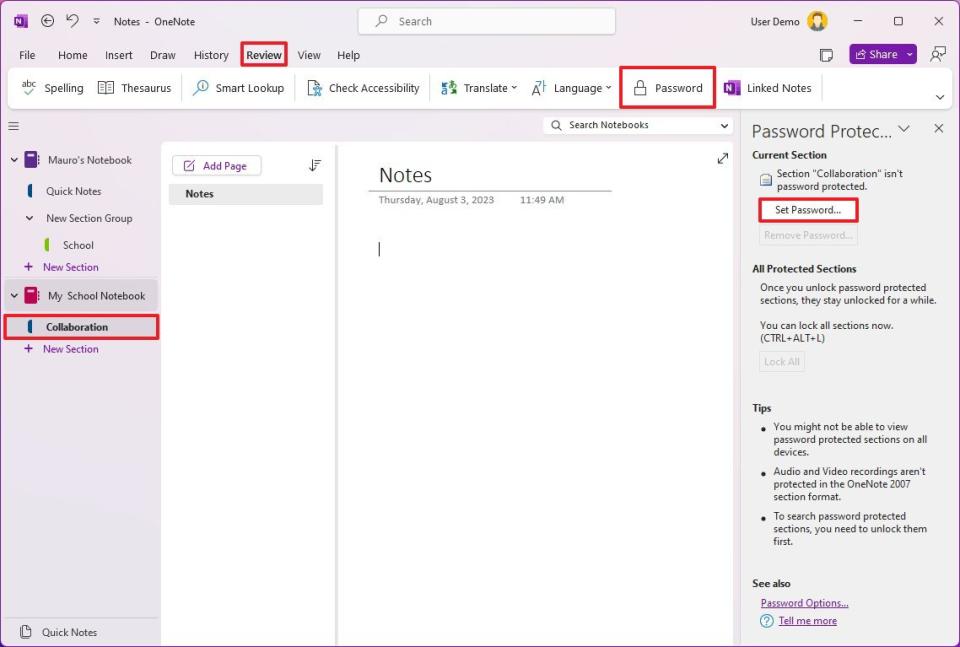
Create and confirm the password for the section.
Click the OK button.
Once you complete the steps, the section will stay unlocked for a while before locking itself. You can unlock the section by selecting the section and pressing "Enter" or clicking on the right side and confirming the password.
If you want to remove the password, you can use the same instructions, but on step 6, click the "Remove Password" button.
4. Screen capture
Windows 11 includes the Snipping Tool, but if you need to take a screenshot quickly, you can use the capture feature built-in to OneNote.
To take a screenshot to insert in OneNote, use these steps:
Open OneNote.
Open the page you want to edit.
Click the Insert tab.
Click the Screen Clipping button from the command bar.
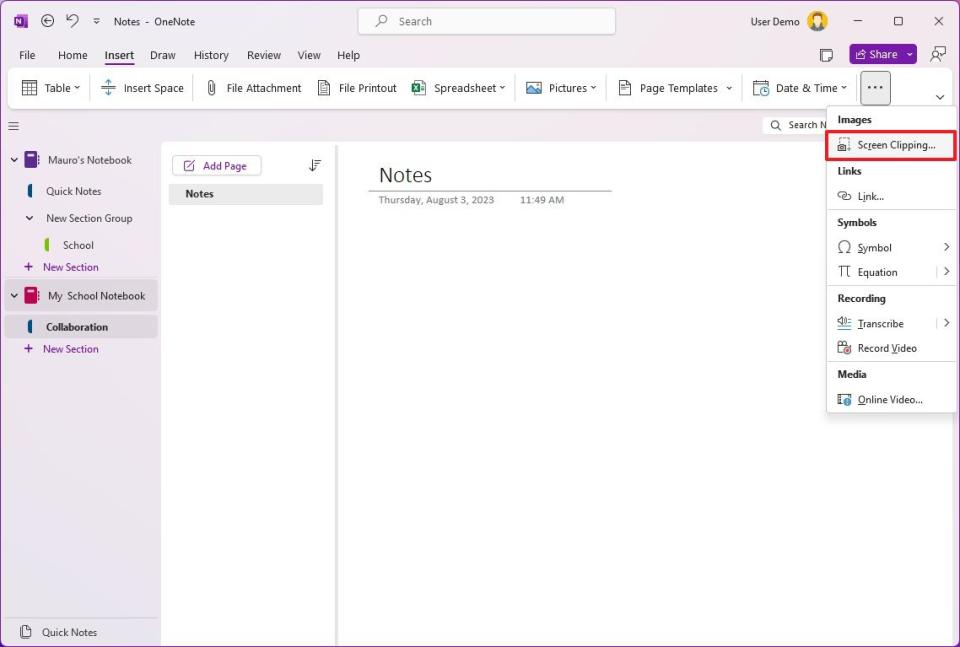
Select the region to capture with the mouse to take the screenshot.
After you complete the steps, OneNote will take a screenshot and insert it automatically into the page with the date and time details.
5. Create lists (tags)
Although you can always use other apps like Microsoft To Do to manage tasks, you can also create lists of things you need to complete within OneNote.
To create a list using OneNote tags, use these steps:
Open OneNote.
Open the page you want to edit.
Write the items on the list on the page.
Select all the items.
Choose the To Do tag.
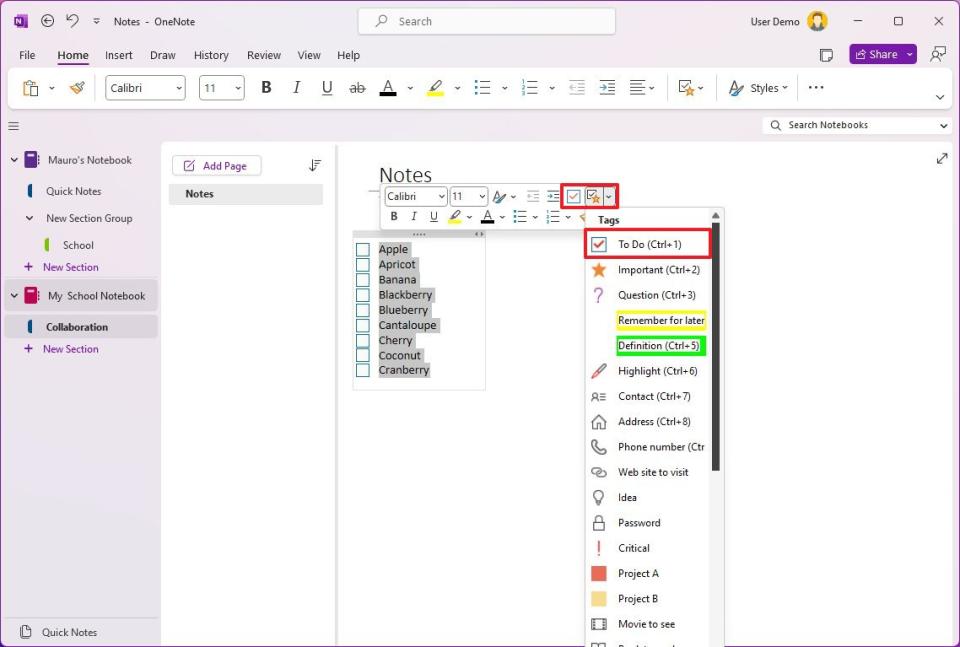
You can also find the action from the "Home" tab using the "Tags" setting and selecting the "To Do" tag. In addition, it's possible to assign other tag variants, such as "To Do priority," "Client request," "Call back," and more.
6. Recover notes
In OneNote, when deleting a section or page, it's immediately deleted from the application. Instead, it'll be placed in the "Deleted" (hidden) section for 60 days, and then it gets removed.
Sections
To recover a OneNote section, use these steps:
Open OneNote.
Select the notebook to recover a section or page.
Click the History tab.
Click the "Notebook Recycle Bin" button from the command bar.
Right-click the section and choose the "Move or Copy" option.
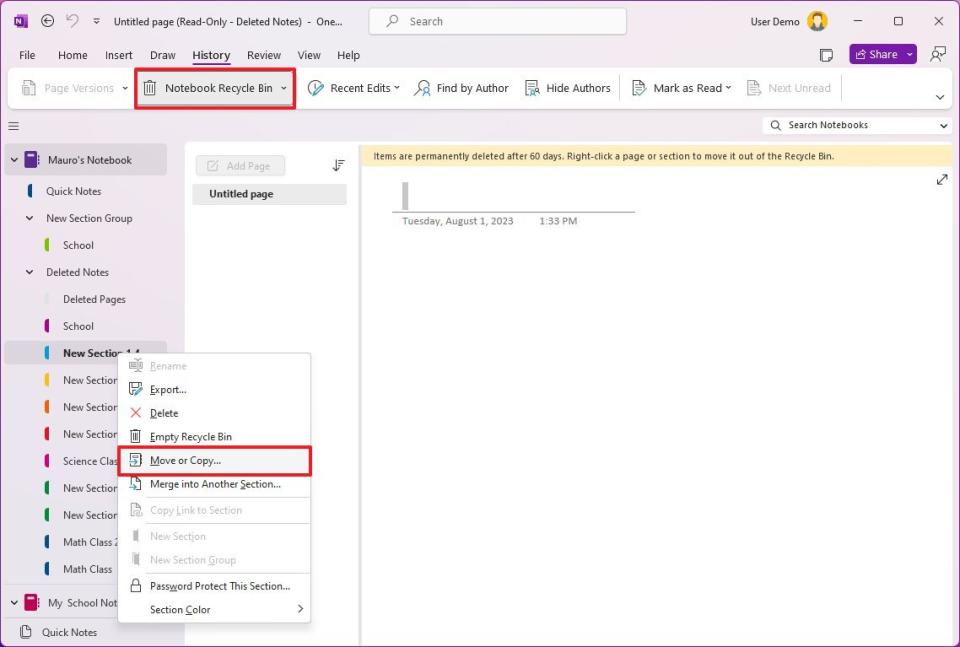
Choose the notebook to restore the section.
Click the Move button.
Once you complete the steps, the section will be restored.
Pages
To recover a OneNote page, use these steps:
Open OneNote.
Click the History tab.
Click the Notebook Recycle Bin button from the command bar.
Select the Deleted Pages group on the left navigation side.
Right-click the page and choose the "Move or Copy" option.
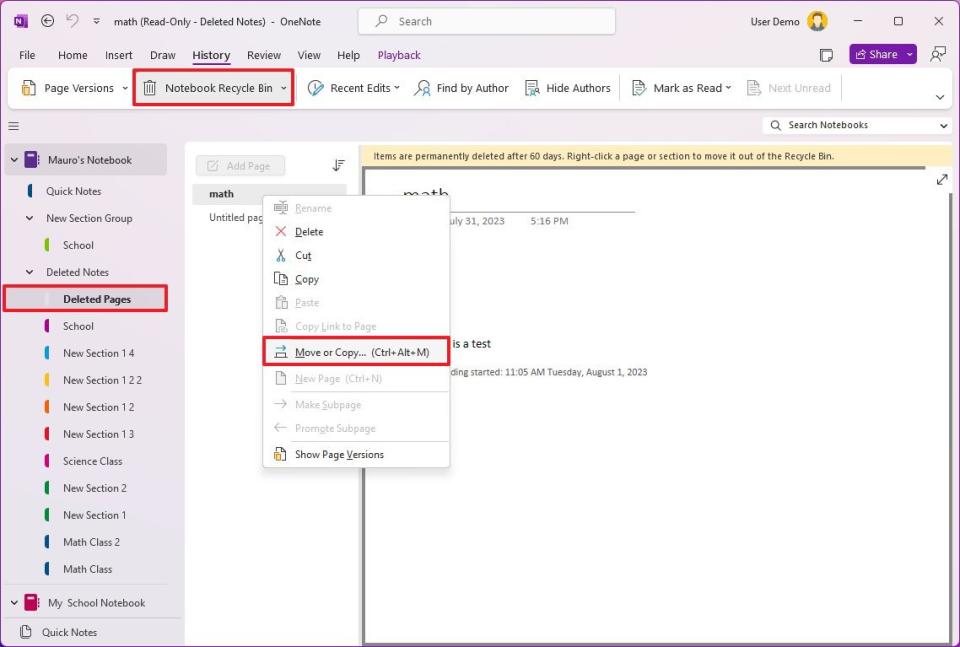
Choose the notebook to restore the section.
Click the Move button.
After you complete the steps, the page will be restored.
7. Page revisions
OneNote also keeps track of the changes made to the page with two features, including revisions and recent edits. "Revisions" allows you to review different backups of the page, which you use to extract content or
Revisions
To manage revisions for pages in OneNote, use these steps:
Open OneNote.
Click the History tab.
Select the page to review.
Click the Page Versions button from the command bar.
Under the page, review the available versions.
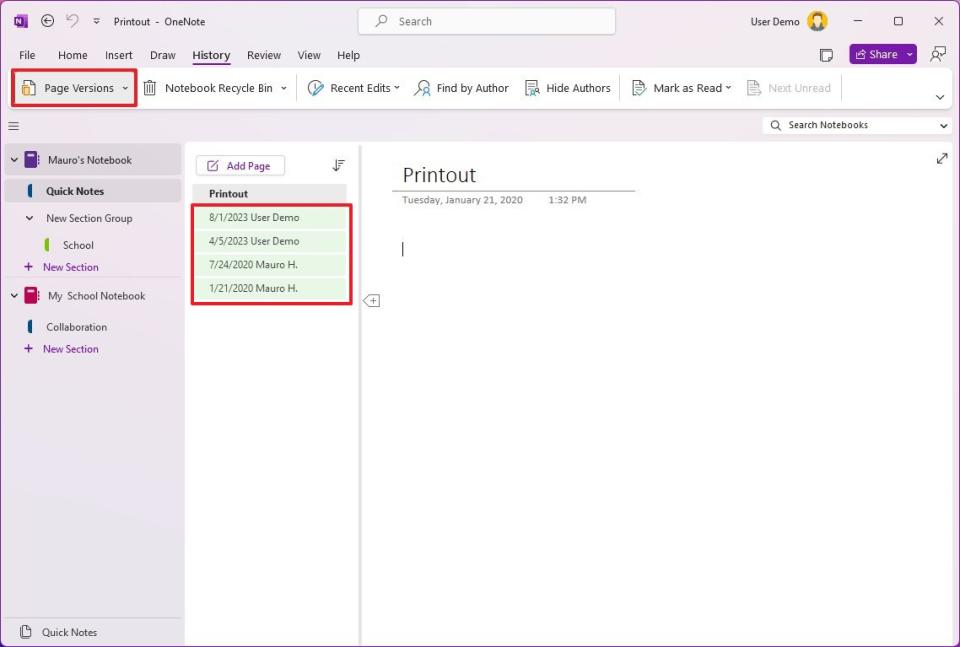
(Optional) Right-click the version of a page, and choose one of the available options, including "Restore Version" that replaces the current version or the "Copy Page To" option to restore the page as a copy.
Click the Page Versions button again to exit the feature.
Once you complete the steps, you can extract content from previous versions. You can make an older revision of the current version, or you can transform the revision into a new page.
Recent edits
To review recent edits on pages in OneNote, use these steps:
Open OneNote.
Click the History tab.
Click the Recent Edits setting from the command bar and choose the time range to review the edits.
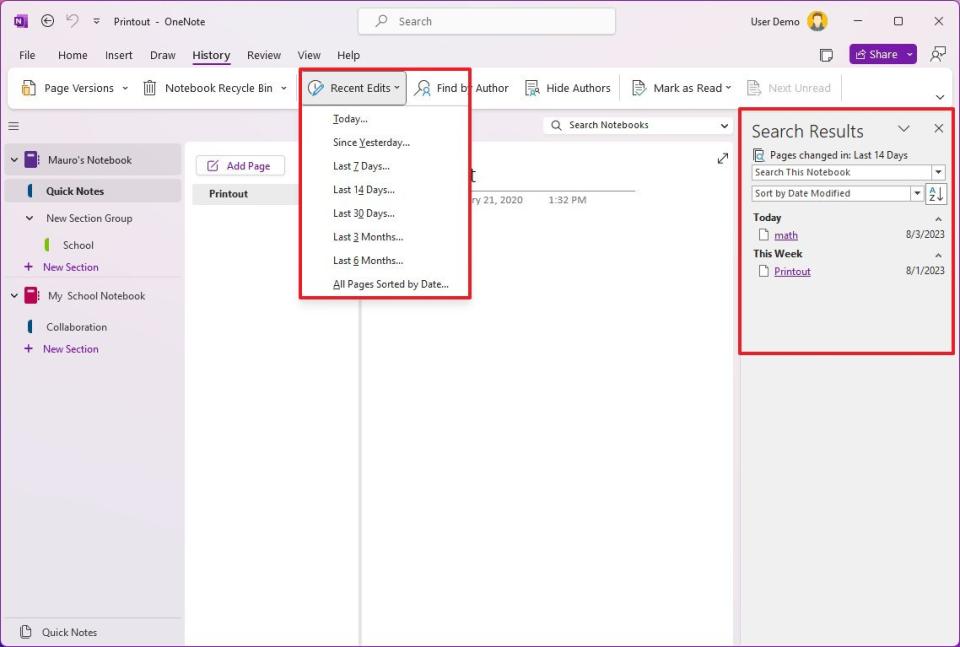
Once you complete the steps, you can browse through the different modifications made to the pages.
8. Voice and video recorder
OneNote also includes a voice and video recorder feature that you can use to record school lectures or projects. Another related feature is Voice Dictation, which allows you to write using your voice instead of the keyboard.
Voice recorder
To record voice in OneNote, use these steps:
Open OneNote.
Click the Insert tab.
Open the Transcribe setting and choose the Record audio option.
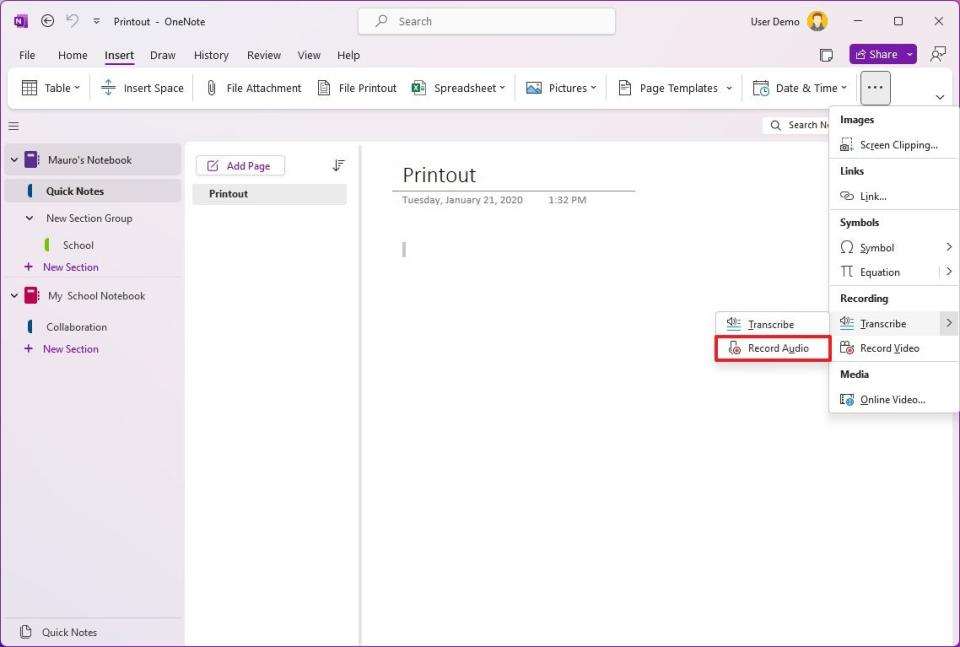
Quick note: The audio will start recording immediately.
Click the Stop button.
Select the audio track on the page and click the Pay button.
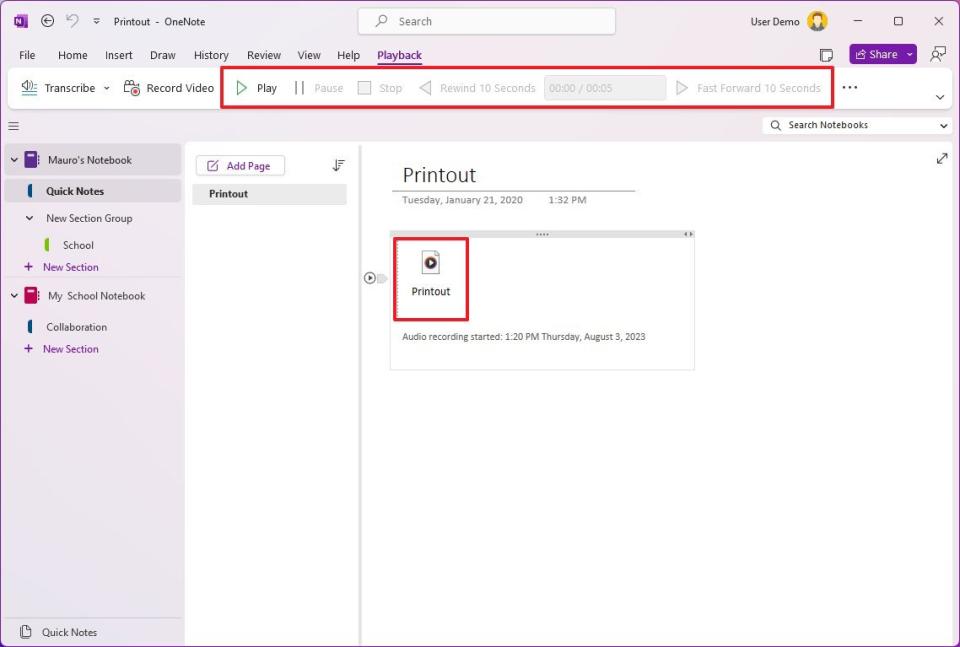
After you complete the steps, the recording will appear as a file you can play at any time by hovering over and using the "Play" button.
If you have a Microsoft 365 subscription, you can access the transcribe feature that converts audio into text.
Video recorder
To record videos in OneNote, use these steps:
Open OneNote.
Click the Insert tab.
Open the Transcribe setting and choose the Record video option.
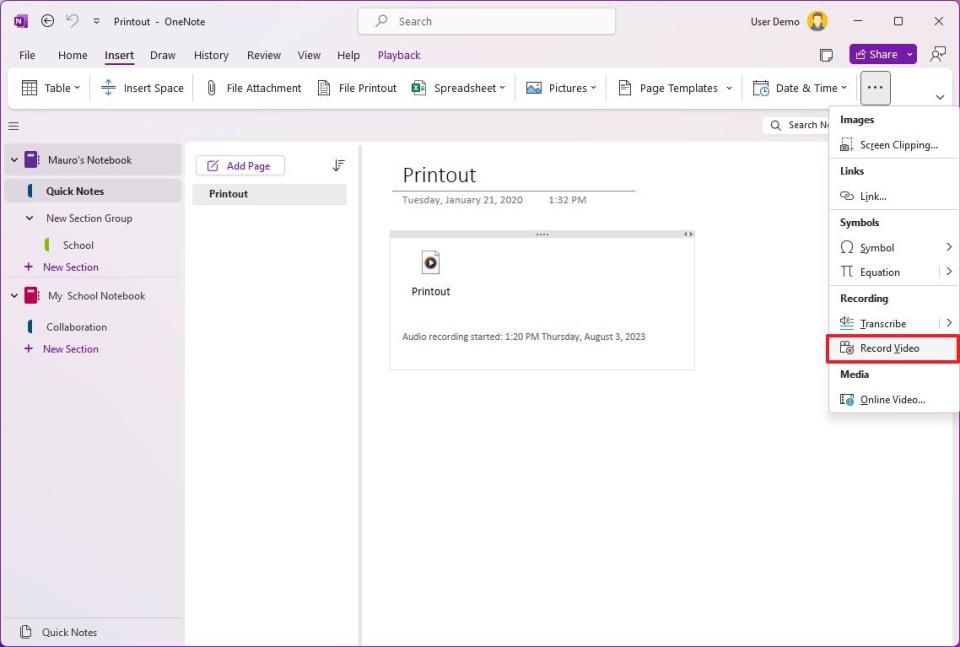
Click the Stop button.
Select the video file on the page and click the Pay button.
Once you complete the steps, the video will appear as a file on the page review anytime by hovering over and using the "Play" button.
Voice dictation
To use your voice to write instead of using the keyboard, use these steps:
Open OneNote.
Click the Home tab.
Click the Dictate button in the command bar to start the feature.
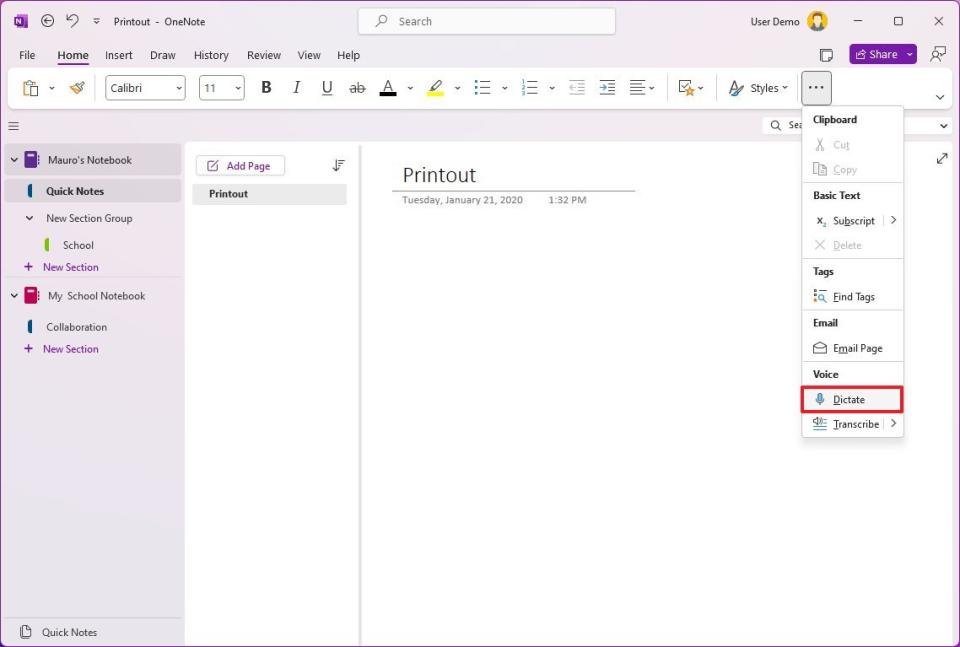
Continue with dictation.
Click the Microphone button to end the dictation.
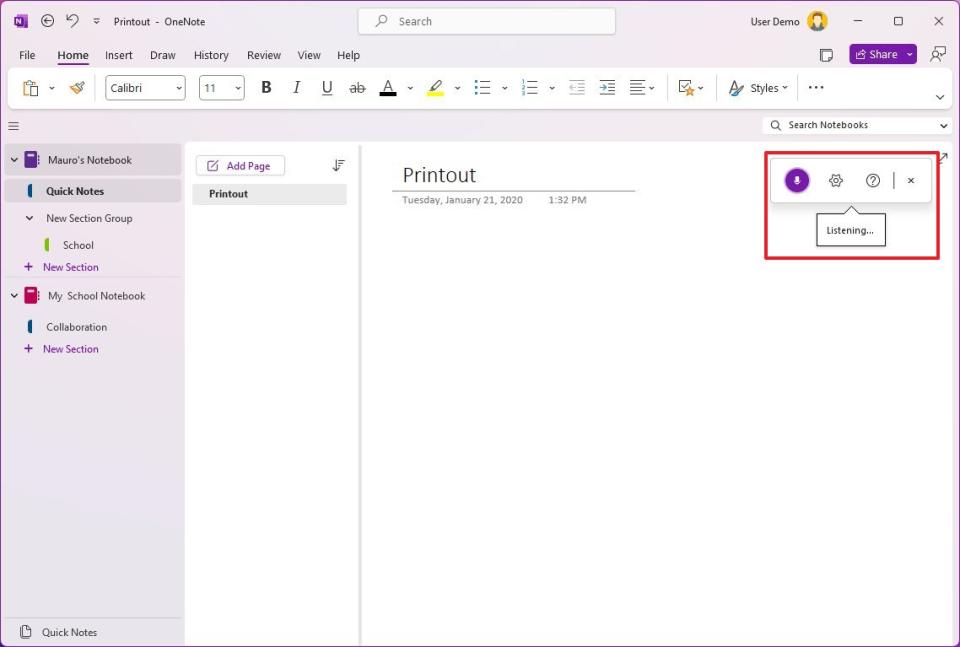
Once you complete the steps, instead of typing, you can dictate to convert voice to text.
9. Review notes
The "Review" tab in OneNote includes every feature you need to make sure that the content is free of grammar errors, some of which include Spelling, Thesaurus, and SmartLookup.
To review the contents of a page and fix grammar errors in OneNote, use these steps:
Open OneNote.
Click the Review tab.
Select the page with the notes to review.
Click the Spelling button.
Select the grammar mistake
Correct the issue from the "Proofing" sidebar.
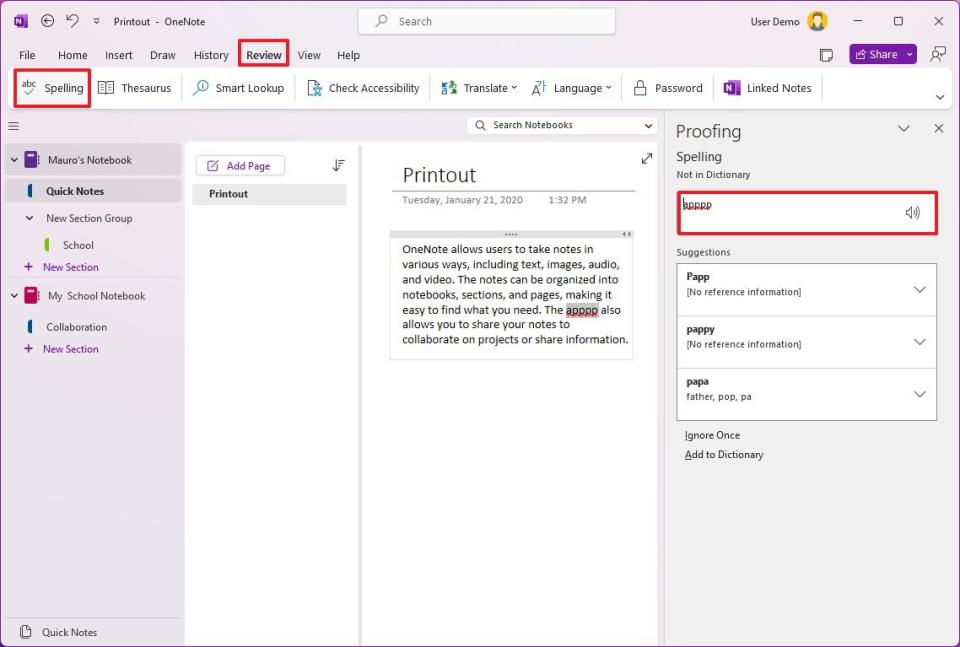
Click the OK button.
Select the word you would like to change.
Click the Thesaurus button.
Click the drop-down menu for the alternative word that sounds and fits the context and choose the Insert option.
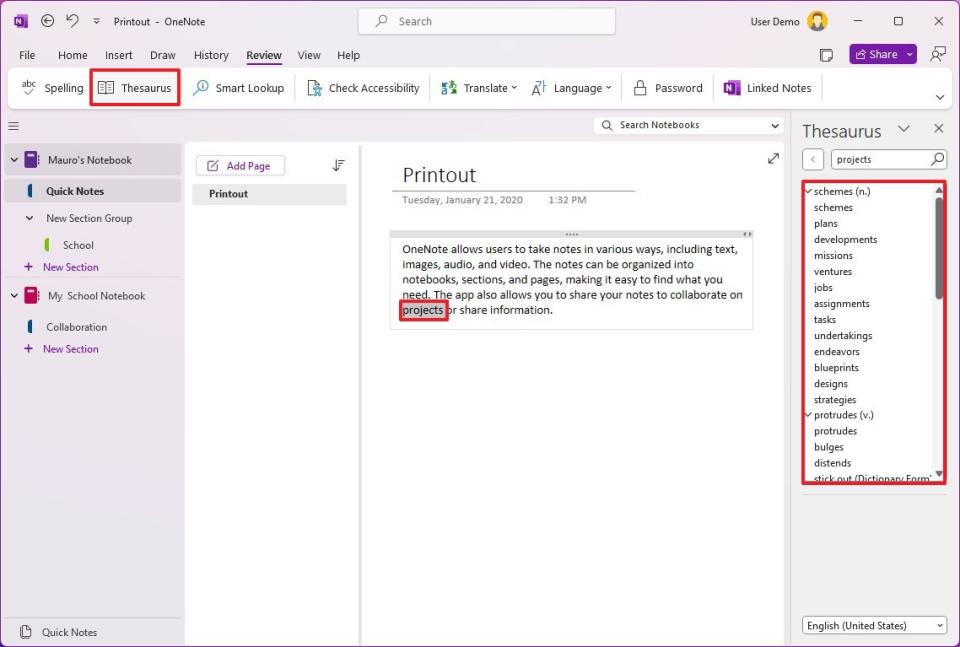
Continue optimizing the text as necessary.
(Optional) Select the word you would like to research.
Click the Smart Lookup button.
Confirm its definition and other details from the "Search" sidebar.
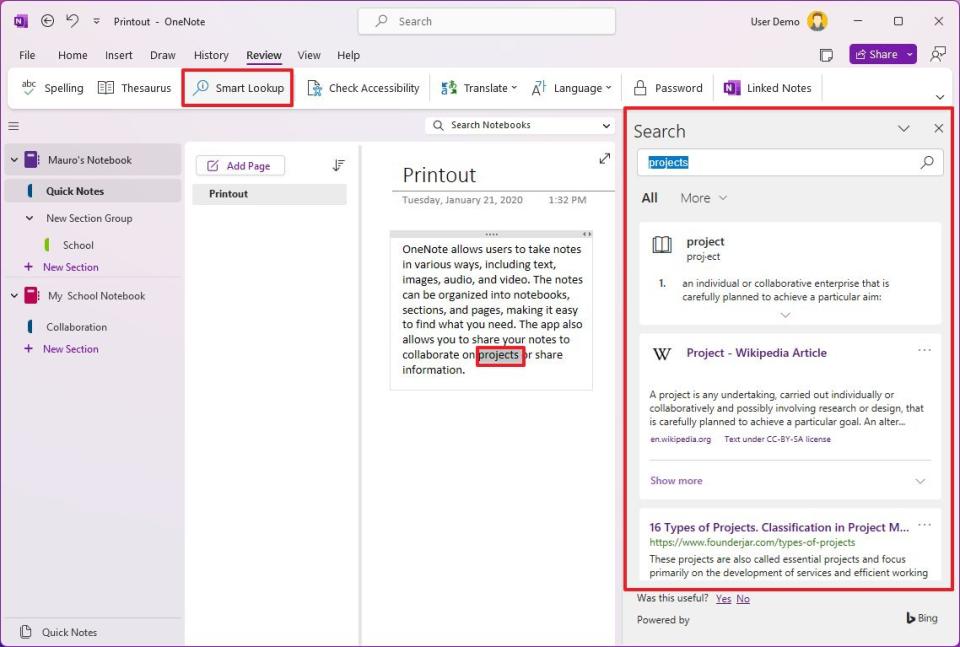
After you complete the steps, you will be able to fix grammar and spelling errors on the page.
10. Share notes
If you use OneNote, you can share notebooks with anyone. This is particularly useful when working on a school project with other people.
To share an entire notebook in OneNote, use these steps:
Open OneNote.
Choose the notebook to share with other people.
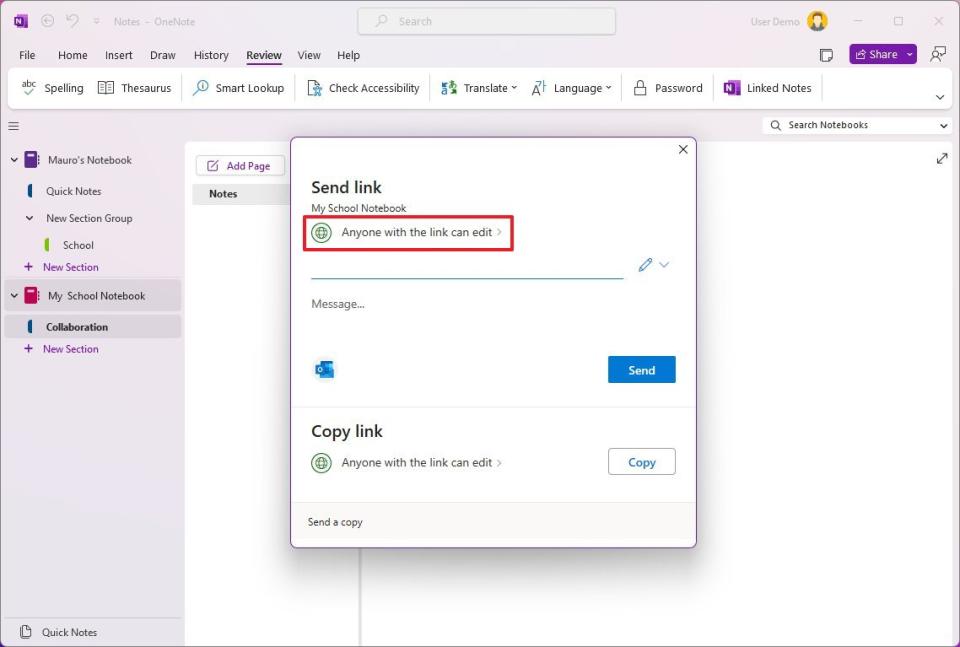
Click the Share button.
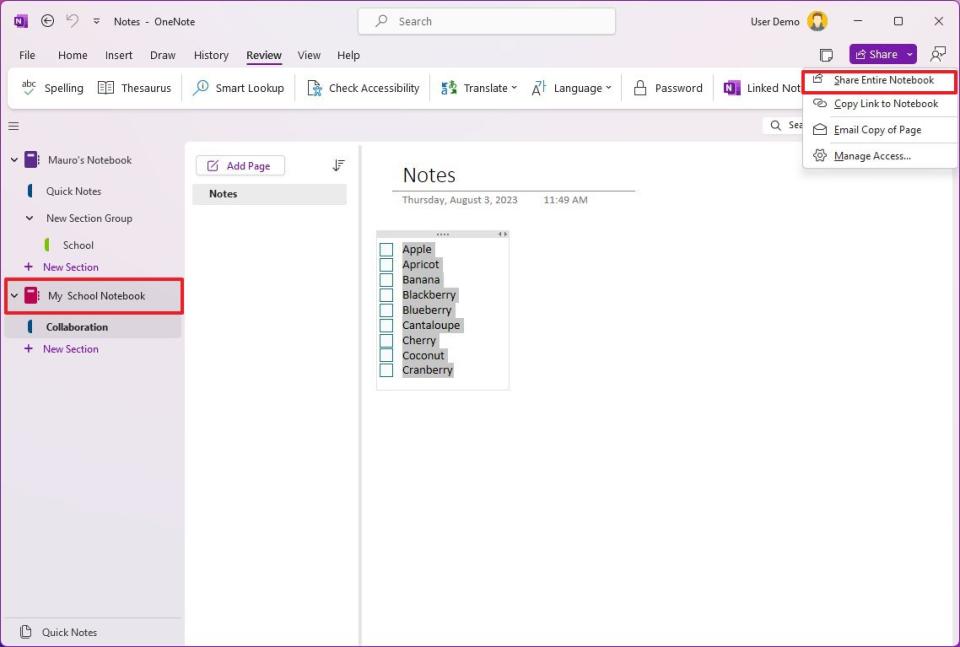
Click the "Anyone with the link can edit" option.
Choose the Specific people option.
Under the "Manage settings" section, choose the "Can edit" or "Can view" option to set the access permissions.
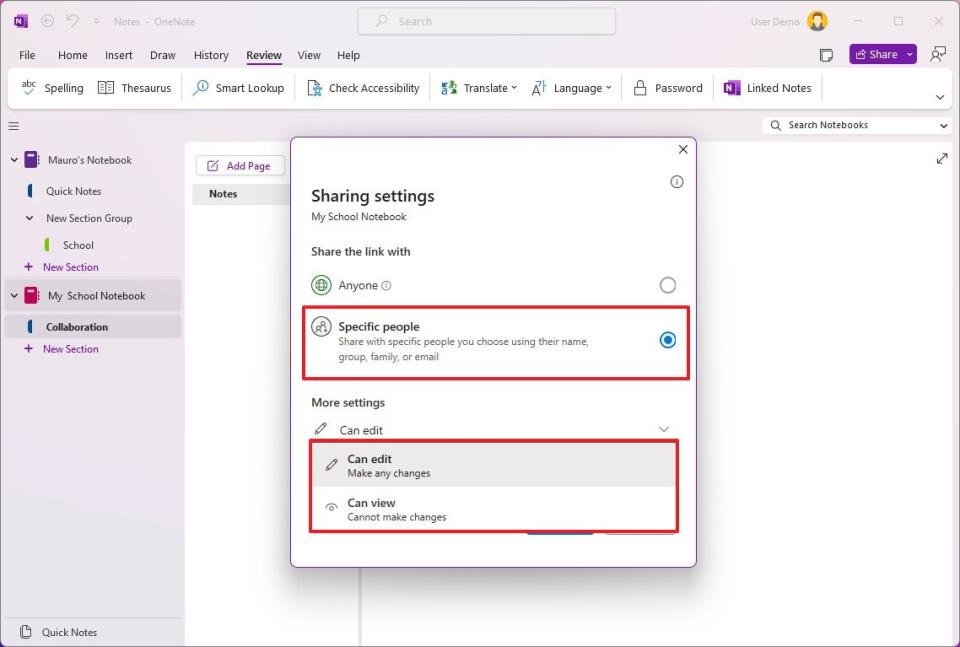
Click the Apply button.
Confirm the emails for the people with access to the notebook.
(Optional) Compose a description message.
Click the Send button.
When using OneNote, you can't share a page or section. Instead, you will be sharing the entire notebook. As a result, if you plan to share notes with other people for schoolwork, it's best to create a new notebook with the sections and pages you want to share. Otherwise, you may end up sharing personal information and other sensitive details with anyone who has access to the notebook.
More resources
For more helpful articles, coverage, and answers to common questions about Windows 10 and Windows 11, visit the following resources:

