Do This First to Guarantee Your Turkey Is Moist and Delicious
(Via ChefSteps Team of ChefSteps)
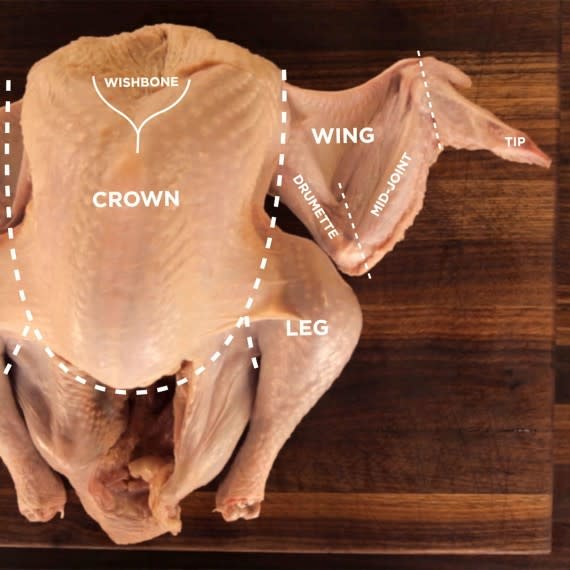
Here we show you how to butcher a turkey in order to separate its wings, wishbone, crown, and legs. It’s the key to great presentation, preserving that all-important oyster meat, and cooking a turkey that is, dare we say, perfect.
People who love food love Thanksgiving. And the key to an amazing Thanksgiving feast, of course, is mastering the perfect turkey. So what’s the secret to cooking a turkey? Here it is: When you break down a turkey and prepare white meat separately from dark, you’ll wind up with two perfect preparations. The crown (breasts) can get brined to retain juiciness, then roasted per tradition. We use the legs in a roulade, but for an even simpler approach, you can cook them whole in a sous vide bath, or turn them into turkey meatloaf. Because dark and light meat cook separately, you don’t have to worry about the breast overcooking while the legs finish up.
We demonstrate here with a turkey, which, due to its size, makes for a good demo bird. again, the method works for the little guys too. With a little advanced planning – and some elbow grease – you’ll be serving up your best holiday meal yet. Let’s get started.
Note: Once you’ve properly butchered any type of poultry, you can pretty much butcher, well, any type of poultry. Turkey, chicken, Cornish hen, pheasant – they all have the same structure, (or “morphology,” to employ a biology term). The muscle usage of a duck may differ from that of a chicken, but they still share the same parts – breasts, wings, legs, etc. – and those parts can be removed in the same way. So if you’re tired of the turkey and you want to move on to smaller, more delicate birds, you’ll already have all the skills you need.
STEP 1: PREPARE YOUR WORK STATION
To begin you’ll need a clean cutting board and a good knife (such as a chef’s or utility knife). You’ll also want to arrange a tray atop an ice bath, so you can keep butchered cuts cold as you work.
TIP: Whenever we’re butchering a whole animal, we spread out a damp kitchen towel on the counter, and place the cutting board on top of it. This holds the cutting board firmly in place as we work.

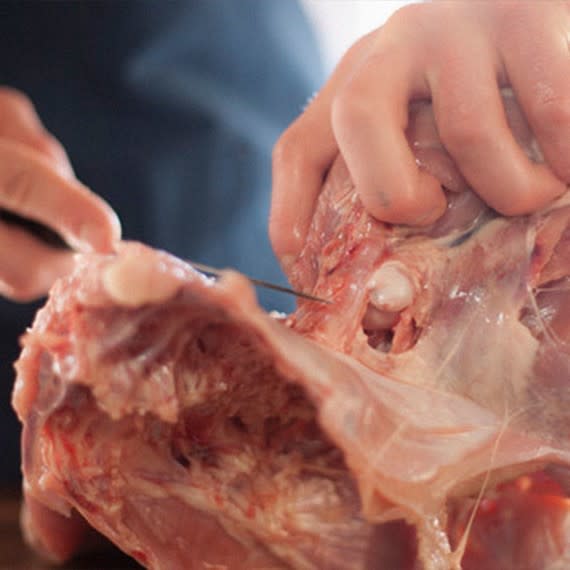
STEP 2: REMOVE THE GIBLETS
Reserve, if desired, for making gravy.
STEP 3: DRY THE SURFACE AND THE CAVITY OF THE BIRD
Using a clean towel, dry the surface and the cavity of the bird. Get that baby good and dry – it’s just nasty trying to break down a wet, slippery turkey.
STEP 4: REMOVE THE WINGS
Poultry wings are typically broken down into three parts: the tip, mid-joint wing and drumette. We remove the first two, leaving the drumette attached. This way you can opt to serve two “airline breasts” (breasts are separated from one another and served with drumette attached) or a roasted crown (breasts stay attached and are presented as a centerpiece) with Frenched drumettes.
To butcher the wings, use your finger to find the the knuckle joints. Once you’ve identified those, slice through the joints with a knife – the slight resistance you will feel should be collagen, not bone, and you should be able to cut through easily.
Reserve pieces on ice. Wing tips contain lot of collagen, making them ideal for creating stocks.
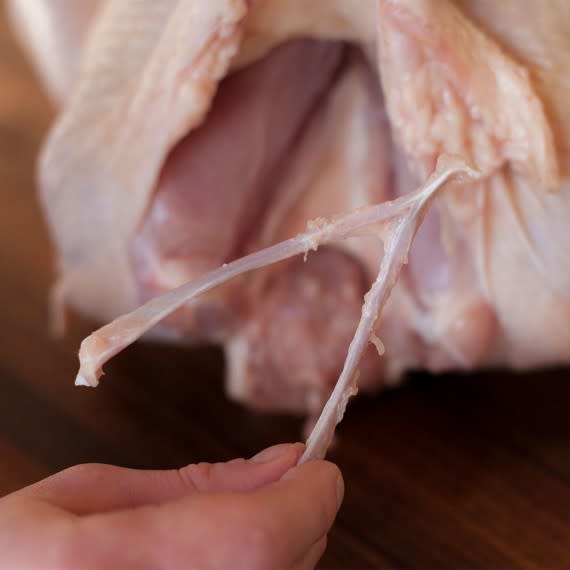
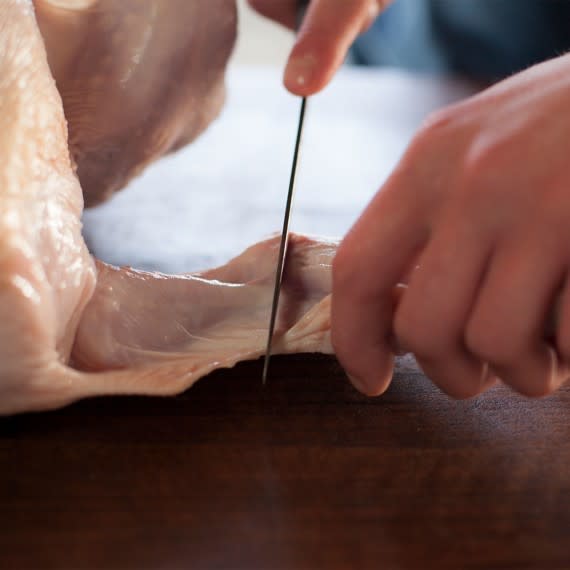
STEP 5: REMOVE THE WISHBONE
Lay the bird on its back. Gently lift up the skin at the top of each breast where it meets the neck; you should see faint lines around the length of the wishbone. Use these to guide your knife as you slice along the length of the bone all the way down on both sides.
Now, use your fingers to pinch around the bone and pull it outward to remove. The amount of force required to remove the wishbone will differ from bird to bird. They’re easy to remove on quail, game hens, and chickens. Turkey wishbones, however, may take a little effort.

STEP 6: REMOVE THE CROWN
Lay the bird breast-side up with its legs facing you. Slice through the skin where the legs meet the underside of the breast, near the rib cage. You want to cut as far away from the breast as possible because as the breasts cook, the skin will tighten; if you cut too close to the breast you won’t have enough skin to cover the breast when you serve it.
Just below the rib cage, slice down the length of each side. Pop both legs out of their sockets so they lay flat on your cutting board.
Use a knife or kitchen scissors to separate the crown from the legs at the spine.
Reserve crown over ice.

DON’T FORGET: CONSIDER THE OYSTER!
The oyster is a lump of dark meat located on the back of the bird, near the top of each thigh. Far too often this little treasure is left behind when poultry legs are butchered. Why does this matter? Well, a lot of people say the oyster is the most flavorful, tender piece of all. These people know what they are talking about. Read on for the best way to ensure that your bird gets butchered with oysters intact.
STEP 7: REMOVE THE LEGS
Flip the bird over so that the legs are facing down on your work surface.
Prep oysters: At the top of each thigh, where it meets the spine, you will feel a lump of meat – that’s the oyster! Gently use your knife to cut a slice down the spine, cutting through only the skin. At the top near the oysters, carefully peel skin back until you start to see the oyster muscle. Now, slice along the bone on the upper right side of the left leg. Use your fingers to help pull the oyster meat away from the spine. Remember you are not removing it all the way at this point, you are setting it up so it comes off with the leg. Repeat on the right leg.
To remove the legs, push from the back of the bird until you see the bone in the joint break through the skin. This will happen easily, so be careful. Beginning at the top of the thigh, near the oyster, slice along the bone until the leg separates from the carcass. Reserve chilled.
Note: Don’t trash that leftover carcass – it’s great for stock.
STEP 8: ADMIRE YOUR HANDIWORK
Dang, look at those lovely turkey pieces! That’s the trick to cooking a turkey. Happy Thanksgiving!
More from Martha Stewart:
20 Classic Comfort Food Recipes from Martha Stewart
36 Dinners You Can Make in Just 15 Minutes!
42 Slow-Cooker Recipes Worth the Wait
DIY Dried Fruit Granola Bites
Very Green Cucumber and Pear Juice
