What's the Deal With Cast Iron Pans?

Cast iron. It’s one of the oldest types of cookware around, and also one of the most misunderstood. If you’ve never used it, cast iron can seem finicky and temperamental — intimidating, even. That and the cookware can range from super cheap to insanely expensive, with manufacturers varying from large-scale producers (US-based Lodge has been manufacturing in America since the 1890s, though most mass producers are foreign) to small boutique foundries. Cast iron can be found everywhere from cooking stores to large supermarkets, even hardware stores; not to mention garage sales, second hand stores and perhaps even your grandmother’s kitchen.
So is cast iron worth it? That depends on your needs and cooking preferences. If you’re looking to sauté, sear or pan-fry, you can’t do much better than cast iron. Baking or roasting? Cast iron works wonders. Frying eggs, cooking steaks and burgers, pancakes or perfecting your grilled cheese sandwich? It’s hard to find a better cooking base than cast iron. I love to call it the original “non-stick pan.”
“There’s nothing mysterious about cast-iron,” says Rachael Narins. “It’s not super high maintenance. It may be different than what you’re used to, but it’s a really versatile, usable pan.” Narins, culinary educator, founder of Chicks with Knives and author of two cast iron cookbooks, is a devoted fan.
“It’s another object in your own life, but none are out of the realm of possibilities,” she continues. “You wipe your iPhone down every once in a while and you charge it and keep it away from water. So with your cast iron, you season it once a year and you don’t use harsh, abrasive cleaners on it. And you make sure it’s dry before you put it away.”
Probably the first thing you will notice when cooking with cast iron is that it actually takes a while to heat up, a surprise to many cooks new to it. Unlike other metals such as aluminum, iron does not conduct energy such as heat well, and so heating the cookware takes patience. But that patience is worth it. Once a pan is heated, it retains the heat much longer than other metals, radiating it onto food. It provides a surface perfect for searing meats and leavening breads or other baked goods, giving the foods a crunchy crust and rich caramelization. Which makes it a classic for many comfort food dishes.
“My latest cast iron cookbook is about cooking for two,” says award-winning food and travel author Joanna Pruess. “It covers two things. By virtue of quarantine, we’re cooking for smaller numbers, and we’re craving comfort food. A cast iron pan can do almost everything you need far more than you’ve ever imagined.”
So, what exactly is cast iron cookware?
Cast iron cookware — whether pans, griddles or Dutch ovens — is cookware produced by pouring molten iron into individual sand molds. The composition and quality of iron will vary by manufacturer, and this composition can affect the weight and quality of the finished cookware.
Because it is cast in sand molds, the cookware will start with a textured, grainy surface. In the past, many manufacturers — including notable names such as Griswold, Wagner and Lodge — ground the cookware after casting to smooth out the surface area. But grinding is a laborious and time-consuming process, and many manufacturers stopped it around the time cheaper imports (not ground) began flooding the markets.
The preference for whether a pan is smooth or textured varies by cook.
Mark Kelly, former public relations and advertising manager for Lodge, said in an earlier interview that grinding actually inhibits the seasoning process.
“From a functional standpoint, it’s my contention that the grit — having the texture — gives the seasoning a better grip,” says Narins.
Other cooks prefer a smooth surface, arguing that grinding actually “opens the pores” of the iron, allowing the seasoning to soak in for a better seal. Having collected and used both types over the years, I prefer the smooth, ground surface for its ease of use and cleaning, though I have noticed a textured pan seems — and this my own observation and not scientific — to carry more of the pan’s essence and flavor into a dish. Needless to say, I love both.
How to season a cast iron pan
“Seasoning” a pan involves coating the pan with a layer of fat, then heating the pan slowly over time so the fat dries and forms a protective layer. Historically, this involved coating the pan with lard, other animal fat, or shortening; many cooks have come to coat their pans with high-heat oils, such as vegetable, canola or flaxseed.
Seasoning the pan prevents it from corroding (read: rusting), and, over time, gives the pan its slick surface. “You season [the cookware] by rubbing it with oil and baking it. People say it's nonstick, but it’s actually that the oil has changed enough it’s really plasticized, a natural resin. You’re actually polymerizing the molecules,” says Narins.
“The polymerization process seals the molecules together layer upon layer” over time, adds Pruess.
Many pans and other cookware, such as that produced by Lodge, come pre-seasoned. But it never hurts to give them a little extra love before using, and seasoning well as you own them.
“Even if your pan says it’s pre-seasoned, I would always start cooking things that are fatty,” says Pruess. “Don’t put your eggs in there right away. I’d put some bacon in there. I’d put meat in there. Coat it with extra fat. Even if it says it’s pre-seasoned, without knowing the brand or what you’re buying, I’d do this as a preemptive strike” to prevent sticking and prepare your cookware.
If your new pan is not seasoned, or you’re unsure if there is any coating, wash the pan first, scrubbing it with soap under warm running water. Then dry completely. After this, just to be sure the water is evaporated, heat the pan (or other cookware, including lids), gently over a stove-top burner to make sure it is dry.
Coat the pan with a light layer of fat, be it oil, animal fat (such as rendered duck fat or bacon grease) or shortening (your grandmother may still swear by that, and we don’t want to rock the boat). Place the cookware in a 350-degree oven for an hour or two to season, making sure you have a foil-lined rimmed baking sheet on a rack underneath to catch any dripping fat.
The first time you season, you’ll notice your pan will take on a slightly darker, golden tint. Over time, as you continue to use the pan and season, the pan will darken, until it achieves a blackened surface.
And as you continue to use your pans and other cookware, you’ll notice that their nonstick abilities improve, taking in and lending flavoring over time, almost as if they have a memory of the recipes they’ve carried.
How to clean a cast iron pan
As for cleaning, there are various methods for removing food or grime from cast iron. When my family would camp growing up, my father would take some coarse dirt or sand from the campsite and use it to scrub the pan, loosening any food particles before rinsing, drying and oiling. When I was in cooking school, we used a similar — if slightly more sanitary — method by scrubbing our cookware using coarse salt. At Chef Prudhomme’s test kitchen, staff would use a damp scrub brush or sponge to remove any residue.
Regardless of your method, find something abrasive that can remove the dirt — but is not soap (which can eat away your seasoning) — without removing the seasoning. First, wait until the cookware is cool, then scrub, placing the pan under warm or hot running water if needed. Once the residue is removed, dry the cookware completely using a towel. Place the cookware over the gentle heat of a stove-top burner to make sure it is dry and to warm it up. Then wipe with a thin, fresh coating of oil or fat all over, including the handle. Afterward, set it aside to cool completely. I liken the process to removing make-up: clean your face first (but don’t use anything too harsh), then dry properly, open the pores, and moisturize.
Because the seasoning can carry flavor (particularly if, like me, you cook a lot of steak and bacon), Narins recommends investing in a few different pieces to cook specialized items, be it fish, vegetarian recipes, or baked goods.
Properly cared for, cast iron cookware can last for centuries. My favorite pan is a Griswold skillet from the 1930s I found in a thrift store in Northern California years ago. It was in sorry shape with rust and some sort of scum, but had no cracks or pits. Over time, I was able to restore it and eventually found a complimentary lid, which I also restored. The pan can usually be found on my stove-top at home (unless I’m camping and take it with me), and is used at least two to three times a week. I would swear it carries decades of cooking memories, and improves the flavor of my food.
Where to find great cast iron pans
No matter your price point, if you have interest, you will find cast iron cookware that fits your budget. Generally, price varies depending on the type of cookware and brand. If you think about it, cast iron is actually reasonably priced compared to other types of cookware and noted brands.
If you’re searching for something new, look for a reputable brand, and try to buy American as domestic manufacturers have to follow standards for composition and production, meaning you will probably get better quality.
And don’t reject you may find at a garage sale or inherit. Many collectors believe the quality of vintage cookware is actually superior to what you can find today. David G. Smith, author of books on collectible cast iron and known as "The Pan Man" in collector’s circles, once told me that a bread pan that sold locally for $87 later went for $25,000 at a high-end auction.
If, like me, you come across a vintage piece of cast iron cookware in less than stellar condition, it’s not hard to restore it. Methods vary, and you can look them up online, often with videos. One common method I use is oven cleaner: Place the rusted or grimy cookware in a large heavy-duty trash bag and spray a generous coating of oven cleaner over the entire surface. Seal the bag (this keeps the oven cleaner moist so it can continue to work) and leave the bag alone for two to three days to give the cleaner time to work away at the rust and grimy coating. Then check the cookware. If the bad coating isn’t completely softened, spray again and leave the cookware for another day or two.
Once the grime or rust is softened, place the cookware under warm running water and scrub using a brush or sponge to clean the pan to its original finish. Dry the piece well, then season as you would any other cast iron cookware. Voila.
What to look for
If you are buying cast iron, be it new or vintage/second-hand, here are a few things to look for:
Examine the quality of the piece. It should have consistent thickness, without cracks or pitting (dips or rivets in the iron).
Avoid swirls in the metal, as this is a sign of poor casting.
Even if it comes “seasoned,” season again. Cast iron will never suffer from too much love.
If you come across a used piece, don’t be scared off. Even if it’s been neglected or begun to rust, it can be saved so long as it’s not damaged.
A lot of older pans and cookware are lighter by weight owing to the composition of the iron used, and many newer pans and pieces are heavier. Be sure to buy one you can hold and carry; it does you no good if it’s too hard to use.
Forgiving as cast iron can be, there are a few things to avoid if you want a long and prosperous relationship:
Never run a hot pan under water. This will crack the pan, ruining it.
Don’t drop the pan. This could break the pan, as well as your toes, or anything else it may hit.
Never run cast iron through the dishwasher.
Don’t store food in cast iron. Every time you cook with it, the food will absorb a little iron from the pan. Storing food will cause too much iron to leach into the food, ruining the seasoning and causing the food to taste metallic.
Be careful cooking acidic foods (tomato based, wine, etc) as this can leach iron from the pan and actually ruin the seasoning and pan itself over time.
Pans will pick up, or “remember,” stronger flavors, so keep keep separate fans for things like cooking fish/cakes, etc.
Types of cast iron pans
If you’re interested in cast iron, Doris Mosier, longtime vintage cast iron dealer, noted in an interview with me years ago that most of her customers were in the market for a skillet, griddle and Dutch oven. Here’s a breakdown of the most popular pieces:
Skillet
Also known as a frying pan, this pan has a wide cooking surface with low angled sides that often have drip spouts on the sides and a handle. It’s perfect for sautéing, searing, baking and pan-frying.
Griddle
This is a flat pan with a wide cooking surface for cooking burgers, grilled cheese sandwiches, pancakes, fried eggs, hash browns and more. It is also good for searing steaks and other meats. The very shallow sides hold in fat that may drain from the food, and it often has drip trays for collecting excess liquid and fat.
Grill pan
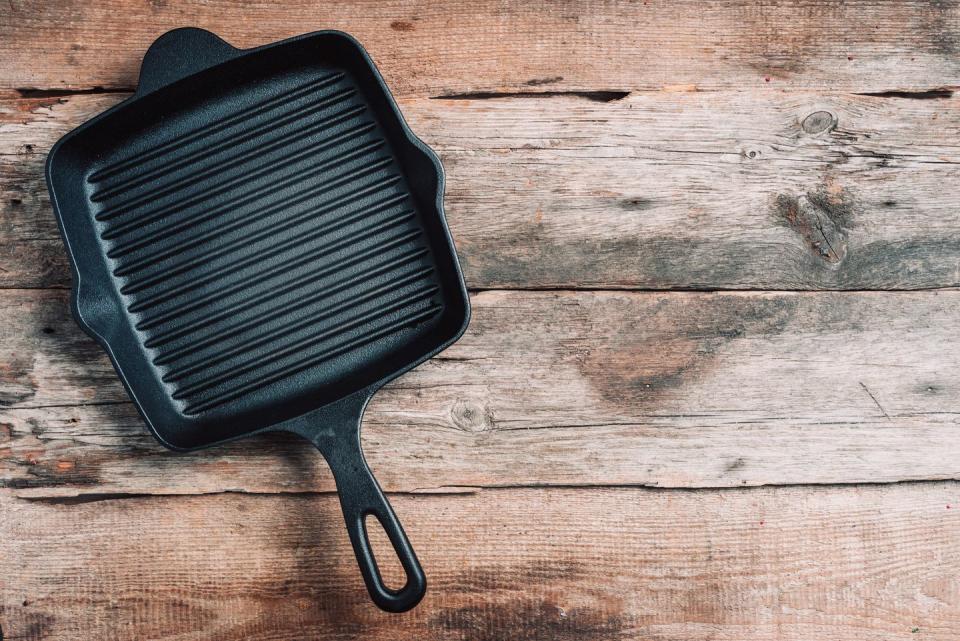
A skillet or griddle with a ribbed surface to give grill marks to whatever is being cooked or seared, with dips to drain excess fat. This could be part of a skillet or may be part of a griddle (flat surface on one side and ribbed on the other).
Dutch oven

This is a deep pot with a tight fitting lid. Also called a casserole pan. Some Dutch ovens come with legs and lips around the lids for cooking outdoors (coals are placed under the oven and over the lid to distribute heat evenly to whatever is cooked or baked). It’s perfect for cooking roasts, stews, casseroles and deep-frying.
“What’s so appealing to me is that it’s beautiful, it’s functional, it’s historical. It’s eco-friendly, and everything you want in a pan,” says Narins. “I love that it’s Americana, that image of the chuckwagon and the people cooking on actual cast iron on wood-burning stoves and how important that was to the development of the West.
“There’s so much history in each pan, and then you build your own history into it.”
Recipes for your cast iron pan
Homey Oven-Roasted Chicken Thighs and Legs with Pan Gravy
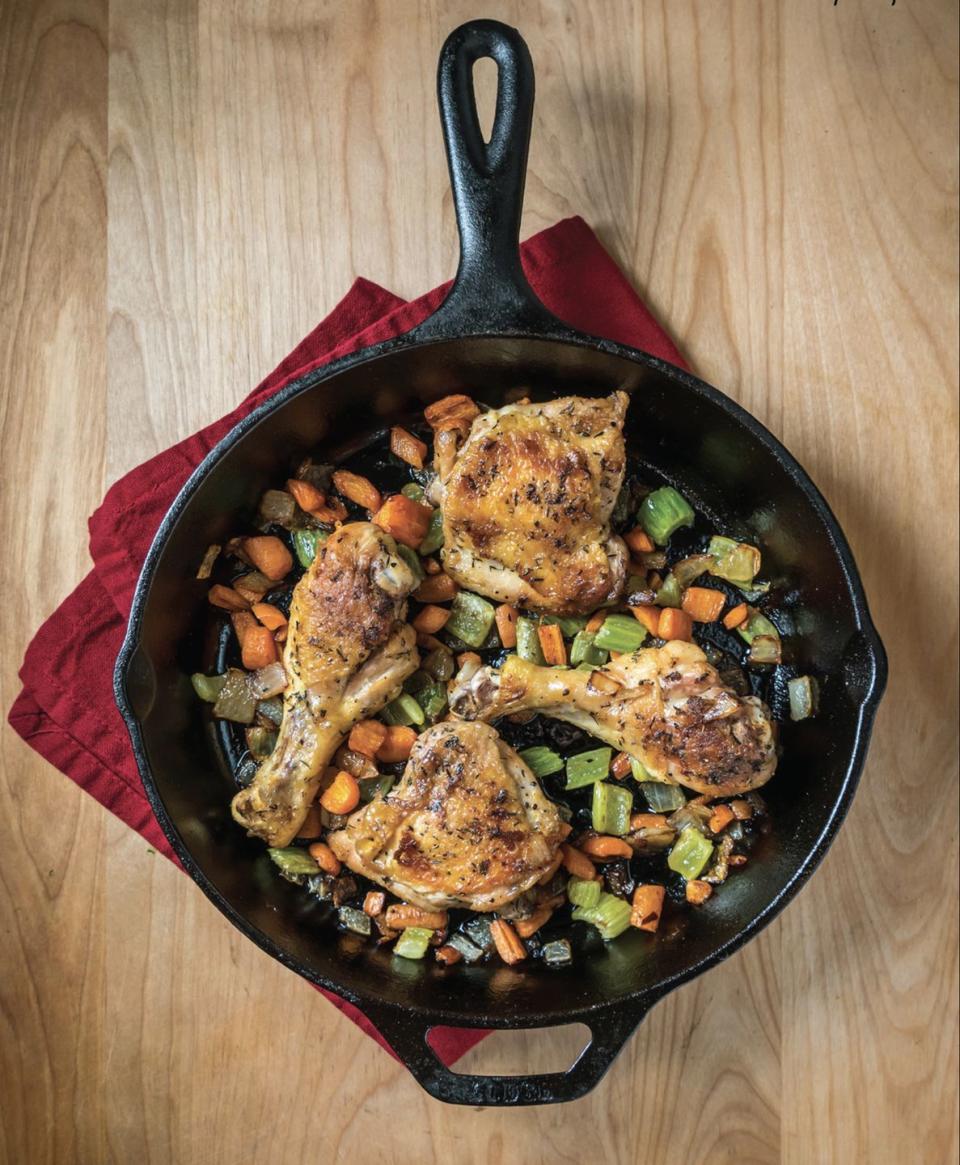
“This delectable chicken roasted in a deep or regular 10-inch cast-iron skillet is the epitome of easy comfort food. A cup of aromatic vegetables are browned along with the chicken and then puréed with some broth and lemon juice into the delicious home-style gravy. Serve with mashed potatoes for more old-fashioned goodness.” — Joanna Pruess
About 1 hour. Serves 2
Ingredients
1 teaspoon kosher salt or sea salt
½ teaspoon dried thyme leaves
½ teaspoon freshly grated lemon zest, plus a few drops freshly squeezed lemon juice
⅛ teaspoon coarsely ground black pepper
Canola or other vegetable oil
2 legs-thigh combinations (about 1½ pounds), separated, excess fat and skin trimmed, and blotted dry
⅓ cup diced carrots
⅓ cup diced celery
⅓ cup diced onion
½ cup chicken broth
½ teaspoon Worcestershire sauce
Chopped flat-leaf parsley, to garnish
Directions
1. Preheat the oven to 350°F. In a small bowl, combine the salt, thyme, lemon zest, and pepper.
2. Heat a 10-inch cast-iron skillet over medium-high heat until hot but not smoking. Brush with a little oil, add the chicken, skin-side down, and cook until the skin is crisp and lightly browned and the pieces easily move in the pan, 6 to 7 minutes. Season with half of the salt mixture and scatter the vegetables in the pan.
3. Turn and cook the second sides until browned, about 3 minutes. Add remaining seasonings and transfer to the oven to roast until done and the juices run clear when the thigh is pricked deep in the flesh without touching the bone, about 30 minutes. Remove the pan from the oven, transfer the chicken to a plate, tent with foil, and keep warm in the oven.
4. On top of the stove, pour the chicken broth into the skillet, bring to a boil, and scrape up the brown bits from the bottom of the pan. Transfer to a mini food processor and purée until smooth. Add the Worcestershire sauce and lemon juice to taste and pulse to blend. Divide the chicken between two plates or leave on a platter. Serve with the gravy and garnish with a little parsley.
Note: Adapted from a recipe by Joanna Pruess in her book Cast-Iron Cooking for Two: 75 Quick and Easy Skillet Recipes.
Lemon-Blueberry Clafoutis

“A clafoutis is a puffy, custardy, fruit-filled pancake that is a classic French dessert. Most often they are made with cherries, but one of my favorites is with blueberries with a citrusy hint of lemon. Some people like them with a fairly thick layer of custard, but I prefer them more like a pancake with the berries just embedded and a slightly crunchy bottom from melted sugar. Serve it warm, straight from the pan either for brunch or dessert. It takes minutes to make.” — Joanna Pruess
About 30 minutes, plus resting time. Serves 2
Ingredients
4 tablespoons granulated sugar, divided
3 tablespoons all-purpose flour
Pinch of salt
1/3 cup whole milk
1 large egg
1 teaspoon lemon juice
1/2 teaspoon grated lemon zest
1 tablespoon unsalted butter
1 teaspoon light or dark rum
1 cup blueberries
Confectioners’ sugar, to garnish
Sour cream or crème fraîche, to garnish
Directions
1. Place a 10-inch skillet in the oven and preheat to 425°F. Let it heat for 10 to 15 minutes.
2. Meanwhile, in a medium bowl, stir 3 tablespoons of the sugar, the flour and salt together.
3. In a separate medium bowl, beat the milk, egg, and lemon juice and zest until blended; whisk them into the dry ingredients until completely smooth.
4. Carefully remove the skillet from the oven. Add the butter, swirl until melted, add the remaining sugar and rum and boil briefly until melted. Add the blueberries and shake until they evenly cover the bottom of the pan. Turn off the heat.
5. Pour the batter over the berries and transfer the skillet to the oven. Bake until the edges are richly browned, the pancake is slightly puffy, the berries are bubbling, and a knife inserted in the center comes out almost clean, 11 to 12 minutes. Remove and let stand for 10 minutes, dust with confectioners’ sugar and serve with a dollop of sour cream or crème fraîche.
Note: Adapted from a recipe by Joanna Pruess in her book Cast-Iron Cooking for Two: 75 Quick and Easy Skillet Recipes.
Tzimmes with Seitan

“Tzimmes is the Yiddish word for a big fuss," Rachael Narins writes in her book, Cast-Iron Cooking: Recipes & Tips for Getting the Most Out of Your Cast-Iron Cookware. "It's also the name of this beautiful autumnal stew that comes together perfectly in your cast iron skillet or Dutch oven. Typically, the recipe is made with meat, but this version uses seitan (a meat substitute made of gluten) to make it vegan. Serve this stew with corn bread, brown rice, or buttered noodles. This is terrific warm, room temperature or cold. It will keep in the refrigerator for up to four days.”
About 12 minutes. Serves 4 to 6
Ingredients
1 tablespoon olive oil
1 medium red onion, large dice
3 large carrots, peeled, cut into large dice
2 cups (about 8 ounces) seitan nuggets
2 large sweet potatoes, peeled, large dice
6 - 8 each dried apricots, halved
1 cup prunes, pitted (optional)
1 tablespoon dark brown sugar
1 large pinch of cinnamon or pumpkin pie spice
Zest and juice of one medium orange
1 cup apple cider
2 teaspoons kosher salt
Directions
In a large skillet or Dutch oven, heat the oil over medium heat. Add the onion, carrots and seitan and cook without stirring until slightly browned, about 4 minutes, Add the remaining ingredients and simmer until the sweet potatoes are soft, about 12 minutes. Taste and add more salt if needed.
Note: Adapted from a recipe by Rachael Narins in her book Cast-Iron Cooking: Recipes & Tips for Getting the Most Out of Your Cast-Iron Cookware.
Noelle Carter is a chef, food writer and culinary consultant at Noelle Carter Food. She was the longtime Test Kitchen director and food writer at the Los Angeles Times and a longtime contributor to “The Splendid Table,” a nationally-syndicated radio program from American Public Media. A native Southern Californian, she also holds a degree in film from the University of Southern California. Follow Noelle on Twitter @noellecarter.
Get Shondaland directly in your inbox: SUBSCRIBE TODAY
You Might Also Like

