How to Organize Canned Goods in Cabinets, Pantries, and More
Keep canned food in order and easy to reach with these simple organization ideas.

Canned goods are a pantry staple that makes dinner prep easier (even on busy weeknights). While some are small, most cans take up a decent amount of room in cabinets and drawers, so it’s important to have a system to keep them organized. The proper storage for canned food not only saves space but also helps you find what you need when you need it. It also cuts down on wasted food, preventing cans from going missing towards the back of the pantry and expiring before you can enjoy them. You’ll also be able to quickly take note of any cans that have swollen or accumulated rust, which indicates spoilage.
One of the best ways to prevent canned goods from spoiling is by placing them in a cool, dry area away from direct sunlight. Storing them in a reach-in or walk-in pantry, within kitchen cabinets, or inside drawers are all ideal locations. Now, let’s look at options for organizing canned food within these spaces.

Adam Albright
1. Try the Stadium Seating Method
"Stadium seating" is one of the best ways to organize cans. While it’s not a technical term, it’s one I like to use as a professional organizer to describe a tiered organizer that allows all cans to be within sight. Even the ones stuck in the back will be in full view on a tiered riser. Risers come in a variety of materials, including acrylic, bamboo, and metal, and many are expandable to fit your shelf size, whether that’s in a pantry or a cabinet.
:
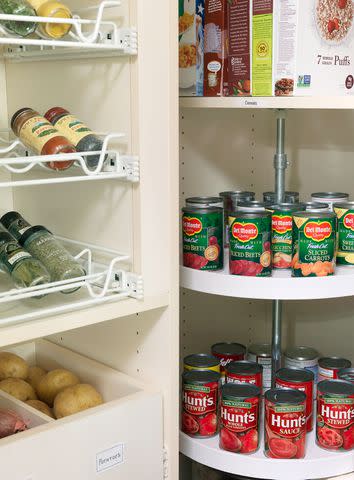
2. Consider a Lazy Susan
Depending on the size of your stock, a lazy Susan may or may not work for your canned goods storage. It’s true that cans are a great thing to place on lazy Susans since they’re round and, therefore, maximize space. However, a small turntable can only hold a handful of cans at a time. So, if you only keep a few on hand at any given time and use an appropriately-sized lazy Susan, this is an excellent option. By simply placing it on a shelf and spinning it, you can find and grab the can you need with ease. However, if you stock up on an abundance of canned goods, stick to one of the other options that can accommodate more items.
3. Divide Canned Goods Within Drawers
Cans can quickly get heavy if you have a large collection, so you’ll want to use a sturdy bottom drawer for this method. Line up cans in neat rows inside a drawer by type. Keep soups, vegetables, beans, and so on separated as best you can. Since you’ll only be able to see the top of the can when you open the drawer, add label tape to the inside lip of the drawer to indicate the categories. The cans will most likely stay put but if you have the space, include drawer dividers between the rows to ensure they don’t slide around. Place those with the soonest expiration date toward the front.

4. Use Empty Wall Space
If you’re blessed with a walk-in pantry, this trick will give you even more space than you already have. A blank wall within the pantry or the inside of the door can be the perfect place to position your canned goods. Using a durable metal rack with baskets, install it utilizing the height from floor to ceiling. Arrange the cans in the baskets, grouping them by type. This makes for quick access without sacrificing any shelf or drawer space. This also keeps them behind closed doors, eliminating visual clutter while staying cool and dry.
5. Employ a Can Dispenser
For deep shelves, a can dispenser can be helpful in making the most of the space. These organizers usually come with three levels that are customizable to the size of the cans. Adjust the bottom rows to accommodate larger cans, like diced tomatoes, and the top row for smaller cans, like tomato paste. Keep canned goods categorized by row so you know when you’re running out of a particular product. When you remove one can of black beans from the front of the dispenser, the backup will roll out behind it.
:

6. Utilize Bins and Baskets
Lastly, make canned food storage simple by lining up some open containers along a shelf or inside a drawer. Use bins to keep categories separate and specific. For example, use one for baking items, such as pumpkin puree, cherry pie filling, and condensed milk, and another for canned seafood. Add labels to each bin, then simply reach in whenever you need something.
What I like about this method is that by containing the cans, you prevent yourself from overdoing it. It’s good to have extras on hand, but it’s also easy to let sales get the best of you and buy more than you actually need. By keeping canned goods organized, you’ll take out the guesswork of what you have and when you need to replace it.

