Let's get experimental: How to use your gear the 'wrong' way to come up with new ideas and unfamiliar sounds

We live in an age of music-making where it can be very easy to stick to conventions. Vast sample libraries, plugin presets and ready tutorials mean that, if you want to make a track in a certain style, it’s never too hard to access the resources you need.
We’re not here to complain about that though; convenience is great. As much as some ‘traditionalists’ might tell you that presets are cheating and Splice is the devil incarnate, there’s nothing wrong with modern music tools. Making music should be easy and accessible.
The problem, however, is that when the sounds and tools you need are readily accessible, it can avoid the need for creative workarounds. We’re talking about the ‘hacks’ and acts of misuse that have resulted in great sonic innovations.
READ MORE
Make some freaky sounds with these experimental sound design tips
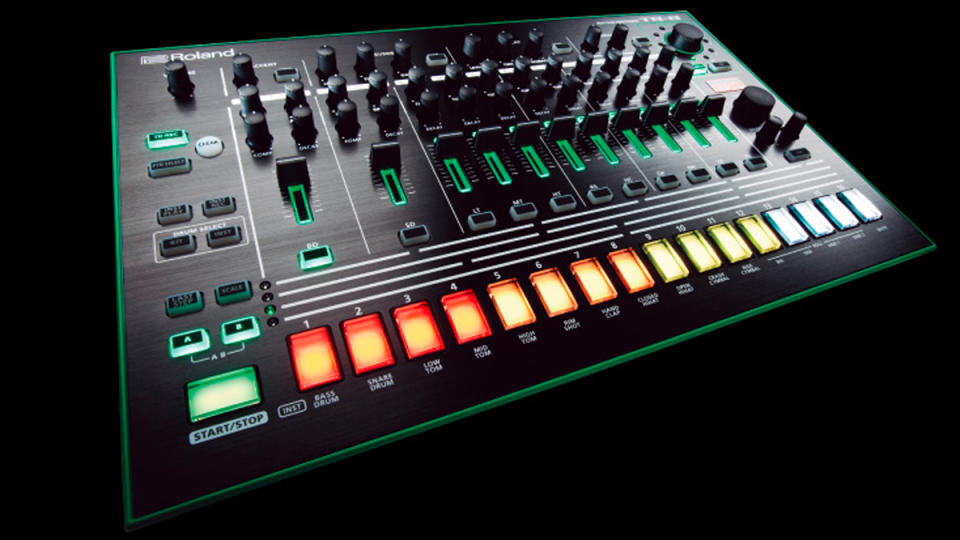
Musicians using that TB-303 because it was cheap and readily available, for example, only to discover its weird sequencer and filter design was capable of a whole new type of bass sound. Or producers splicing and warping tape before the days of simple sampling and audio editing.
To combat this, sometimes it’s worth setting aside some time to simply get weird. Experiment, mess around, do the ‘wrong’ things or see how far you can push your existing gear. Today, we’re here to do exactly that, exploring ways you can go beyond conventional approaches, in terms of sound design, sequencing and processing.
Experimental sound design: it's all about context
When it comes to taking an ‘experimental’ or creative approach to sound design, the key is to forget our learned notions about what a certain sound ‘is’ and the role it is supposed to play within your music.
We tend to compartmentalise sounds into categories. A short, snappy, atonal sound is percussion; tuned low frequency tones are ‘bass’ notes; sustained tones are pads or drones; and so on. In reality, it’s only the final role a sound plays within a musical composition that determines its categorisation, and through editing, effects or simply placing a sound somewhere unexpected we can turn a certain category of sound into something completely different.
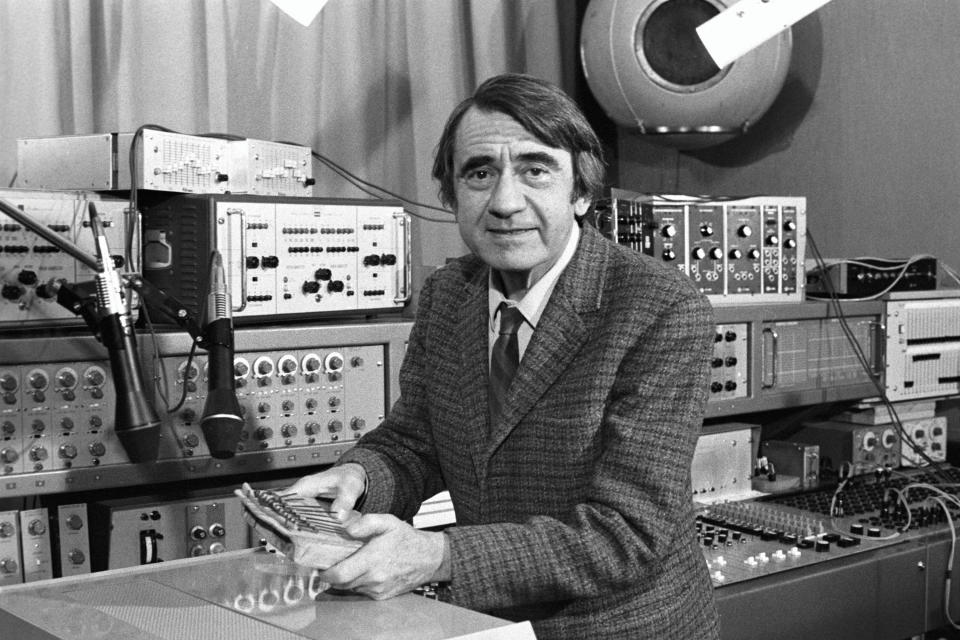
Since the earliest days of broadcast and radio, the likes of the BBC’s Radiophonic Workshop, foley artists and sound recordists have been developing techniques to simulate recognisable sounds using abstract techniques
The idea of shifting a sound from one context to another is nothing new. Since the earliest days of broadcast and radio, the likes of the BBC’s Radiophonic Workshop, foley artists and sound recordists have been developing techniques to simulate recognisable sounds using abstract techniques – turning the pang of metal sheeting into a crash of thunder, or using resonant filters to conjure the bleeps of robots.
In the realm of electronic music there are countless examples of sounds that have now become well-worn staples but originally were intended for completely different purposes: the 808 kick’s use as a bass sound being the most obvious example. Sampling opens up a world of possibilities on this front.
In the 1940s and 1950s, musique concrète pioneer Pierre Schaeffer established the idea of a ‘sound object’, a basic sonic building block that exists detached from the context of its creation. Modern samplers and software allow us to treat any sound in this way, dramatically altering pitch, amplitude or length of a sound, or looping granular elements in order to create effects completely different from that of the original source.
Yet it’s easy for the modern producer to reject the creative effort required to transform sounds into other sounds; especially in this age of shiny sample packs, construction kits and expertly-designed synth patches. However, it’s highly satisfying to generate a sample that’s unique to your personal library of sounds, and you know you’ll never hear your bespoke creations popping up in other producers’ tracks.
READ MORE

Sonic destruction: the science of distortion and how to use it
Beyond the sampling and editing techniques previously mentioned, effects processing can play a huge role in moving sounds from one context to another. Reverb, for example, can have the effect of literally repositioning a sound, at least in terms of how we perceive it; moving a sound from close to far away, or placing an otherwise ‘small’ sound in a huge space.
Distortion, meanwhile, can impart additional harmonics that drastically alter the tonality of a source sound. It’s when we combine these processes that the real magic happens. Chaining a multitude of extreme effects or resampling and reprocessing can create totally unique textures and timbres.
Key to this approach is the word ‘experimental’ itself. It’s important to set aside time to do exactly what that describes: experiment. Toy with sounds without a specific goal or function in mind, but rather simply to see how far you can push your source ‘sound object’ into something new and inspiring.
Exploring polymetric rhythms
In the percussion-focussed realms of dance music, polymetric rhythms have long been used as one of the simplest but most effective methods of experimentation. A polymetre, in musical terms, is what happens when two elements with different time signatures play simultaneously. This is often confused with a polyrhythm, but the two have some important differences.
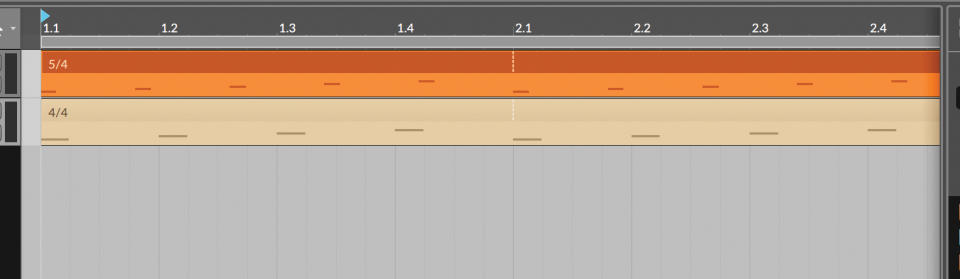
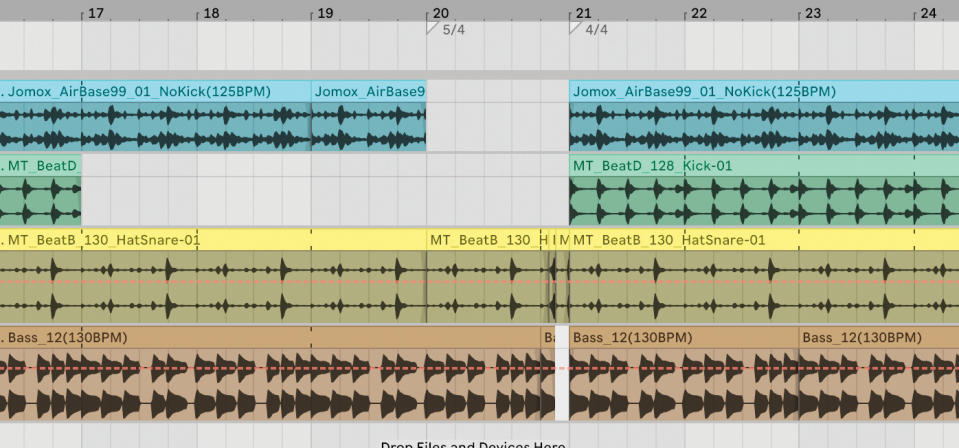
Example A is a polyrhythm. Here, two patterns play at the same time, one in 5/4 over another in 4/4. These two rhythms are playing at different tempos in order to make a single measure of each last the same duration – ie the first beat of the top pattern stays in sync with the first beat of the bottom pattern.

Example B is a polymetre. Here, both patterns are playing at the same tempo, this means that when the lower (in 4/4) reaches the end of a bar, the pattern in 5/4 still has one beat remaining. As a result, as the two patterns loop, the relative positions of the first beat in each pattern changes. This means that using polymetres can result in evolution over the course of a track in a way that doesn’t necessarily happen with polyrhythms.
Because our two patterns last for different durations, the interplay between them changes with each cycle and doesn’t repeat until the 5th bar (20 beats, which is the first number divisible by both 4 and 5). If that all sounds a bit mathematical, worry not; as with many experimental production techniques, it’s easy to apply polymetric rhythms to your tracks without needing to worry too much about the theory behind it.
READ MORE
How to use two drum machines to make polyrhythmic patterns
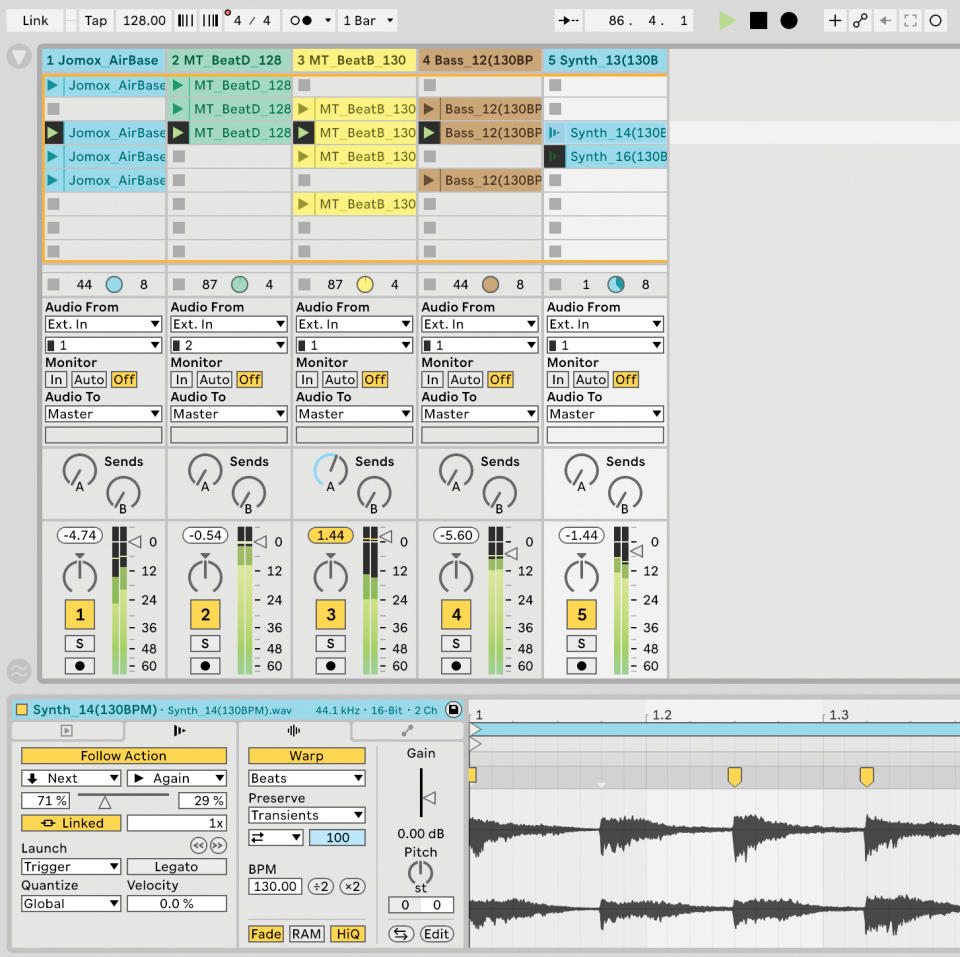
In practical terms, there are several simple ways to experiment with polymetres. As in our examples, you can create different pattern lengths in your DAW’s timeline or clip launcher simply by adjusting the loop length. By setting the length of the top loop to five beats and the bottom loop to four beats, when we drag the two out along our arrangement timeline it creates the polymetric effect we’re after. The benefit of working in this way is that we can easily see the relative positions of our two loops, as well as the points at which they synchronise.
A lot of hardware synths, drum machines and sequencers make it simple to apply these ideas, too. Any sequencer that features a ‘last step’ function, or that allows the user to freely set the step length of each sequencer track, can be used to create a polymetric pattern. To do so, sync your hardware device to a 4/4 MIDI clock and set one or more sequencer tracks to a step length that isn’t 4, 8, 16 or 32, etc.
These sorts of techniques work particularly well for genres like minimal or ambient music, where multiple basic and simplistic patterns are layered
We can apply a similar idea to musical phrases, melodies and riffs even when sticking to a standard 4/4 rhythm. Within standard musical structures, we expect to hear phrases that last for four, eight or 16 bars. We can subvert this by creating patterns that repeat after, say, three or five bars. Doing so can create a similar ‘phasing’ effect to the polymetric patterns described above, whereby a track seems to evolve over time as different elements play out at a slightly different rate.
These sorts of techniques work particularly well for genres like minimal or ambient music, where multiple basic and simplistic patterns are layered to create a shifting and evolving tapestry of sound.
Three experimental rhythmic ideas
Both polymetric and polyrhythmic patterns can be a great way to add complexity and interest to your creations. Using these ideas doesn’t necessarily need to be done in the form of drum sequencing, though. There are various tools and techniques that can be used to apply similar ideas, often subtly, to a range of track elements or even to parameter automation.
As with any of the techniques discussed in these pages, you can apply these techniques as overtly or as minimally as you like. For something truly out there, try combining multiple cross-rhythms and polymetric phrases in a way that your track never truly repeats itself. For a more subtle application though, try using just a single percussive element or polyrhythmic filter modulation over a more straightforward pattern.
1. Polymetric automation
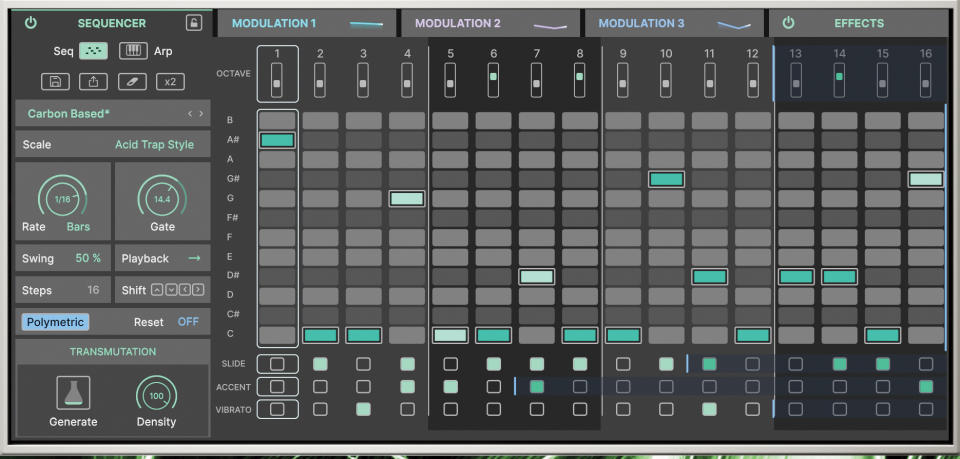
Above we’ve described the use of polymetres across rhythmic patterns, but it’s possible to apply the same idea to parameter automation. Many modern synths or sequencers allow users to trigger parameter changes separately to note triggers. Try, for example, sequencing a filter sweep with a step length of 12 over a 16-step pattern.
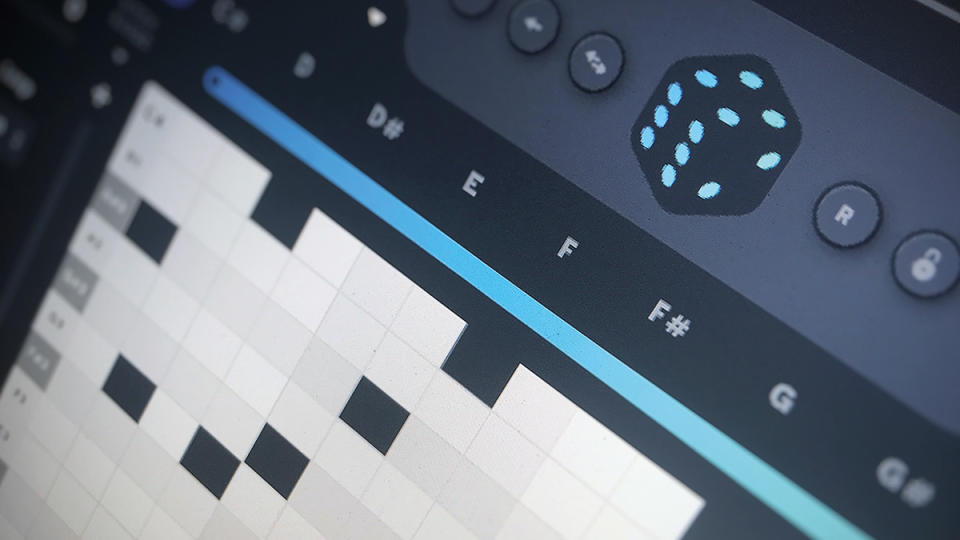
2. Euclidean rhythms
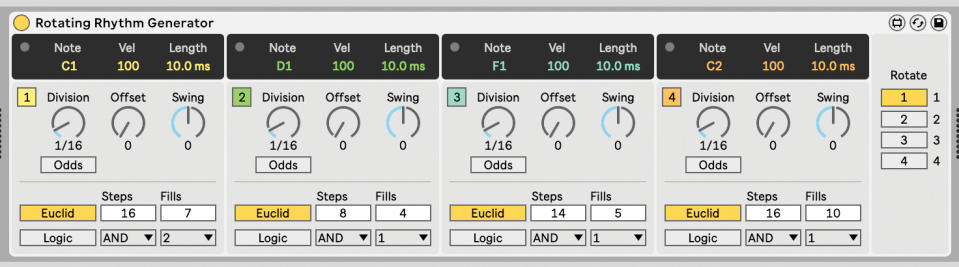
Euclidean sequencers spread triggers out evenly across an assigned range, which can naturally create polyrhythms. If, for example, you set a step range of 16 and fill it with four triggers, you’ll create a simple 4/4 beat. Changing either number to something that doesn’t divide so neatly will create a more unusual rhythmic pattern.
3. Time signature changes
Instead of creating unusual rhythms by using multiple time signatures at the same time, try keeping your listeners on their toes by switching up timings for just a bar or two mid-song. For example, throw in a bar of 5/4 at the end of the breakdown of your 4/4 dance track to mess with people’s expectation of the ‘drop’.
Using real world sounds to create unique textures
Found sounds and real world recordings are a great source of texture in music making.

Recordings of noise or ambience from the real world often contain interesting textures and harmonics – the sounds around you can be ideal sources for things like FX or even rhythmic loops. For this tutorial we’ve raided the FM sample archive for recording of rain, which we’re going to turn into a glitchy percussion part.
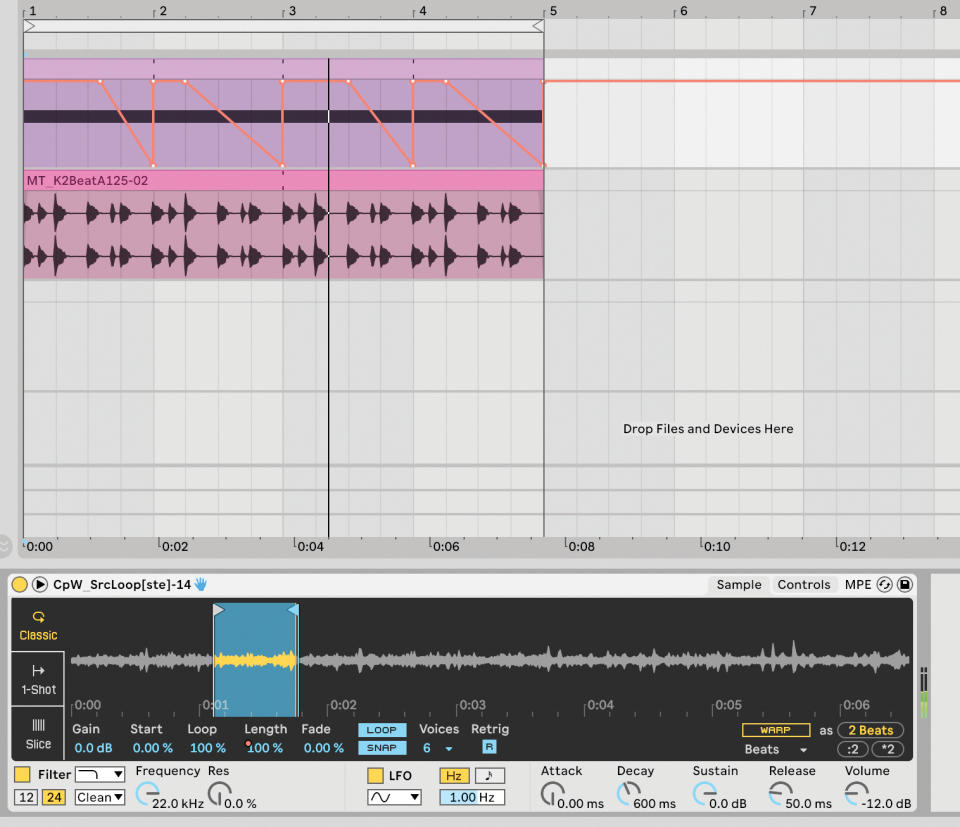
Instead of processing this sound as an audio file directly on the timeline, we import our recording into our DAW’s sampler instrument, allowing us to manipulate the sound using advanced synthesis functions. We begin by looping a choice section of the recording. We automate the loop length to create a robotic stutter-like effect as the sound progresses through each bar.

Next we automate our sampler’s Transpose parameter, to introduce some extreme positive and negative pitch shifts. These will massively alter the timbre and frequency content of our loop, without losing its textural properties. By placing these on choice beats – downward shifts on the 1 and 3, upward around the 2 and 4 – we create a sound almost akin to a kick and snare.
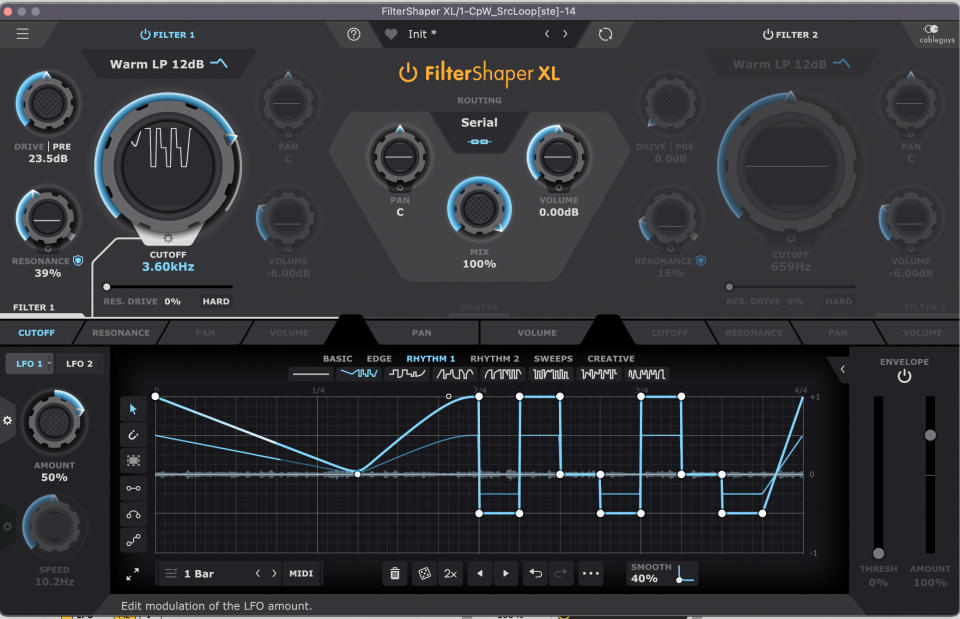
To add yet more movement, we load Cableguys’ FilterShaper 3 as an insert. The custom modulation waveforms here allow us to sequence the cutoff of a low-pass filter to create extra rhythmic movement. We only roll off the top-end subtly, so as not to lose all the texture from our recording, but add resonance and drive to add extra heft.
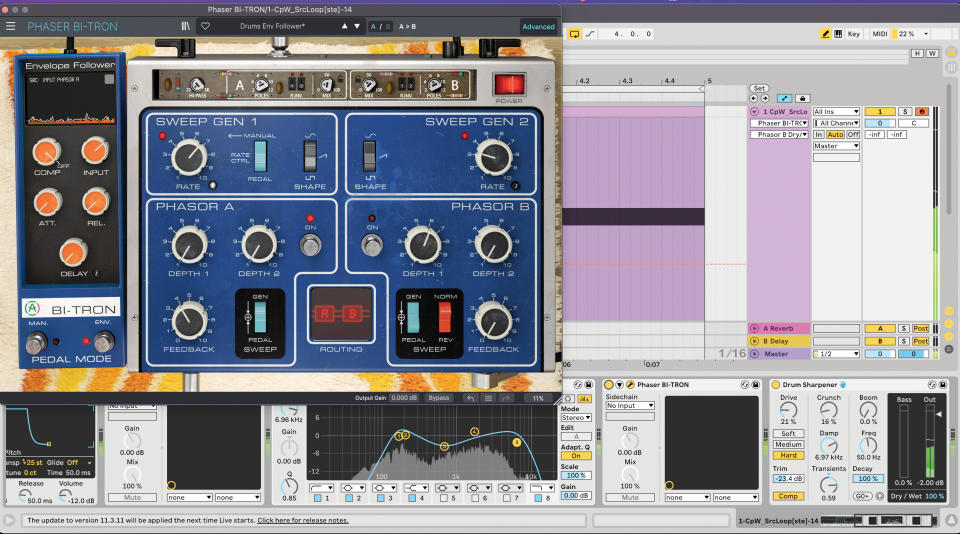
Our loop is now sounding sufficiently rhythmic and glitchy. Now we can have fun with further effects. We add some subtle, pedal-style phasing to add a bit of extra movement to the loop. Drive and transient shaping via Ableton’s Drum Buss help bring out the percussive qualities, too.
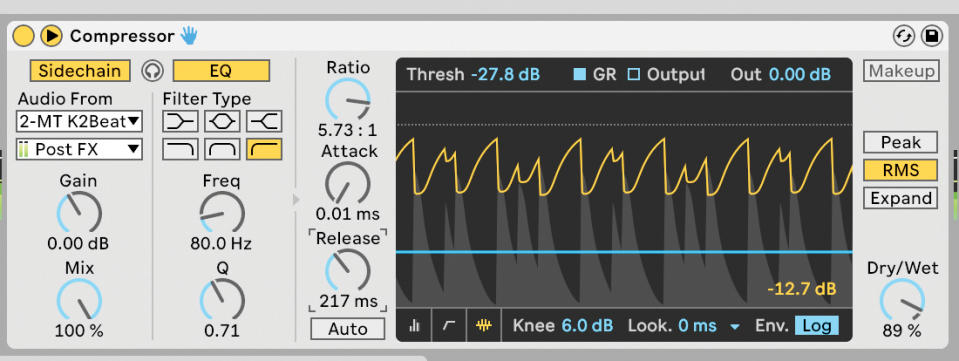
We’re laying this glitchy loop over the top of a minimal kick and snare loop. We apply some fairly heavy sidechained compression from our main drums to this glitchy, textural loop – this creates the effect of our ‘found’ sound filling in the gaps in our more conventional beat.
Microtonalism: breaking free of the chromatic scale
The vast majority of western music is created using the 12-tone equal temperament tuning system. This is essentially the 12 notes we think of as the building blocks of music – C to B, rising or falling in equal semitone intervals – often referred to as the chromatic scale.
In music production, when we refer to ‘microtonal’ music we mean anything that exists outside of these 12-note intervals – ie in the space between the notes. This encompasses all sorts of things, from a huge variety of non-western tuning systems to experimental scales and even basic applications; technically, a pitch bend on a guitar can often result in a ‘micro tone’.
READ MORE
How to create microtonal music using Ableton Live's Microtuner
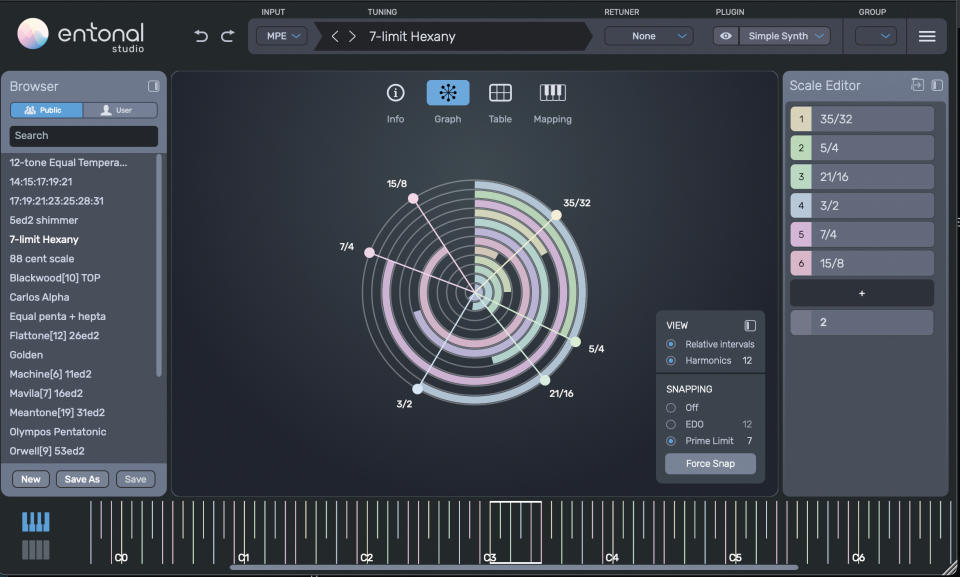
Microtonal scales have become increasingly easy to access in recent years. Korg and Novation have incorporated a range of alternative tunings into the Monologue and Bass Station II synths respectively (both with the aid of notable micro tone user Aphex Twin). Probably our favourite current tool for experimenting with microtonal possibilities is Entonal Studio.
Entonal allows users to freely adjust and precisely retune each note in a scale. It’s effectively a MIDI effect, capable of hosting instrument plugins or being routed to compatible hardware, essentially acting as a microtonal translation device between your MIDI controller/sequencer and a MIDI instrument (it works for MPE, too).
Working with microtonal music can be complex and take some time to be truly rewarding. Creating your own scales can involve either complex theory and mathematics or a lot of very precise experimentation. Fortunately, all of the tools we’ve mentioned here offer plenty of preset tunings to work with.
The key benefit to working with microtonal music, even if you’re using preset scales, is that it can be a surefire way to make your melodies stand out and sound memorable. It’s a great way to break with your compositional habits too. If you tend to reach for the same old progressions of patterns, try applying them to a whole new tuning system and see how it can alter the mood, feel and tone of your playing.
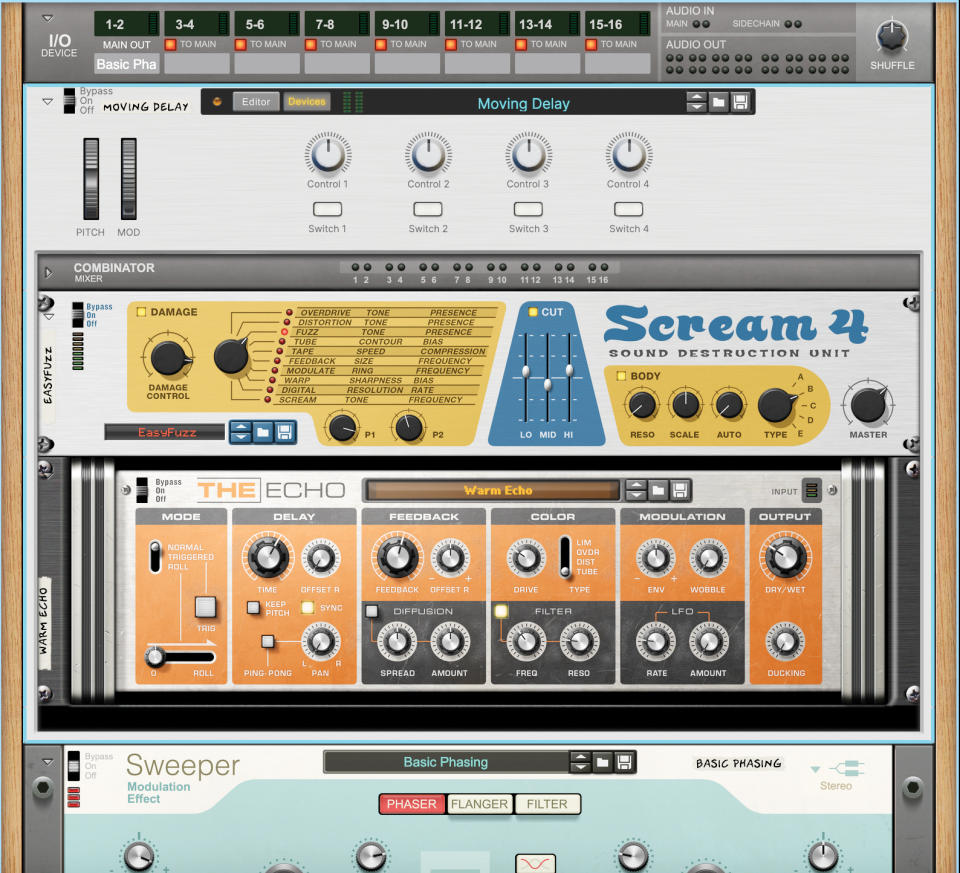
Four creative effect combinations
Recallable effect chains are an invaluable tool for experimental sound design. All hosts provide some way to save a channel’s collection of multiple plugins – for example, a ‘channel strip’ in Logic or an ‘FX chain preset’ in Cubase – as a single preset for easy recall in another session.
Other DAWs such as Ableton Live and Bitwig Studio take this concept further, allowing you to package up a row of individual instruments and effects into a ‘rack’, complete with overall macro controls for multi-parameter knob assignments.
There are several benefits to using saved setups in your workflow. For one, you can save your own go-to effects, giving you starting points for common tasks. Many also offer controls such as overall wet/dry blending for instant parallel processing, or the global governing of multiple parameter movements with a twist of a single macro knob, helping to facilitate creative outcomes you’d never normally come up with.
1. EQ and distortion
Smash a signal through impactful distortion, then place an EQ pre-distortion and experiment with wild peak boosts and cuts. Forcing specific harmonics up into the drive will wildly change the timbral effect, while drastic cuts will quickly clean up or temper the effect.
The same approach works well with filtering too. A modulated low-pass filter before an extreme distortion will cause the harmonics created to change drastically as frequencies are added and removed at the input. Add a bit of resonance to the filter and you’re really talking.
2. Pitch, reverb and delay
As you sweep a melodic signal’s pitch up by an octave or two, use automation to send it to a cavernous reverb effect placed on an aux return. The giant reverb will carry over the rest of the melody, creating a unique ‘shimmering’ tail that you can render and reprocess.
Alternatively pitch shift the wet signal from a reverb or delay send to create odd, otherworldly ambiences (by pitching the sound up) or dark and ominous drones (by pitching it down). A lost of modern delay plugins offer pitch shifting within the feedback loop, creating effects that spiral up or down.
3. Filtering and compression
Filtering a sound over time creates changes in dynamics as frequencies are removed. Counteract this by forcing the filtered signal into grabby, 1176-style compression, to help keep the filtering effect in the forefront of the mix.
For a more overt effect, use an aggressive multiband compressor which can squeeze specific frequencies to match your filtering. And for a more out-there effect, try throwing some sidechaining into the mix, too. A modulated filter feeding into an aggressive sidechained compressor can create interesting rhythmic and tonal shifts.
4. Dual delay
There’s fun to be had by combining multiple delay lines over a single sound – either in serial as inserts or set up in parallel as sends. Try coating a dry signal in some uber-short delay tuned to your track’s key to create a tonal, comb-filtered ‘robo’ effect. Once that’s dialled in, load up a second delay effect – set to a slower, tempo-synced delay time – and echo the metallic sound for extension and tail.
Alternatively, send your sound simultaneously to a synced, rhythmic delay on one send, and a longer, unsynced one on another. This is great for dub-like effects, particularly combined with modulated filters to get the delay lines moving even more!
Taking an experimental approach to arrangement
When it comes to arranging tracks, we rely on expected structural elements. In pop and rock music, that’s verses and choruses, in dance music a drop, build-up and breakdown. These give the listener recognisable elements to latch onto and us songwriters things we can build towards. As with any expected musical forms, there’s a wealth of potential in subverting or completely abandoning these.
At their most experimental, genres like noise, drone and ambient tend to eschew song structure altogether. Listen to the work of ambient greats like William Basinski or Stars of the Lid and you’ll hear that tracks tend to put far more emphasis on subtle shifts in tonality and texture than definable structure.
While much of ambient music is beatless, there are examples of artists taking similar approaches within house and techno. Italian duo Voices From The Lake’s self-titled debut album is a great example, where tracks are built around looped drum grooves, but elements slowly blend in and out, making use of subtle parameter and effect changes more than major structural changes.
There are plenty of ways to be ‘experimental’ with your arrangements without abandoning structure altogether. One avenue to explore is generative music making. Linked to, among others, Brian Eno, generative music is built around systems that create changes without the need to be triggered by a human musician. Modern gear gives us a multitude of ways to explore this.
READ MORE
Ordered chaos: a guide to randomisation, probability and generative music
One simple way is to use mismatched or polymetric phrase lengths – discussed earlier in this feature – so that the interplay of elements changes over time. Probability is a handy tool too. Nonlinear arrangers such as Ableton’s Session View often allow users to assign probabilities to decide what happens next. In Live, for example, Follow Actions allow a probability to dictate whether a clip will retrigger or move on to something else at the end of its cycle.
Ultimately, experimental arrangement can come down to as little as doing anything unexpected. Instead of going into a drop after your breakdown, flip the beat into something completely new. Make your track go ‘up’ when it’s expected to go ‘down’. Anything out of the ordinary will help your music stand out.

