Can I Interest You in One of These HIIT Workouts That'll Get You Sweaty in 15 Minutes or Less?
HIIT workouts are a treasured form of exercise for those who like sweating and hate wasting time—so, yeah, most of us.
But if you're unclear what a HIIT is or how to do it, lemme explain. High-intensity interval training is a cardio workout that switches between periods of ~intense~ exercise, like burpees, squat jumps, mountain climbers, or anything that works your whole bod, and a timed active recovery, per the National Academy of Sports Medicine.
Basically, those short bursts of high-level training add up to one killer workout in less time than it takes to drive to the gym. And we love to see that.
Obvi, the harder your workout, the more time you need to recover before your next sweaty seshy. That's why the National Academy of Sports Medicine recommends doing them two to three times a week MAX with at least 48 hours between each sesh. If you ignore that rule, you might risk getting injured, which is a huge bummer.
OK, now that we're all on the same page on what the hell this whole HIIT thing is, I'm about to drop some free workout content on you: The kick-ass trainers on the SWEAT app (on iTunes and Google Play) have put together four actually fun and super effective HIIT workouts, so you can choose your own sweaty adventure depending on your vibe.
Each workout is 15-minutes or less and follows the format laid out above (bouts of tough cardio with a timed recovery chaser). That said, each trainer has their own unique style (more on that below), which means you can start with something a little less hardcore on a stressful Monday, get a little spicier on Wednesday, and go bananas with a tough sesh on Friday. What I'm saying is you do you!
Finally, (I know, I'm a little long-winded today. Thank you for understanding.) Team SWEAT is offering a YEAR-LONG free trial of their app (normally $120 a year or $20 a month) to Cosmo readers—aka your beautiful self. So you can follow their program week after week and get after those fitness goals for free 99. What. A. Deal.
Alright, ready to get after it? Let's do this!
If you're new to this whole intensity thing
The workout: Monica Jones leads you through a beginner-friendly full-body workout that you can totally crush in 15 minutes. You got this!
How to do it: Perform the exercises below in order for the sets and time noted. Repeat circuits one, two, and three before cooling down.
Warm up: Inchworm
Step 1: Plant both feet on the floor shoulder-width apart. Bend at the hips and while keeping your legs as straight as possible, place your hands on the floor directly in front of your feet. This is your starting position.
Step 2: Inhale. Without moving your feet, walk your hands forward until your body is in one straight line from your head to your heels, resting on the balls of your feet, ensuring that your legs remain as straight as possible.
Step 3: Exhale. Without moving your feet, walk your hands backward to return to the starting position, once again, ensuring that your legs remain as straight as possible. Repeat for 60 seconds.
Warm up: Squat kick
Step 1: Begin by standing with both feet on the floor slightly further than shoulder-width apart, hands placed behind your head. Gently draw your ribs towards your hips to engage your core. This is your starting position.
Step 2: Inhale. Bend at both the hips and knees, until your upper legs are parallel with the floor. Ensure you keep a proud chest and that your knees remain in line with your toes (don’t allow your knees to fall in).
Step 3: Exhale. And push your feet into the floor to extend your legs, as you reach the top flex at the hip to kick your right leg up, transferring your weight onto your left foot, at the same time using your left hand to reach across and touch your right foot. Lower your leg to the floor, inhale as you perform another squat, and repeat on the opposite side. Continue for 60 seconds.
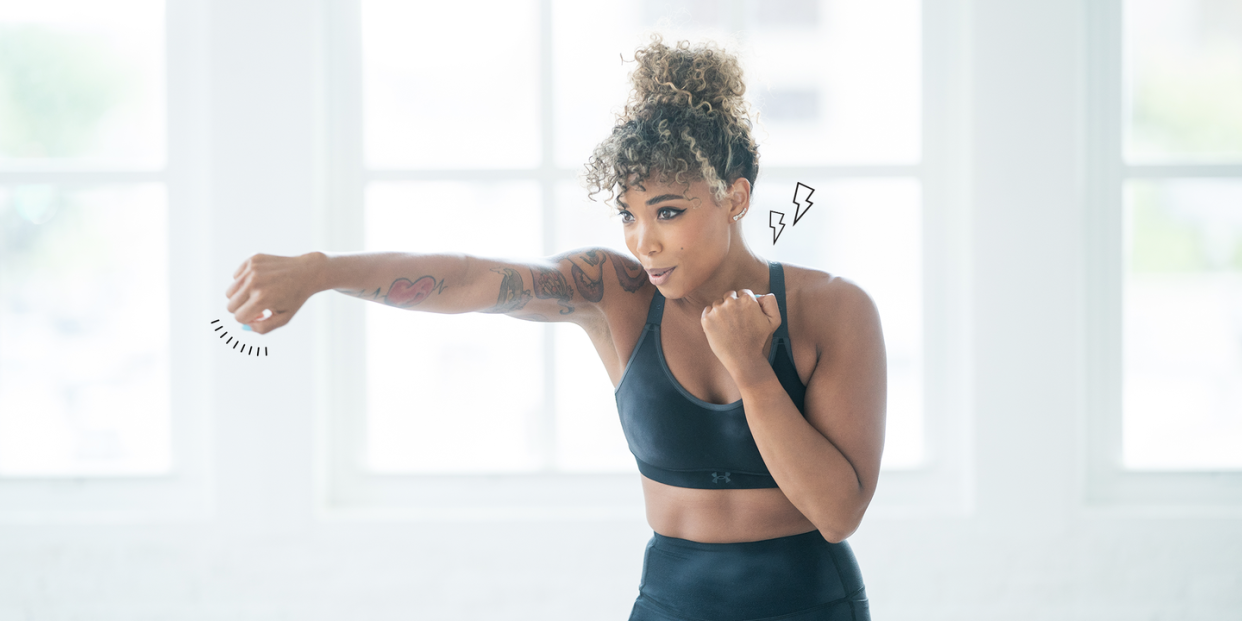
Circuit 1: Jab, cross, upper, upper
Step 1: Begin in a split stance with your left foot forward and your right foot back*. Raise your arms slightly and bend your elbows to position your arms into what is called your guard position. ‘Punch’ by extending your left arm out in front of you, at the same time internally rotate your left wrist so that your wrist is now positioned with your palm facing down Return your left arm back to the guard position. ‘Punch’ by extending your right arm out in front of you, at the same time internally rotate your right wrist so that your wrist is now positioned with your palm facing down. Return your right arm back to the guard position.
Step 2: Perform an uppercut by keeping the elbow tucked and punching upward with your left hand. Return your left hand to the guard position. Perform an uppercut with your right hand by keeping the elbow tucked and punching upward whilst rotating your right hip and heel. Return your right arm to the guard position. Continue completing the combination for 30 seconds, continuing to breathe throughout.
*If you are left-hand dominant, place your right foot forward and punch with your right hand first.
Circuit 1: Sumo squat
Step 1: Plant both feet on the floor further than shoulder-width apart. Point both feet slightly outward. This is your starting position.
Step 2: Inhale. Looking straight ahead, bend at both the hips and knees, ensuring that your knees remain in line with your toes. Continue bending your knees until your upper legs are parallel with the floor. Ensure that your back remains within 45-90 degrees of your hips.
Step 3: Exhale. Push through your heels and extend your legs to return to the starting position. Repeat for 30 seconds.
Circuit 1: Straights
Step 1: Begin in a split stance with your left foot forward and your right foot back*. Raise your arms slightly and bend your elbows to position your arms into what is called your guard position. ‘Punch’ by extending your left arm out in front of you, at the same time internally rotate your left wrist so that your wrist is now positioned with your palm facing down. Return your left arm back to the guard position. Repeat for 30 seconds.
Circuit 2: Hooks
Step 1: Plant your feet in a split stance with your left foot forward and right foot back*. Raise your arms slightly and bend your elbows to position your arm in what is called is called your guard position. ‘Punch’ with your left arm by raising your left elbow up and out, before quickly rotating your left arm and torso to the right to punch across your body. At the same time internally rotate your wrist so that your palm is now in an overhand position (palm facing down). Bring your arm back to the guard position. As your left hand returns to the guard position, in quick succession ‘punch’ with your right arm by raising your right elbow up and out, before quickly rotating your right arm and torso to the left to punch across your body. At the same time internally rotate your wrist so that your palm is now in an overhand position (palm facing down). Continue alternating between left and right hooks for 30 seconds, remembering to breathe throughout.
Circuit 2: Modified X hop
Step 1: Plant both feet on the floor slightly further than shoulder-width apart. Looking straight ahead, bend at both the hips and knees, ensuring that your knees remain in line with your toes. Continue bending your knees until your upper legs are parallel with the floor. Ensure that your back remains between 45 and 90 degrees of your hips.
Step 2: Propel your body upwards into the air. Extend and reposition both of your legs to land in a lunge position. Ensure that your weight is distributed equally between both legs. Immediately, propel your body upwards into the air again. Extend and reposition both of your legs to land with feet together directly beneath you before propelling into a lunge position with the opposite leg forward.
Propel your body upwards into the air again. Extend and reposition both of your legs to land with feet together directly beneath you before propelling into a squat position.
Continue alternating between landing in the squat and lunge position for 30 seconds, remembering to continue breathing throughout.
Circuit 2: Drop push-up to straights
Step 1: Plant both feet on the mat shoulder-width apart. This is your starting position. Inhale. Bend at both the hips and knees to place your hands on the mat on either side of your feet, ensuring that your spine remains in a neutral position and your knees remain in line with your toes. Jump both of your feet backward so that your legs are completely extended behind you, resting on the balls of your feet. Your body should be in one straight line from your head to your heels.
Step 2: Exhale. Push through your chest and extend your elbows to lift your body back into the starting position. Jump both of your feet forwards in between your hands, once again, ensuring that your feet remain shoulder-width apart. Push through your heel to midfoot and extend your legs to stand in a split stance.
Step 3: ‘Punch’ by extending your left arm out in front of you, at the same time internally rotate your left wrist so that your wrist is now positioned with your palm facing down Return your left arm back to the guard position. ‘Punch’ by extending your right arm out in front of you, at the same time internally rotate your right wrist so that your wrist is now positioned with your palm facing down Continue alternating between left and right punches for four repetitions before completing another drop push up. Continue for 30 seconds.
*One full cycle equals one repetition
*If you are left-hand dominant, place your right foot forward and punch with your right hand first.
Circuit 3: Plank dips
Step 1: Start by placing your forearms (wrist to elbow) firmly on the mat, ensuring that your elbows are directly below your shoulders. Extend both legs behind you and elevate your hips off the mat, resting on the balls of your feet. Brace your abdominals and ensure that your spine remains in a neutral position. This is your starting position.
Step 2: Keeping your core engaged, lower (dip) your hips to the left side in an arc until they are just above the ground. In a rocking motion, return back to the starting position before lowering your hips to the right side and then back towards the starting position.
Step 3: Ensure you keep pressing away from the ground through your forearms and shoulders. Try to prevent your hips from sagging throughout the movement, ensuring you are breathing deeply throughout. You should feel the tension in your abdominals and shoulders during the movement. Continue alternating between sides for 30 seconds.
Circuit 3: Sit-up to jab-cross
Step 1: Start by lying flat on your back on a yoga mat. Bend your knees and position your feet firmly on the mat. Engage your abdominal muscles by drawing your belly button in towards your spine. This is your starting position. Inhale. Keeping your heels firmly planted on the floor, slowly lift your head, shoulder blades, and torso off the floor. Lengthen your spine to sit up tall, exhale as you 'punch' with one arm at a time by extending your arm out in front of you from the 'guard position'.
Inhale. Slowly lower your torso, shoulder blades, and head to the mat to return to the starting position. Repeat for 30 seconds.
Circuit 3: Lateral shoot through
Step 1: Starting on all fours on a yoga mat, ensure that your knees are below your hips and your hands are below your shoulders. Set your spine in a neutral position and draw your shoulder blades down and back. Press into the floor with your hands and toes to slightly elevate your knees so that they are hovering just off the floor. This is your starting position.
Step 2: Inhale. Exhale. Release your right foot and left hand, pivoting on your left foot to open up your hips. Tuck your right knee across and into your torso to lower your right hip and rotate your torso to the left. At the same time raise your left arm directly above your head. As you reach the end of your rotation extend your right leg.*
*If done correctly your torso and right leg should be pointing 90 degrees to the left of the starting position.
Step 3: Inhale. Press into the floor with your right hand to stay elevated. Bend your right knee and raise your right hip to rotate your torso back to neutral, at the same time, lower your left arm to the floor to return to the starting position.
Step 4: Inhale. Exhale. Release your left foot and right hand, pivoting on your right foot to open up your hips. Tuck your left knee across and into your torso to lower your left hip and rotate your torso to the right. At the same time raise your right arm directly above your head. As you reach the end of your rotation extend your left leg.*
*If done correctly your torso and left leg should be pointing 90 degrees to the right of the starting position.
Step 5: Inhale. Press into the floor with your left hand to stay elevated. Bend your left knee and raise your left hip to rotate your torso back to neutral, at the same time, lower your right arm to the floor to return to the starting position. Continue alternating for 30 seconds.
Cooldown: Kneeling hip stretch to tricep stretch
Step 1: Begin in a kneeling position on a yoga mat. Release your left leg and take one large step forward so that you are in a low lunge position, ensuring that your left knee is not further forward than your toes. Release your right arm overhead and place your hand between your shoulder blades. Exhale. Gently push down your right elbow with your left hand.
Step 2: Keeping your torso upright, push your hips forward so that you feel a stretch along the front of your right leg. Hold for 30 seconds then repeat this stretch on the other side.
Cooldown: Hamstrings
Step 1: Plant both feet on the floor hip-width apart. While keeping your legs straight, bend forward from your hips and reach for your toes with both hands (or as far as you can). Rest your hands on the mat, feet, or on your shins—whichever is most comfortable.
Inhale. Press further into your left heel and bend your right knee. Exhale. Press further into your right heel and bend your left knee. Inhale. Press further into your left heel and bend your right knee. Exhale. Press further into your right heel and bend your left knee. Continue alternating between right and left for 30 seconds, breathing deeply throughout.
If your core is on your mind
The workout: Follow SWEAT app co-founder Kayla Itsines through this intermediate HIIT sesh that gives extra love (if you want to call it that?) to your abs, glutes, and hips, aka your core. It'll be over in 12 minutes, friends.
How to do it: Perform the exercises below in order for the sets and time noted. Repeat circuits one, two, and the ab finisher twice before cooling down.
Warm up: Hip flexor to hamstring
Step 1: Begin in a kneeling position on a yoga mat. Release your left leg and take one large step forwards so that you are in a low lunge position, ensuring that your left knee is not further forward than your toes. Keeping your torso upright, push your hips forwards so that you feel a stretch along the front of your right leg. This is your starting position.
Step 2: Inhale. Exhale. Draw your glutes towards your right heel and bring your torso towards your left thigh. At the same time, extend your left knee with toes flexed, ensuring that your shoulders and hips remain level. Hold this position for three to five seconds, breathing deeply throughout.
Step 3: Inhale. Exhale. Bend your left knee and press your toes into the mat, ensuring that your knee is no further forward than your toes. At the same time, lift your torso away from your left thigh, to return to an upright position. Hold this position for three to five seconds, breathing deeply throughout. Continue alternating between the low lunge and hamstring stretch positions for 30 seconds per side.
Warm up: Rocking chair
Step 1: Plant both hands on the mat slightly further than shoulder-width apart, feet together on the mat behind you while resting on the balls of your feet. This is your starting position.
Step 2: Bend at the hips and knees to shift your glutes over your heels and lower your torso towards the mat. Extend your arms along the mat, sinking your chest into the position and keeping your shoulders down and back. Press through your feet to extend your legs and return to the starting position. Repeat for 30 seconds.
Warm up: Squat and rotation
Step 1: Plant both feet on the floor slightly wider than shoulder-width apart. Looking straight ahead, bend at both the hips and knees, ensuring that your knees remain in line with your toes. Continue bending your knees until your upper legs are slightly below parallel to the floor. Ensure that your back remains within a 45- to 90-degree angle to your hips. Place hands between your feet with your palms pressed into the floor. This is your starting position.
Step 2: Inhale. Exhale. While maintaining a straight back, release your right hand and extend your arm upwards. Lengthen your spine and rotate your torso towards your right knee, turning your eyes towards your right hand. Hold the stretch for three to five seconds, breathing deeply throughout.
Step 3: Inhale. Untwist your torso and lower your hand to return to the starting position.
Step 4: Exhale. While maintaining a straight back, release your left hand and extend your arm upwards. Lengthen your spine and rotate your torso towards your left knee, turning your eyes towards your left hand. Hold the stretch for three to five seconds, breathing deeply throughout.
Step 5: Inhale. Untwist your torso and lower your hand to return to the starting position. Complete alternating between right and left for 30 seconds.
Circuit one: Squat
Step 1: Plant both feet on the floor shoulder-width apart. This is your starting position.
Step 2: Inhale. Looking straight ahead, bend at both the hips and knees, ensuring that your knees remain in line with your toes. Continue bending your knees until your upper legs are parallel with the floor. Ensure that your torso remains as upright as possible while maintaining a neutral spine.
Step 3: Exhale. Push through your heels and extend your legs to return to the starting position. Repeat for 30 seconds.
Circuit 1: High knees
Step 1: Plant both feet on the floor slightly further than shoulder-width apart. Keeping your weight on your left foot, bend your right leg to bring your knee into your chest.
Step 2: Lower your right leg and plant your foot on the floor. Keeping your weight on your right leg, bend your left leg to bring your knee into your chest. Once you are comfortable with this movement, increase your speed so that you are hopping from one foot to the other. Continue alternating between right and left legs for 20 seconds.
Circuit 1: Half burpee
Step 1: Plant both hands on the mat slightly further than shoulder-width apart, feet together on the mat behind you while resting on the balls of your feet. This is your starting position.
Step 2: Inhale. Exhale. Jump both of your feet forwards in between your hands, ensuring that your feet remain shoulder-width apart.
Step 3: Inhale. Jump both of your feet backward to return to the starting position. Repeat for 10 seconds.
Circuit 1: Side plank
Step 1: Start by lying lengthways along a yoga mat. Place your left forearm firmly on the floor, ensuring that your elbow is directly below your shoulder and that your forearm is parallel to (in line with) the short edge of your mat. Extend both legs and, using your obliques, gently raise your hips off the mat. Position your feet one on top of each other or place your left foot on the mat in front of your right—whichever is most comfortable.
Hold this position for 30 seconds, before completing 30 seconds on the other side.
Circuit 2: Rocking chair and plank
Step 1: Place both hands on the mat slightly further than shoulder-width apart, with feet apart on the mat behind you, while resting on the balls of your feet. This is your starting position.
Step 2: Release your right hand and reach across your body to touch your left shoulder, ensuring that you brace your abdominals to keep your hips parallel to (in line with) the floor. Lower your right hand to return to the starting position.
Step 3: Release your left hand and reach across your body to touch your right shoulder, once again, ensuring that you brace your abdominals to keep your hips parallel to (in line with) the floor. Lower your left hand to return to the starting position.
Step 4: Bend at the hips and knees to shift your glutes over your heels and lower your torso towards the mat. Extend your arms along the mat sinking your chest into the position and keeping your shoulders down and back. Press through your feet to extend your legs and return to the starting position. Repeat for 30 seconds.
Circuit 2: Burpee
Step 1: Plant both feet on the mat shoulder-width apart. This is your starting position.
Step 2: Bend at both the hips and knees to place your hands on the mat on either side of your feet, ensuring that your spine remains in a neutral position.
Step 3: Inhale. Jump both of your feet backward so that your legs are completely extended behind you, resting on the balls of your feet. Your body should be in one straight line from your head to your heels.
Step 4: Jump both of your feet forwards in between your hands, once again, ensuring that your feet remain shoulder-width apart.
Step 5: Exhale. Propel your body upwards into the air. Extend your legs below you and your arms above your head.
Step 6: Inhale. Land in the starting position, ensuring that you maintain ‘soft’ knees to prevent injury. Repeat for 20 seconds.
Circuit 2: Mountain Climber
Step 1: Place both hands on the yoga mat shoulder-width apart and both feet together behind you, resting on the balls of your feet. Gently draw your ribs to your hips to engage your core. This is your starting position.
Step 2: Keeping your left foot on the floor, bend your right knee, and bring it in towards your chest.
Step 3: Extend your right leg to return to the starting position.
Step 4: Keeping your right foot on the floor, bend your left knee, and bring it in towards your chest.
Step 5: Extend your left leg to return to the starting position. Continue alternating between right and left for 10 seconds, inhaling for four mountain climbers and exhaling for four mountain climbers.
Circuit 2: Glute bridge
Step 1: Start by lying flat on your back on a yoga mat. Bend your knees and position your feet firmly on the mat, ensuring that they are hip-width apart and your spine is in a neutral position. Allow your arms to rest by your sides on the mat. This is your starting position.
Step 2: Inhale. Exhale, gently draw your ribs to your hips to engage your core. Press your heels into the mat, activate your glutes, and raise your pelvis off the floor until your body forms one straight line from chin to knee, resting on your shoulders.
Step 3: Inhale. Lower your pelvis to return to the starting position. Repeat for 60 seconds
Ab finisher: Plank
Step 1: Start by placing your forearms (wrist to elbow) firmly on the mat, ensuring that your elbows are directly below your shoulders. Extend both legs behind you and elevate your hips off the mat, resting on the balls of your feet. Brace your abdominals and ensure that your spine remains in a neutral position. Hold this position for 30 seconds, breathing deeply throughout.
Ab finisher: Russian Twist
Step 1: With your hands clasped in front of your chest, start seated on a yoga mat with knees bent and heels firmly planted. Lean back slightly so that your abdominals are engaged and you are balancing on your sit bones. This is your starting position.
Step 2: While keeping your lower body as still as possible, twist your torso to the right and gently touch your elbow on the mat next to your right hip. If you cannot reach the mat, just twist as far as you can while keeping your lower body still.
Step 3: Untwist your torso to return to the starting position.
Step 4: While keeping your lower body as still as possible, twist your torso to the left and gently touch your elbow on the mat next to your left hip. If you cannot reach the mat, just twist as far as you can while keeping your lower body still.
Step 5: Untwist your torso to return to the starting position. Continue alternating between right and left for 30 seconds.
Cooldown: Glute Stretch
Step 1: Start by lying flat on your back on a yoga mat. Bend your knees and position your feet firmly on the mat, ensuring that they are hip-width apart and your spine is in a neutral position. Release and turn out your right leg so that your ankle is resting on your left leg just above your knee. Draw your left knee in towards your torso, resting both hands on the back of your left thigh. Hold this position for the specified amount of time, breathing deeply throughout.
Each time that you exhale, draw your knee further into your chest and press your right elbow into your right knee to increase the stretch, ensuring that your spine remains in a neutral position and your tailbone on the floor. Repeat this stretch for 30 seconds.
Cooldown: Hamstring stretch
Step 1: While seated on a yoga mat, extend both legs as wide as you can.
Step 2: Bending from the hips, turn your torso towards your right leg and reach for your foot (or as far as you can). If you can reach your toes, gently pull them back towards you or rest your hands on your ankles or shins — whichever is most comfortable.
Step 3: Hold this position for the specified amount of time, breathing deeply throughout. Each time that you exhale, lower your torso further towards your right leg, ensuring that you are bending from the hips and not rounding through your spine. Hold for 3o seconds and repeat this stretch on the other side.
Cooldown: Child's pose
Step 1: Start in the center of your mat on all fours—ensuring that your shoulders are stacked over your hands and your hips are over your knees, toes untucked. Draw your glutes towards your heels and lower your torso towards your thighs. Extend your arms along the mat, resting your head on the mat between your arms. Create space between your shoulders and ears by drawing your shoulder blades down and back. Hold this position for 30 seconds, continuously breathing in and out through your nose
If barre class is your jam
The workout: Another HIIT workout for inbetweeners: This 10-minute full-body barre routine from Britany Williams that'll have you feeling the burn, ballerina style.
How to do it: Perform the exercises below in order for the sets and time noted. Repeat core series twice before cooling down.
Warm up: Inchworm to world’s greatest stretch
Step 1: Stand at the edge of your yoga mat with your feet hip-width apart. Keeping your legs straight, hinge forward and walk your hands the length of the yoga mat until you are in a plank position with your hands under your shoulders.
Step 2: Then, to perform the World’s Greatest Stretch, bring one foot to the outside of the hand then reach that hand up to the ceiling, letting your gaze follow.
Step 3: Return the hand and foot so that you’re in a plank, repeat the rotation on the other side. Then walk the hands to the feet, keeping the legs straight, and return to standing. Repeat for 30 seconds.
Warm up: Squat
Step 1: Bring your feet wider than shoulder-width with the toes slightly turned out.
Step 2: Shift your hips back and down, keeping the chest upright to lower into a squat. Then lift back up to standing by contracting the glutes and straightening the knees. Repeat for 30 seconds.
Warm up: Alternating lateral lunge
Step 1: Start in a standing position with your feet wider than shoulder-width and your toes facing forward. Shift your weight to one side, bending that side’s knee deeply, shifting the hips back, yet keeping the chest upright.
Step 2: The opposite leg should stay completely straight. Now shift the weight to the other foot, repeating the position on the other side. Continuously flow through the movement side to side for 3o seconds.
Lower body: Second to passé
Step 1: Start with your feet wider than shoulder-width with the toes turned out.
Step 2: Keeping the torso upright and the core engaged, bend both knees so that the knee tracks over the second and third toe. This is the starting position.
Step 3: After reaching your lowest point, press up and bring one foot to the inner thigh or calf of the opposite leg.
Step 4: Return back down to the starting position and repeat. Open your arms wide to the side and bring your fingertips towards each other in front of you to make an “O” shape with as you lift up to balance on one leg. Repeat the movement for 15 seconds on each side.
Lower body: Second to passé to curtsy lunge
Step 1: Start with your feet wider than shoulder-width with the toes turned out.
Step 2: Keeping the torso upright and the core engaged, bend both knees so that the knee tracks over the second and third toe. This is the starting position. After reaching your lowest point, press up and bring one foot to the inner thigh or calf of the opposite leg.
Step 3: Step the bent foot behind you on the back diagonal and bend both knees so that you’re in a curtsy lunge. Lift your foot back up to the passé position with the foot touching the thigh before returning to the starting position. That's one rep.
Step 4: Repeat from the beginning. Open your arms wide to the side and bring your fingertips towards each other in front of you to make an “O” shape as you lift up to balance on one leg. Repeat the movement for 15 seconds on each side.
Lower body: Curtsy Lunge Pulse
Step 1: Hold a curtsy lunge position with one foot on the back diagonal behind the other foot, coming to the ball of the back foot.
Step 2: Keeping the torso upright or slightly hinged forward, pulse downward by continuously slightly bending and extending both knees. Repeat for 30 seconds.
Lower body: Curtsy Lunge Jump
Step 1: Start in a curtsy lunge position with one foot on the back diagonal behind the other foot, coming to the ball of the back foot. Bend both knees and keep the torso upright or slightly hinged forward.
Step 2: Next, jump up with the front foot as you drive the back leg towards the chest. Land softly back in the curtsy lunge. Repeat for 30 seconds.
Core series: Commando to Spider Plank
Step 1: Come to a plank position with your hands under your shoulders and your feet hip-width apart. Engage through the core and lower body to stabilize.
Step 2: Next, lower down to your forearms one at a time. Then return to your palms. Finally, draw one knee to the outside of the elbow on the same side of the body.
Step 3: Repeat on movement for 30 seconds with the knee on the other side. Then repeat. Alternate which forearm comes down to the ground first.
Core series: Side plank hip pulses
Step 1: Bring one forearm to the mat with your shoulders stacked over the bent elbow so that your hips are also stacked on one another. Reach the top arm straight up to the ceiling.
Step 2: Keeping the core engaged, pulse upwards through the hips to challenge the obliques. Repeat for 15 seconds before performing the move on the other side.
Core series: Mountain climber
Step 1: Come to a plank position with your hands under your shoulders and your feet hip-width apart. Engage through the core and lower body to stabilize.
Step 2: Next, draw one knee to the opposite elbow then repeat with the other knee. As one knee comes forward, the other foot steps back. Move continuously, keeping the torso relatively still. Repeat for 30 seconds.
Cooldown: Reclining Figure Four
Step 1: Come to your back. Bend one knee with the foot flat on the ground. Place the other ankle on the thigh then thread your hands around the hamstring of the bottom leg, pulling the thigh closer in towards the torso to deepen the stretch in the glutes and outer hip.
Step 2: Hold the stretch for 30 seconds before repeating on the other leg.
Cooldown: Butterfly
Step 1: Come to seated with the soles of the feet together and the knees open wide towards the ground. Bring your hands to your feet and slightly hinge forward from the waist to deepen the stretch in your hips. You can press your elbows into the stretch to open the hips more. Hold for 30 seconds.
If you're ready to do the most
The workout: For the advanced kids in this class, check out Chontal Duncan's AMRAP (as many reps as possible) style 15-minute workout. Don't let her impressive Muay Thai background intimidate you. You got this!
How to do it: Perform the exercises below in order for the sets and time noted. Repeat the entire circuit 3 times, resting for one minute between each lap.
Kettlebell swing
Step 1: Holding a kettlebell directly in front of your body, plant both feet on the floor slightly further than shoulder-width apart. Inhale. While maintaining a slight bend in your knees, tilt forwards from your hips and allow the kettlebell to gently swing backward between your legs. This is your starting position.
Step 2: Exhale. Using your glutes and hamstrings, extend your legs and hips to swing the kettlebell forwards and upwards to shoulder height.
Step 3: Inhale. Bend your knees and tilt forward from your hips to lower the kettlebell and return to the starting position. Repeat for 45 seconds, ensuring that your glutes and hamstrings power the movement and you are not lifting the kettlebell with your arms and shoulders.
High knee and burpee
Step 1: Begin standing, positioning your feet slightly further than hip-width apart. This is your starting position.
Step 2: Keeping your weight on your left foot, bend your right leg to bring your knee toward your chest. Lower your right leg and plant your foot on the floor. Keeping your weight on your right leg, bend your left leg to bring your knee into your chest. Once you are comfortable with this movement, increase your speed so that you are hopping from one foot to the other.
Step 3: Once you have completed 10 high knees bend at the hips and knees and place your hands on the floor on either side of your feet, ensuring that your spine remains in a neutral position. Jump your feet backward so that your legs are completely extended behind you, resting on the balls of your feet. Your body should be in one straight line from your head to your heels in a push-up position.
Step 4: While maintaining a neutral spine, inhale and bend your elbows and lower your torso towards the floor until your arms form two 90-degree angles. Ensure you maintain tension in your arms and shoulders so that your chest does not collapse towards the floor. Repeat for 45 seconds.
Kettlebell squat rack
Step 1: Holding a kettlebell in each hand with an overhand grip (palms facing you), plant your feet on the floor shoulder-width apart. Raise one kettlebell at a time to chin height by bending your elbows and rotating each wrist underneath the handle, allowing the sphere of the kettlebell to rest on the top of your forearms. Raise your elbows outward to form a ‘rack’ between your upper arm and forearm. This is your starting position.
Step 2: Inhale. Looking straight ahead, bend at both the hips and knees, ensuring that your knees point toward your toes. Continue bending your knees until your upper legs are parallel with the floor. Ensure that your elbows remain elevated and your back remains as upright as possible.
Step 3: Exhale. Extend both knees to return to the starting position. Repeat for 45 seconds.
Mountain climber
Step 1: Place both hands on the yoga mat shoulder-width apart and both feet together behind you, resting on the balls of your feet. Gently draw your ribs to your hips to engage your core. This is your starting position.
Step 2: Keeping your left foot on the floor, bend your right knee, and bring it in towards your chest.
Step 3: Extend your right leg to return to the starting position.
Step 4: Keeping your right foot on the floor, bend your left knee, and bring it in towards your chest.
Step 5: Extend your left leg to return to the starting position. Continue alternating between right and left for 45 seconds, inhaling for four mountain climbers and exhaling for four mountain climbers.
Kettlebell bent over row
Step 1: Holding a kettlebell in each hand with a neutral grip (palms facing inwards), plant both feet on the floor shoulder-width apart. While maintaining a slight bend in your knees, hinge forward from your hips so that your torso is parallel to the floor. Extend your arms directly below your chest. This is your starting position.
Step 2: Inhale. Exhale. Bend your elbows to bring the kettlebells in towards your body, ensuring your elbows remain in close contact with the sides of your body. You should feel a small squeeze between your shoulder blades. Inhale. Extend your elbows to lower the kettlebells and return to the starting position. Repeat for 45 seconds.
You Might Also Like

