Fantastic (stock) plugins and how to use them: Logic Pro Space Designer
Recently, we embarked on a quest to help you get the best out of Logic Pro’s stock plugins; the sound-shaping tools that arrive bundled with the DAW when you buy it. After kicking off with Logic's all-powerful synth plugin, Alchemy, we now turn our attention to one of their flagship reverbs, Space Designer.
Regardless of your music preferences, it’s arguable that reverb is something of a must-have effect. Typically, when recording, the aim is to capture sound-sources as dry as possible; without any sort of room-ambience or natural reverb.
This allows the engineer/producer maximum scope to manipulate the sound to their desired needs. Reverb can then be artificially added at a later stage to increase realism, atmosphere, character, etc.
Furthermore, in an age of multi-tracking and MIDI generated sound-sources, it’s important to make instruments (which have all been recorded or programmed separately) sound as though they’re sharing the same acoustic environment (as if recorded all together at the same time). This helps improve a mix’s cohesiveness and typically yields a more natural and immersive listening experience.
A brief history of reverb
In the earliest days of recording, reverbs were captured naturally, utilising acoustically tuned rooms in which to record. This was complicated, expensive and hard to control. By the late 1950s, innovations such as echo-chambers, plate-reverbs and large spring-reverbs were developed. Each had their own unique characteristics, and whilst large, expensive and somewhat cumbersome, remained the primary methods of mechanically inducing artificial reverb effects in post-production.
By the 1980s, the advent of the digital era brought with it digital reverbs, which were powerful and versatile effects capable of synthetic reverbs that sounded like nothing heard before. In the video above, Antonio Fini demonstrates a restored version of the EMT 250, the world's first digital reverb.
Whilst producers and engineers were now equipped with a range of mechanical and digital tools that could emulate things such as concert halls, if you truly wanted a concert hall reverb, you still had to record in a concert hall (which would be very costly).
Enter impulse responses and convolution reverb! As computing and processing power grew in the 90s, impulse response technology was developed, offering producers new possibilities in their reverb arsenals. Let’s look in more detail at how they work in plugins such as Space Designer.
Impulse responses and convolution
In simple terms, an impulse response is just that; an impulse and a response. Typically, the impulse is a short burst of white-noise, played through a speaker, in a room, concert hall, or any other sort of space. The white-noise burst (impulse) is recorded, along with the reverberation tail (the response), and that’s it!
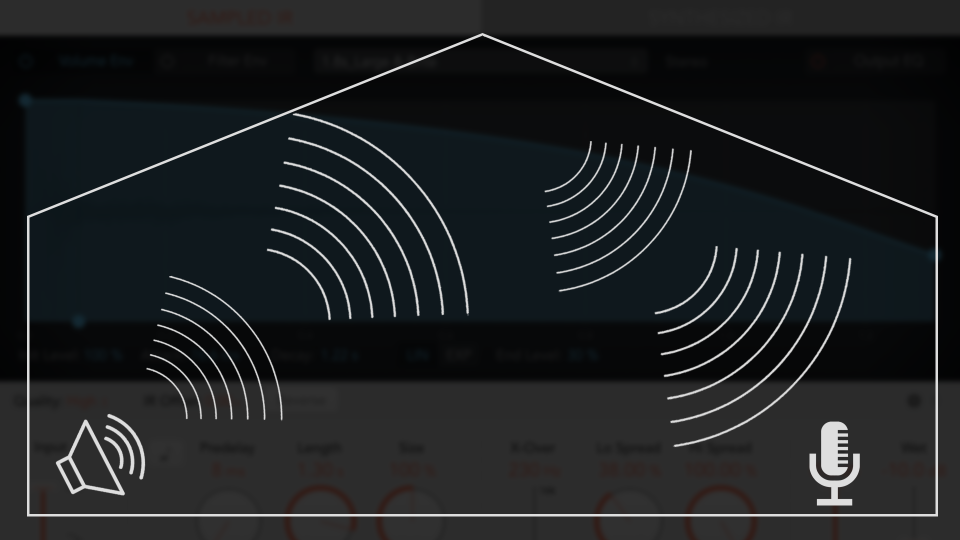
Imagine a quaint village church, or a large, Gothic cathedral, or an empty Victorian theatre, or even an iconic live space, such as Abbey Road’s Studio One, with a speaker at one end of the space and a microphone at the other. That’s it! It’s an extremely simple premise, but it’s the first part in the process of convolution.
Once the Impulse Response (IR) is loaded into a convolution reverb, the software is capable of analysing the characteristics of the impulse response (tone, length, diffusion, pre-delay, etc) and mapping these to whatever sound is being processed.
Thanks to this technology, you can record an acoustic guitar in your bedroom, load up an IR of Abbey Road’s Studio One or The Royal Albert Hall, and have your guitar sound as if it were recorded in one of those iconic spaces.
It's worth noting that impulse response technology is not solely used for reverb, but also used in other forms of analogue signal processing, such as capturing the characteristics of guitar amplifiers and iconic, old, analogue studio equipment.
Space Designer
Logic’s Space Designer comes preloaded with hundreds of IRs that cater to a wide palette of sounds from very small and intimate, to enormous and other worldly.
There is also a huge array of analogue circuitry and speakers on offer (such as guitar amps and transistor radios), which can be great for experimental tones and lo-fi colouration.
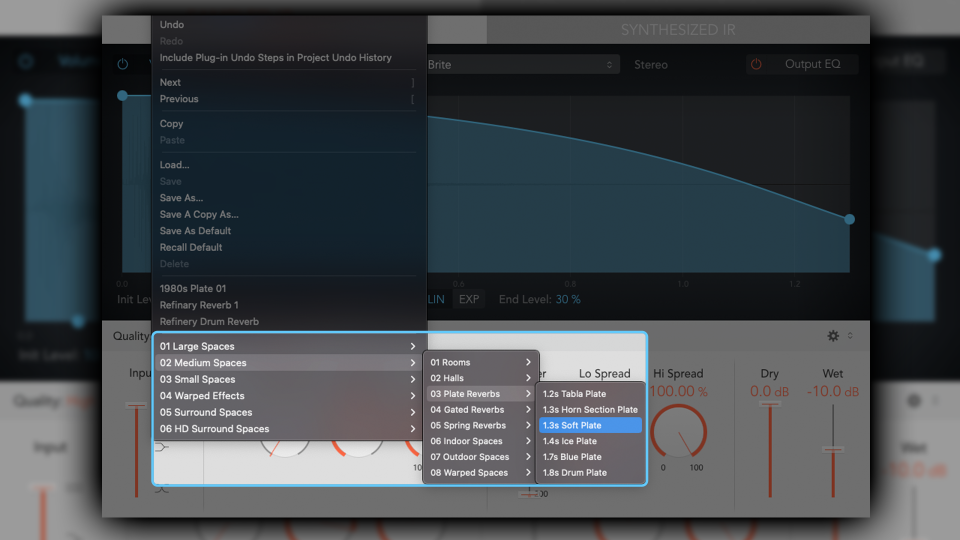
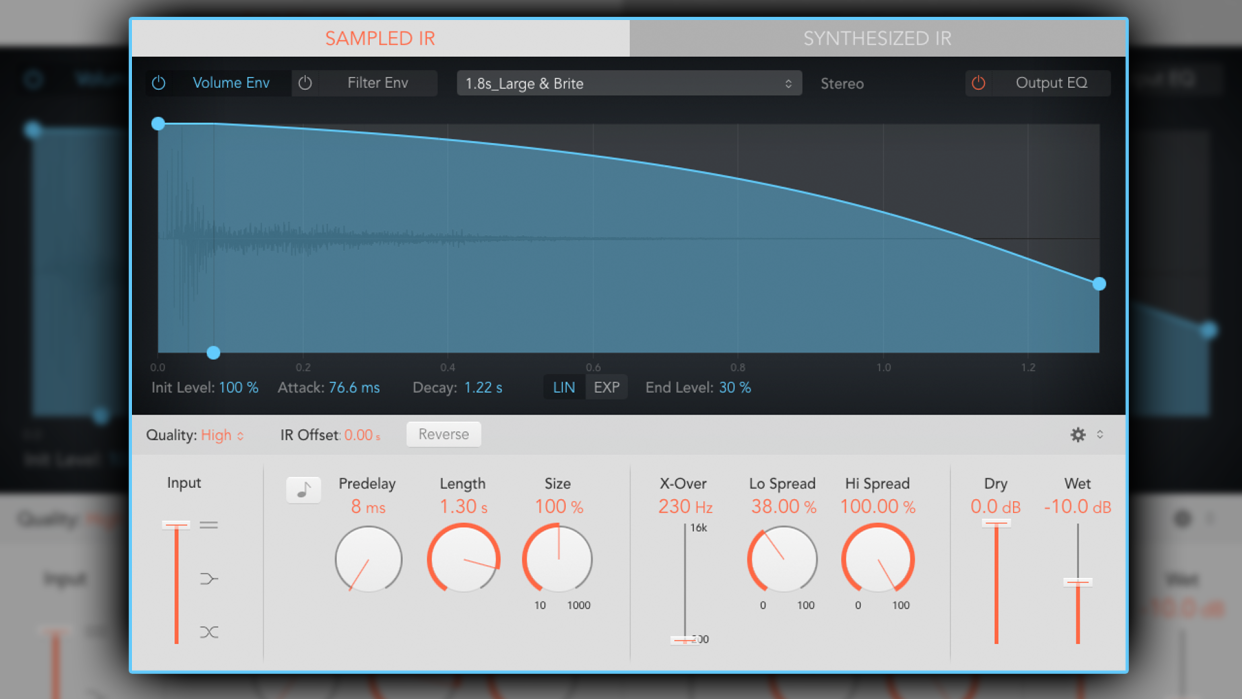
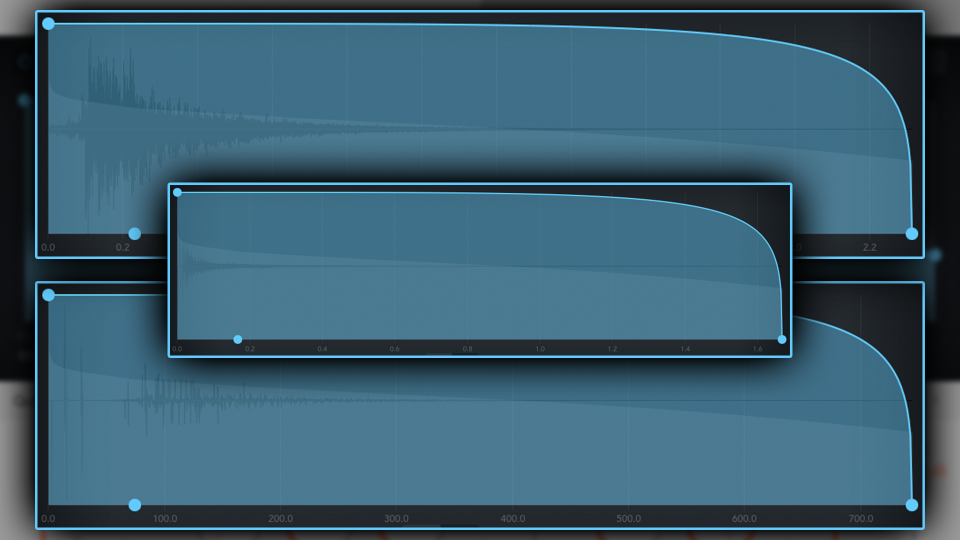
To recall an IR, simply select from the drop-down menu. The catalogue of IRs is very clearly labelled making it intuitive and easy to navigate. Once loaded, the Sampled IR is displayed in the Envelope window like so:
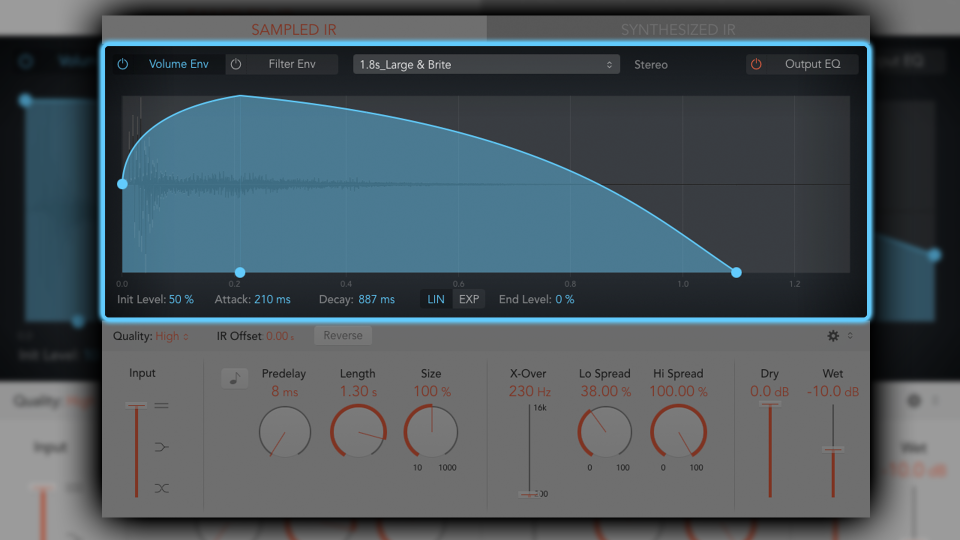
By default, the Amplitude Envelope is displayed, allowing for tailored attack and decay times. It’s also capable of processing in either a linear or exponential format.
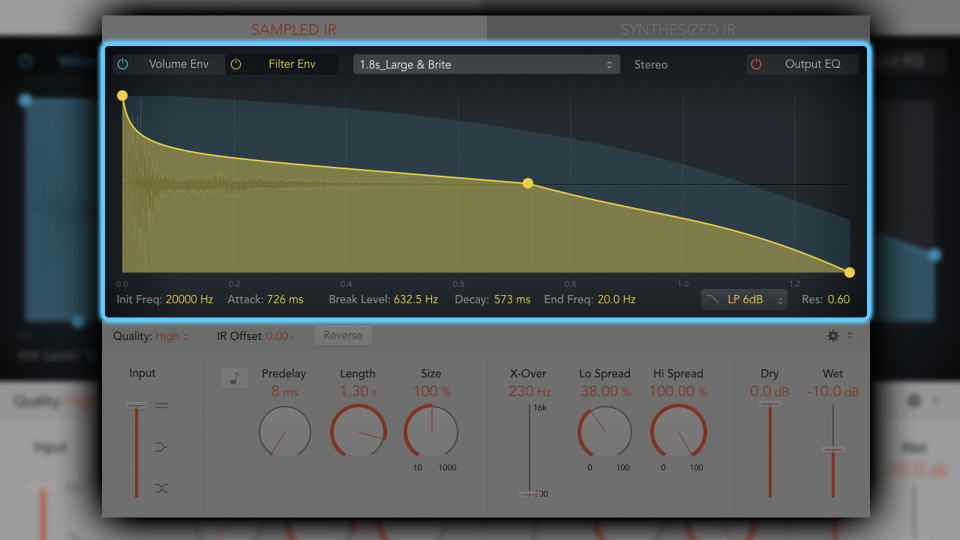
There’s also a Filter Envelope option, allowing for a reverb that gets duller or brighter over time.
The graphical display can be manipulated, but there are corresponding dials. The dials have reverb–specific names, however, they’re akin to the ADSR conventions, and thanks to their visual design, as soon as you begin to manipulate them, it will feel very intuitive, just like an ADSR envelope. There are -6db and -12db (per octave) low-pass options, as well as high-pass and band-pass filter options.
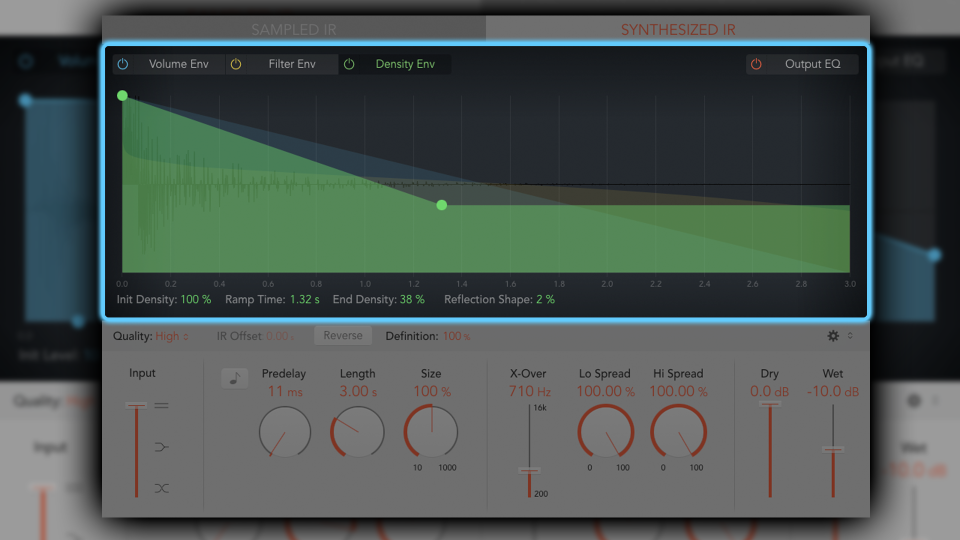
Not so obvious is the Synthesized IR option to the right of the Sampled IR button.
This is an IR that Space Designer will generate/derive (real-time) based on a combination of the original Sampled IR and any customised settings of Length, Envelopes, EQ and Spread parameters.
If you find yourself tinkering a lot with a Sampled IR, try switching over to the Synthesized IR variant. As it auto-generates the Synthesized IR based on how you’ve altered and manipulated the Sample IR, there’s every chance the Synthesized IR will be closer to what you were aiming for with your Sample IR manipulations.
Note that the Synthesized IR includes a Density Envelope option. This allows you to envelope the number of reflections in the reverb.
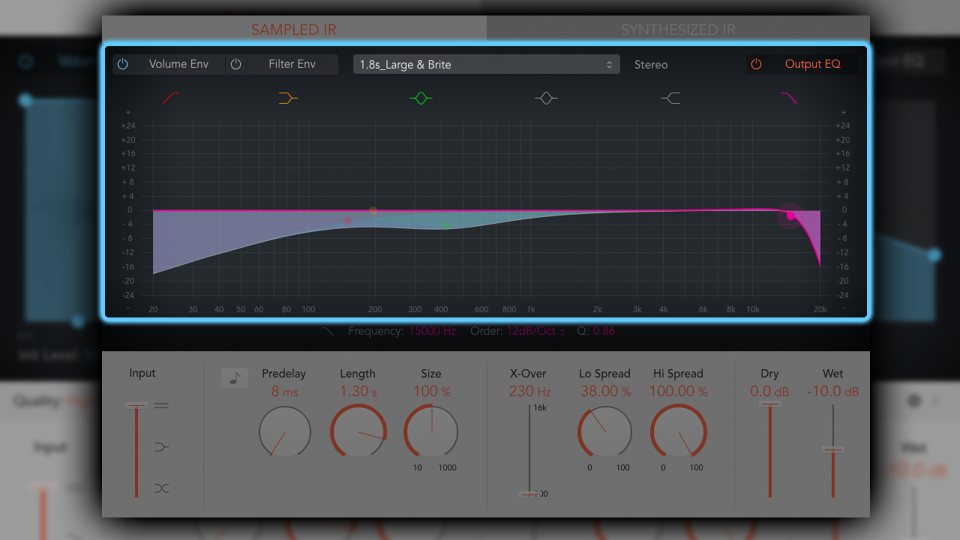
Whilst reverb is a vital production tool, in isolation, it runs the risk of negatively altering the tonal character of your work.
Typically this is due to the reverberations and reflections exaggerating frequencies that can result in woolliness or harsh top-ends. A post-reverb-EQ is therefore often needed. Whilst it’s no effort to add an EQ plugin after your reverb in your signal chain, Space Designer conveniently includes a HP/LP/Shelving/2-band Parametric EQ in its output stage.
I often find myself rolling off the highs and lows, as well as scooping the lower-mids a little, to aid in clarity and distinction of my reverbs.
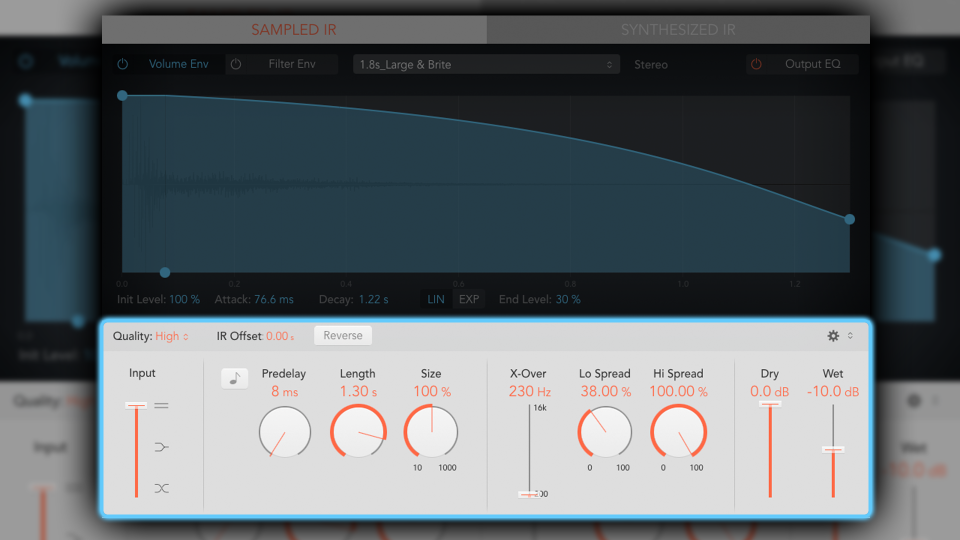
Below the Envelope Window are more of the usual parameters one might expect to find on a reverb plugin:
Quality - Processing quality. This is great for emulating very crude, vintage digital reverb artefacts, as it allows you to reduce the sample-rate of the reverb to as low as one quarter of your project’s sample-rate
IR Offset - A time-based offset for how long it takes the IR to sound
Reverse - reverses the reverb
Definition - Only present in Synthesized IR mode. Increase/decrease the natural phenomenon of directional information reducing over the duration of the reverb-tail
Input - Input level and stereo mixing options (normal/split, combined/mono, switched/inverted)
Predelay - How long before the reverb swells
Length - Length of reverb tail. This will alter depending on the length of the IR
Size - 100% is the IR’s original size. It can be increased up to 1000%
Lo Spread - How much lower frequencies are diffused. 100% is the IR’s original characteristic
Hi Spread - How much higher frequencies are diffused. 100% is the IR’s original characteristic
X-Over - Sets where the Lo and Hi spread controls crossover/split
Dry/Wet - How much original signal and reverberated signal (respectively) are in the output. When used on a bus with Aux sends, it’s strongly recommended that dry is set to 0%
Loading your own IR
Whether as freebies hosted on message boards, made by charitable individuals, or as officially licensed products that sit behind paywalls, there are literally thousands of impulse responses readily available on the internet. A quick search and you’ll no doubt find all sorts of interesting and useful acoustic spaces and analogue equipment in IR format, all of which can be loaded in Space Designer.
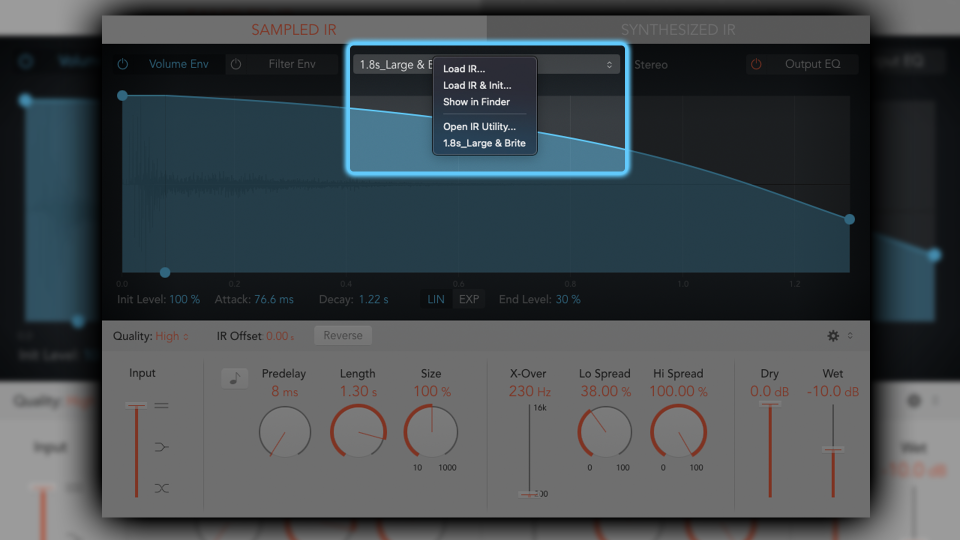
In the Sample IR drop-down menu, select Load IR and from here everything works exactly the same as detailed above. Space Designer does not limit you to only using the IRs it comes bundled with.
A few favourites
If you’re new to Space Designer (or music production in general), choosing your reverb can feel rather daunting (as the choice is so vast).
Furthermore, it's a very specific and subjective choice, based on the needs of the project and your personal tastes; there’s not really such a thing as good or bad, right or wrong (although there are some pitfalls to look out for - more on that below).
Whilst every project is different, I have a few go-to IRs that I often find myself recalling when starting work on a new project.
Medium Spaces - Rooms - Medium Sweet:
A great all-rounder, ideal for adding colour and warmth without overstating its presence
Small Spaces - Plate - Drum Plate:
Snappy and characterful with nice, early reflections
Medium Space - Hall - TV Studio:
Sounds open and lush, yet small enough that it contains some early reflections. A soft, light touch that still contains a lot of noticeable character
Large Spaces - Plate - Nice Plate:
Open, airy, lush. Ideal for spacey, ambient projects
Warped Effects - Speakers - Tiny Phone:
Sounds like a phone speaker! Great for lo-fi colouration
A quick tip for the newbies
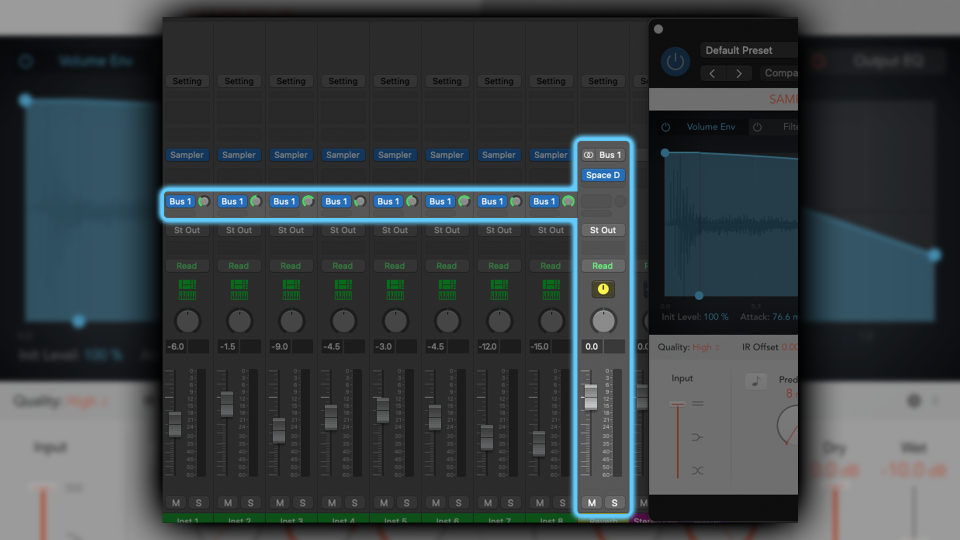
Reverbs are CPU-heavy! Racking up lots of reverbs will quickly incur System Error Overload messages. Moreover, it’s not necessary as it doesn’t yield the best sonic results.
To create a cohesive sound palette that feels natural, like multiple musicians playing together in a room, and minimise CPU load, utilise less reverb plugins and more aux-sends. Place one reverb plugin on a bus, make sure its Dry control is set to 0% and use each channel’s send to apply the desired amount of reverb to each signal.
Lastly, be mindful of what reverb can do to the frequencies in your mix. Too much low-end information can often make things bloated and woolly. Too much high-end information can often make things fluttery and overly shimmery (even peaky and harsh) in the top-end.
Be mindful, then, of either utilising an EQ before your reverb to tame and shape the extremes, or taking advantage of the inbuilt EQ in Space Designer.
Closing thoughts
Space Designer is one of the most versatile reverb plugins I’ve used, and like many of Logic’s stock plugins, seems too good to simply be a stock plugin. With its default IRs, it’s got something for almost any scenario, and if it hasn’t, it’s no issue to load in a third-party IR.
Furthermore, whilst it’s extremely versatile and goes far beyond the usual attributes of a reverb plugin (hosting analogue circuitry and speaker emulation), it’s so incredibly simple and easy to use. It’s a masterclass in less-is-more and intuitive user-interfacing.
If you’re a Logic user and haven’t yet dabbled in Space Designer, I urge you to spend a little time playing around with what this reverb has to offer. Regardless of your musical tastes and stylings, you’ll almost certainly find something in Space Designer to spark your imagination and creativity.

