How to combine chords and walking basslines on guitar

Part one: How to combine chords and walking basslines on guitar
One of the things I’m most often asked is how to play walking basslines on guitar. Between my private students and the guitar retreats I teach, inevitably someone will ask me how to combine chords with walking basslines while keeping a swinging jazz groove.
Being able to play chords and basslines at the same time is the ultimate accompanist’s skill for a jazz guitarist, whether jamming in a guitar duo or working with a singer. My chord and bassline approach sits at the core of my playing, so mastering it will give you a deep insight into my chord melody style.
In this series of lessons, I’ll teach my technique of combining chords and walking basslines from the ground up, starting with the most important chord shapes and fingerings, through to constructing authentic basslines.
While most jazz guitarists know some big impressive guitar chords with terrifying names, it’s more effective to use smaller fragments of chords when playing them in tandem with a walking bassline.
These fragments are called root and guide tone voicings, as they contain the root of the chord, normally played on the sixth or fifth strings, plus its guide tones (the 3rd and 7th) played on two of the middle strings. The 3rd and 7th are the notes that best define the sound of a chord and indicate whether it is a major 7th, minor 7th or dominant 7th.
I hope you enjoy getting started.
Chords for exercise 1
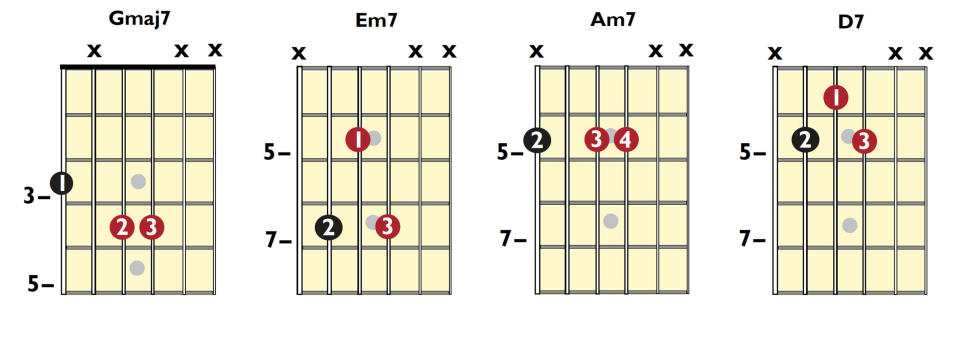
Exercise 1. Gmaj7-Em7-Am7-D7
We’ll use the I-VI-II-V progression in G Major as our workhorse: Gmaj7-Em7-Am7-D7. Here’s how the stripped-down chords are played as guide tone voicings.
Chords for Example 2.
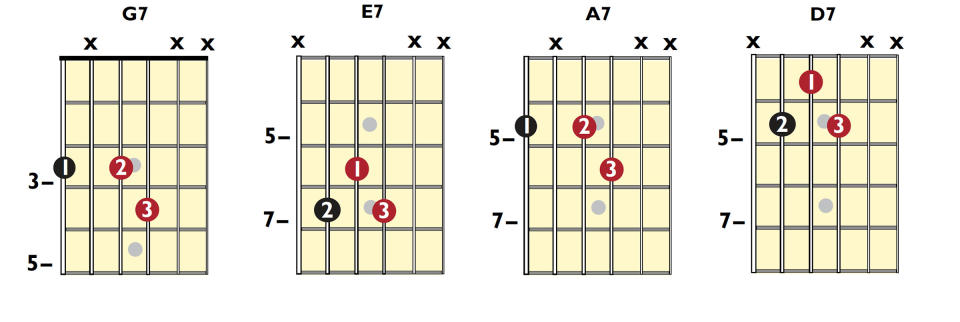
Example 2. Changing the I-V-II-V chords to dominant
These chords are diatonic to the key of G major, but jazz musicians will often convert the chord qualities and play them all as dominant chords for more of a jazz-blues feel. It’s fine to mix and match these voicings to your taste. The only one that is set in stone is the D7 chord, which resolves back to the I chord.
Have a go at looping the I-VI-II-V sequence around and using different chord qualities each time. In subsequent examples we’ll play that sequence in different areas of the neck and also introduce some simple chord substitution ideas. But we’ll get to that in due course!
Exercise 3. Adding bass accompaniment
Now it’s time to add some simple bass note accompaniment. First, we’ll just play the basic bass line to the chords. Play the root twice on each chord, but pay attention to how I accent each note. The first note is longer and the second note is slightly staccato (cut off).
Exercise 4. Learning to walk
Now that we know where the bass notes are, how do we begin to walk? It’s easier than you might think. We’re going to spend a little time constructing some bass line ideas before we introduce the chords. The first step is to add a chromatic approach note either above or below the target bass note.
Rather than playing two bass notes per chord as in the previous example, we replace the second note with a chromatic approach note located a semitone above or below the chord that will follow. In Ex4, I play an approach note a semitone above each root note.
The approach note is played just before the chord change, so that we land on root notes on the beat. The root notes are all on the strong beats of the bar (beats 1 and 3) and the chromatic approach notes are all on the weak beats of the bar (beats 2 and 4). Notice how we’ve created movement and a tension that resolves when we move to a targeted root note?
Exercise 5. Approach notes for tension and release
Now, let’s try it the other way around by targeting the root notes from a semitone below. Approaching the root from a semitone below sounds just as strong as approaching it from above. Musically, it has the same effect, as once again the tension on the weak beat resolves to the root note on the strong beat.
Exercise 6. Bass note substitution
A very common substitution idea in jazz is to replace the I chord (Gmaj7) with the III chord from the same key. In the key of G major that’s Bm7. This example replaces the I chord bass note (G) with the III chord bass note (B) to create a nice descending pattern.
Exercise 7. Chord substitution
We can combine these ideas and introduce the substitution idea later. In this example we play the I-VI-II-V as normal in bars 1-2, then introduce the Bm7 substitution in bar 3, replacing the G chord. This is played using approach notes from above.
Exercise 8. Mixing up approach notes
It’s time to get creative. We can mix up the approach notes, varying whether we play them from above or below. Now we’re starting to sound more like a jazz bass player.
There are lots of different options, of course, and here is one idea to get you started, but consider this a creative exercise. In your practice time, find as many ways as you can to navigate the progression. If you think about it, the permutations are virtually limitless.
Exercise 9. Lower fretboard register idea
When you’ve thoroughly explored the progression in this position, try other areas of the neck. Here’s one idea played in the low fretboard register.
Exercise 10. Higher fretboard register idea
Finally, here’s another approach played in the higher fretboard register, and then we’ve completed our walking bassline primer. Spend some time practicing walking in different zones of the neck and work towards moving smoothly between positions.
This will be great preparation for the second half of the lesson, when we’ll start to combine walking basslines with guide tone chords to create a full-sounding accompaniment.
Part two: How to combine chords and walking basslines on guitar
Now it’s time to combine these two elements and make it sound like there are two instruments playing together.
Our aim here is to allow the steady quarter-note walking bass pattern continue, while the target chords are played on the off beats. We’ll begin by getting the basic rhythm of the two parts working together.
Example 1
Play the bass note of the G7 on beat 1 and the rest of the chord on the off beat, before jumping to the F on beat 2 (the chromatic approach note to Em7). Repeat the chord rhythm then play the Bb chromatic approach note to A7 on beat 4. Repeat with the A7 and D7 chords in bar 2. Approach each chord from a semitone above.
Example 2
Now try playing the same rhythm but approach every chord with a chromatic step from below.
Example 3
Repeat the previous idea using the Bm7 substitution in the sequence. First, play chromatic approaches from the previous example.
Example 4
Now try the same progression approaching with the chromatic note below the chord.
Example 5
Finally, play the full I-VI-II-V / III-VI-II-V progression and combine chromatic approaches from both above and below. Here’s one route around the changes, but you should be able to come up with many more! Using this approach the permutations are almost limitless.
Example 6
As our aim is to make the bass and chord parts sound like two instruments working together, to help with this effect, the next stage is to accentuate the difference by playing both parts at different volumes. We want the bassline louder and the chord stabs quieter and less obvious.
Example 7 exaggerates the volume difference between the bassline and the chords. It’s a bit over-the-top but done deliberately, to cause you to think about your volume levels. Separating the voices in this way takes a bit of practice to sound natural. To begin with, exaggerating the dynamics will help to build the independence between your thumb and fingers.
Example 7
Working on developing the ‘volume controls’ between your thumb and fingers is a challenge for most students at first. A little trick I like to teach is to get my students to play the bassline once through loudly without the chords, then on the repeat to add in the chords as quietly as possible. Try this on the I-VI-II-V sequence.
Example 8
Until now the chord stabs have been played staccato (clipped) but we can let some chords ring out as a contrast. We do this by leaving the fingers on the higher strings while we play the next note of the bassline (listen to the audio before playing Ex 8).
We want to leave the fingers playing the chord in position for as long as possible, while the spare finger plays the bassline. These variations keep the texture of the rhythm guitar interesting and break up any monotony.
Example 9
Another way to add interest is to move the position of the chord stabs in the beat. Until now, we’ve played them on the ‘and’of beats 1 and 3, but with practice we can move them to the 1/16th-note divisions of the beat.
To develop this feel, forget about the whole sequence for a moment and just hold down a G7 fragment. Play the bass note with your thumb and the rest of the chord right after. Let the notes ring for two beats and repeat four times.
Example 10
When you’re confident with this rhythm, apply it to the four chords in the I-VI-II-V sequence.
Example 11
Now add the 1/4 note walking bass back in. I’ve notated the bass approaching from above, but when you’re ready you can begin to improvise your own basslines.
Example 12
The 1/16th note stab can be played at any point in the bar. In this final example, you’ll notice that I’ve also introduced some additional chords. There’s no great mystery to this, I’m just “harmonising” some of my chromatic approach bass notes. This is much easier than it sounds and increases our harmonic options.
If you decide to turn an approach note into a chord, just make it the same quality of chord as the one you’re targeting. I.e. target the A7 chord from a half step above with a Bb7 chord; target the G7 from a half step above with an Ab7 etc. You can also harmonise approach notes from below in exactly the same manner. Here’s how it sounds.

