How to make better beats: the ultimate guide to drum programming, mixing and sound design in 2023
This November, we’re going big on beats, the rhythmic backbone of your music, and the element that sets genres apart and gets feet tapping. Over the coming days, we’ll tackle both programming and mixing better beats, with round-ups of the best beatmaking software and tips for better acoustic and electronic drums (and all without a human drummer in sight).
Drummers across the world are running for the hills! That’s because the world of computer music-making has never been in better shape when it comes to beat-craft, with software packages and drum machine plugins more feature rich than ever before.
Now you can have practically any electronic drum machine in history on your hard drive, plus the best acoustic drum kits, played by the best players, all recorded by the most incredible mics in the finest studios in the world. There really is no reason to leave the comfort of your computer to create either the most hard-hitting electronic beats, or the most authentic-sounding acoustic drum tracks.
BUYER'S GUIDE
Best drum machine plugins 2023: Sample and synthesis VSTs for beatmaking
And it’s those two broad categories – electronic and acoustic – that we’re focusing on here. In previous features we’ve tended to discuss one or the other as separate beat-making entities, but the computer has united the two worlds. So it doesn’t matter how you create your beats: you can merge electronic polyrhythms with acoustic loops, underpin a raging metal drum track with a huge 909 kick, or even smatter some machine gun trap hats over a country drum track. Actually, that sounds awful, but you know what we mean: when it comes to beat creation, your computer lets you create them however you like.
Broadly speaking, we’re starting by covering programming – from basic to intricate – across a variety of broad-stroke genres, all demonstrated with a kind of step- or note-sequencing format that any DAW user will recognise. Then, for the humans among you, we’ll detail some of the tips you can use to make those beats sound more ‘real’.
Of course electronic producers can leave humanity at the door if they wish – a lot of club genres swear by the rigidity and power of tightly-quantised beats, and that’s fine. But one of the big criticisms of computer music-making is that it somehow removes the ‘proper human’ element – so we’ll show you how to bring that back.
Elsewhere we’ll cover several production techniques, including mixing a drum kit, whether that’s been recorded directly from a real one, or one from a library. And talking of those, we’ll detail some of the best libraries for acoustic drums, the best machines for electronic beats, the finest free beat makers and our choice of ‘out there’ instruments. Being 2023 and all, we’ll take a glance at AI beat-making, too.
So put your sticks away, or wish your drummer well, and prepare for better beats!
A (very) brief history of beatmaking
The heartbeat pounding in our bodies is not only providing the helpful function of keeping us alive, but also gives the perfect raw materials for the human rhythm track. It is perhaps inevitable, then, that getting any emerging technology to help us create beats has always been high on the human agenda.
If we had all day we could potentially trace this use of ‘technology’ back to when someone decided to club some rocks in a sequence, but instead, we’re going to skip forward a few millennia to when electricity got involved.
READ MORE
10 drum machines that changed musical history
In fact, we’re even going to skip over the ‘drum machines’ of the 1950s and ’60s that used basic electronics or tape to give you drum sounds and ballroom beats. We’re fast forwarding to –where else – the 1970s. This was the decade that not only gave us cheap(er) synths but the first modern drum machines, and both are directly responsible for how we make music today.
As is the case with a lot of technology, it was created to replicate something that was hard to do, so, to a certain extent anyway, early synths were trying to create orchestra sounds and early drum machines were trying to be drummers. We’re simplifying things, of course, but in both cases, it was the technology’s inability to do its intended job, or (more kindly) its flexibility to do jobs we hadn’t yet thought of, that ended up creating next generation machines to create genres of music we’re still enjoying today.
For the drum machine, this meant early ’70s models from Eko and Roland (then known as AceTone). The former’s 16-step approach could be said to have kick-started sequencing while Roland gave us the TR-77 which, like so many of their products, was designed to be the perfect partner to… an organ.
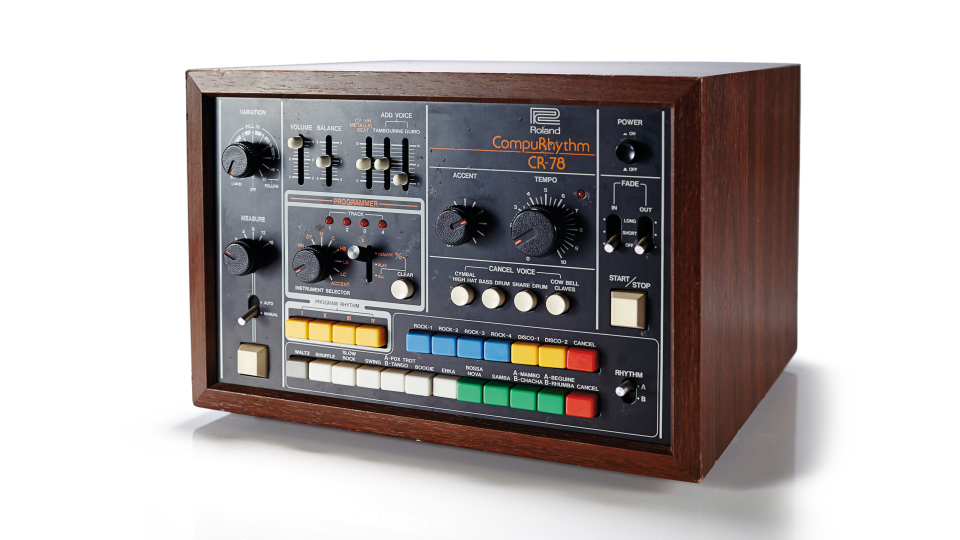
The company’s CR-78 was the big one though. While it also featured organ-style presets for Bossa Nova and Rhumba rhythms it would be adopted by artists including John Foxx, Peter Gabriel, Genesis and Depeche Mode more for its electronic sounds and less for its Strictly Come Dancing tendencies. Roland had inadvertently given us electronic beats that everyone had access to, not just Kraftwerk. And then they did it again, and the rest was EDM history. ‘0’ yes they did.
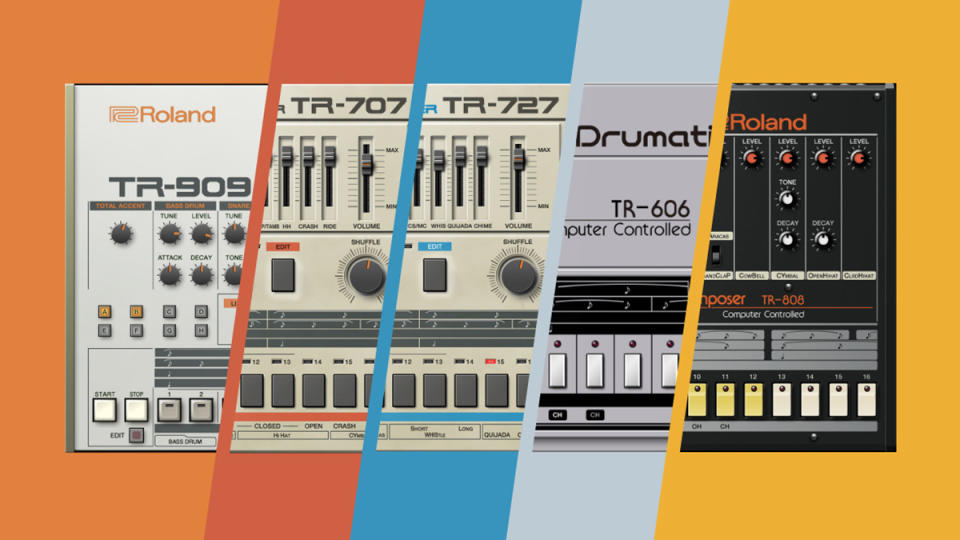
X0X-rated
So much has been said about Roland’s next range of TR drum machines that we have little to add. Suffice to say, the Roland TR-808 and 909 – alongside the TB-303 (another unintentional Roland genre launcher) – helped dance music along the way. They also took the step sequencing/beat-making approach up a level, so much so that their ‘XOX’ approach is still used today.
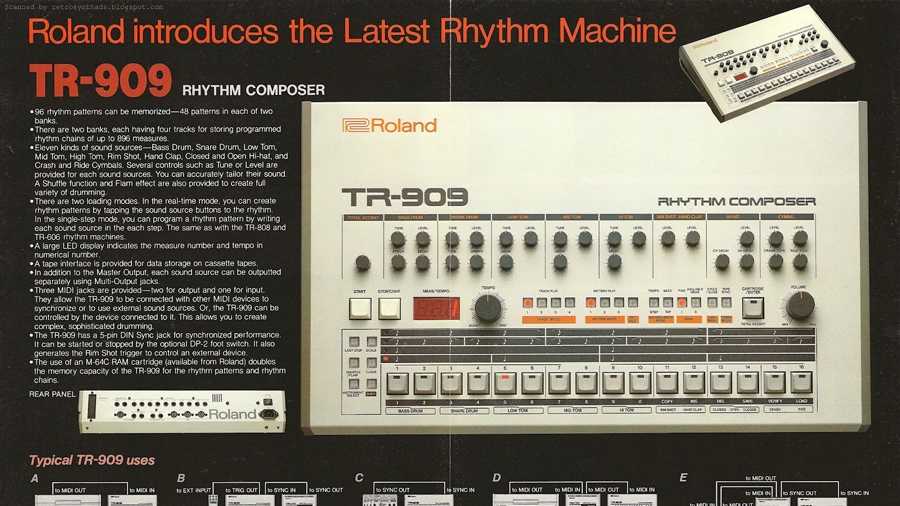
Drum machines then went digital and sampling became ‘a thing’ throughout the ’80s, but these highly editable and superb-sounding Roland machines really did set a blueprint for most drum machines that followed, in both hardware and software.
So much so that the first proper software instrument – Propellerhead’s ReBirth RB-338 – emulated both the 808 and 909 drum machines and the 303 Bassline. Yes, there were very early software instruments before ReBirth, but this was the first to do complete tunes.
You know the rest of the history. Software drum machines became big business as they were easy to run on early computers. However, these instruments were still largely producing electronic beats for a largely computer-based electronic music producing audience. The drummer was still safe. Until…
The rise of acoustic beats
As processor speeds and hard drive spaces increased, the software industry turned its attention to recreating real drum kits. So nowadays, with gigabytes aplenty, we can get recordings of every drum, from every kit, at every angle, recorded with every microphone.
READ MORE
Best drum VSTs 2023: Our pick of sampled drum kit plugins
And while some of these acoustic drum libraries focus on quality drum kits and mic placement, others offer you MIDI files of playing produced by real people! So unlike some other software instruments, drum libraries go that bit further with real playing mixed with hi-tech processing. Now you can get the full experience of a human being behind the best drum kit ever made, all within your DAW. (There are even signature drummer plugins with famous named drummers supplying their sounds and styles – so not all drummers are out of work just yet!)
As you can see, then, the last five decades have brought us here pretty fast and this article is really a celebration of where we’re at and where we came from. We’re aiming it at all levels and all beat creators. Whether you use the XOX style of creating beats, or you like to drag in individual kicks onto an audio track and create your own, or you record a real drummer, or whether you just let AI do it all, you will find something to learn below, as we mix, tweak, EQ, compress and even analyse beat-making in different genres.
Beat creation with AI
No feature hosted on a technologically-minded website is complete without the mention of AI! However, such is the current level of technology behind beat creation, you would assume that artificial intelligence is really ‘not required’. Electronic beat creation is often better the simpler and more hard-hitting it is, and acoustic drum production, as with our ‘best library’ roundups, is in as good a place as it’s ever been.
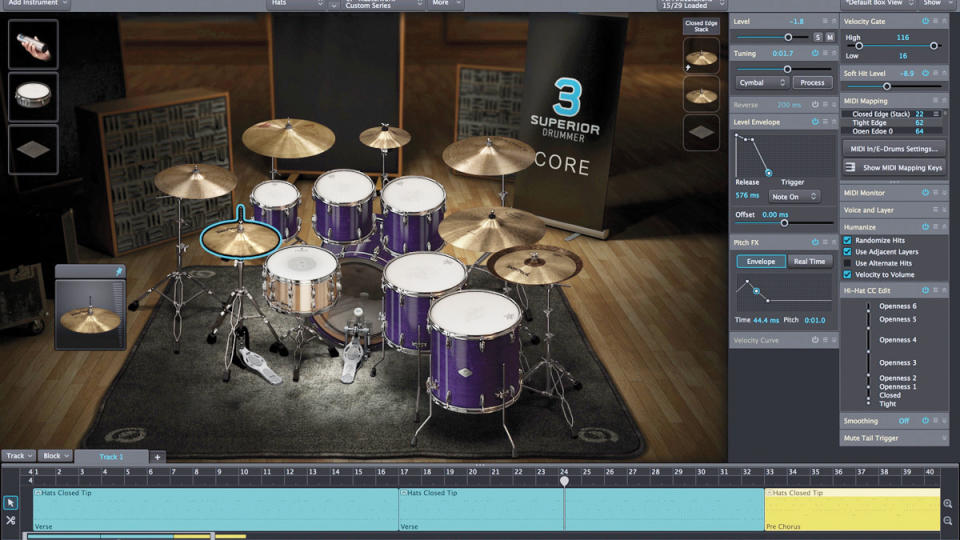
However, there are major players pushing the AI buttons. Toontrack – who else – is at the forefront. They might not call it ‘AI’ but Superior Drummer and EZdrummer have features that cover everything needed to humanise and create beats. Song Creator (which suggests clips based on MIDI files) and The Tracker (which cleans up or edits beats in drum loops) are just mind-blowing.
EMERGENT DRUMS
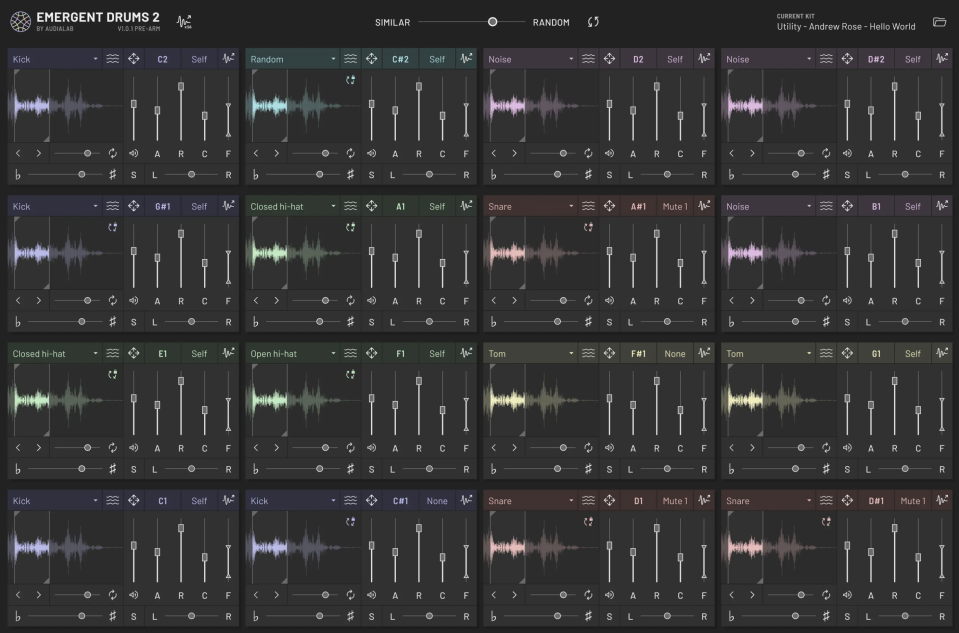
Elsewhere, AudioModern are probably at the forefront of easy beat creation with Playbeat 3 and Audialab’s Emergent Drums can ‘create’ infinite drum sounds using machine-learning technology; DrumNet claims to do the same with AI-powered technology and there will be more.
But do we really need that much help with our beats? Our DAWs have already made beat creation a lot easier than it was and we’re in a fantastic place already. So, perhaps AI will not have the impact here that it’s having in other areas of our lives. Do we really dare to make that kind of prediction in 2023? No, we don’t.
6 of the best electronic drum plugins
Your DAW might have 808/909 sounds already, but these machines will drive your electronic ambitions higher. Each of these plugins is compatible with both Mac and PC and won't set you back more than $200, with several coming in at half that price.
1. Wave Alchemy Triaz
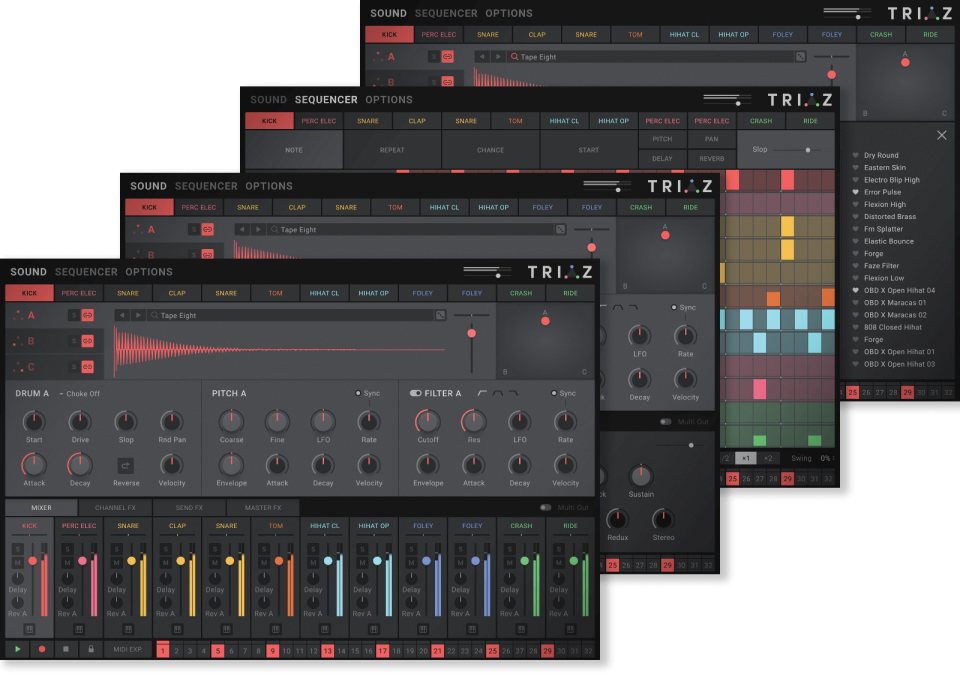
Triaz is one of the newer releases here and throws in a huge library of 10,000 sounds, great sequencing and a triple-layered sound engine to let you sculpt beats like never before. The core concept and feel is very electronic but there’s no reason you can’t throw your own samples in here and take it where you like.
2. UVI BeatBox Anthology 2
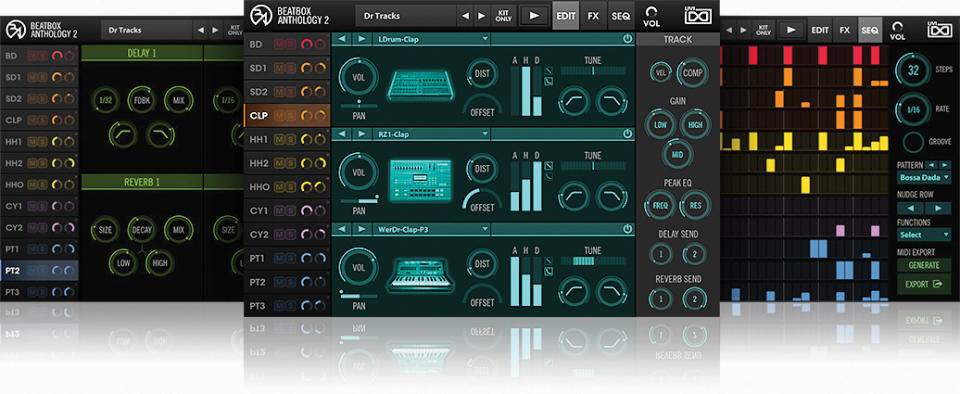
In many ways, BeatBox Anthology 2 is the ultimate electronic drums resource as it has all the sounds – 11,000 samples in all – from over 100 drum machines from over 50 years of beatmaking. If that lot is not enough, there are pretty detailed sound-editing options, layering flexibility and a built-in sequencer. It could be the history of electronic beats you need in one (big) library.
3. Native Instruments Battery 4
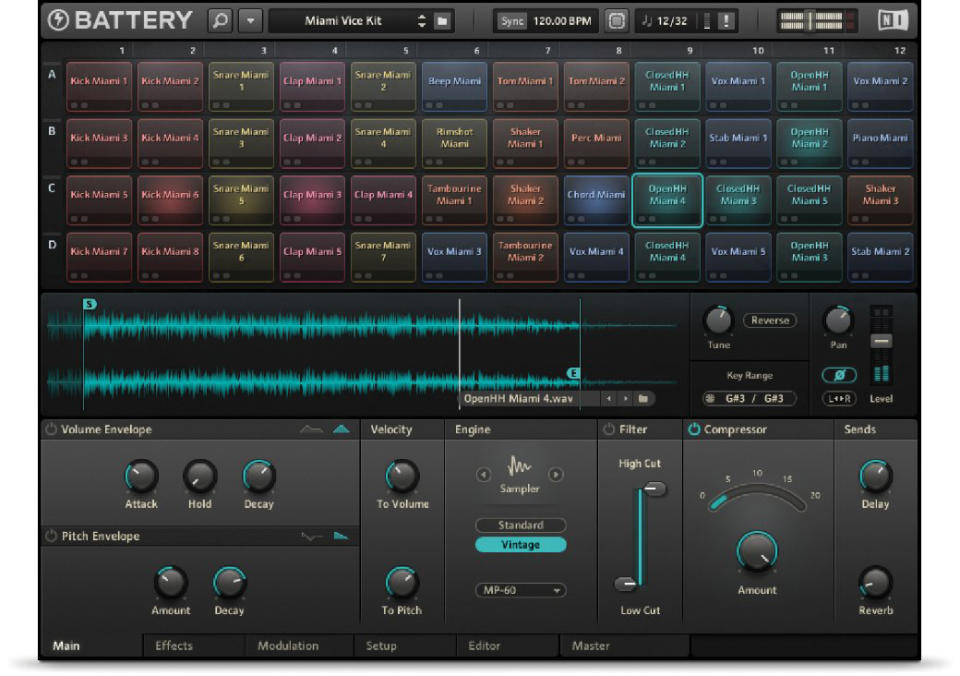
Not exactly a new title but NI have kept Battery fresh over the years with updates and library extras – and it was so good to start with that it is still the number one tool for many. It’s not specific to electronic beats – it is a sampler that can play back anything – but what it brings to the beats table is still valid. Great editing, easy workflow and amazing kits. But surely worth an update soon…
4. D16 Group Nithonat, Nepheton & Drumazon

These are some of the best X0X recreations. With Nithonat (606), Nepheton (808) and Drumazon (909), D16 have taken core elements of the original Roland units but redesigned them to fit in with 21st century music making. So the UIs are less restricting and there are one or two added extras for sequencing and random beat making. A group deal (€349) includes Phoscyon 2 (the 303!).
5. Xfer Records Nerve
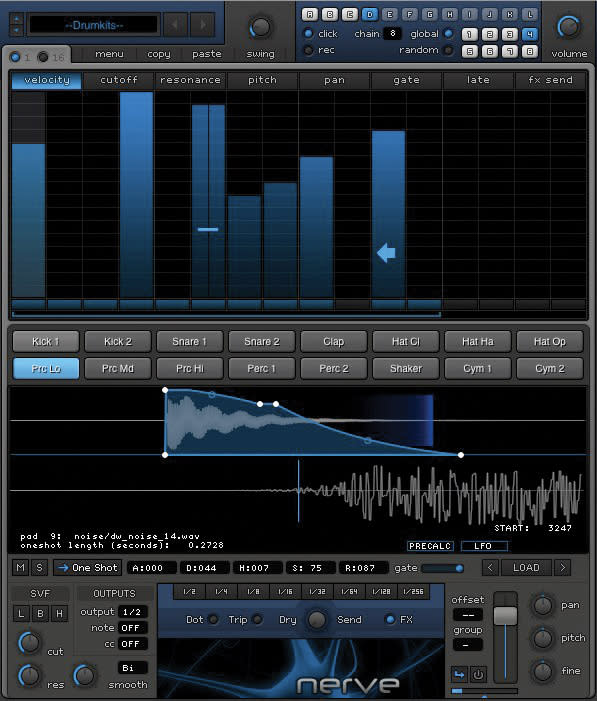
Nerve is old, ok, but it still caters for the beats of today (which are often even older!). And unlike other tools here, it’s not emulating hardware but coming up with completely new sounds or editing existing ones for beats you might not find elsewhere. Forget the age, and prepare to dig deep for some real beat benefits.
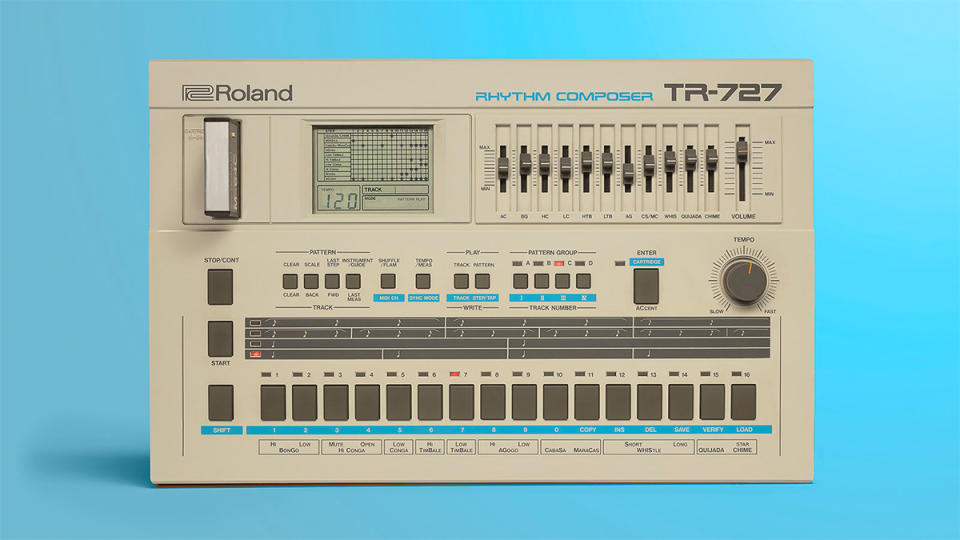
6. Roland Cloud
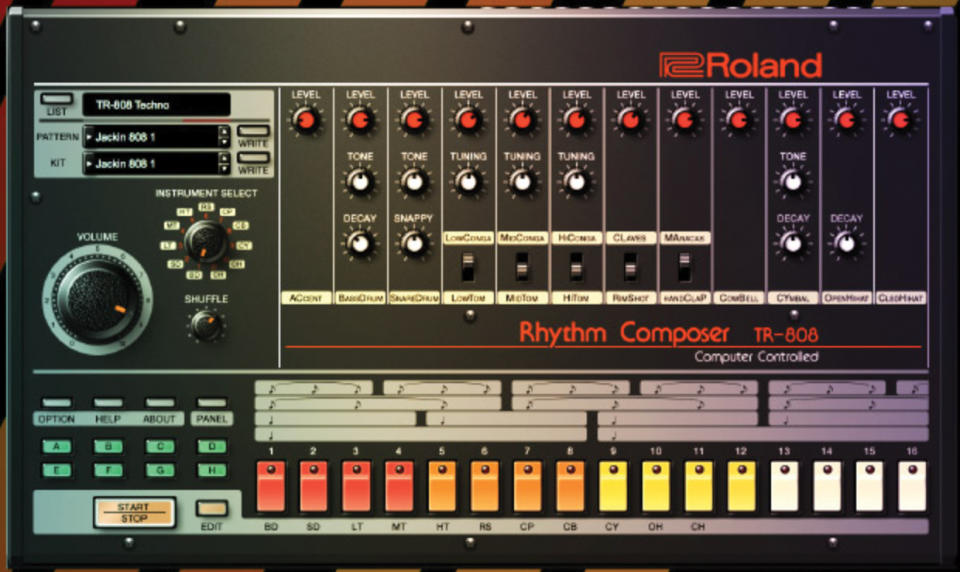
How could we not cover the classic Roland TR-808 and 909 (and the 606, 707 and 727 while we’re at it)? The truth is that many of these classic beats are accessible as samples within many DAWs but these very slick plugins from Roland will let you twist and turn those sounds just like the original hardware, but for a lot less cash.
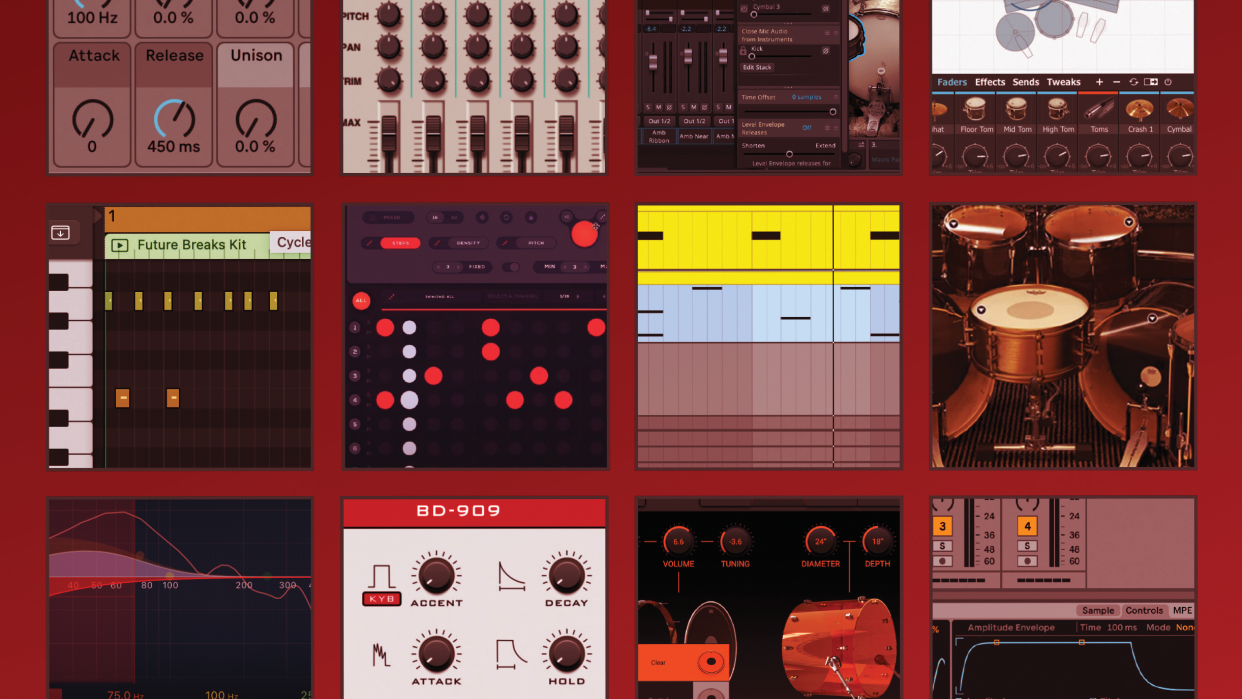
Programming beats in six different genres
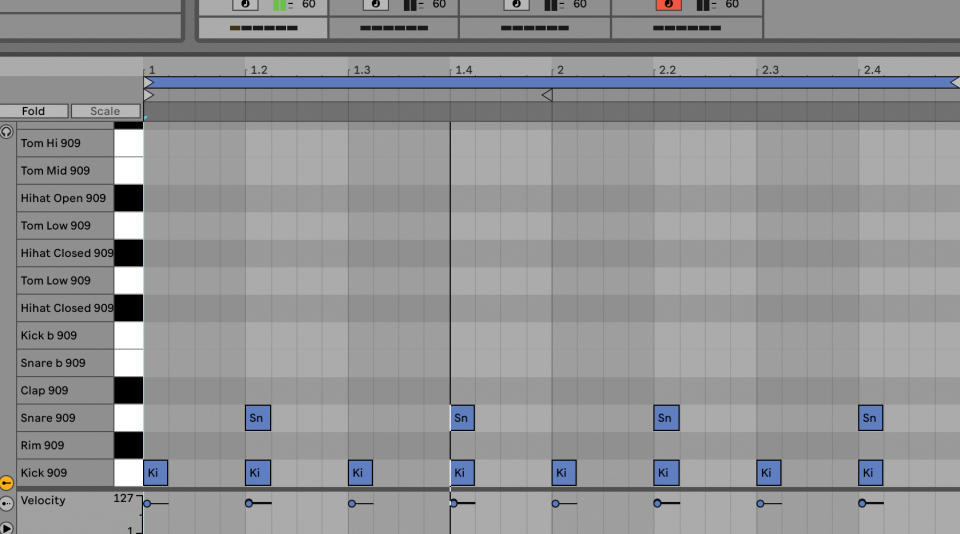
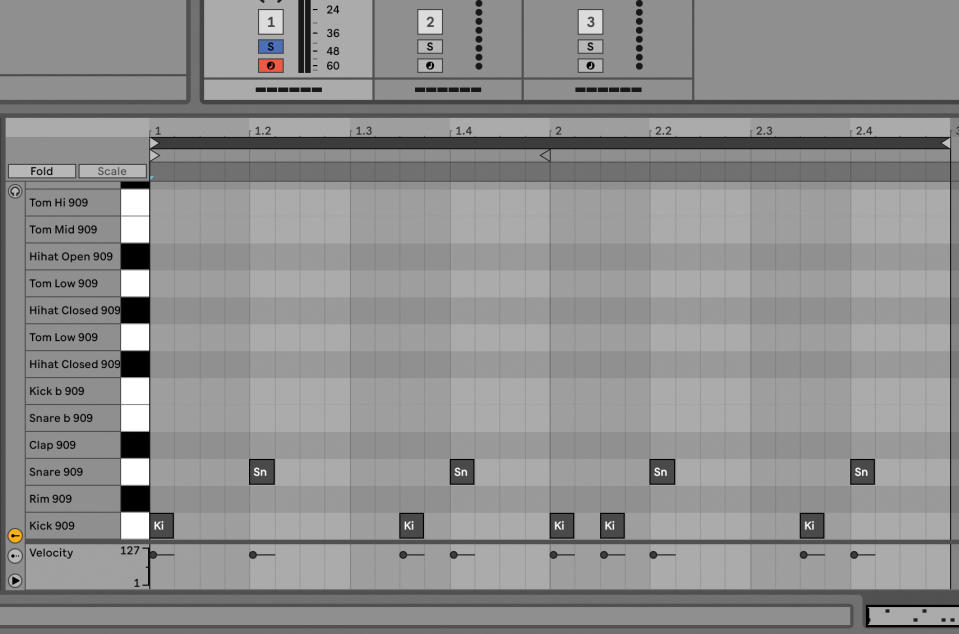
We’ll start by swiftly covering several main genres of music using a typical sequencing approach (ours is in Live but will be similar to most DAWs). We’re starting with the simplest – house music – which has a tempo of around 130bpm. Use a 909 kit if you can and place a kick on every beat in the bar and a snare on every other.
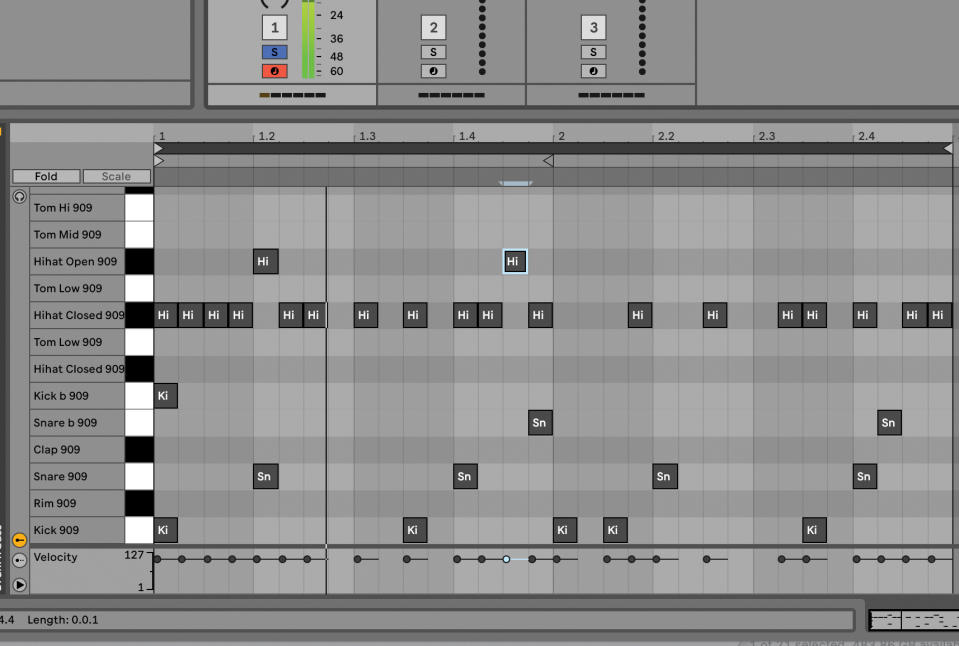
Continue with a closed hat on the off-beat of each bar and then add another one on top of this to add interest. You can use variations of this second hat pattern to add interest to loops as you arrange your tune.
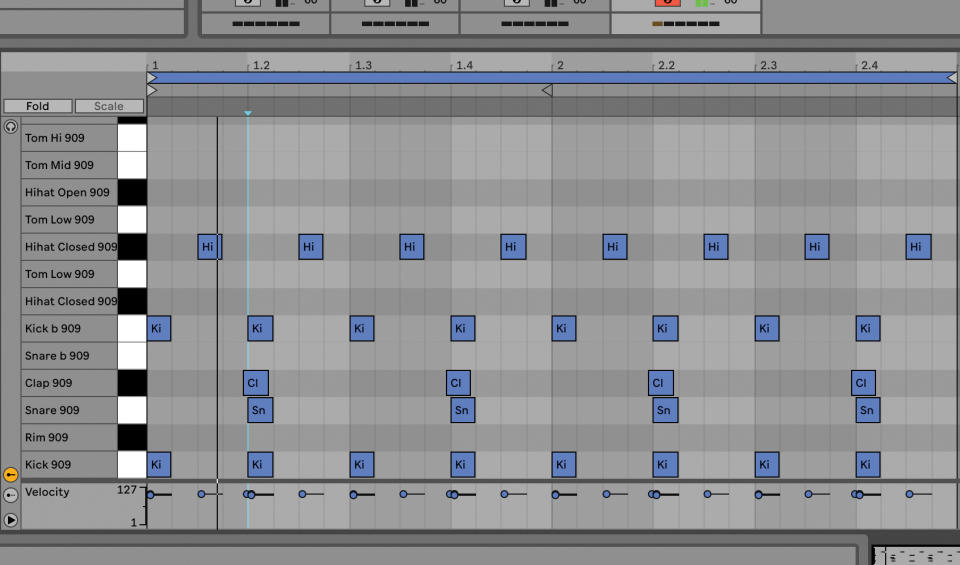
Variations on house music will pretty much start with the last pattern, and now you can add other flourishes to take it into different sub genres. Consider adding another deeper kick and a clap that hits just before the snare for an electro house vibe, for example.
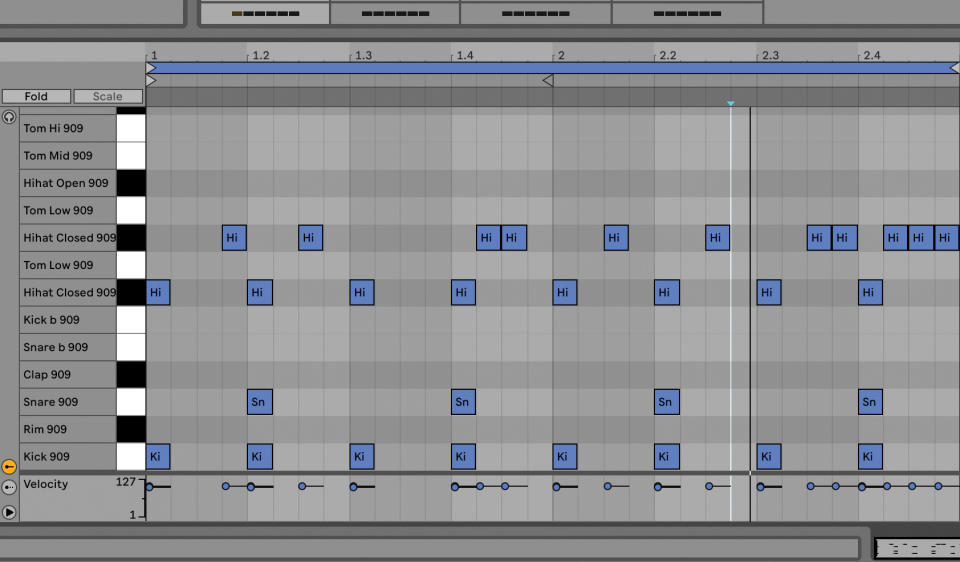
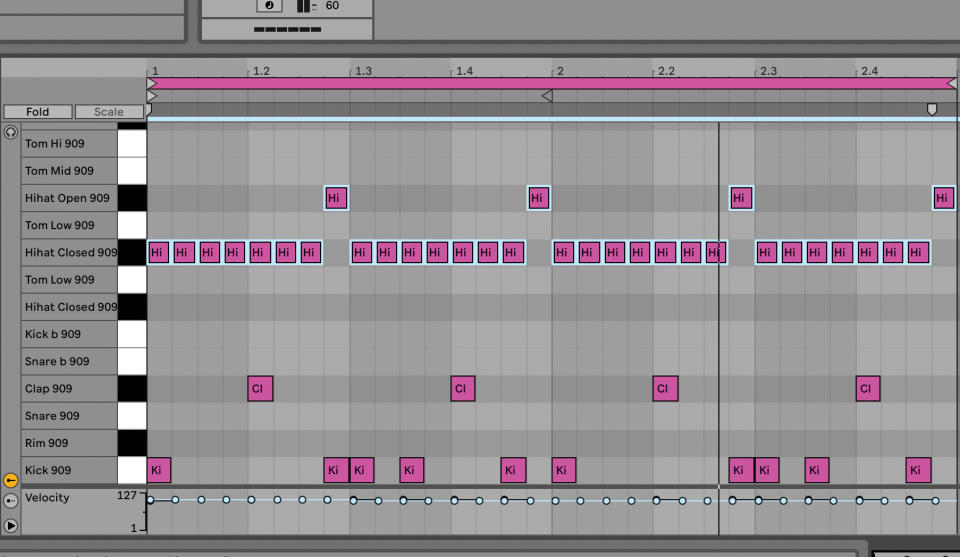
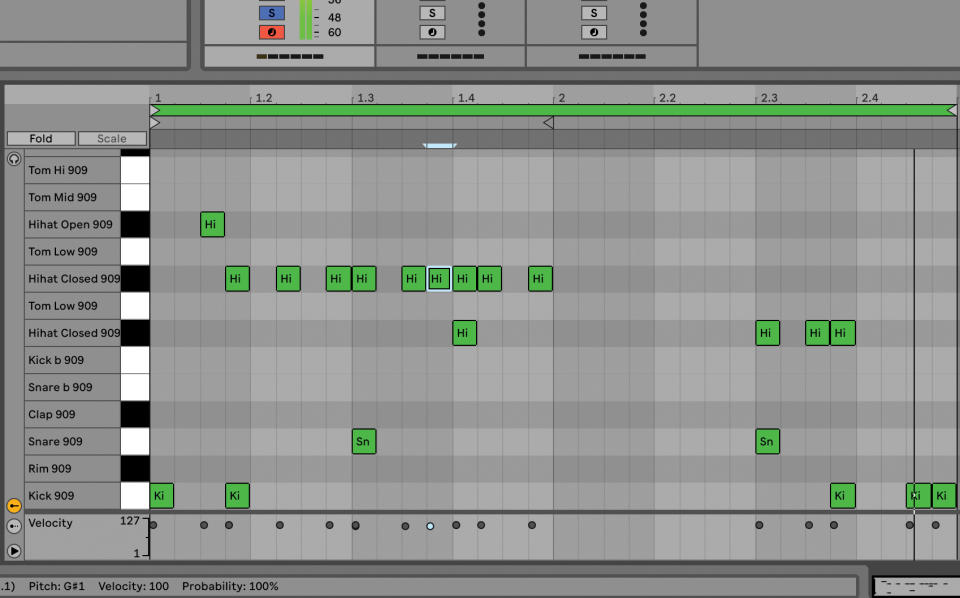
When you move into the realm of trance, you can take the same house building blocks, but you are now upping the bpm to around 140. Note the extra kicks and the clap in time with the snare this time for a more rigid feel.
What really lifts trance, though, is some manic hat action where you put a closed hat on every 16th measure and then an open on every off-beat (deleting the closed hat on each). This gives it a classic, more frantic but still very much 4-4 feel.
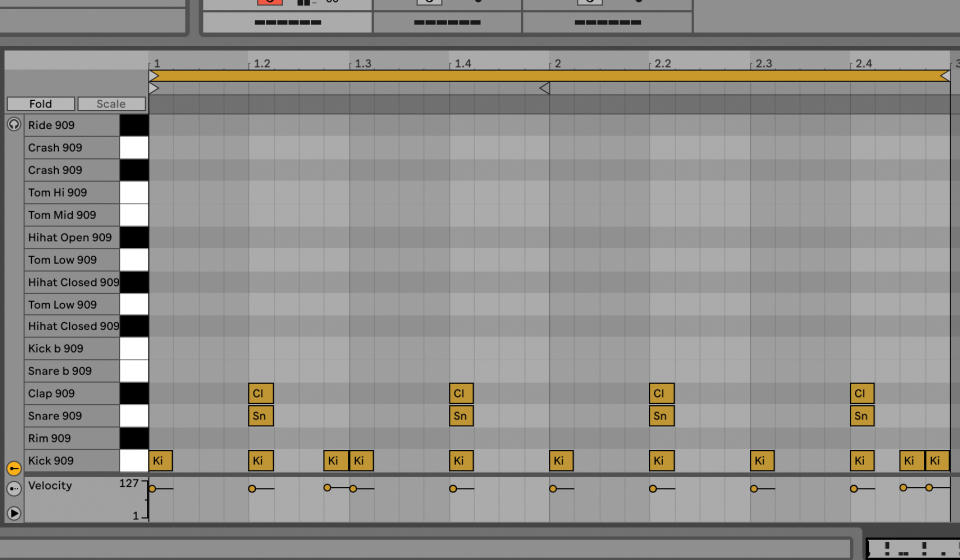
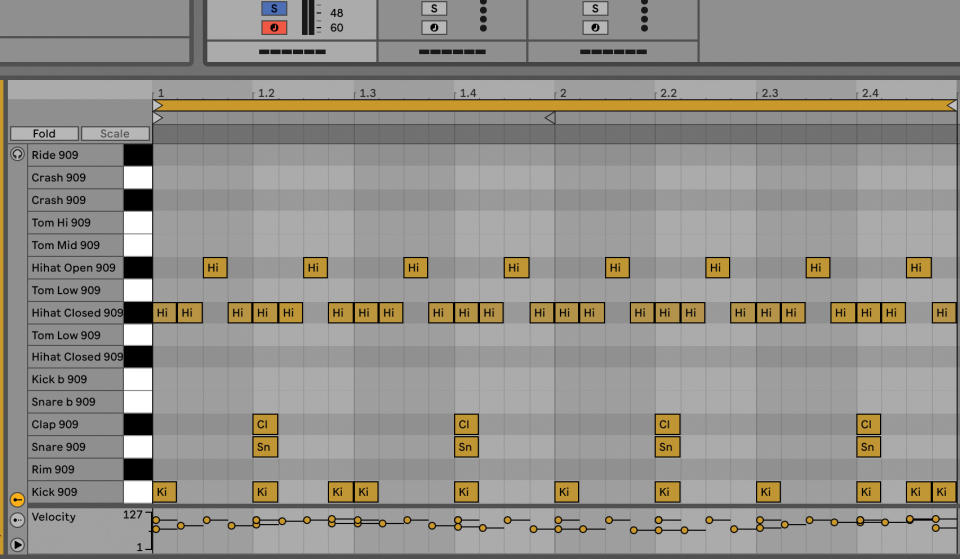
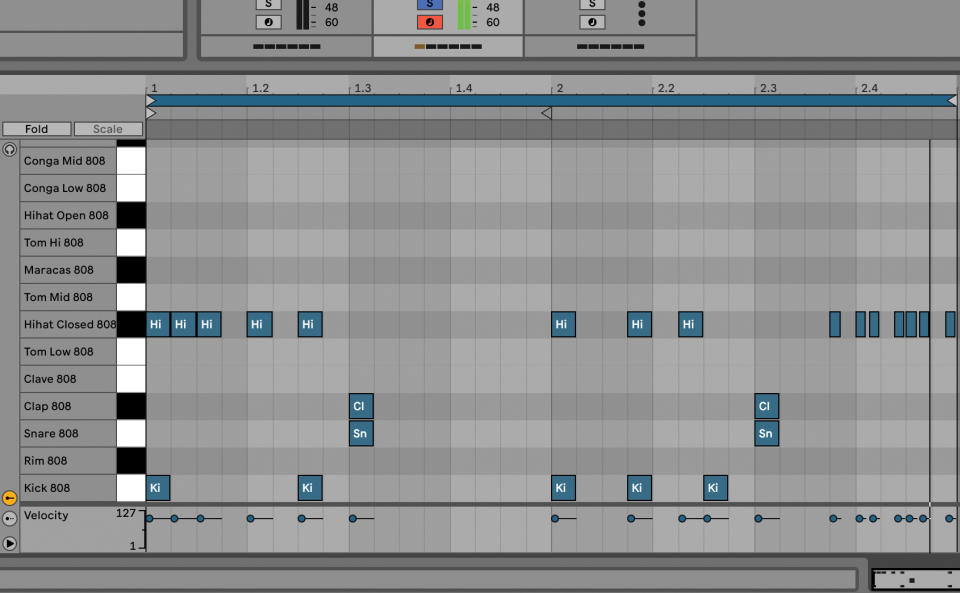
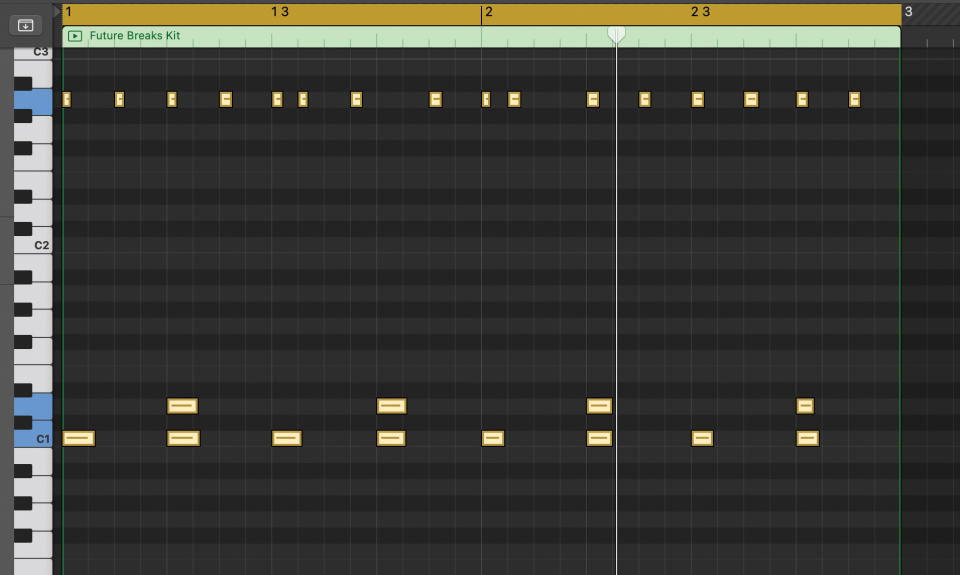
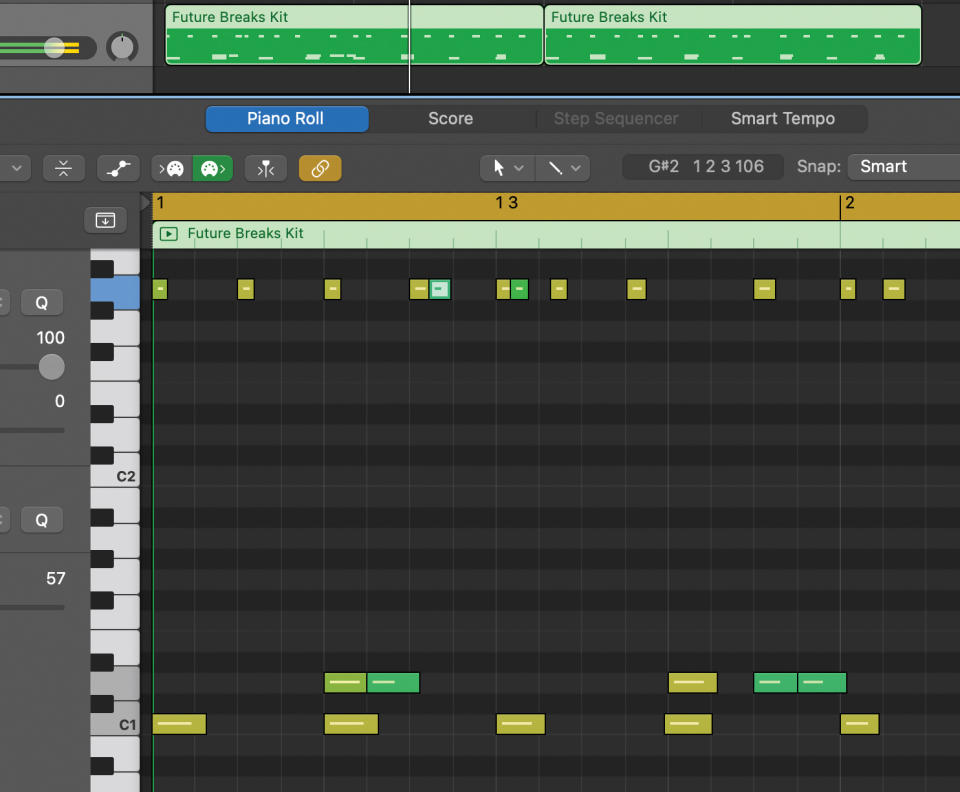
We’re finally moving away from simple four-four with hip hop but you do place a kick at the start of the 1st and 3rd beats and a clap on the 2nd and 4th. Then place the kicks as shown for more of a swing-like feel.
The magic happens with the closed hats on every 16th note while on the last beat there’s an open hat (again, delete the closed hats here). Even though there is a solid set of kicks in the pattern, it does now feel a lot more fluid than the beats we have previously created.
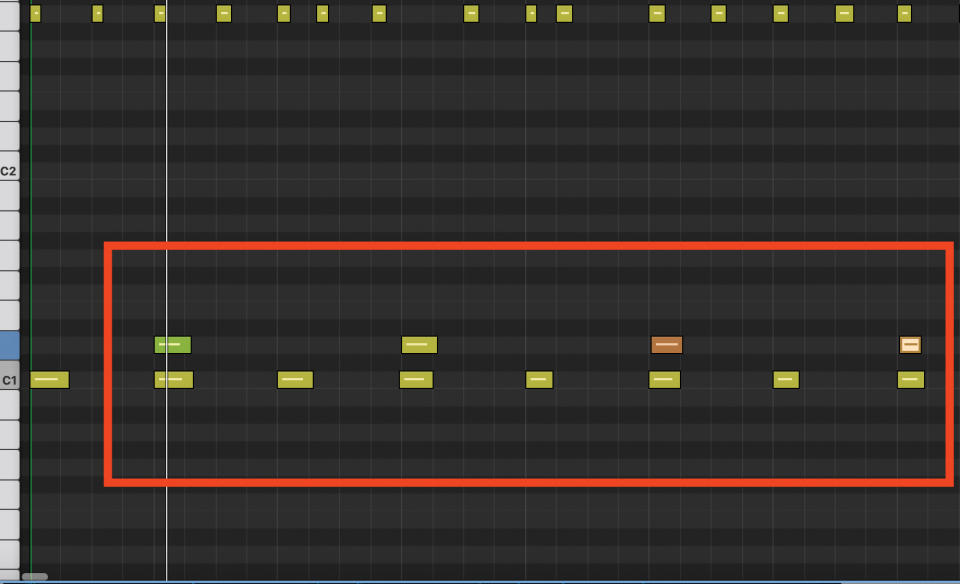
Dubstep might not be as popular as it once was but is worth covering for its more intricate patterns. Here the kick is only on the first beat of each bar to start with and the snare on the third. Then add further kicks in the first half of the bar and, beyond that, it’s up to you. The jittery hat pattern is key while the rides keep it in check.
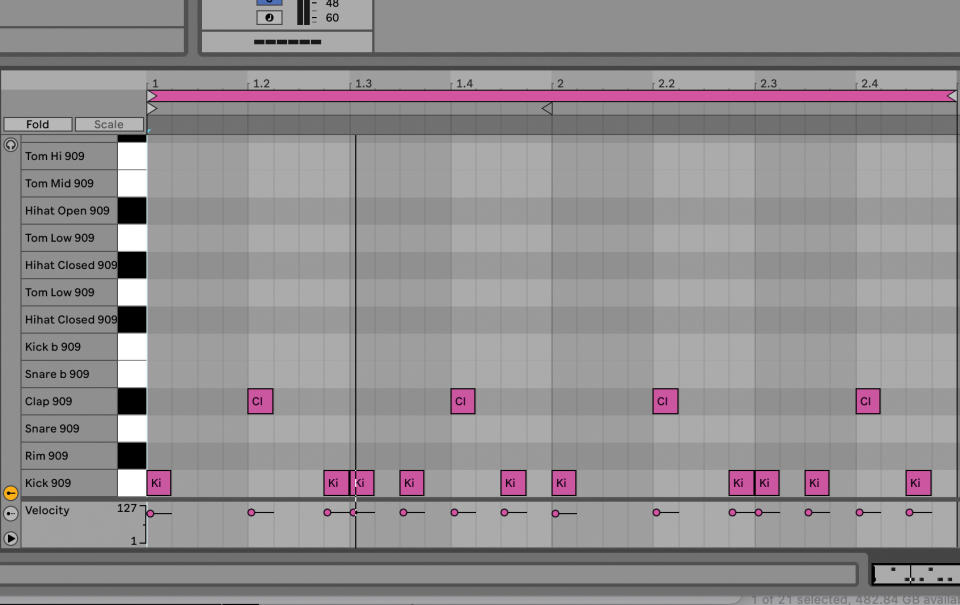
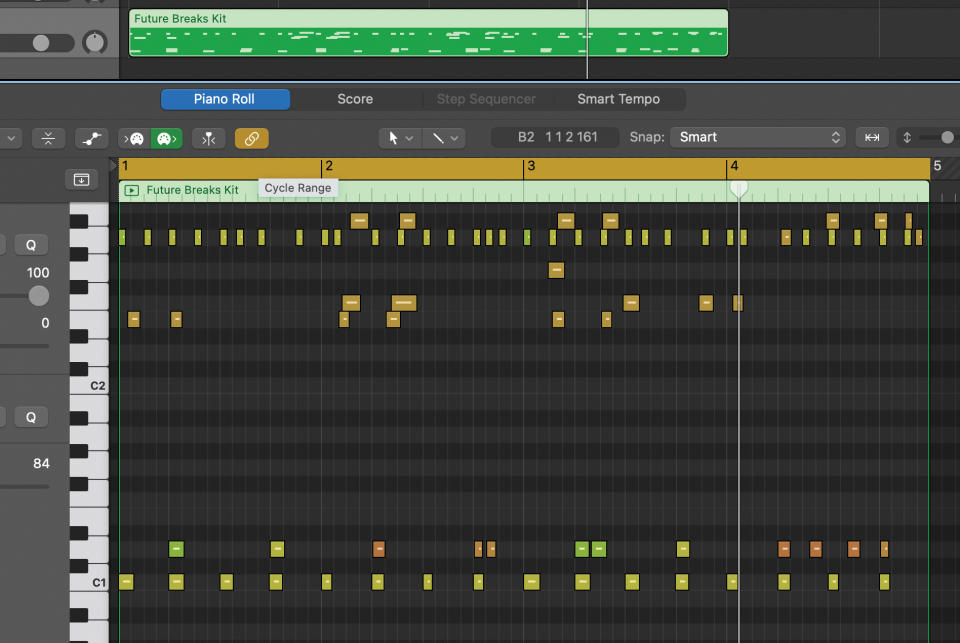
Similar to dubstep, in that most of the action happens in the first two beats of the bar, trap also has its snare (and a clap) on the third beat. It also relies on hats for the interest beyond this, but the lack of action in the second half of the bar adds a great and dramatic lull on each cycle.
With grime it’s all about those tension-inducing gaps but this time the main one is the first half of the second bar: complete silence. Closed hats once again demonstrate their importance, and here’s where you can really go to town by editing these for a completely different feel.
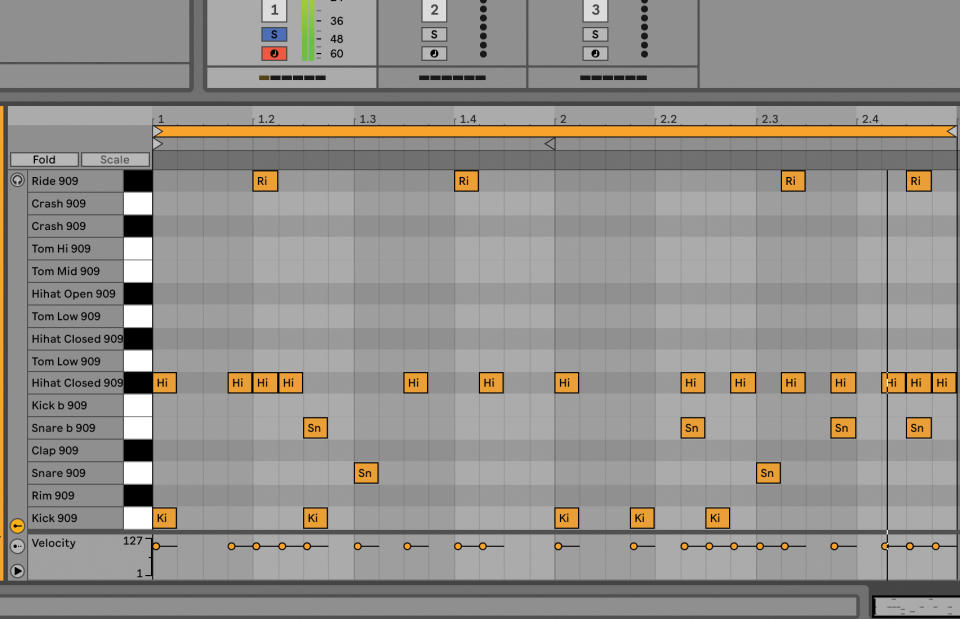
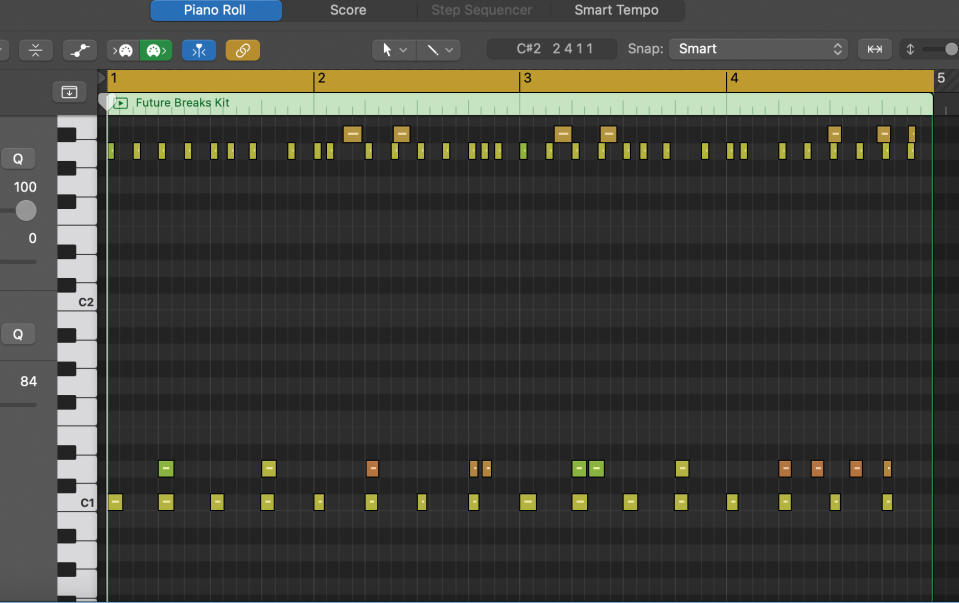
With drum & bass we’re really racking up the tempo; anything north of 160-170bpm. We’ll start keeping it simple and, like previous genres here, we have a kick at the start of a bar and snare on the third beat. Then add the kicks as shown for the classic 2-bar loop.
Have we said hats are important already? Of course we have. Here they add a frantic top line and can be wherever you like but clusters are good. Remember, as with all of these patterns, use this just as a starting point and take it in whatever direction you can.
How to add humanity to electronic beats
The most common complaint when using DAWs is that beats produced within them are simply not human enough. Here we have some very quick-fire tips to introduce more of a human groove into your static beats. Start with a simple kick-snare pattern with the kick on every beat, the snare on every other and a simple hat pattern.
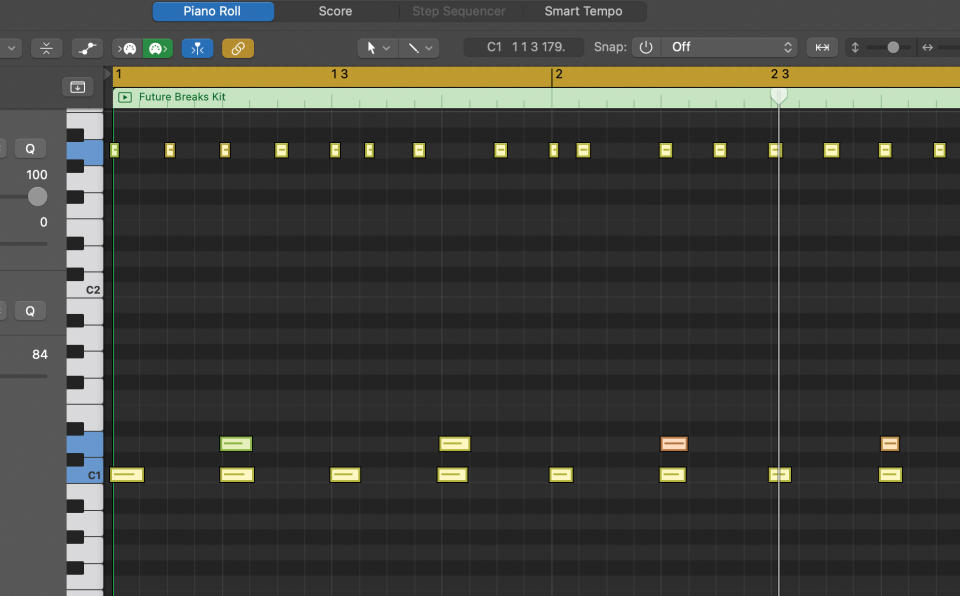
The rigidity is caused simply by the fact that the beat has been quantised to within an inch of its life. The first thing to do is undo some of that rigidity by switching your snap off and shifting notes very slightly away from the beat, introducing (very) small drift in the kick and snare. Be very subtle otherwise it simply sounds like it’s been played badly!
Already just shifting the odd kick or snare gives the beat a less machine-like feel. But in this case, changing the hat positions in a similar way takes it further simply because they are at a higher frequency with a more obvious attack. And for this reason you have to be even more subtle with your shift (as shown).
Taking this further, you can emulate a real drummer’s playing by mimicking the push and pull of whole sections of beats. Introduce a delay (10ms) on one part so they play (very slightly) behind the beat, or push the notes back by around 30ms so they play before it. This latter option gives more energy to a track’s rhythmic feel.
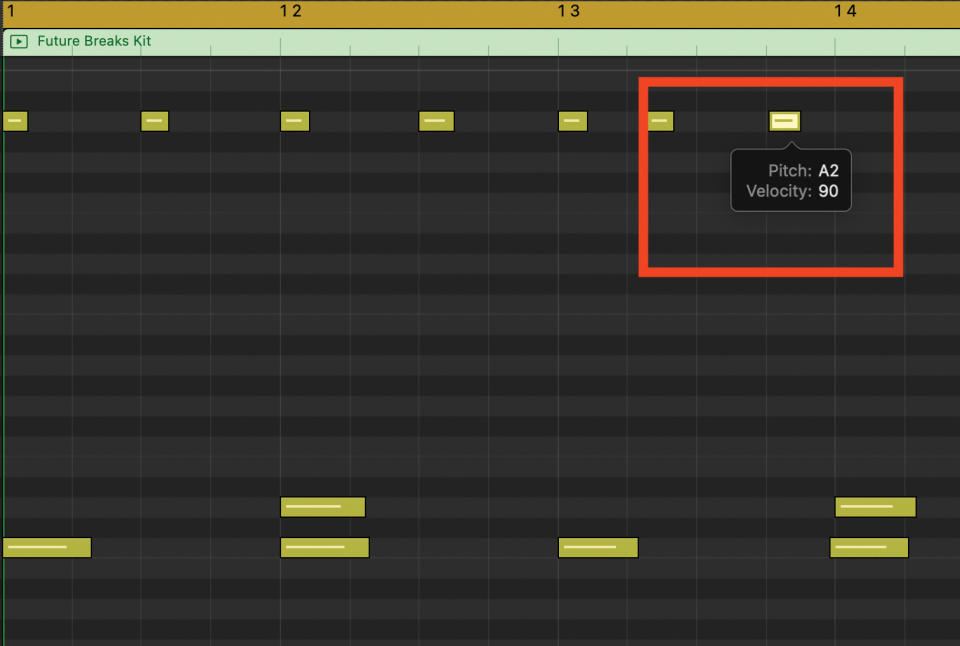
Programming drum machines often leaves you with every beat sounding identical because the velocity is the same; so changing this up can produce a more human feel. Here we adjust the velocity of the snare by +/- 10 on the first, third and fourth beats.

Again, using the same process with the hats is more dramatic, too much so in this case. You have to be more subtle with the changes – perhaps +/- 5 across the pattern. In our case it just sounds a bit like the drummer’s had too much to drink.
Our beats are starting to sound more human but are still basic. You can really switch up the ‘real’ content by adding fills and extras on each beat – basically you want to stop it sounding like the loop that it was, so variation across bars is key here.
You can, of course, take this way too far as we have done here, and the simple rule is that a drummer (usually) has a maximum of two legs and hands to play so keep your programming within the realms of this physicality and it should feel like a human is hitting the drums rather than an octopus.
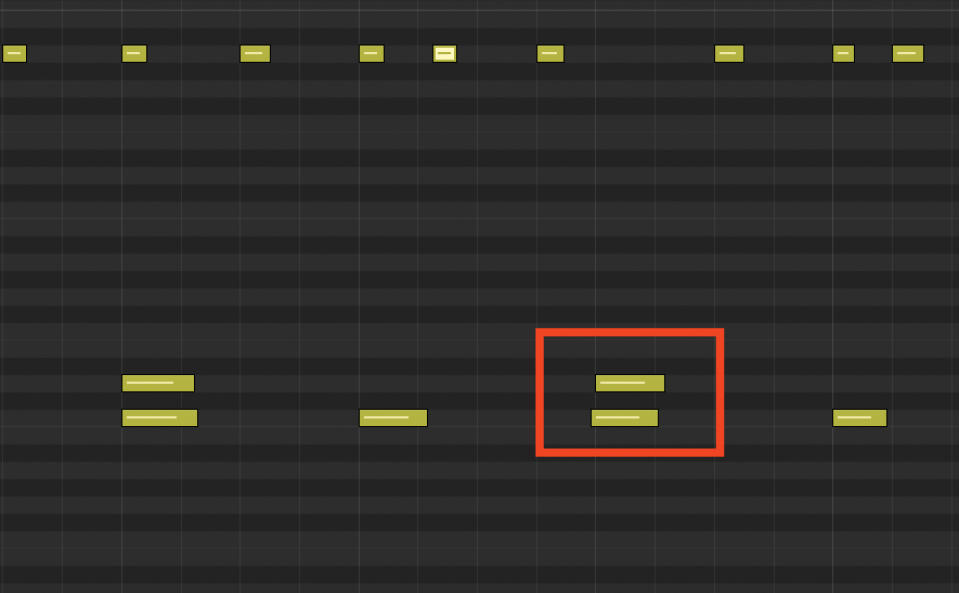
We’ll take the fills thing a little further now and introduce some ghost notes to our pattern. These are repeated snares and hats, for example, that are used as mini fills but tend to have a much lower velocity than the first hits of either sound.
It’s starting to sound much more human now but you can really go to town here, for once not being too subtle with the hats, for example, as long as you keep the velocities of the ghost notes fairly low in comparison to their proceeding notes.
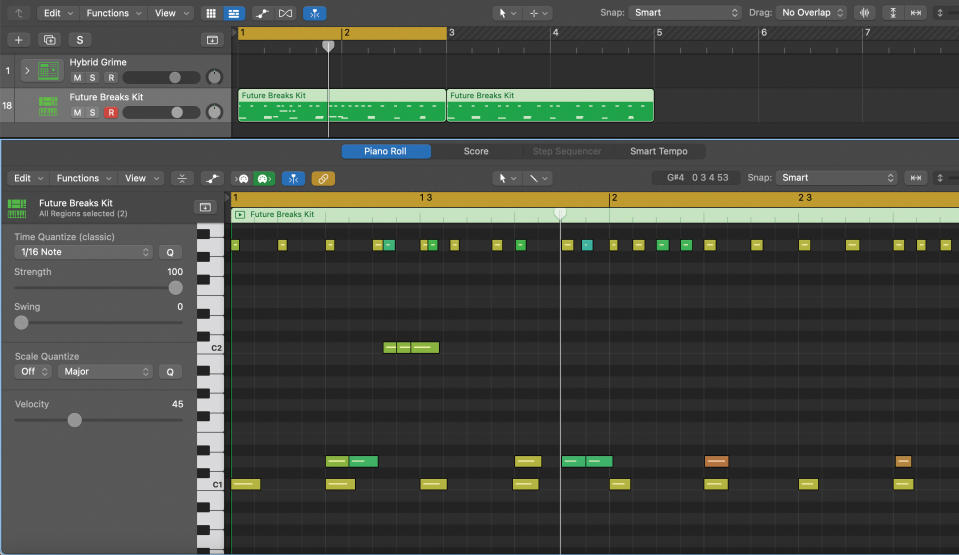
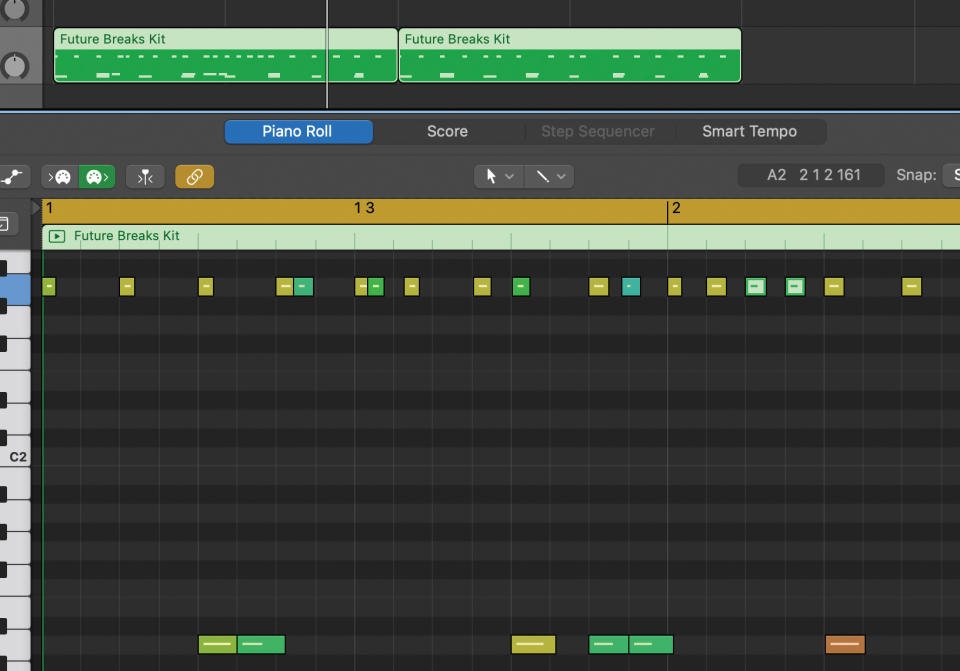
Finally let’s take a quick look at swing, which adds a more free-flowing feel to any swung notes. These are dependent on how you have the notes quantised in the first place. Ours is 16-note so swing only applies to notes on the 16th note. Here’s ours before swing…
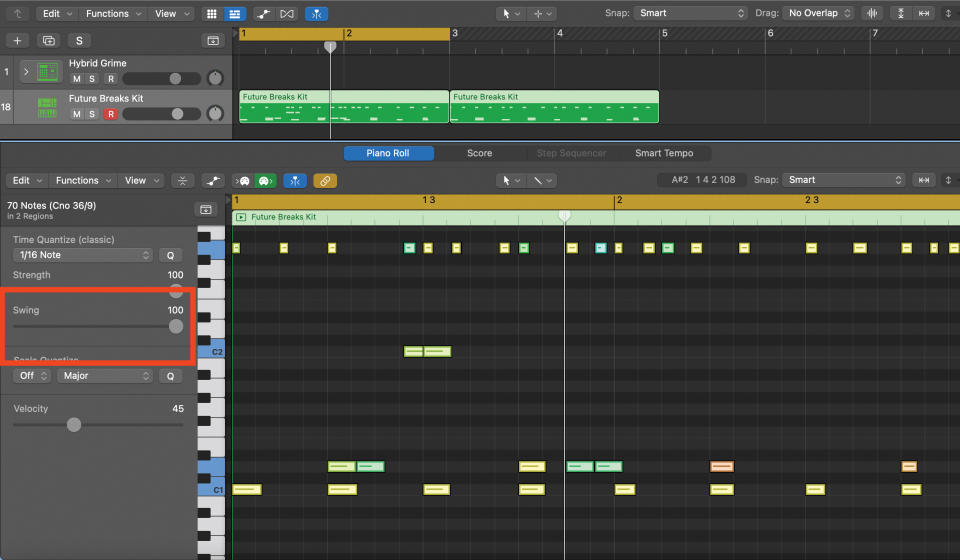
And here it is at maximum swing. Note that only the toms and hats have moved as they were on beats that fell on the 16-notes – the rest were on the 8th note. Experiment with quantise and swing values at different timing and you can get some humanity, very quickly.
Mixing drum parts
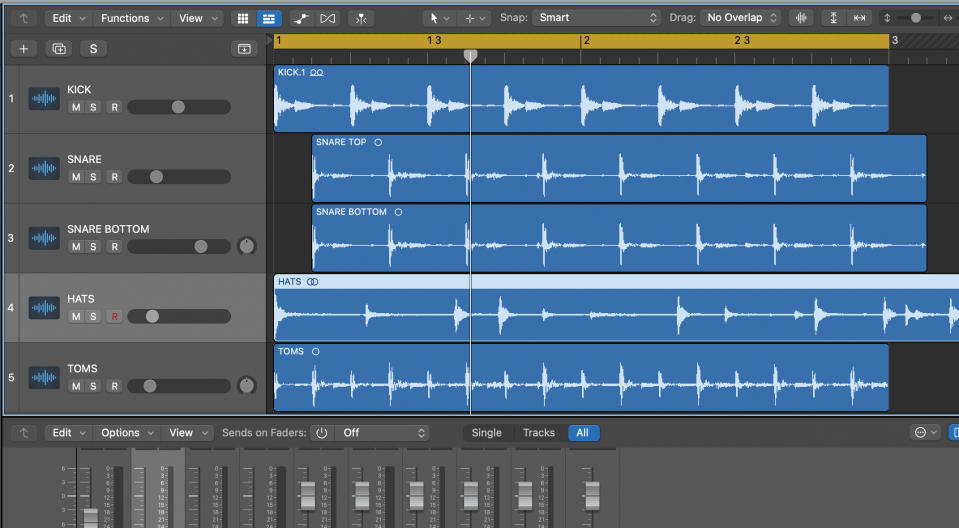
Now we’re going to cover some typical mixing scenarios that you might find while dealing with different parts of the drum kit. We’ll cover some of the processes you might need which apply to both live drum recordings or audio samples for all parts of the kit. We have our kit recording from top (kick) to bottom so you can see the parts.
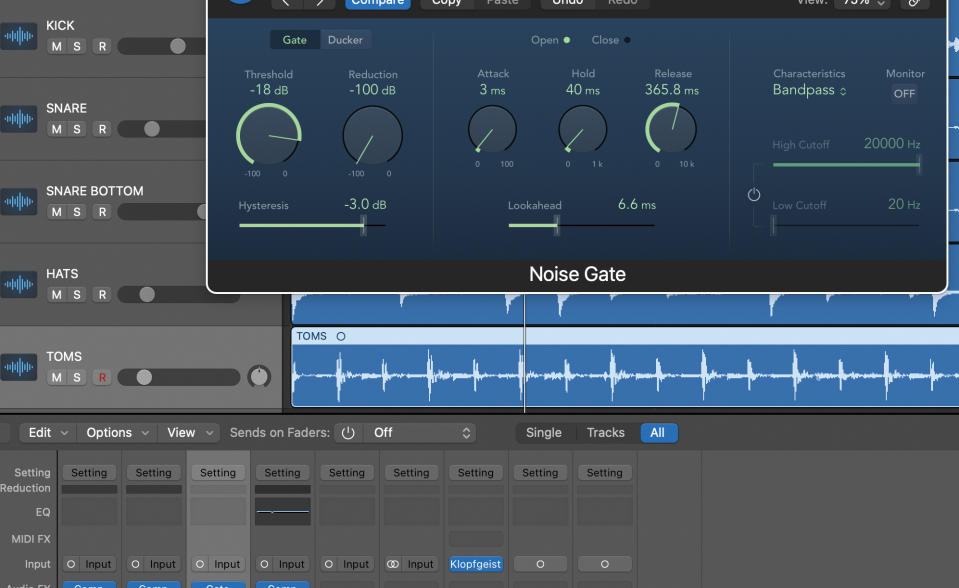
One of the first things you might experience, with live recordings in particular, is spill between tracks, and this is where a noise gate comes in handy. Here the Toms have spill so we set the Threshold at -18dB and Release quite high (experiment with these) and the Look Ahead to 6.6ms. The gate stops all the spill above the set level.
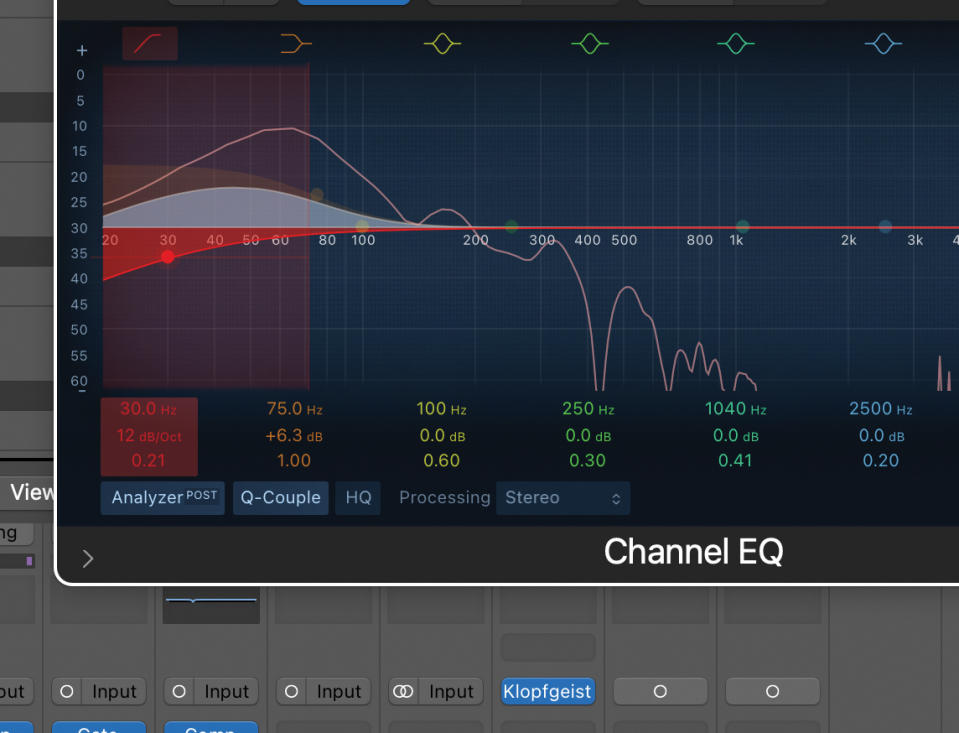
We’ll now turn our attention to each part of the kit. It’s the kick first and we now realise our original recording didn’t have a lot of beef; so it’s either time to consider re-recording it or processing it further. EQ will certainly help. Put a low-cut filter on first (set at 30Hz to remove ultra low frequencies) and then push the 70Hz region to add bite.
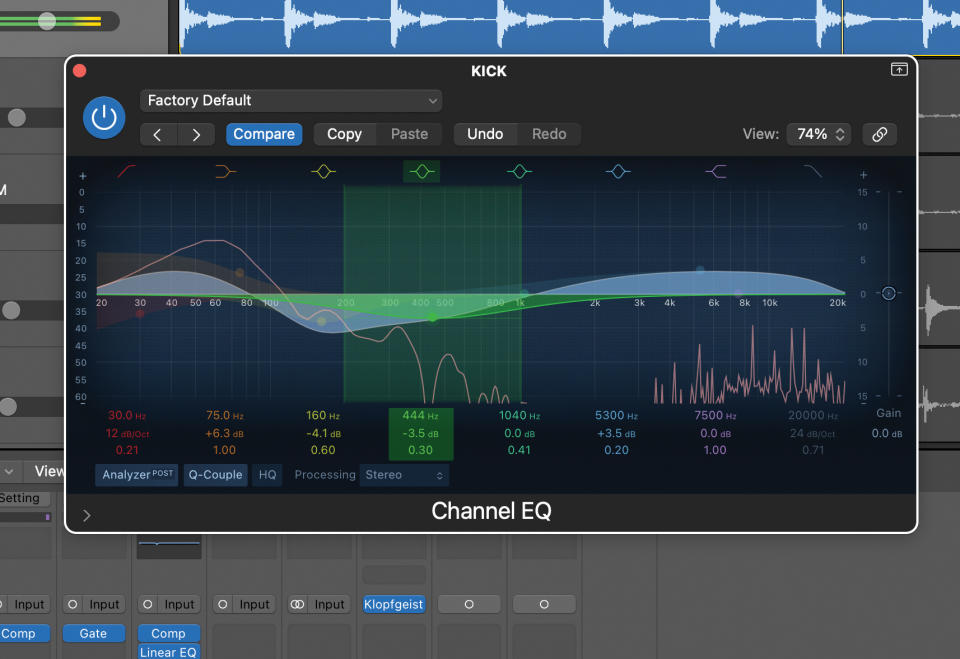
There’s a lot you can do to add impact to a kick in surprising frequency areas (it’s not just the bass). Boosting at 5kHz or thereabouts can give you a nice click, while cutting between 150Hz and 5kHz increases clarity. Experiment though, as kicks can be wildly different but try settings like these to start with.
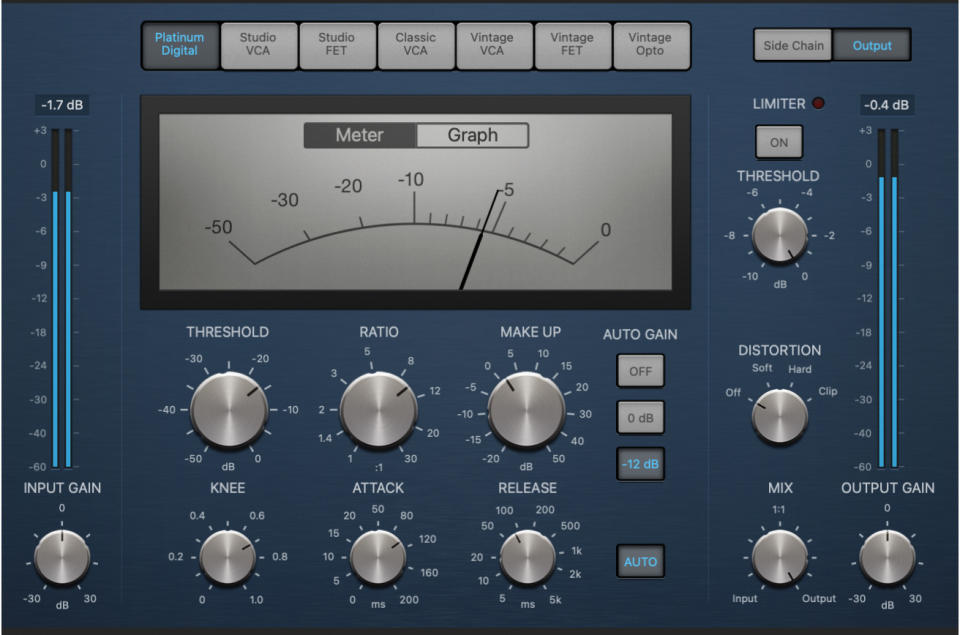
You should have a compressor on the kick channel which will help you control not only levels (if it’s an erratic recording) but also transients and attitude. We set the ratio to 9:1 and the Attack dial at 90ms for a fairly pleasing and level result. Again, experiment.
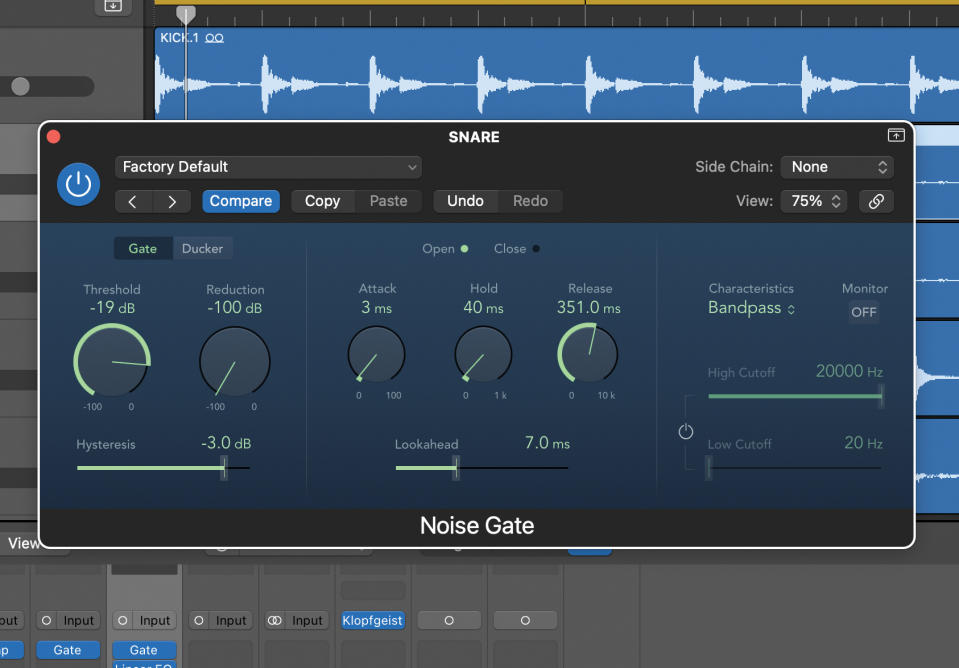
We’ve set up two snare mics for our live recording, so almost inevitably we get spill between the two. It’s a matter of inserting a noise gate again. Try similar settings to when this corrected the tom issues. Now you know why people like to use acoustic sample libraries!
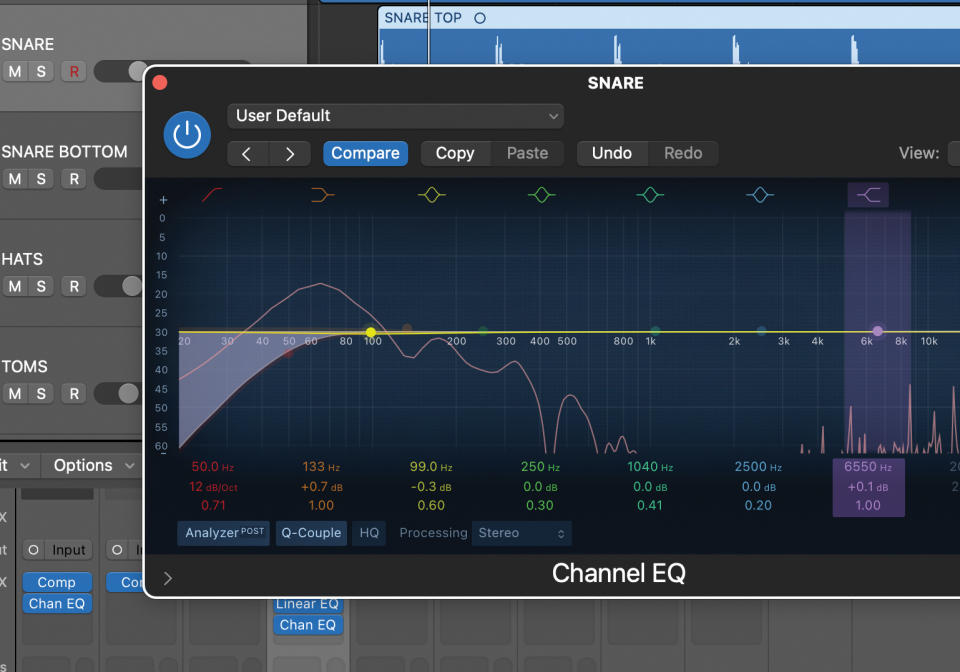
Of course, mixing drums isn’t just about tackling individual elements but mixing them together. So we’ll now get the snare to sit better with the kick. Let’s put a high-pass EQ on the snare set at 50Hz up to 150Hz – remove frequencies below it which should make both sounds more distinct.
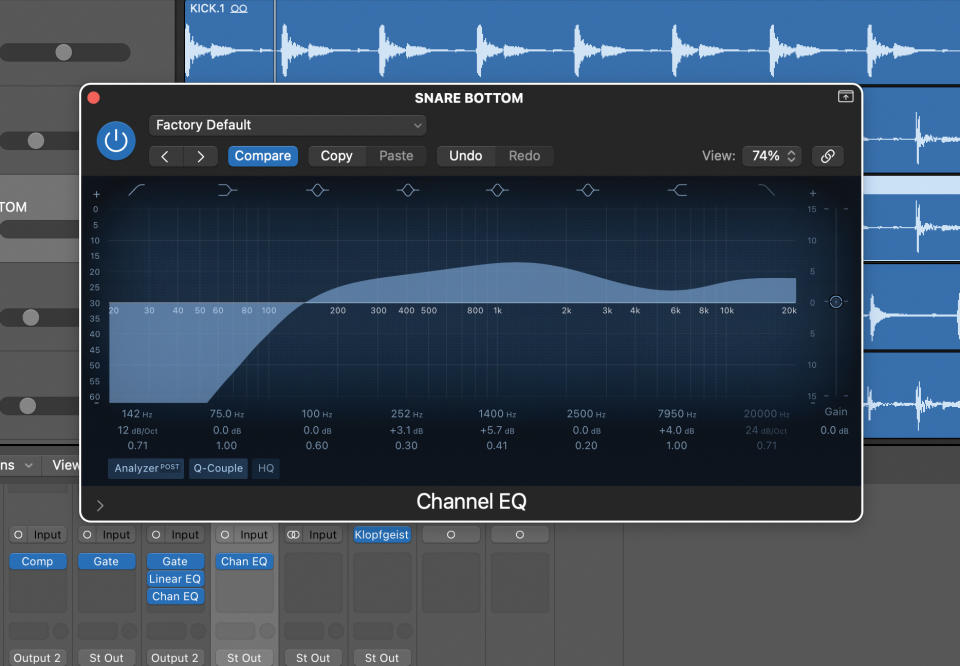
With two snares, we raised the HP filter cutoff to around 150Hz for the second, and boosted both in three different areas of the mids and highs just to help them sit better with the kick. At this point you can add a small amount of reverb (or large amount depending on your genre) just to give either or both snares more life.
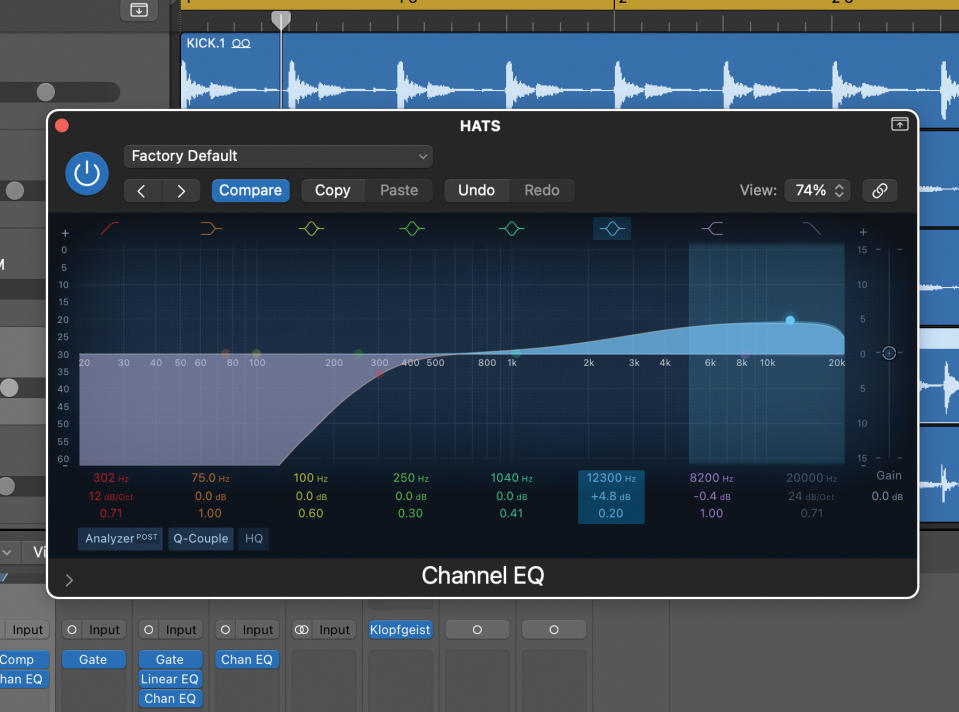
Now bring the hats in and it’s pretty easy to get them to sit well with the kick and snare. You’ve probably guessed we’ll remove any low frequencies but this time set the high pass higher at around 300Hz. Give it a boost at around 14kHz to add that magic ‘air’.
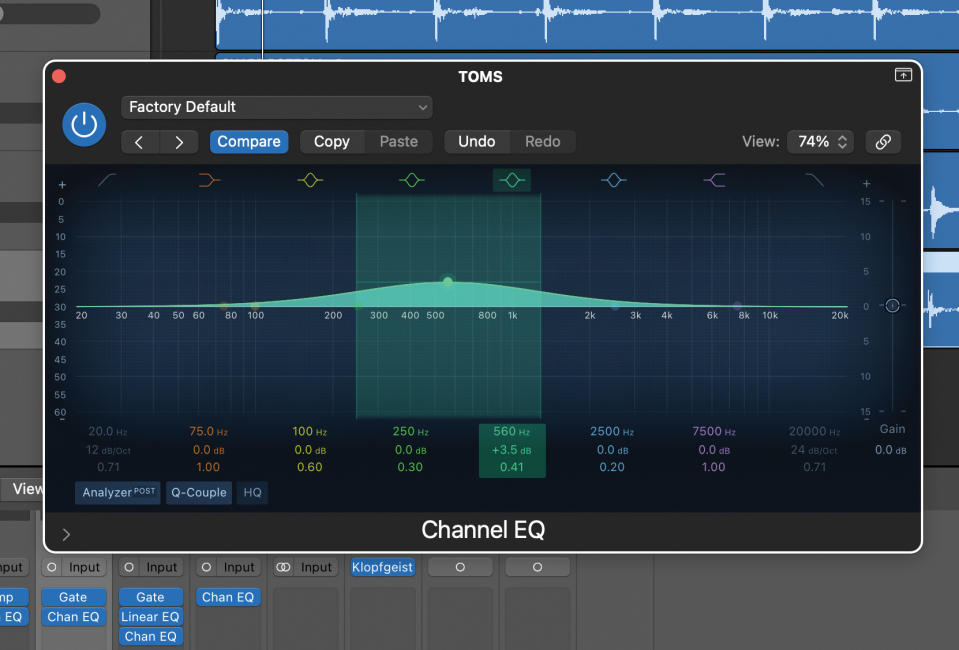
We love a nice tom sound – especially those synthetic ones from ’70s quiz shows – and fortunately ours has already been processed with the gate to keep it on a leash. Do add some EQ boost in the low-mid/mid range to give them a lift, depending on how they’re sitting with the rest of the mix.
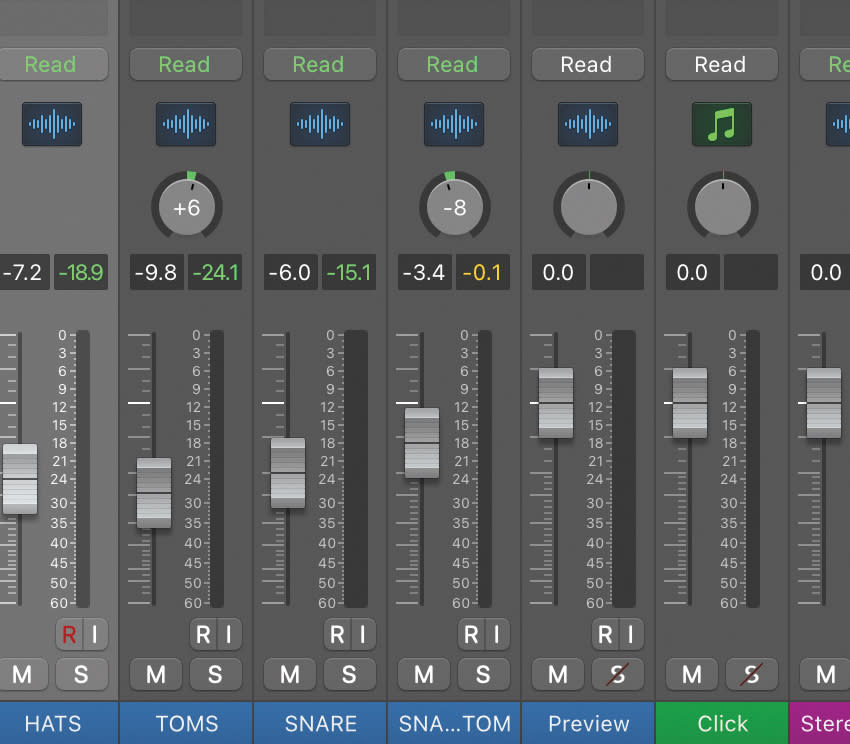
You don’t need to go too wild with your panning. The kick and snare can be central as they should already be sitting well together, and the toms and hats can be slightly panned either way. If you have any room mics for live drums, pan them each way too.
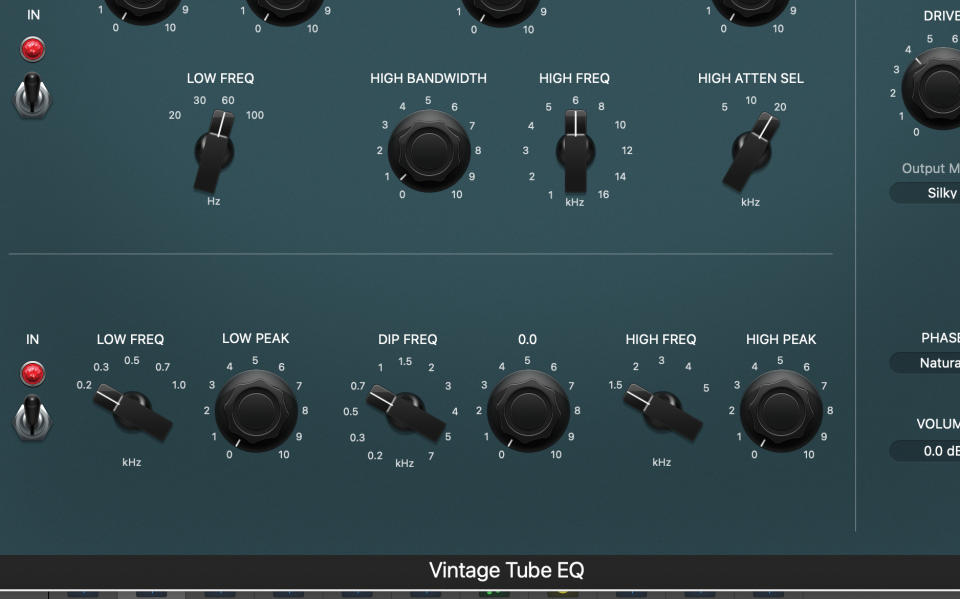
Finally, a touch more EQ applied across the drum bus gels all of the sounds together. Again, don’t go overboard here as you might need to EQ further down the line when other instruments are mixed. This is a good time to try other EQ types for more creative gelling.
Kick processing techniques
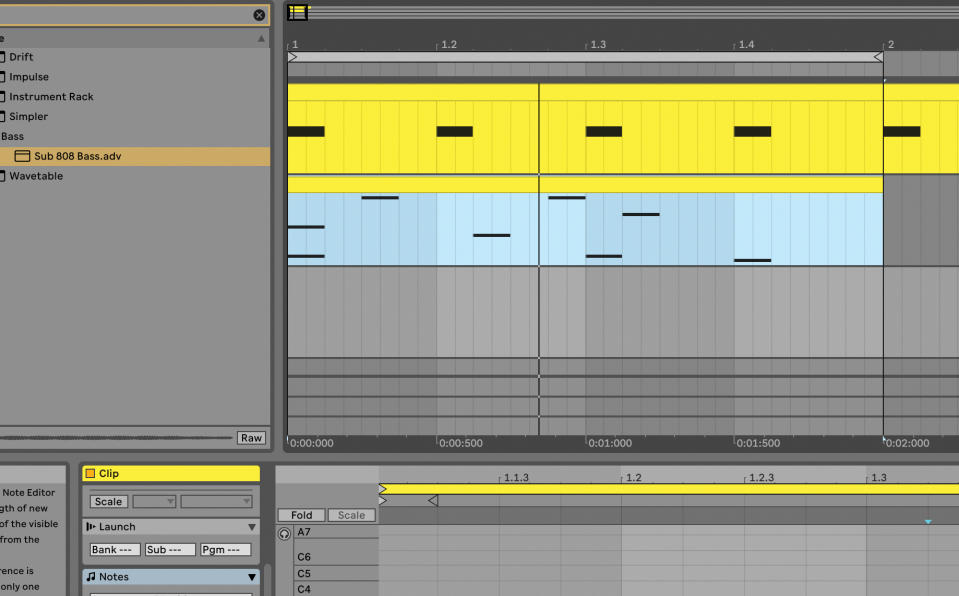
The kick is the most vital part of your beat arsenal, so here we’ll cover some key techniques to keep it carrying your tracks. First we’re going to mix up some electronic MIDI kicks with acoustic audio kicks. Load up an electronic kick drum into a sampler and record a 4-4 loop. Then load your acoustic drum loop in on an audio channel.
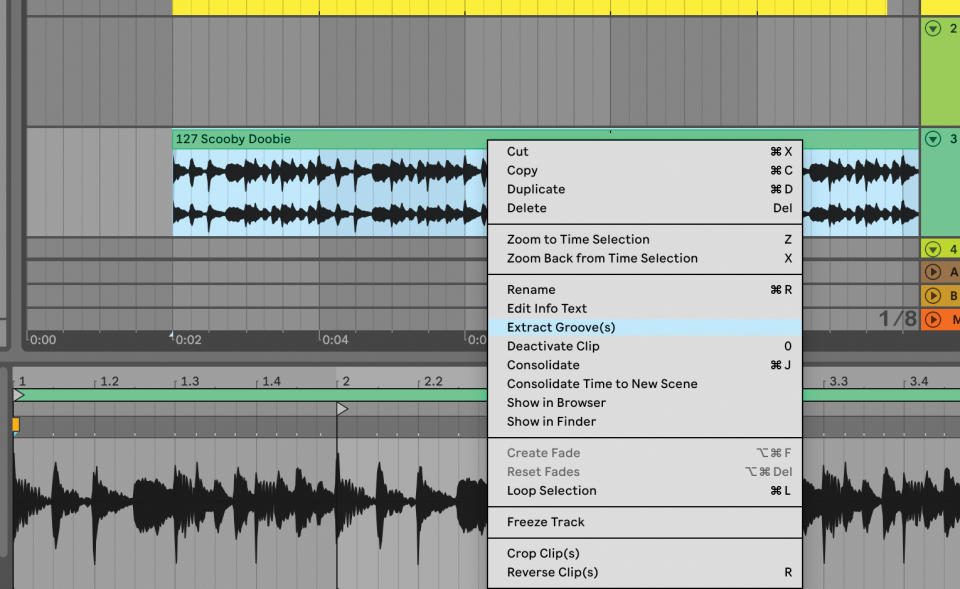
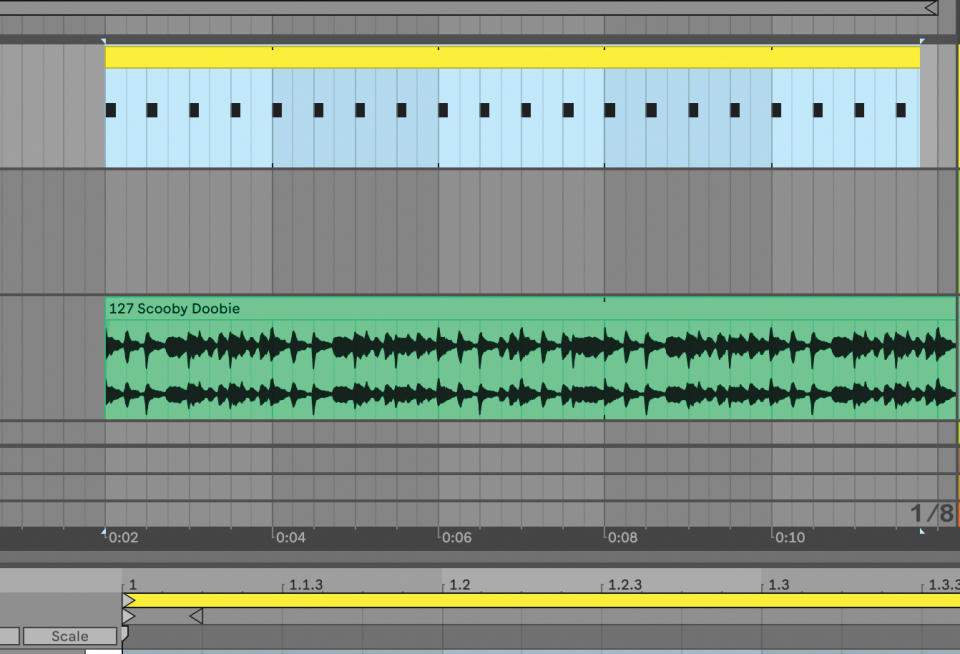
Your 4-4 loop might be too quantised for the acoustic drum loop so the first thing we’ll do is match its timing to the acoustic beats. In Live (shown above, but also possible in other DAWs), you can extract the groove of the acoustic loop. Right (Control) click on the audio part and select Extract Groove.
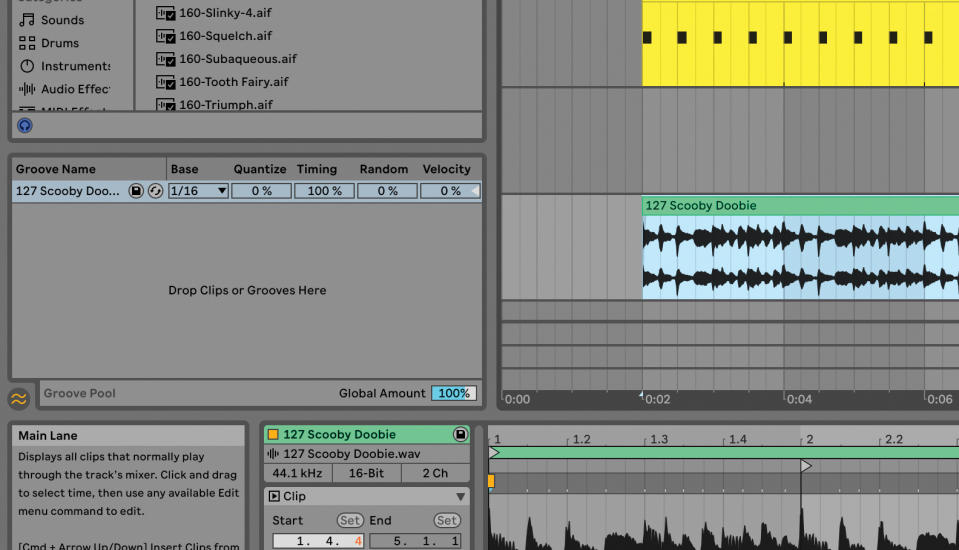
Live analyses your audio file and depending on how long it is, will eventually come up with a Groove which is then stored in the Groove Pool (with a name matching that of the audio file you extracted it from, in our case Scoobie Doo).
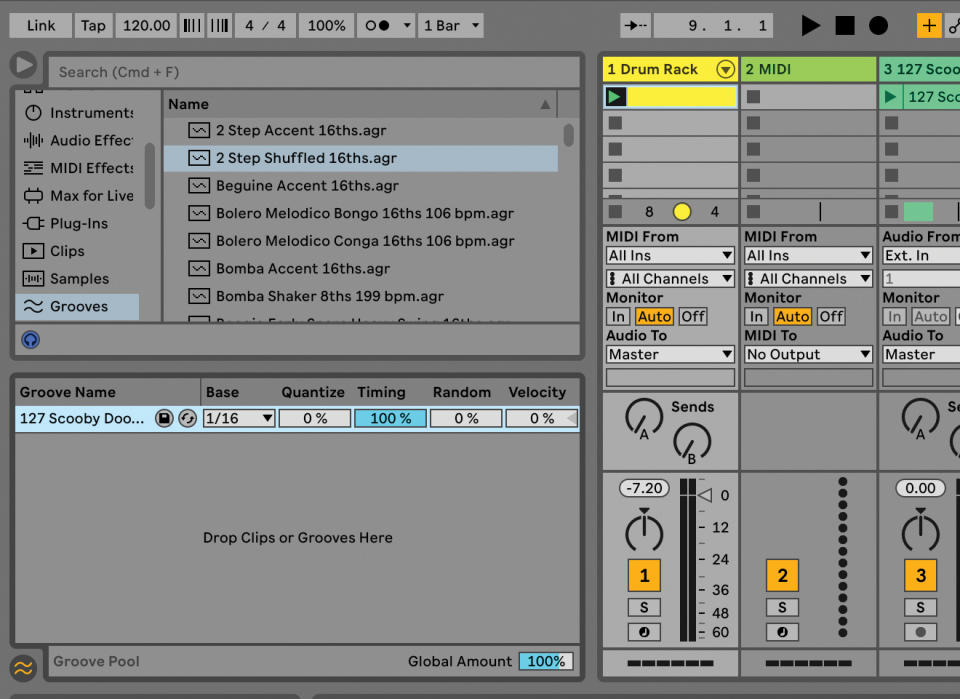
Now you can simply drag the newly created groove onto your MIDI clip and the kick drums within it will shift to match that of the audio groove. This is a great way to add more feel to any rigid 4-4 beats and you don’t have to just apply it to kicks, but anything you like!
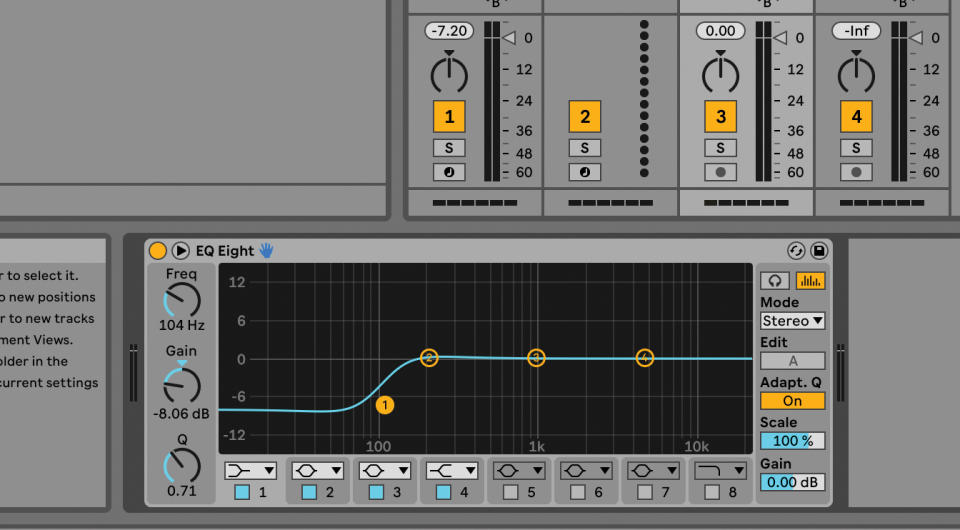
Now that your kicks are playing in time, they may clash so it’s time to apply a small amount of EQ to either or both, to make them stand out. You could simply apply a low shelf EQ to the acoustic loop. We found setting it at around 100Hz helped here, but experiment.
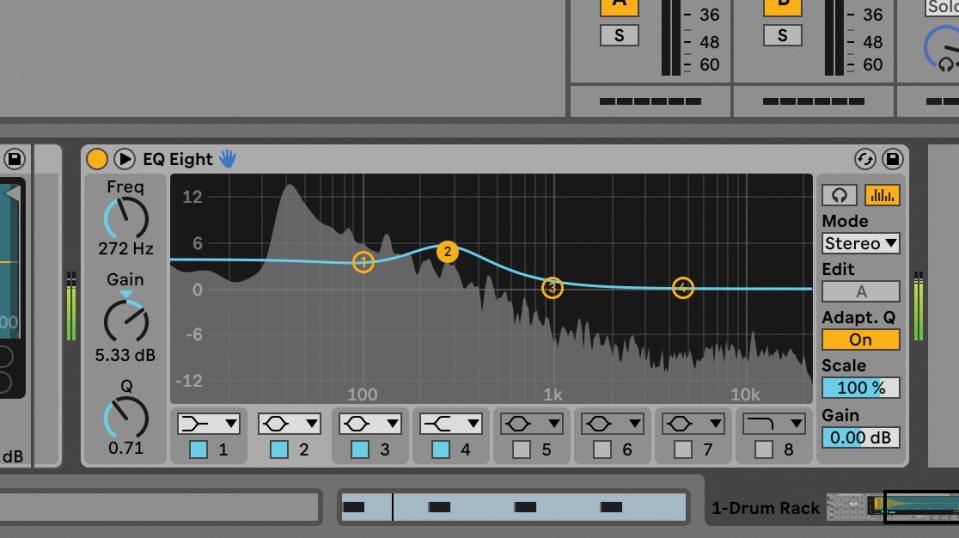
You can also use EQ on the electronic drum part too – this time try nudging it up, away from the other kick. We found that a nudge around 270Hz gave our electronic kick a nice click that stood out against its acoustic counterpart.
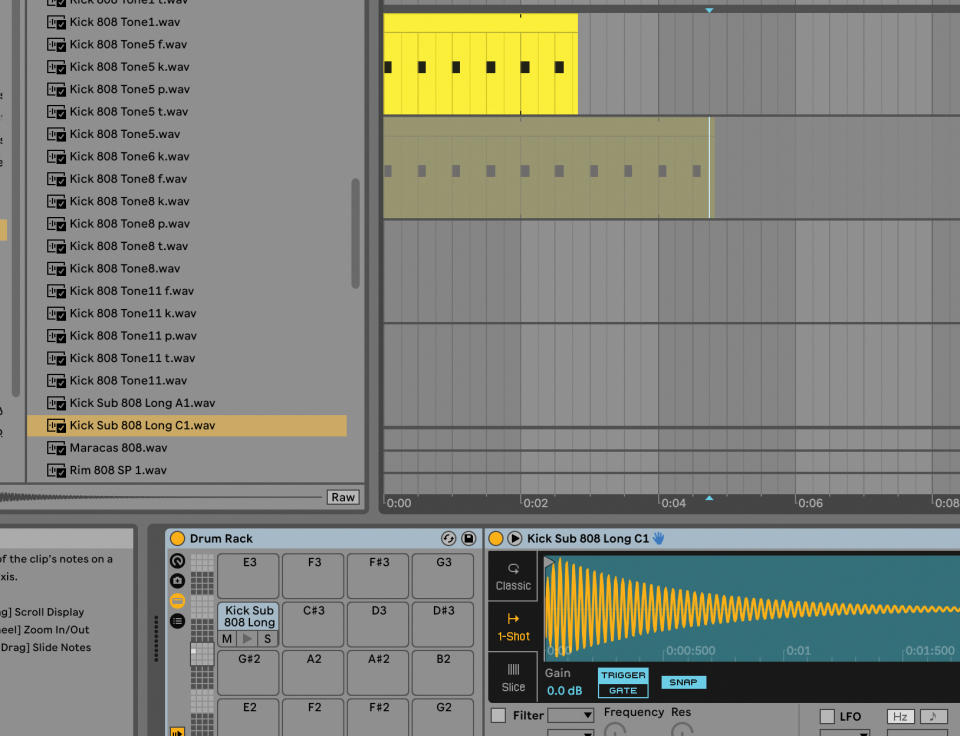
We can employ a similar technique when mixing kick and bass. This can be used when layering an 808 sub or kick sound with a standard kick to give it more clout, or distinguishing a standard melodic bassline from a kick drum. Replace your audio loop with an 808-style low sub sound and match it in time with the original kick.
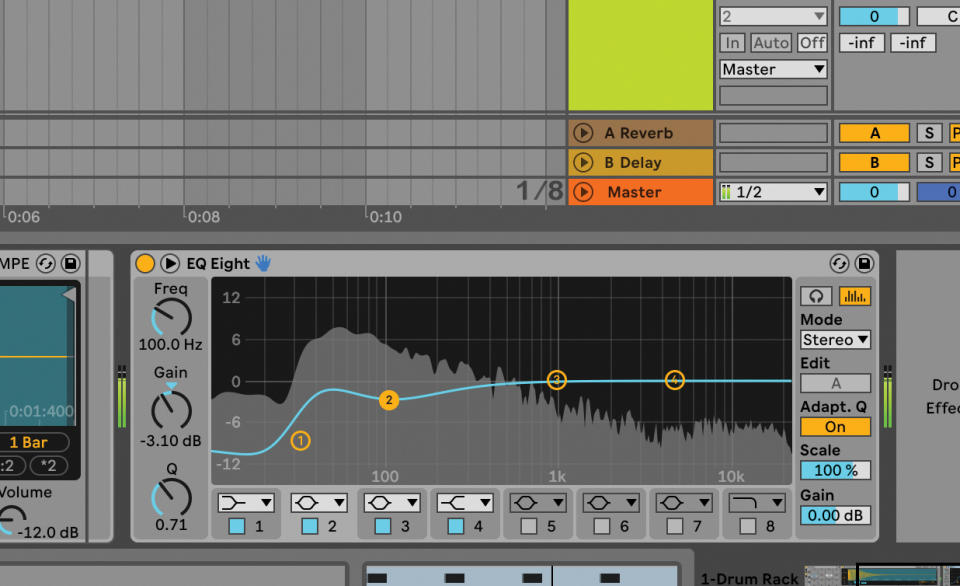
Firstly, use a high-pass EQ on the electronic kick to remove the low frequencies clashing with the sub; this allows the sub to occupy that space on its own but you can still enjoy the sound of the electronic kick. We had to experiment with ours, bringing a slight notch down at 100Hz for the sub to stand out too.
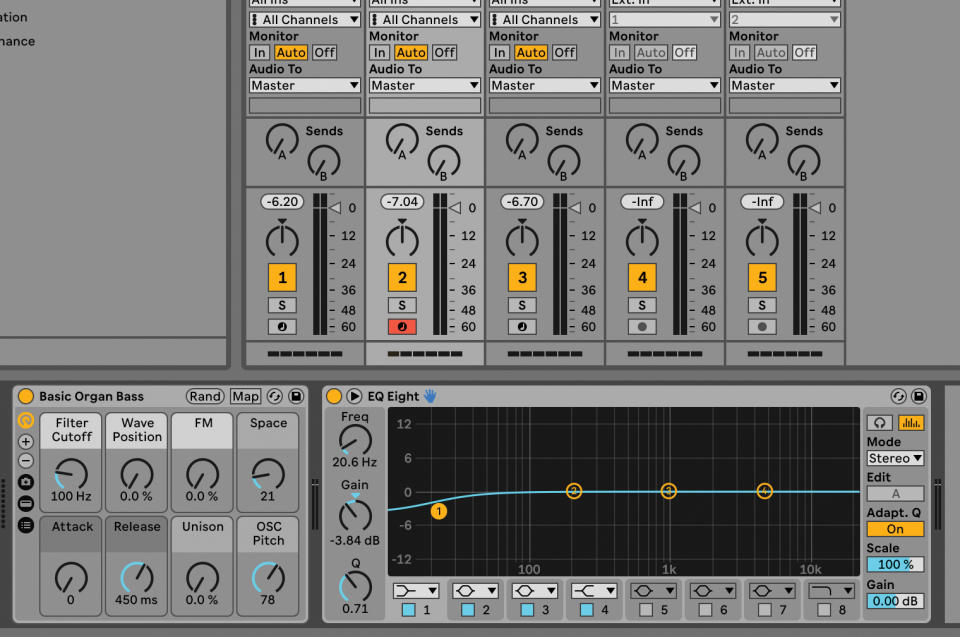
This technique can work well when mixing melodic bass sounds with kick drums. Some parts of their frequencies clash, so reduce one and (if necessary) raise the other. Here, on an organ bass, we have put a low shelf on the organ, for example.
We can use an envelope technique to achieve a different way of mixing two bassier sounds together. This time we’ve loaded in a melodic sub bass sound and recorded a bassline to go with our original kick sound.
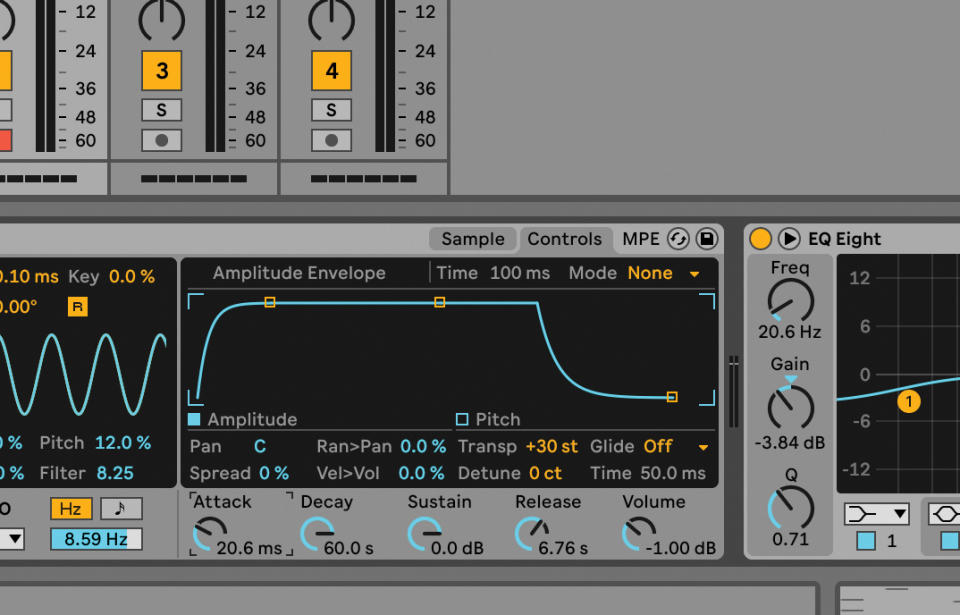
Open up the envelope page in Simpler. If you set the Attack value to 20ms – even though we can’t generally hear any timing differences less than 30ms – it makes both low end sounds more distinct from one another.
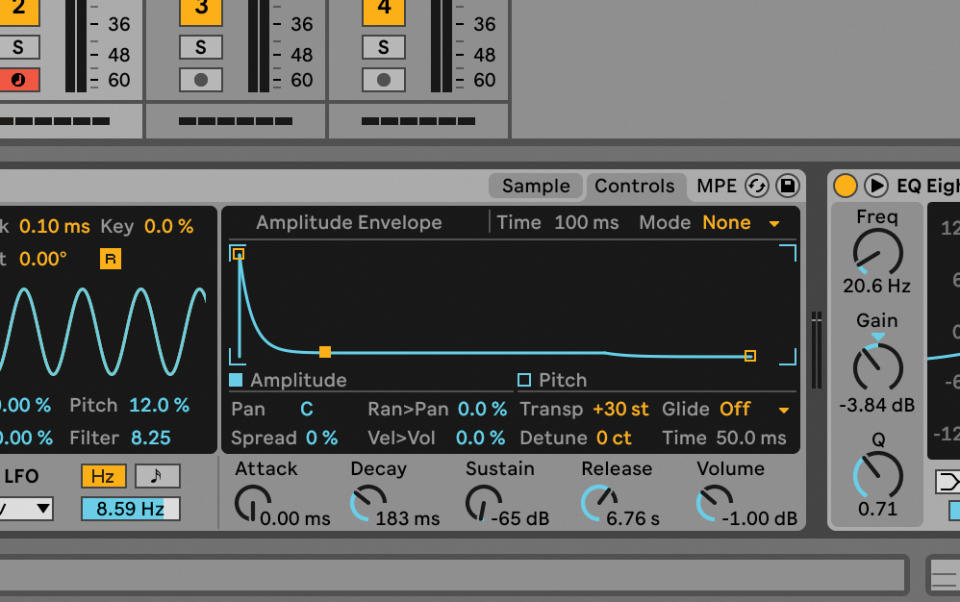
Adjusting the kick’s envelope values will also help distinguish the two sounds. Set the Decay to around 150ms to tighten the kick sound up and make it punchier. We’ve used Ableton Live in these examples but the theory should hold with whatever DAW you use.
Watch this space for more round-ups of our favourite drum plugins and beat-building software as we continue to walk you through how to make better beats in the coming days.

