10 more things you didn't know Logic Pro could do
We recently explored ten things you (probably) didn’t know Logic Pro could do. But, as Logic is such a massively capable piece of software, there are - of course - more than ten of its lesser-known and under-appreciated features worth highlighting.
With that in mind, we’ve put together ten more things you probably didn’t know Logic Pro could do, helping you to make the most out of Apple's full-featured DAW.
1. Strip Silence
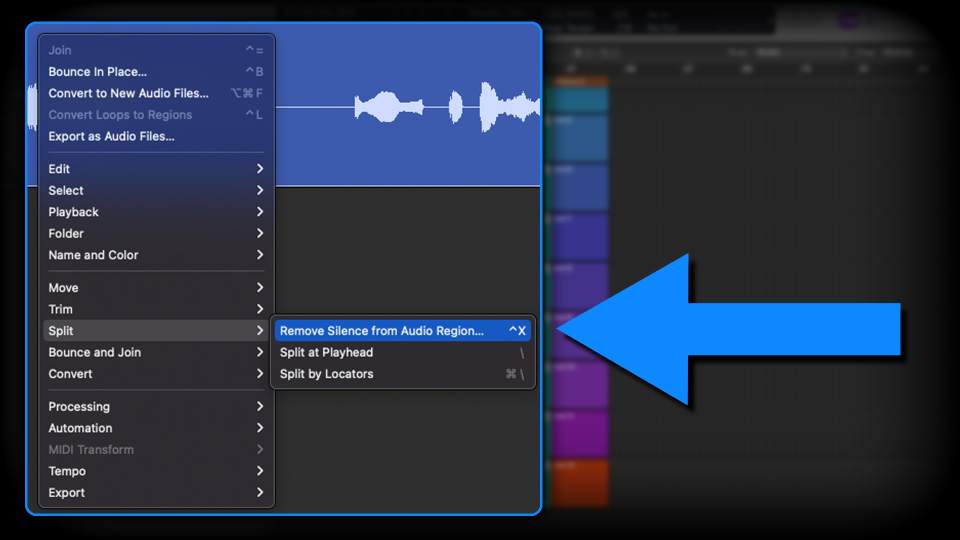
If you’ve ever recorded vocals or anything with gaps and pauses between parts, you’ll most likely be familiar with having to edit out all the in-between moments of fluff and unwanted noises; breathing, gross mouth noises, movements, headphone-spill, etc. Thankfully, Logic Pro has a super-nifty way of quickly carrying out this editing process in a single, automated process called Strip Silence.
With the audio region highlighted, right-click and select Split > Remove Silence From Audio Region, or use the shortcut Shift-X. A dialogue window will appear, in which you can manually determine the loudness threshold of when/where the process will make the edits. We usually find the default parameters to be just fine, if the process doesn’t quite sound right upon first attempt, undo it and repeat with adjusted loudness thresholds, as required.
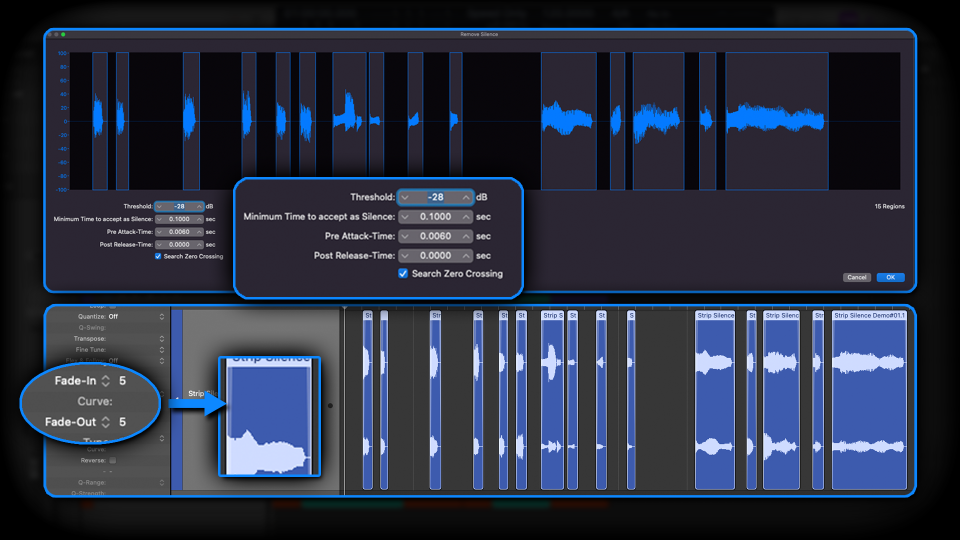
Whilst the edits in this process will be made at zero-crossings, so as not to induce any unwanted clicks or pops, you may still wish to further smooth things out, with region fades. A quick way to apply lots of fades to every region in instances such as this, is to make use of the Inspector pane.
With all the regions highlighted, manually type in a Fade-in and Fade-out value; the lower the value, the short/faster the fade.
2. Quick Transpose
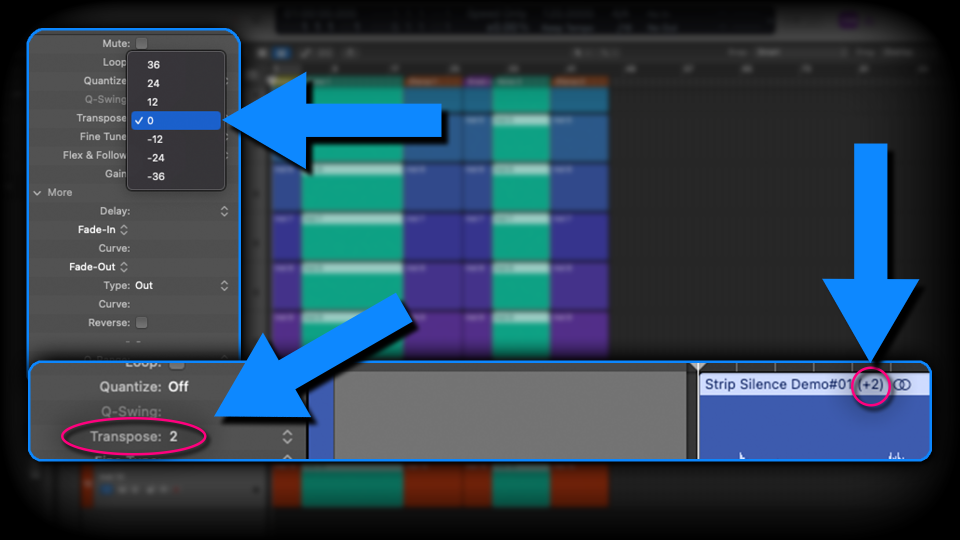
Whilst we’re on the subject of the Inspector pane, did you know that you can manually, and rapidly transpose entire regions, both MIDI and audio?
This is ideal for key-matching loops and samples, altering noises and sound effects, or even a nice workaround if you’re not confident playing keyboards in different key signatures.
With a region highlighted, use the Transpose setting to change the key/register of the region. Clicking on the up/down indicators provides you with presets of +/- octave intervals, but if you double click on the value box, you can manually type in whatever number you like. Once you do this, the region will show the transpose value in brackets at the end of its name.
It’s worth noting that, whilst transposing MIDI is flawless, transposing audio files is more complicated (for the computer’s processor), and the further/more-extremely you transpose, the more artefacts you’ll introduce into the audio. If you make large jumps, you may notice a drop in audio quality.
3. Drum loops to Drum Machine Designer
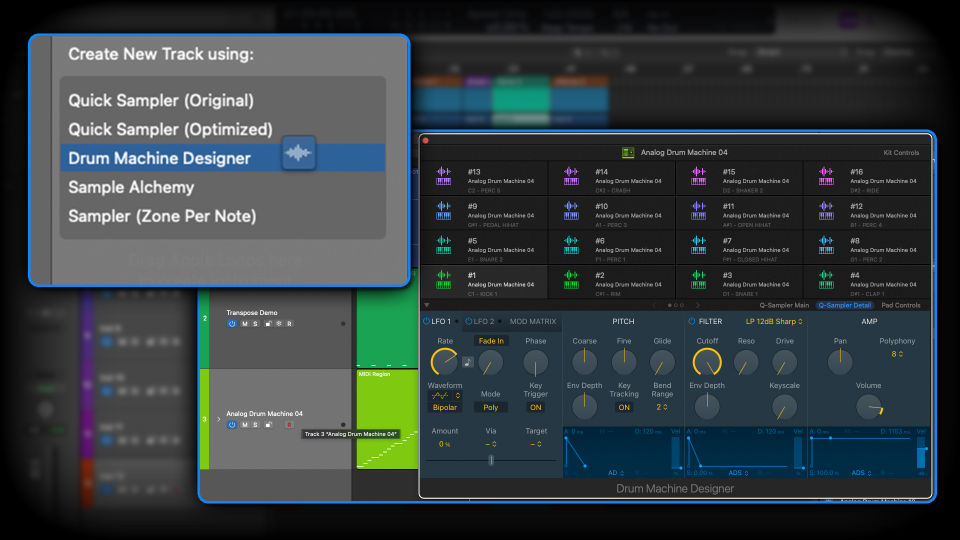
Have you ever liked the sound of a drum loop, but not the rhythm/pattern that the drum loop plays? You may have spent a long time, painstakingly chopping up the drum loop, to isolate the individual components of the drum beat, so that you can re-sample them and programme the rhythmical pattern to your liking. Well, Logic can actually do that for you!
Take a drum loop (any drum loop will do, it doesn’t have to be from the loop browser). Drag and hover it over the Track Header to bring up the different track options. Select Create New Track using Drum Machine Designer.
Logic will analyse the loop and cut each significant transient into its own sample, and place it on a dedicated pad, on the Drum Machine Designer plugin.
This process isn’t flawless; Logic isn’t always necessarily going to accurately identify things for what they are, and sometimes, it repeats samples on multiple pads of Drum Machine Designer, so you may want to do a little tweaking and refining of the settings. However, this is a massive time-saver, as it automates in milliseconds, something that could take you a long time to do manually.
4. Pack Take Folder
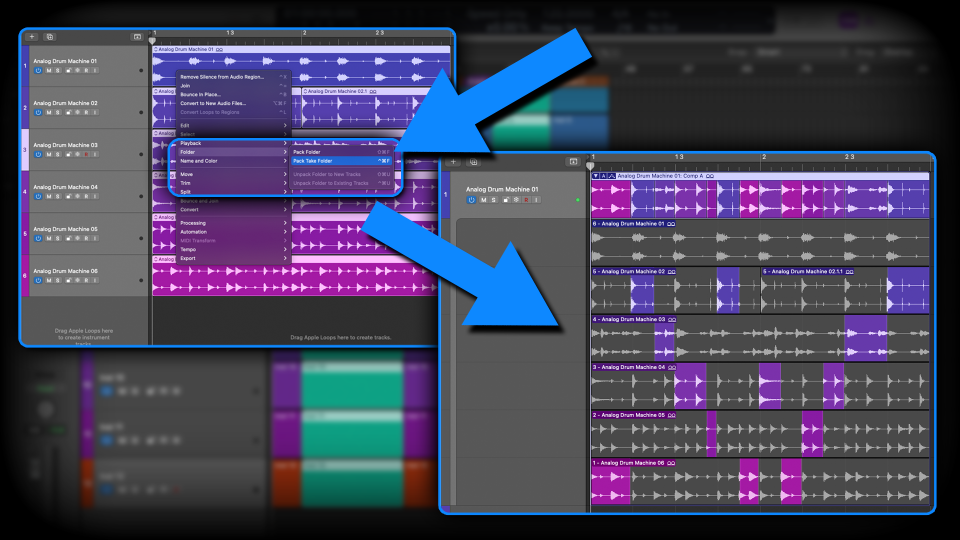
If you’ve ever recorded audio such as vocals or guitar-solos in Logic, you’ll most likely be familiar with the notion of comping together a perfect take from a Take Folder (multiple takes, stacked upon each other, from which you can highlight and select the ideal take).
Well, this comping process can be somewhat turned upside down, by making a Take Folder from things that aren’t multiple takes of the same thing. It sounds confusing, but it’s actually quite straightforward.
Take a selection of different drum loops, and line them up on your arrange page, as pictured above. Right-click and select Folder > Pack Take Folder or press Shift+Command+F. They will now be packed into a take folder and you can comp together small slices of each part of the different loops to make a bizarre, new and unique drum pattern.
5. Overlapping Take options
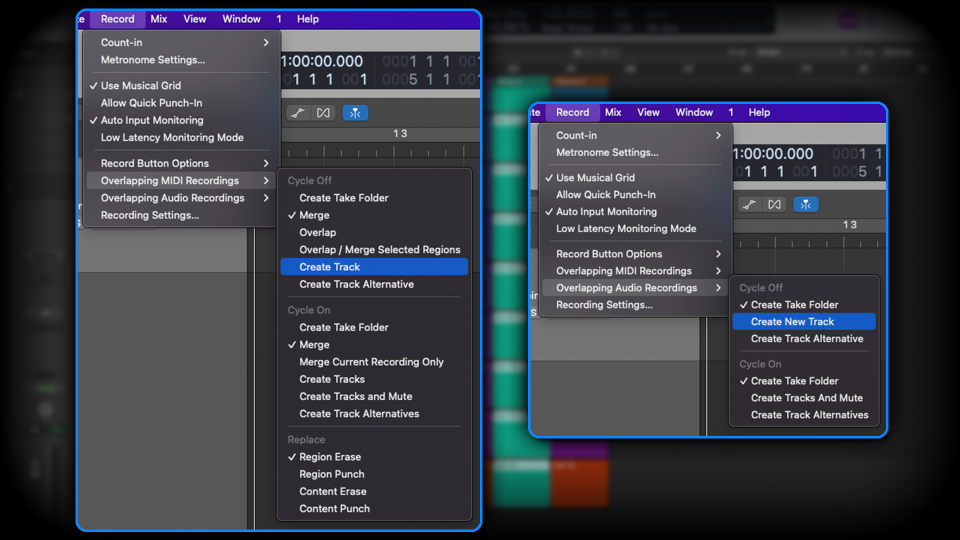
On the subject of comping, it’s common practice to have something cycled while the musician plays their part repeatedly, from which you will piece together a comped edit. By default, audio recording on a cycle creates a Take Folder, whereas MIDI (somewhat annoyingly) just adds/merges the additional cycles’ takes into the same MIDI region.
These settings can be changed and tailored to best suit your workflow. Go to Record > Overlapping MIDI Recordings or Overlapping Audio Recordings to choose what will work best for you. There are a wide range of options, including creating new tracks (which are muted by default), creating track alternatives, creating merged audio takes, and more.
This is a superb customisation option that can negate a certain degree of tinkering and faffing around once you’ve finished recording.
6. Audio to MIDI
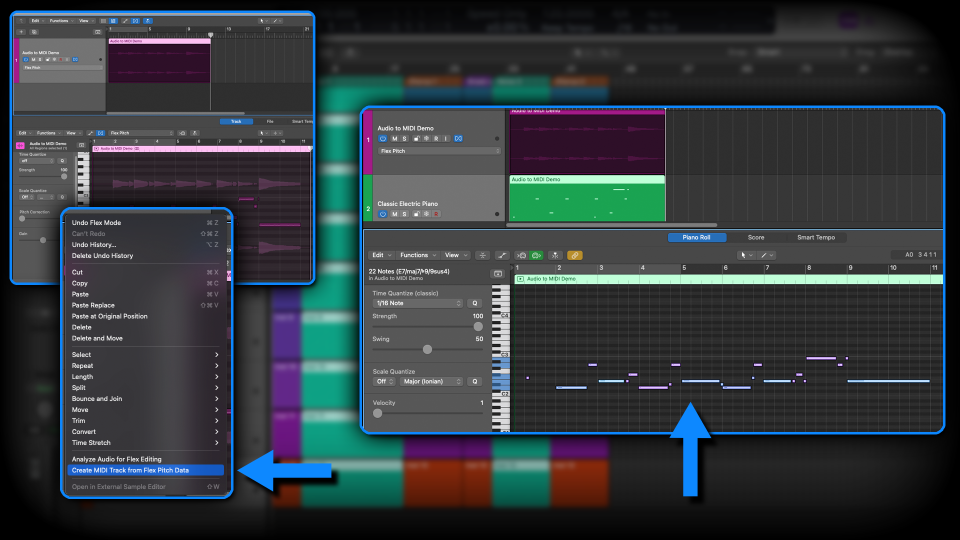
Sometimes, it can feel like DAWs in general are somewhat biased towards keys players, as so much of the MIDI protocol is keyboard-centric; not surprising given that MIDI was invented by synth legends Dave Smith (of Sequential Circuits) and Ikutaro Kakehashi (founder of Roland).
However, if you don't happen to be a proficient keyboardist, you’re in luck, as Logic Pro can take any piece of monophonic audio and convert it to MIDI.
If your end goal is to create MIDI, it doesn’t really matter what or how you record your audio. You could sing it into a microphone, play it on the guitar, or any other instrument. Once recorded, enable Flex in the Pitch Flex mode.
In the track-edit window pane, select Create MIDI Track from Flex Pitch Data. Logic will now make a software instrument track containing a MIDI region with notes that mirror what was in the audio.
You will likely need to do a little tidying up, such as quantizing, tweaking note velocities and so on, but in the grand scheme, this process is probably more efficient than trying to play the keyboard, if you’re not a keyboard player.
7. Low Latency Mode and Freeze Tracks
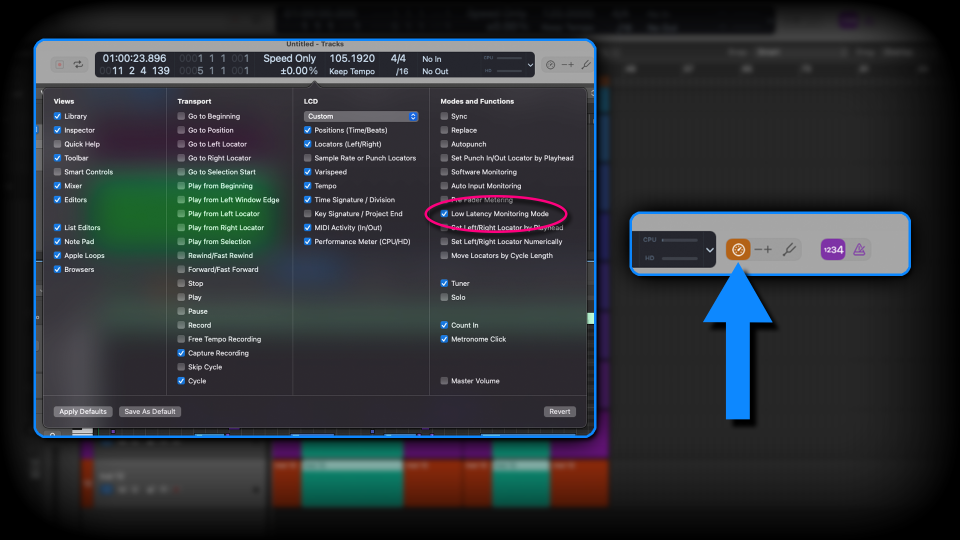
Sometimes, a project grows into something of a behemoth and it places very heavy demands on your computer’s CPU, as well as your audio interface. This can result in system overload messages and/or problematic latency when attempting to record new parts. There are some workarounds to this scenario, in the form of Low Latency Mode and Freeze Tracks.
Enable Low Latency Mode in a customised control panel. From here, you’ll see a new button appear in the upper-right-hand side. When active, it turns off a number of high-demand processes, such as aux-sends, reverbs, side-chained plugins and so on. Therefore, whilst things might not sound exactly the same and when enabled, you won’t experience any noticeable latency whilst recording.
Freeze Tracks does just that! It freezes a track’s processing, by creating an invisible, virtual mix-down of any/all frozen tracks. Enable Freeze in the track header and select it on any/all tracks you believe are mix-ready. When you press play, logic will do a quick freezing process, and then you’ll find CPU load greatly decreases.
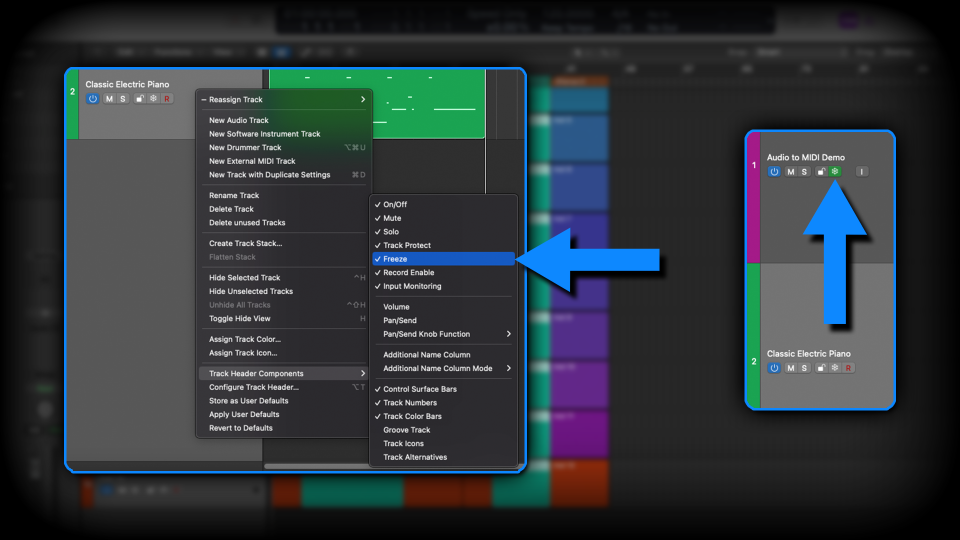
By freezing tracks, Logic references a mixed/bounced version of the track and you cannot make any further changes to effect parameters, however, you can still amend volume, aux sends and panning. You can unfreeze at any time to change plugin settings and then re-freeze.
Note that freezing tracks will create rendered audio files in the project-folder’s directory, meaning that whilst the CPU load is reduced, the physical hard-drive space your project occupies will increase.
If you’re freezing and unfreezing tracks a lot, you may end up with lots of unneeded audio files cluttering up your hard drive. If this happens, simply go to File > Project Management > Clean Up to initiate the removal of unwanted audio files (to the Trash).
8. Latch Mode automation
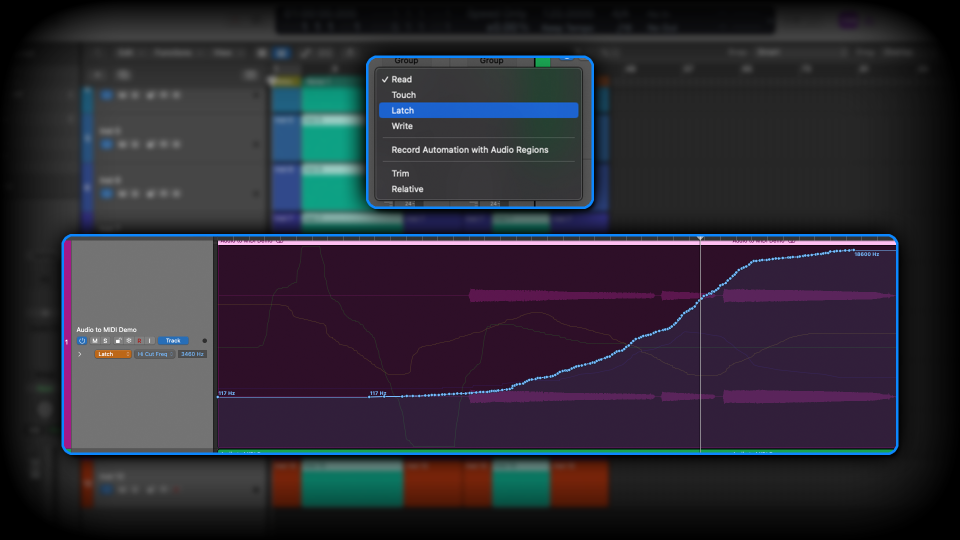
When first introduced on digitally controlled analogue recording consoles in the 1970s, automation quietly became one of the most significant innovations in the history of music technology. Today it’s a cornerstone of DAWs, and allows a level of precision producers of old could only dream of. That said, it can still be slow and finickiy to draw things in the way you want them. Enter Latch mode!
By switching automation mode to Latch, anything you adjust during playback will be drawn in the automation. This applies not only to volume and pan, but just about every plugin parameter.
In the example pictured above, we've twiddled a bunch of dials on playback, and you can see many lanes of automation now present as a result. Couple this with a MIDI controller of some sort, and you can really go to town with hands-on mixing techniques that require a lot less mouse-work.
9. Import video to timeline
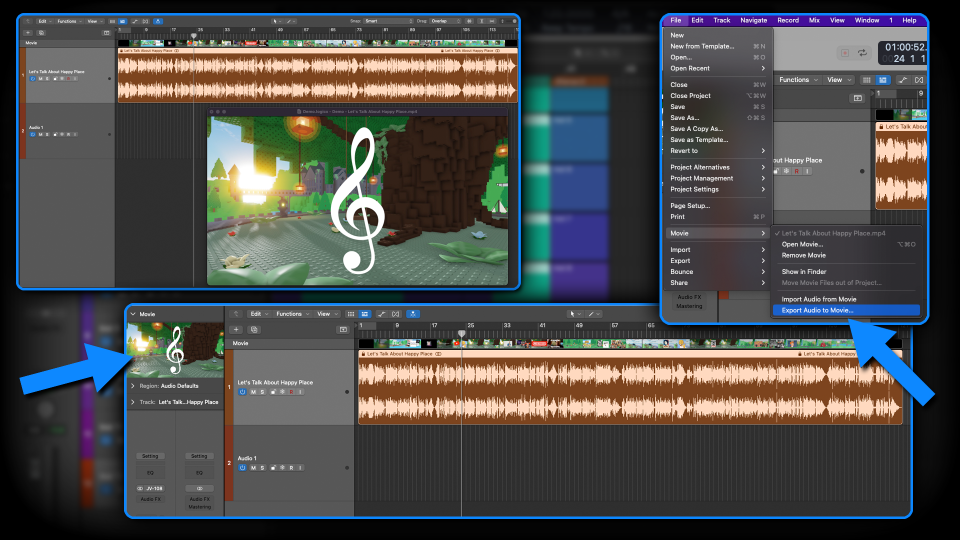
Whether it’s YouTube, TikTok, Instagram or any other online platform where you’re hoping to promote your music, you’ll probably want to make video content that contains your music. With that in mind, did you know you can import videos into Logic Pro, so that you can create and sync music perfectly with your video?
Simply go to File > Movie > Open Movie, and your video will appear as a floating window. If you close the window, it will remain visible in both the timeline and the Track-Inspector. Double click the movie in the Track Inspector to re-open the large, floating window.
In this process, Logic will ask you if you want to extract the audio from your video. If you do this, it will appear as a locked audio region on your timeline.
If you want to export your newly recorded audio, as just an audio file, simply Bounce as normal. If you want to render the audio to the video, as a movie, go to File > Movie > Export Audio to Movie, and then save the file as you would any other export.
10. Use Tape Delay as a lofi plugin
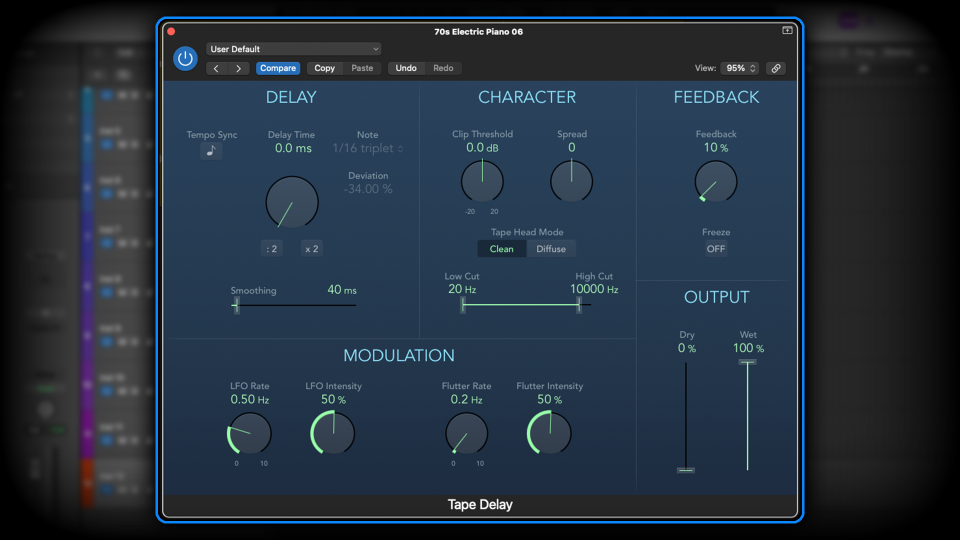
We've mentioned this before in a piece on lo-fi plugins, but we love this aspect of Logic so much that I think it’s worth mentioning here too.
Logic’s Tape Delay is a much more powerful and creative tool than you might first think. Yes, it’s an excellent and easy-to-use delay effect, but it’s also superb at emulating analogue tape saturation. If you’re into making lo-fi music, vaporwave, or simply experimenting with wobbly, vintage-style textures, this is something you must try out.
To achieve this, turn Tempo Sync off, set Delay Time to 0, Feedback to less than 10%, Dry to 0% and Wet to 100%. From here, you can dial in the modulation and character parameters to taste. Above is an example of how I often use it.
We've used this effect to create warm, characterful electric pianos and synth pad tones, when working on lo-fi and vaporwave music. Sometimes we place it on specific tracks, other times we've used it on buses - you could even throw it on the master channel if you're feeling adventurous.
Furthermore, if you couple this effect with some of the speed and tempo manipulations mentioned in the our previous round-up of Logic Pro's lesser-known features, you’ll be well on your way to achieving some very vintage, dirty textures.

